How to Configure Queue Detection
Contents
Head detection for Smart Frame
Introduction
The queue detection function allows a VIGI camera to detect and report the length of queues. Typical applications include retail checkouts, service counters, reception desks, and ticketing areas where queue lengths need to be monitored.
Requirement
- A VIGI IP Camera capable of Queue Detection
Note: A VIGI InSight S385 is used for this FAQ example.
Please follow the camera installation guidelines below to achieve accurate counting performance:
- Ensure the installation site has stable and sufficient lighting, avoiding overly dark or overexposed environments. For indoor scenes, adequate supplementary lighting is required.
- Ensure the monitoring area is open and unobstructed.
- Install the camera at a downward angle between 20° and 60° to provide a clear view of people in the monitored area.
- Keep the installation height below 5m (16 feet) for optimal detection accuracy.
- Ensure that a person’s head in the image appears large enough for clear recognition to maintain reliable counting accuracy.
Configuration
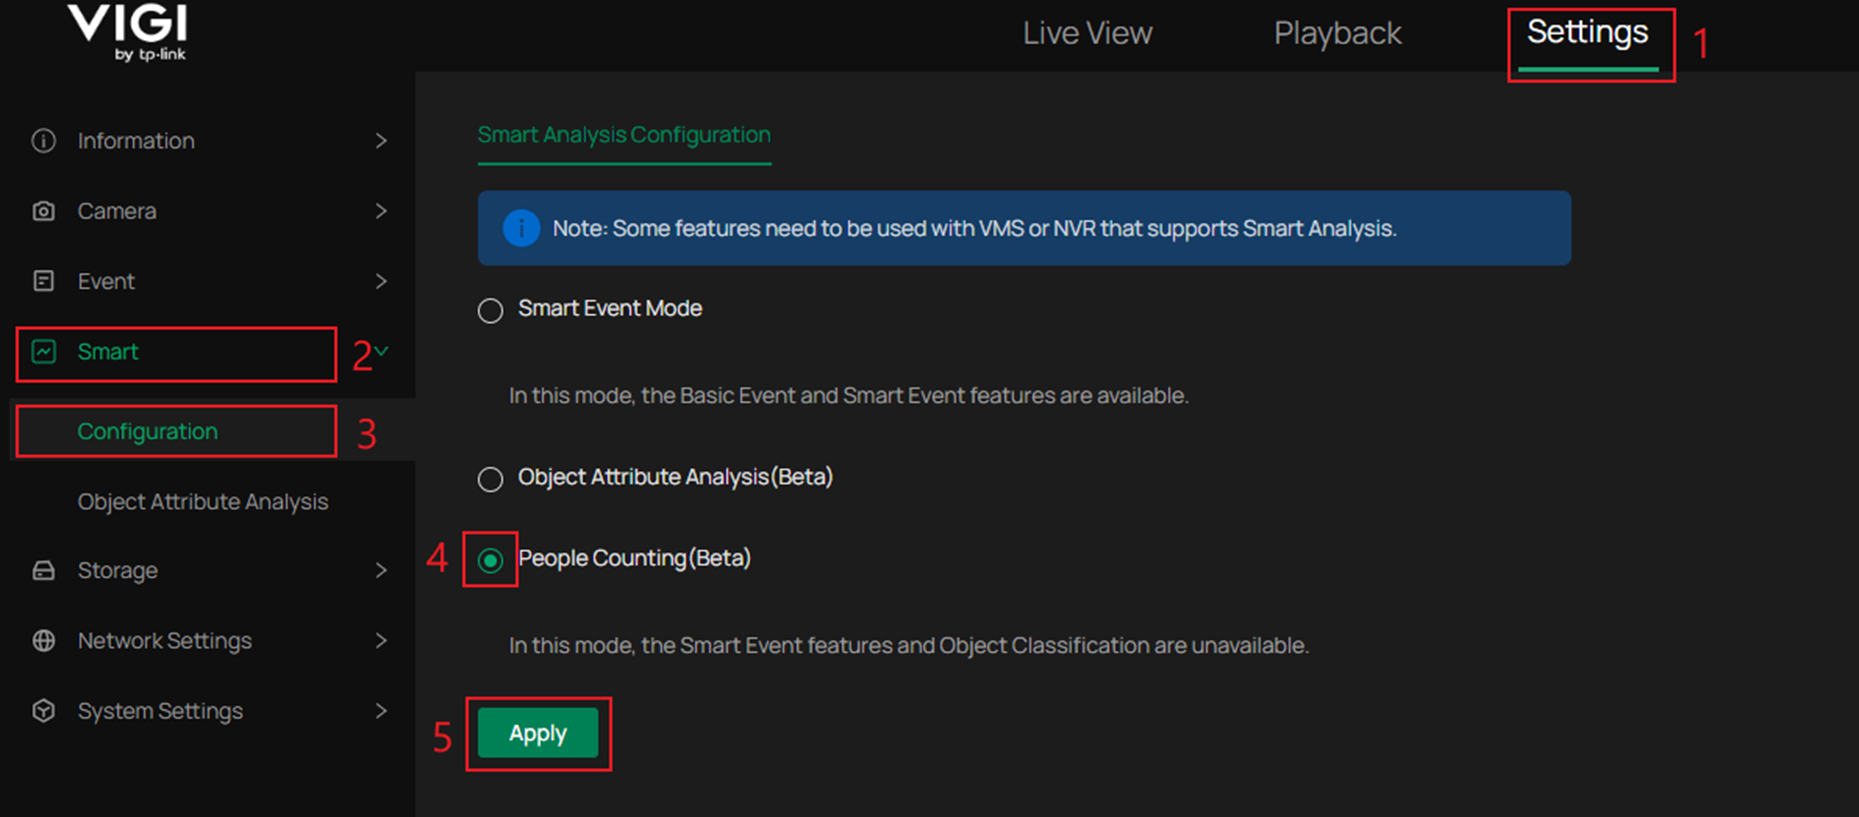
Step 1. Navigate to Settings, Smart and Configuration. Select People Counting, and click Apply. The device will restart, and the user will be prompted to log in again.
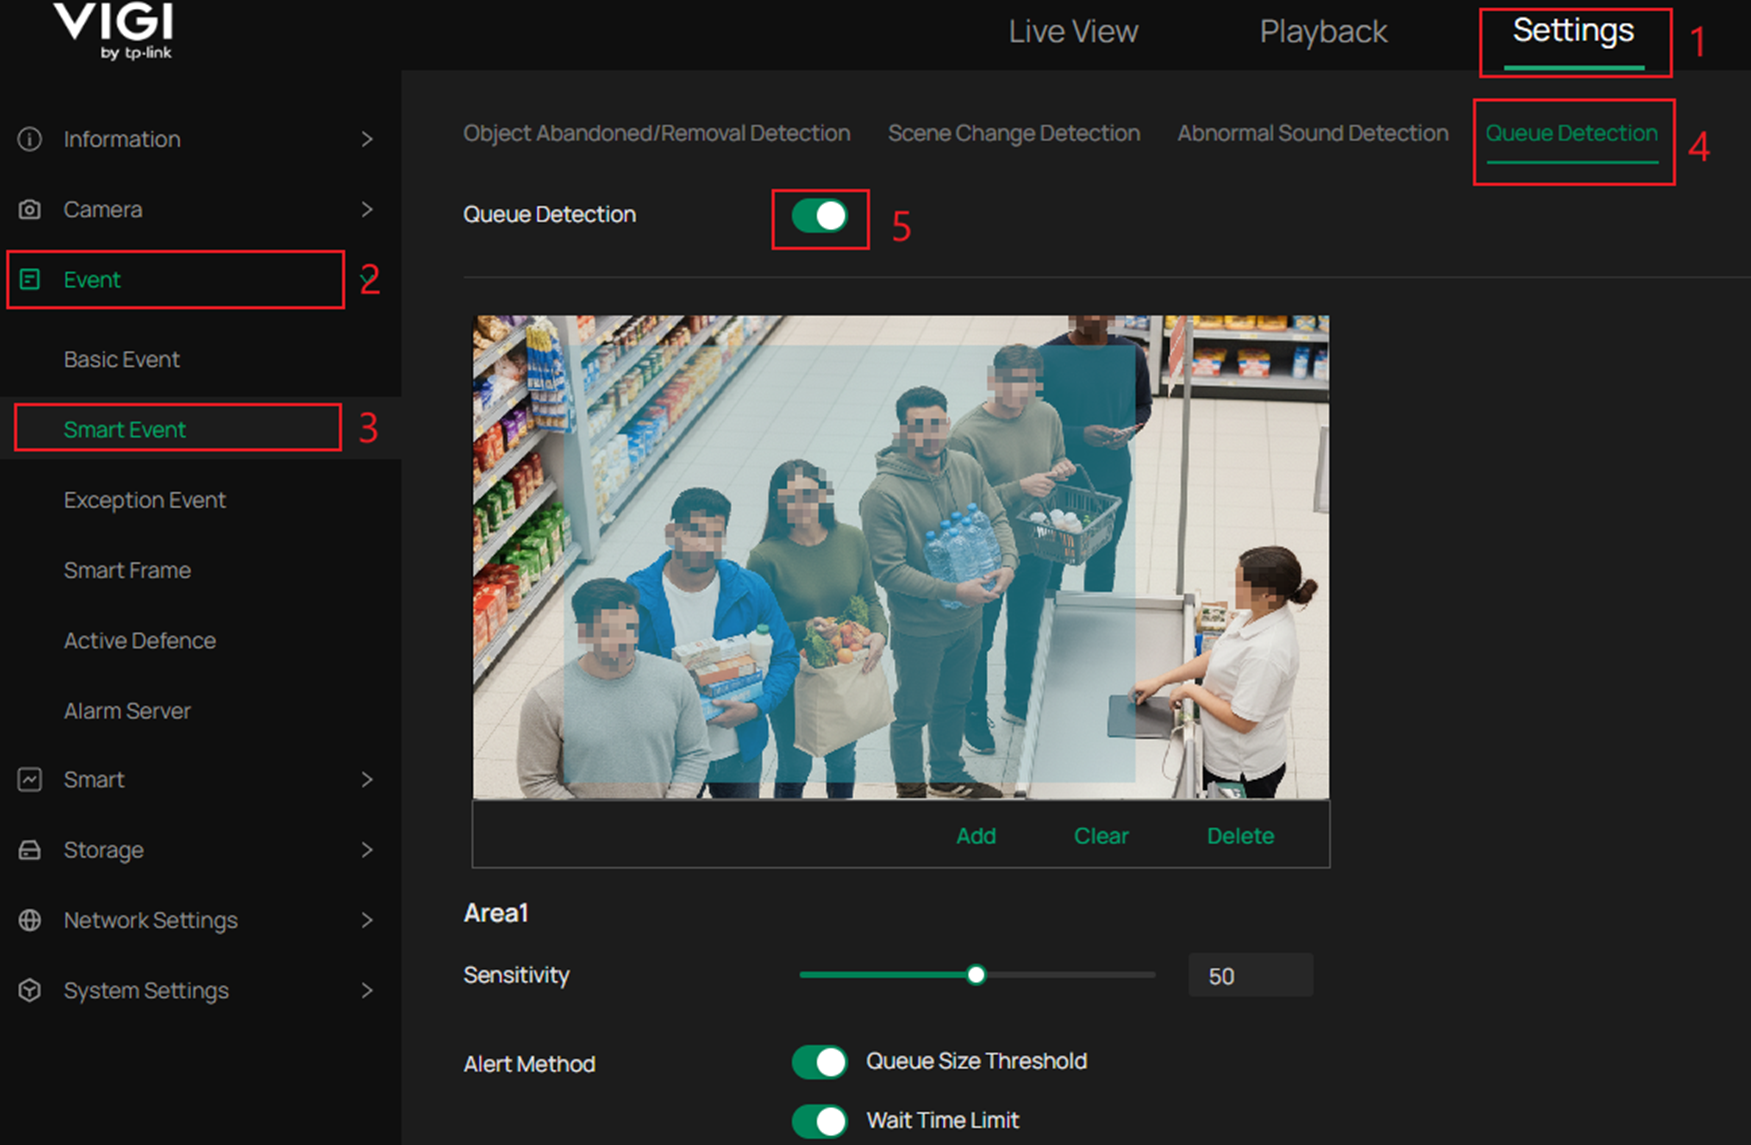
Step 2. After the IPC reboots, navigate to Settings, Event, Smart Event, Queue Detection then Select the Queue Detection tab to enable Queue Detection and view the configuration options displayed.
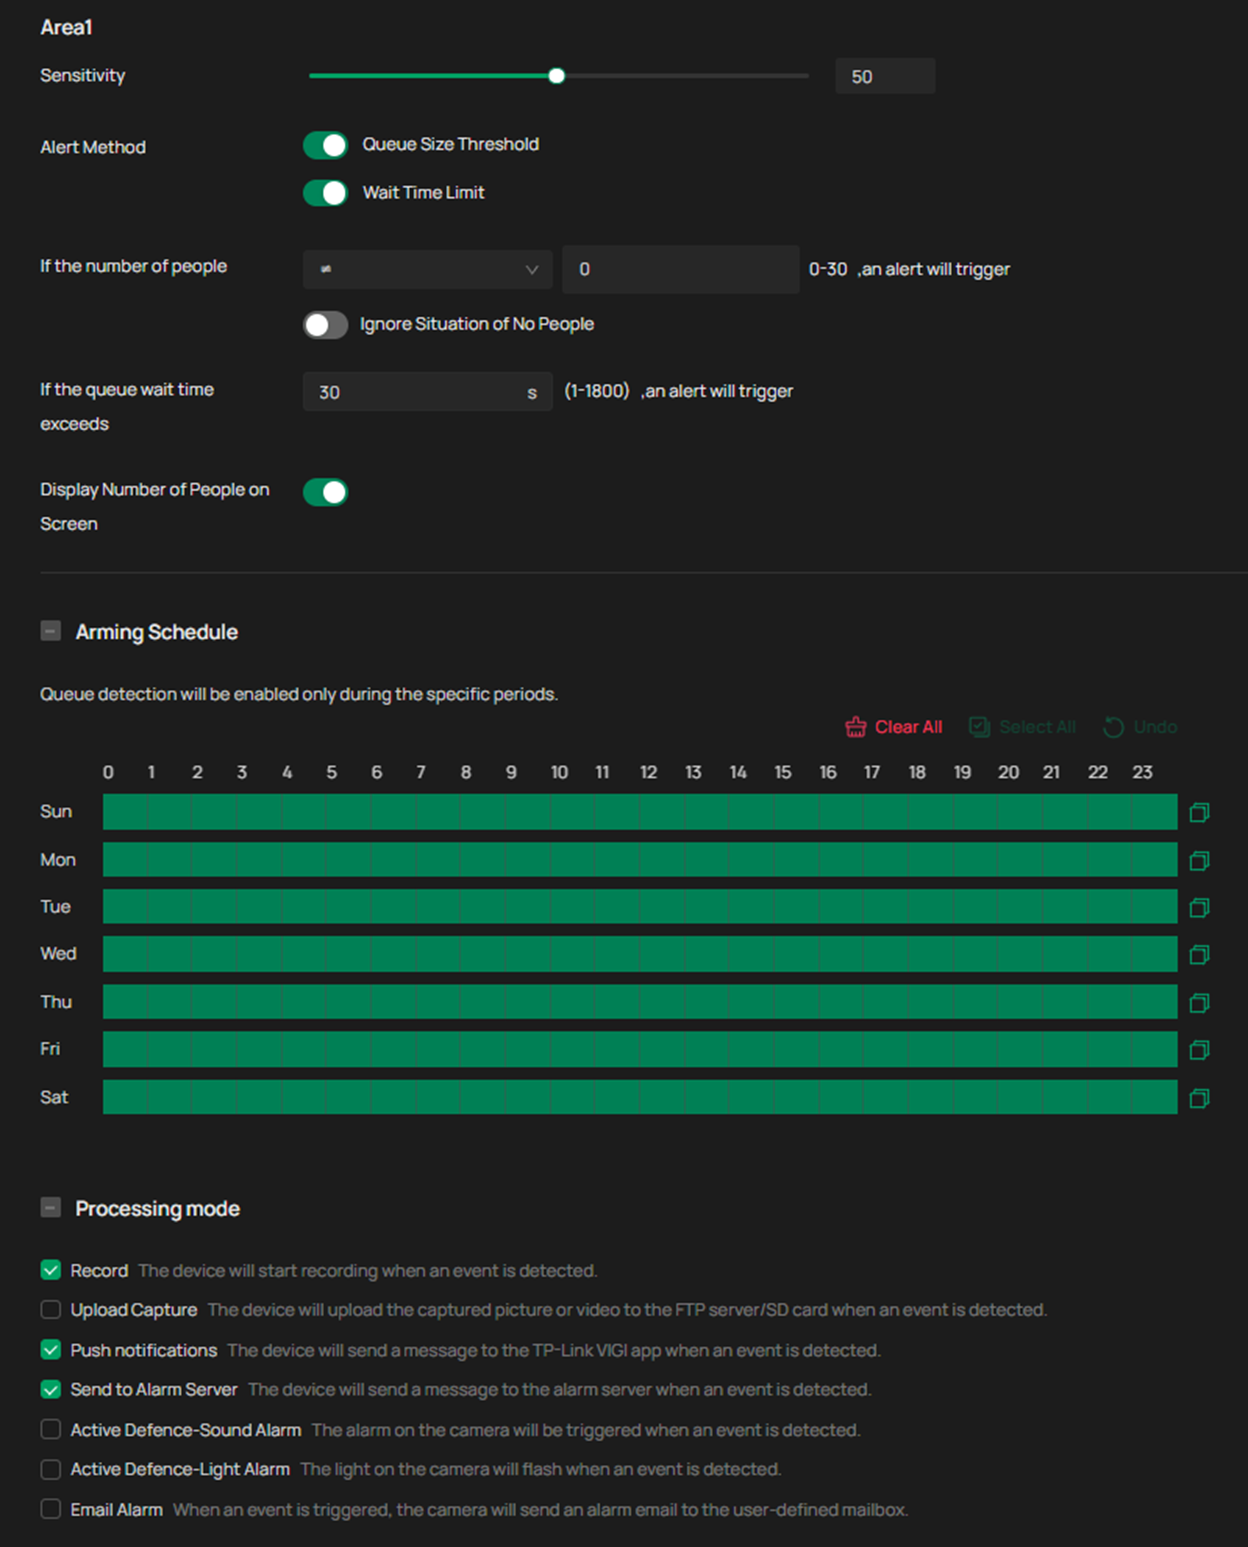
Step 3. Configure the settings of Queue Detection. An explanation of these settings is as follows:
Add: Add a new Queue Detection area.
Clear: Clear all Queue Detection areas and settings.
Delete: Remove a Queue Detection area.
A maximum of 3 Queue Detection areas can be created.
Please leave some space between the edge of the Queue Detection area and the edge of the IPC monitoring frame.
Adjust the detection areas and rules based on the specific scenario.
Each area can be configured with its own set of settings.
The following configuration items can be configured separately for each area, including Arming Schedule and Processing mode:
Sensitivity: The default value of 50 is generally recommended. Setting this value higher will result in easier detection. However, the higher the sensitivity, the lower the detection threshold, which may lead to false alarms.
Queue Size Threshold: Activate the Queue Size Limit. Queue Detection will monitor the number of people in the queue and will send an alert when the corresponding configuration is triggered.
How it works:
An alert will trigger when the number of people in the queue meets the condition you set.
You can choose from four comparison options:
|
Symbol |
Meaning |
Explanation |
|
= |
Equal to |
Triggers when the queue size is exactly the number entered. |
|
≠ |
Not equal to |
Triggers when the queue size is any number except the one entered. |
|
> |
Greater than |
Triggers when the queue size is larger than the number entered. |
|
< |
Less than |
Triggers when the queue size is smaller than the number entered. |
If ≠ or < symbols are used, this will open an additional option: Ignore Situation of No People. Using this setting, no alarm will be triggered when the conditions are met.
Wait Time Limit: Activate the Queue wait time Limit. Queue Detection will monitor the length of time people are in the queue and will send an alert when the corresponding time is exceeded.
How it works:
If the queue wait time exceeds the value entered, an alert will trigger.
Display Number of People on Screen: This setting will place a number on screen displaying the amount of people in the queue.
Arming Schedule: Set the day and time in which Queue Detection will be enabled.
Processing mode: These options determine what is triggered when an event is detected.
Record: The device will start recording when an event is detected
Upload Capture: The device will upload the captured picture or video to the FTP server/SD card when an event is detected.
Push notifications: The device will send a message to the TP-Link VIGI app when an event is detected.
Send to Alarm Server: The device will send a message to the alarm server when an event is detected.
Active Defence-Sound Alarm: The alarm on the camera will be triggered when an event is detected.
Active Defence-Light Alarm: The light on the camera will flash when an event is detected.
Email Alarm: When an event is triggered, the camera will send an alarm email to the user-defined mailbox.
Select Apply once the settings are correct.
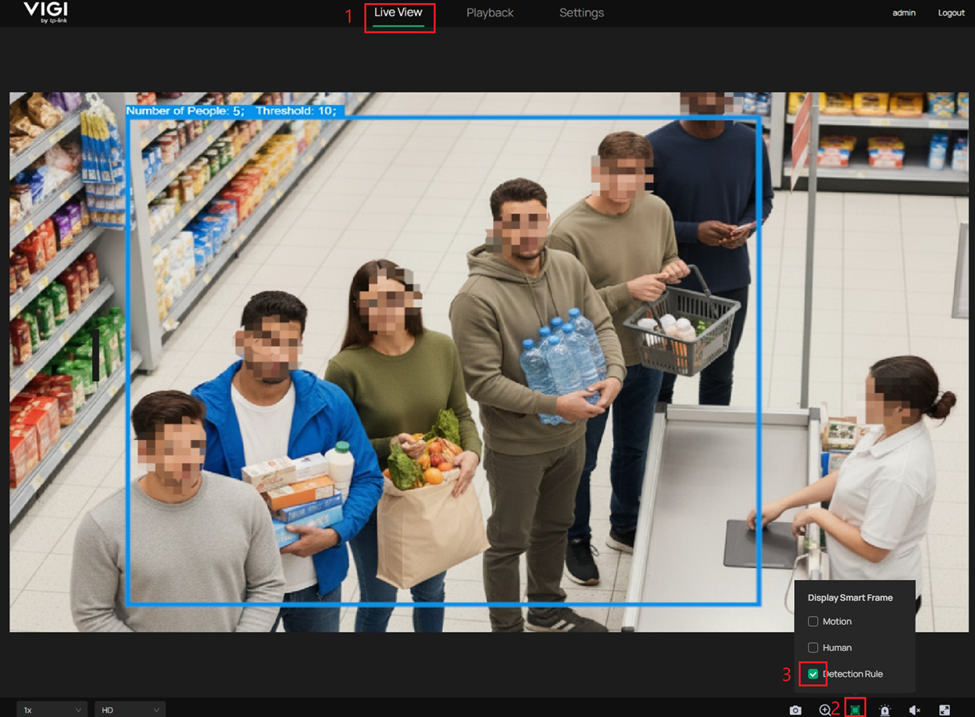
Step 4. To see Queue Detection in real time, select the Live View tab. To view the number of people in the Live View tab, select Display Smart Frame in the bottom-right toolbar and check Detection Rule.
Head detection for Smart Frame
As an additional setting, it is also possible to configure Head detection within the Live View when People Counting is enabled. This will highlight the heads of people within the frame of the camera.
Step 1. Go to Settings > Event > Smart Frame > Enable Human Detection > Apply.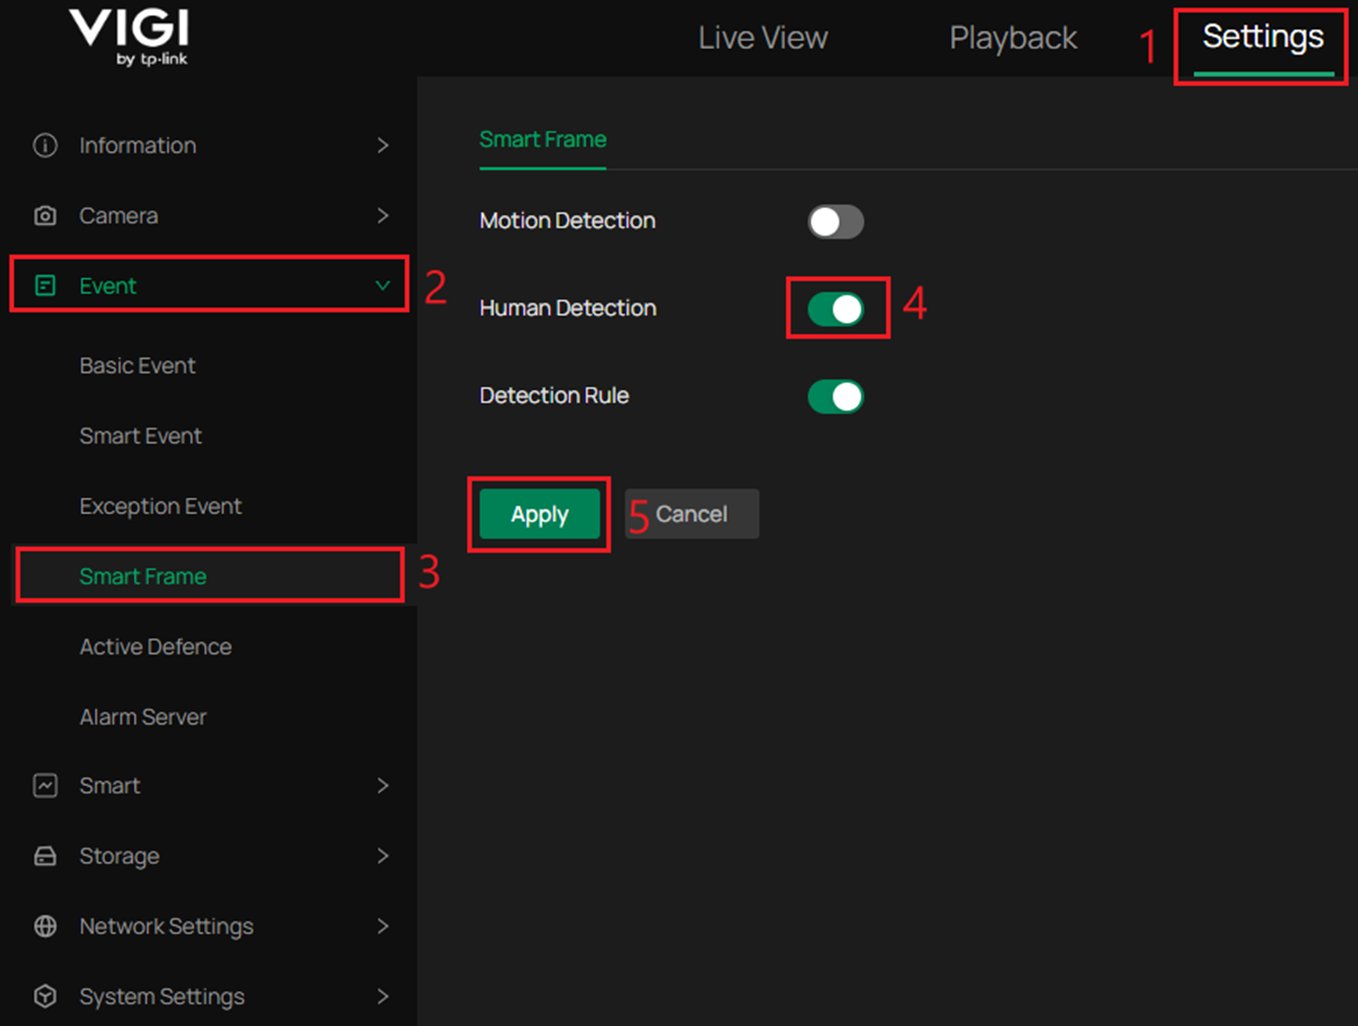
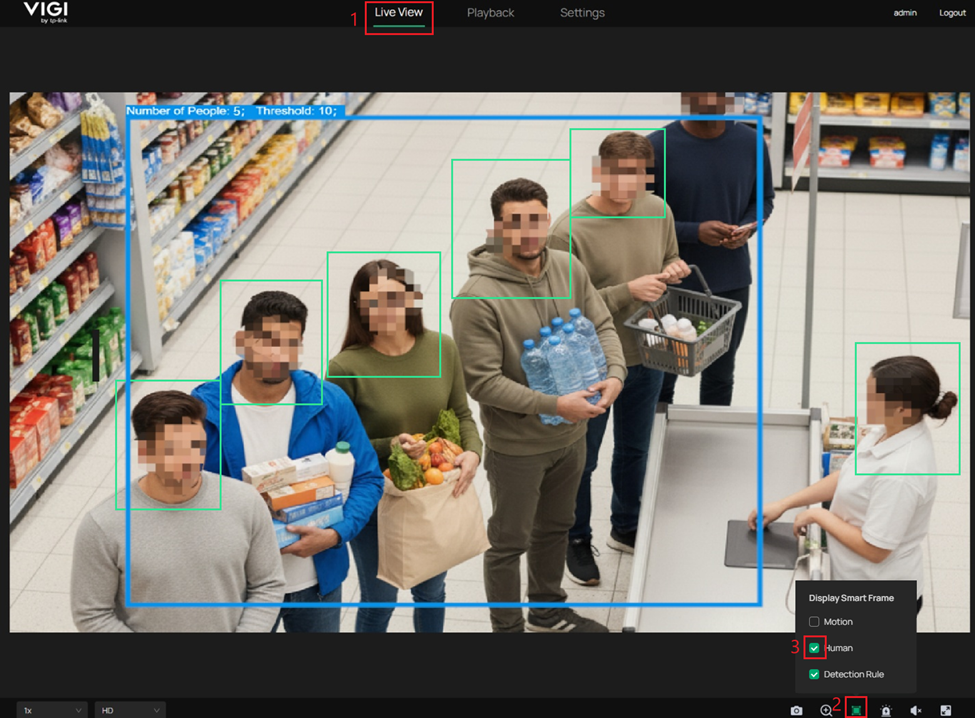
Step 2. Go to Live View > Smart Frame window > Human. The Live View window will now display Human Detection by highlighting the heads of people on camera.
Conclusion
Queue Detection setup is complete. The camera will now track queue length and trigger events based on your settings.
Get to know more details of each function and configuration please go to Download Center to download the manual of your product.
QA
Q1: Which is the recommended alarm type to use when the Queue Threshold is reached?
A1: The recommended alarm type depends on your scenario. For most environments, non-intrusive options such as Record, Upload Capture, Push Notifications, or Email Alarm are preferred. Active Defence-Sound Alarm and Active Defence-Light Alarm are available but are generally not used for queue thresholds because they may cause unnecessary disturbance in public areas.
Q2: Why do I need to enable People Counting before configuring Queue Detection?
A2: Queue Detection relies on the People Counting Smart Analysis Configuration to identify individuals, so People Counting must be enabled first.
Q3: Why should I leave space between the detection area and the camera frame edge?
A3: This reduces detection errors that occur when people enter or exit the monitoring frame.
Looking For More
Is this faq useful?
Your feedback helps improve this site.


TP-Link Community
Still need help? Search for answers, ask questions, and get help from TP-Link experts and other users around the world.