


How to configure the default gateway of the smart and L2 managed switches using the new GUI
Brief Introduction of Default Route
Before configuring the default gateway, we need to have a general idea of default route. The default route is a special type of static route, which specifies a path that the device should use if the destination address is not included in any other routes. Therefore, a default route can solve this problem: if no route to the destination is specified, the device will send the packets to a specific device, that is, the default gateway. Then the default gateway will forward the packets to the destination.
A default route consists of three parts: Destination, Subnet Mask and Next Hop (Gateway). The destination and subnet mask are both the fixed value 0.0.0.0, which means arbitrary destination IP addresses that are not matched by other route entries.
For example, as the following picture shows, the PC needs to access the internet through the router, so we can configure 172.31.48.1 as the default gateway of the PC.
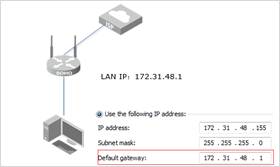
After finishing the default gateway setting, the PC will generate a default route automatically. This default route means, the PC will send all the packets that go to the internet to the default gateway (172.31.48.1).

How to Configure the Default Gateway for TP-Link Smart and Managed Switches?
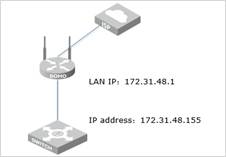
We still assume a network environment as the following picture shows, the switch needs to access the internet through the router. In this case, we need to set the router as the default gateway of the switch.
For TP-Link Smart Switches (T1500 and T1500G series switches)
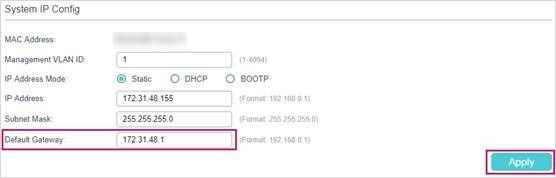
TP-Link Smart switches do not support IP routing, and we just need to designate the default gateway.
Go to SYSTEM > System Info > System IP page, specify the Default Gateway as 172.31.48.1, and click Apply.
For TP-Link Managed Switches (T1600G and T2600G series switches)
On the Managed Switch, we cannot directly set the default gateway as we do on the PC or Smart switches. But we can manually configure a default route for the switch, and the effects are the same.
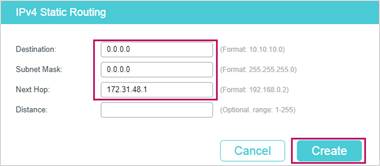
Go to L3 FEATURES > Static Routing > IPv4 Static Routing and click  to load the following page. Enter 0.0.0.0 as the Destination and Subnet Mask, and enter the IP address of the Next Hop (Default Gateway). Then Click Create.
Note: After the configuration, you need to click  on the web interface or use the command “copy running-config startup-config” in the CLI to save the configuration, otherwise the switch will lose the configuration after it is powered off.
Is this faq useful?
Your feedback helps improve this site.


TP-Link Community
Still need help? Search for answers, ask questions, and get help from TP-Link experts and other users around the world.