


How to configure PPTP/L2TP client on remote PC
NOTE: For remote PC to connect to PPTP server, it can use Windows built-in PPTP software or Third-party PPTP software.
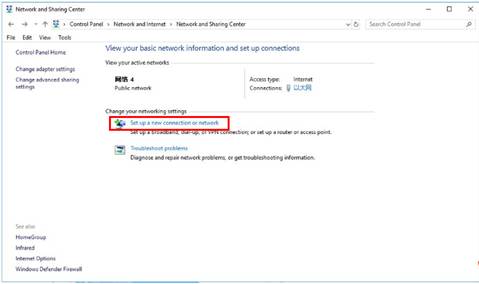
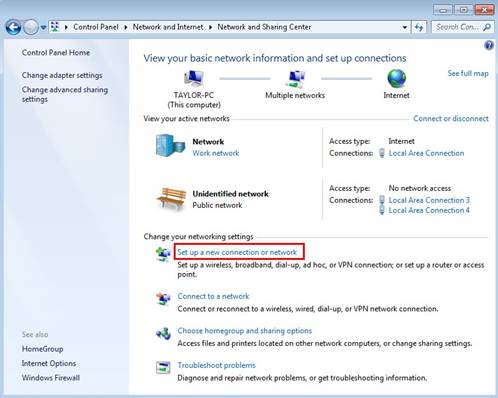
Step 1: Click on Start->Control Panel->Network and Internet->Network and Sharing Center.
Step 2: Click on Set up a new connection or network.
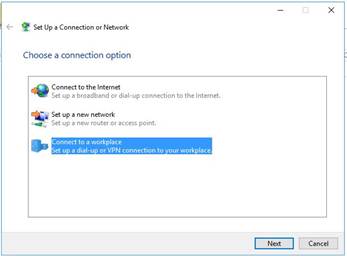
Step 3: Choose Connect to a workplace, and then click on Next.
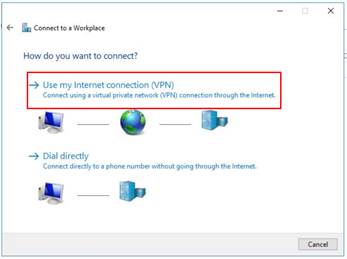
Step 4: Select Use my Internet connection (VPN)
Step 5: Under Internet address field, enter VPN Server’s WAN IP address, and then click on Create. (The Destination name is optional.)

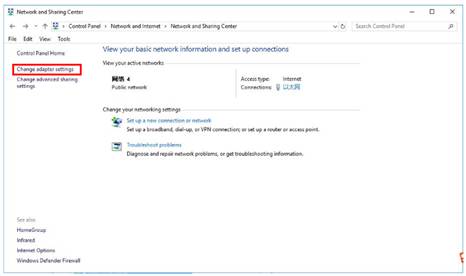
Step 6: Then back to the Network and Sharing Center, click Change adapter settings.
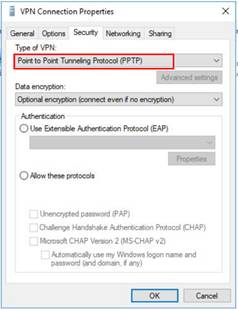
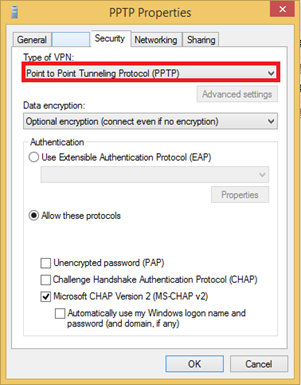
Step 7: Right click on PPTP connection you just created and select Properties, choose Security, Type of VPN: Point to Point Tunneling Protocol (PPTP), Date encryption: it's recommended to choose optional encrypted, and click OK.
Note: If you want to set up a L2TP client in Windows 10, please follow the step7 like below:
Step 7: Right Click on L2TP connection you just created and select Properties. On the Security tab, Select Layer 2 Tunneling Protocol with IPsec (L2TP/IPsec), under Data encryption, select Require encryption (disconnect if server declines).

Click on Advanced settings, pick Use preshared key for authentication, and then enter the key, here is “123456”.

Step 8: After all the setting, right click the PPTP/L2TP connection, choose Connect/Disconnect, and input the Username and Password to connect the VPN Server.

NOTE: For remote PC to connect to PPTP server, it can use Windows built-in PPTP software or Third-party PPTP software.
Step 1: Click on Start->Control Panel->Network and Internet->Network and Sharing Center.
Step 2: Click on Set up a new connection or network.
Step 3: Choose Connect to a workplace, and then click on Next.

Step 4: Select Use my Internet connection (VPN)

Step 5: Under Internet address field, enter router’s WAN IP address, and then click on Next.

Step 6: Enter User name and Password, and then click on Create.

Step 7: The VPN connection is created and ready to use, click on Close.

Step 8: Go to Network and Sharing Center and click on Change adapter settings on the left menu.

Step 9:
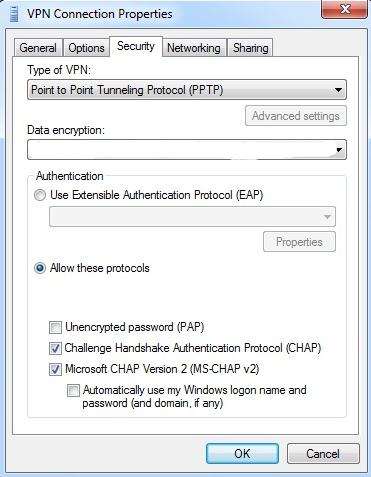
Right Click on VPN Connection and select Properties, choose Security, Type of VPN: Point to Point Tunneling Protocol (PPTP), Date encryption: it's recommended to choose optional encrypted, and click OK.
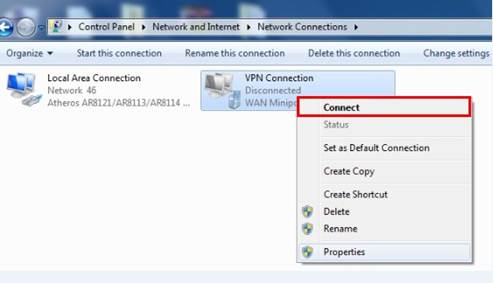
Step 10: Right Click on VPN Connection and select Connect.
Note: If you want to set up a L2TP client in Windows 7, please follow the step9-10 like below:
Step 9:
Right Click on VPN Connection and select Properties. On the Security tab, Select Layer 2 Tunneling Protocol with IPsec (L2TP/IPsec), under Data encryption, select Require encryption (disconnect if server declines).

Step 10:
Click on Advanced settings, pick Use preshared key for authentication, and then enter the key, here is “5678”.

Step 11: Enter User name and Password and then click on Connect.

NOTE: For remote PC to connect to PPTP server, it can use Windows built-in PPTP software or Third-party PPTP software.
Step 1: Click on Start->Control Panel->Network and Internet->Network and Sharing Center.
Step 2: Click on Set up a new connection or network.

Step 3: Choose Connect to a workplace, and then click on Next.

Step 4: Select Use my Internet connection (VPN)

Step 5: Under Internet address field, enter VPN Server’s WAN IP address, and then click on Create.(The Destination name is optional.)

Step 6: Then back to the Network and Sharing Center, click Change adapter settings.

Step 7: Right click on PPTP connection you just created and select Properties, choose Security, Type of VPN: Point to Point Tunneling Protocol(PPTP),Date encryption: it's recommended to choose optional encrypted, and click OK.
Note:If you want to set up a L2TP client in Windows 8.1, please follow the step7 like below:
Step 7: Right Click on L2TP connection you just created and select Properties. On the Security tab, Select Layer 2 Tunneling Protocol with IPsec (L2TP/IPsec), under Data encryption, select Require encryption (disconnect if server declines).

Click on Advanced settings, pick Use preshared key for authentication, and then enter the key, here is “123456”.

Step 8: After all the setting, right click the PPTP/L2TP connection and input the Username and Password to connect the VPN Server.

Step 1. On your Mac, click Apple menu  > System Preferences, then click Network.

Step 2. Click the Add button  at the bottom of the list, click the VPN Type pop-up menu and choose the VPN type. Enter a name for the service, then click Create.

Step 3. Enter the server address, account name, and any authentication settings you received from your VPN server, then click OK.


Step 4. You can click Advanced to setup DNS or internet proxy then click Apply.

Step 5. Select the VPN connection you created on the left and click Connect.
Is this faq useful?
Your feedback helps improve this site.
TP-Link Community
Still need help? Search for answers, ask questions, and get help from TP-Link experts and other users around the world.