How do I log in to the web management page of VIGI IPC and NVR
How to Use the VIGI Config Tool to Get the IP Address of the VIGI Device
Introduction
VIGI IPC and NVR products can either operate under centralized management through the VIGI VMS or work independently in standalone mode. This FAQ explains how to log in to the web interface of a standalone VIGI IPC or NVR.
Requirements
- VIGI IPC and/or VIGI NVR
- Web Browser
- PC on the Same network as the IPC/NVR
How to Log Into a VIGI IPC
With DHCP Server:
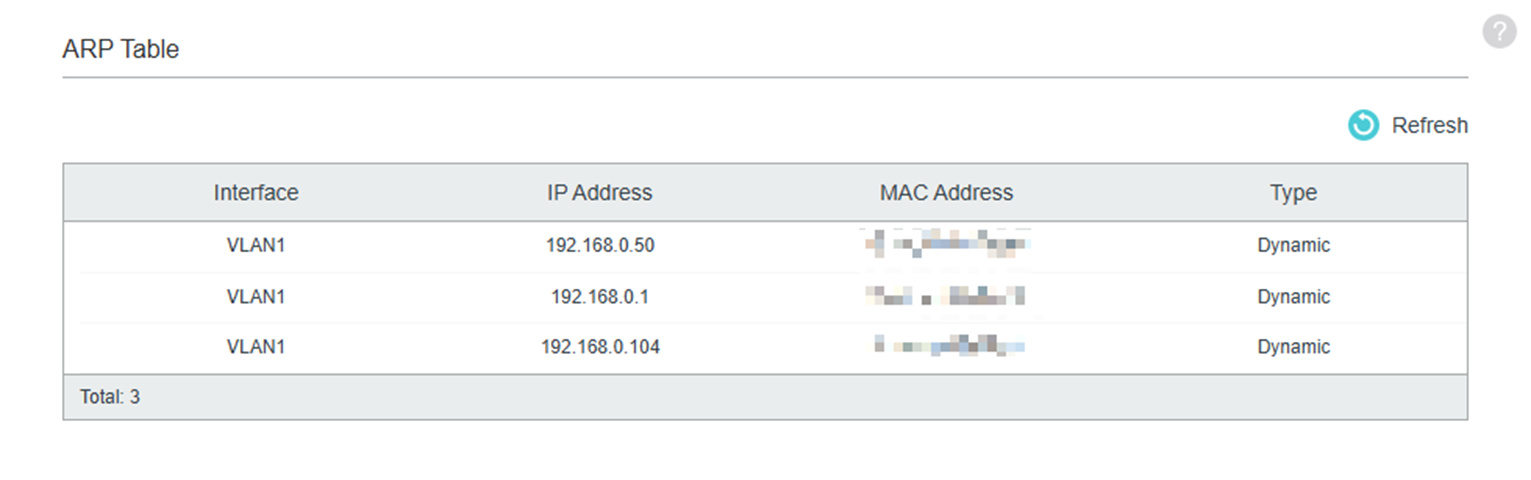
You can find the IP address of the IPC using the router’s DHCP client list or the switch ARP table, as shown below. Additionally, it is recommended to use the VIGI Config Tool to detect and identify the IPC or NVR’s IP address on the network. This is the more official and reliable method, as the VIGI Config Tool is designed specifically for VIGI devices. For installation instructions, please refer to How to install and uninstall VIGI Config Tool
Step 2: Inputting the IP Address in the Web Browser’s URL Bar:
For the best experience, it is recommended to use Google Chrome with the latest version installed, as this browser is fully supported and provides optimal compatibility and performance. Other modern web browsers may function, but features and stability are best ensured when using a supported version of Chrome.
Once the IPC’s IP address has been identified, enter the IP address directly into your web browser’s address bar to access the IPC’s web-based management interface, as shown below.

Access IPC’s Web Interface:
Once the IP address has been inputted in the Web Browser, the Web Management Interface of the IPC can now be accessed, as shown below.
Without DHCP Server:
Step 1: Obtain a VIGI IPC and a computer with an ethernet port.
Step 2: Statically assign the PC’s IP Address to 192.168.0.100 as shown here:
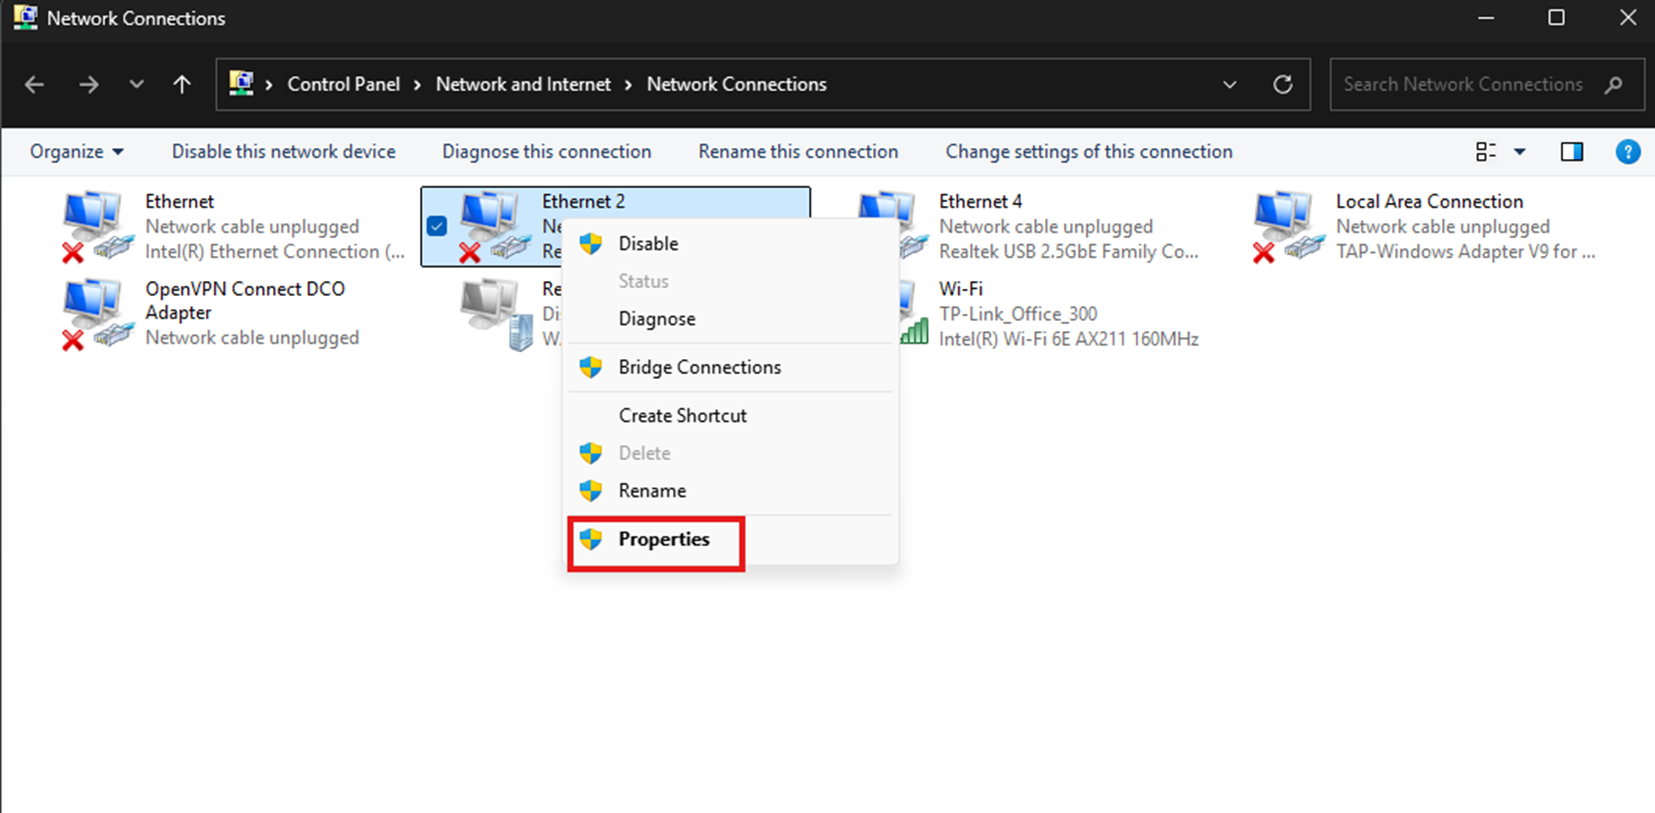
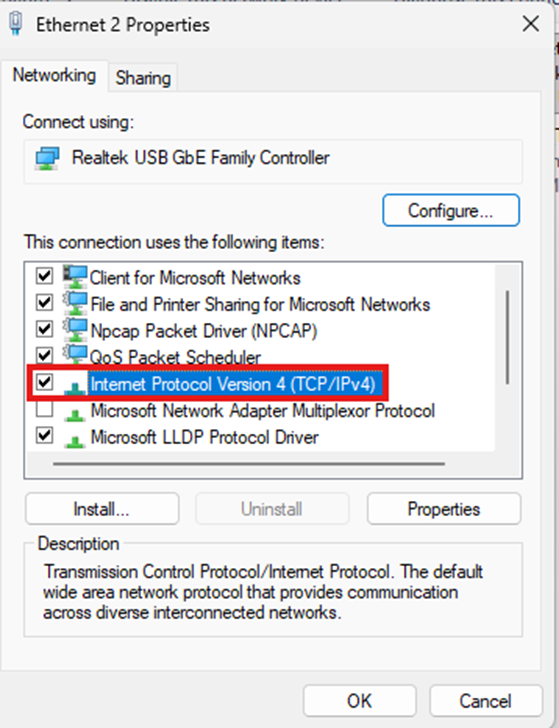
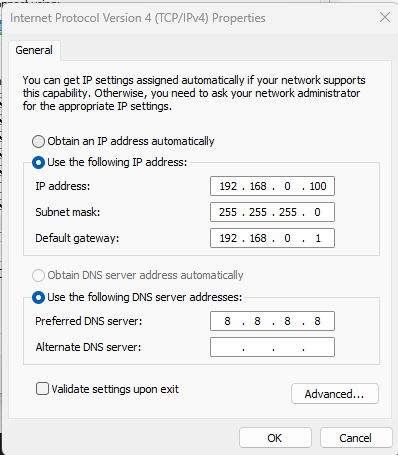
Assigning the PC’s IP address in Windows can be done by going to Control Panel > Network and Internet > Network and Sharing Center > Change Adapter Settings > Right Click on the Adapter and Select Properties > Select Internet Protocol Version 4
Step 3: Accessing the IPC’s Interface.
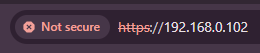
To access the IPC’s Web Interface, you must verify that the IP address of your computer is set to 192.168.0.100. Once set, open a web browser and type in 192.168.0.60 into the web browser, which opens the web interface of the IPC as shown below:

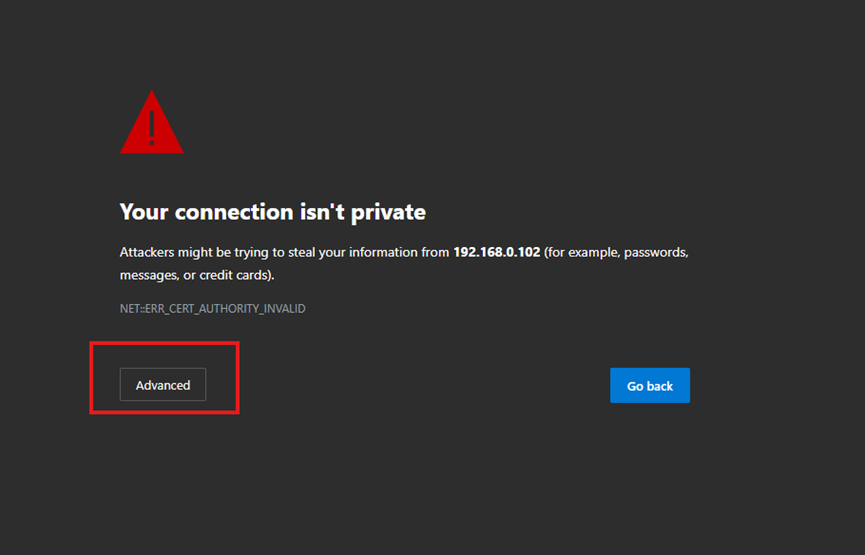
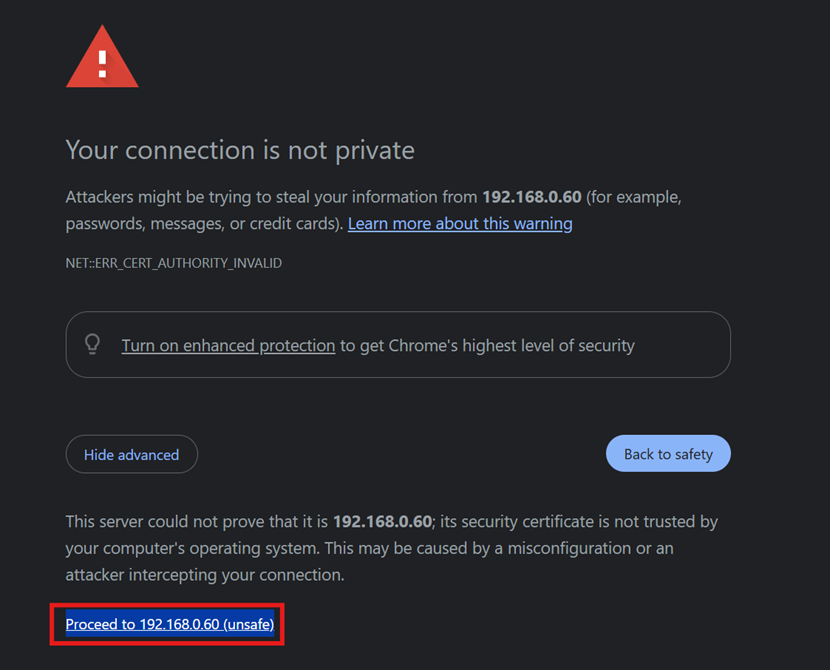
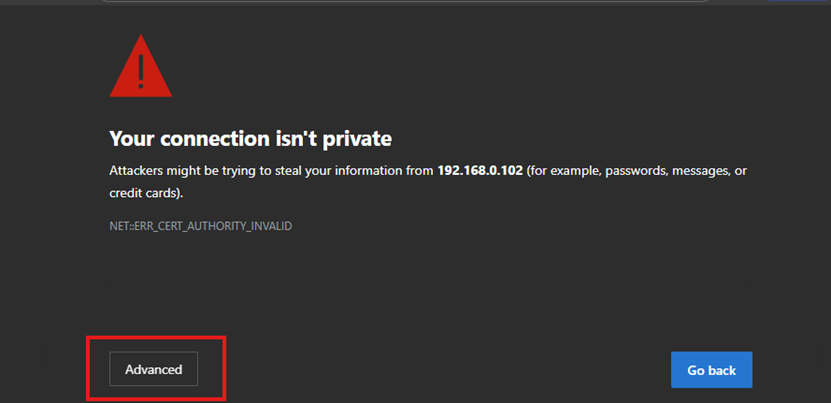
Once the IP Address is inputted in the top search bar in the web browser, a privacy error will show up on the browser screen.
Once the browser privacy message appears, click “advanced” as shown in the screenshot below:
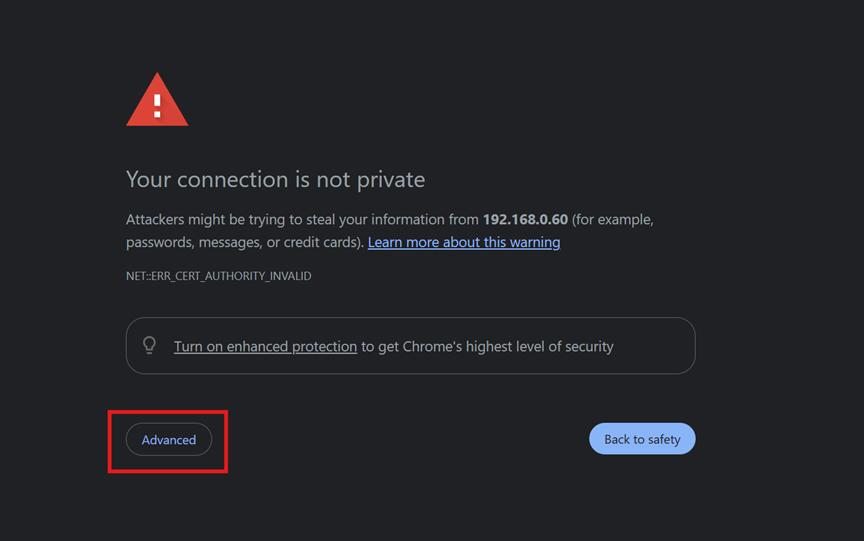
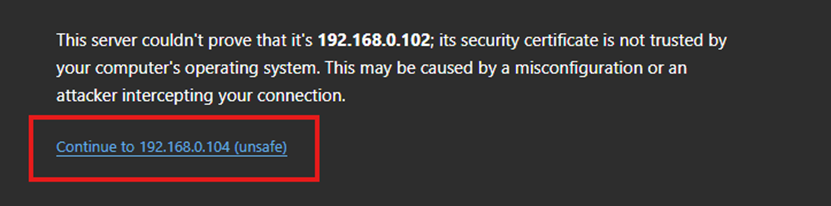
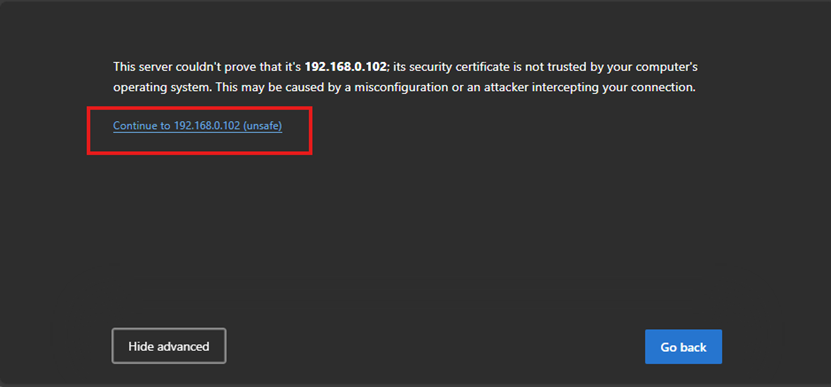
Then, click “Proceed to 192.168.0.60 (unsafe)”, as shown in the screenshot below:
 [
[
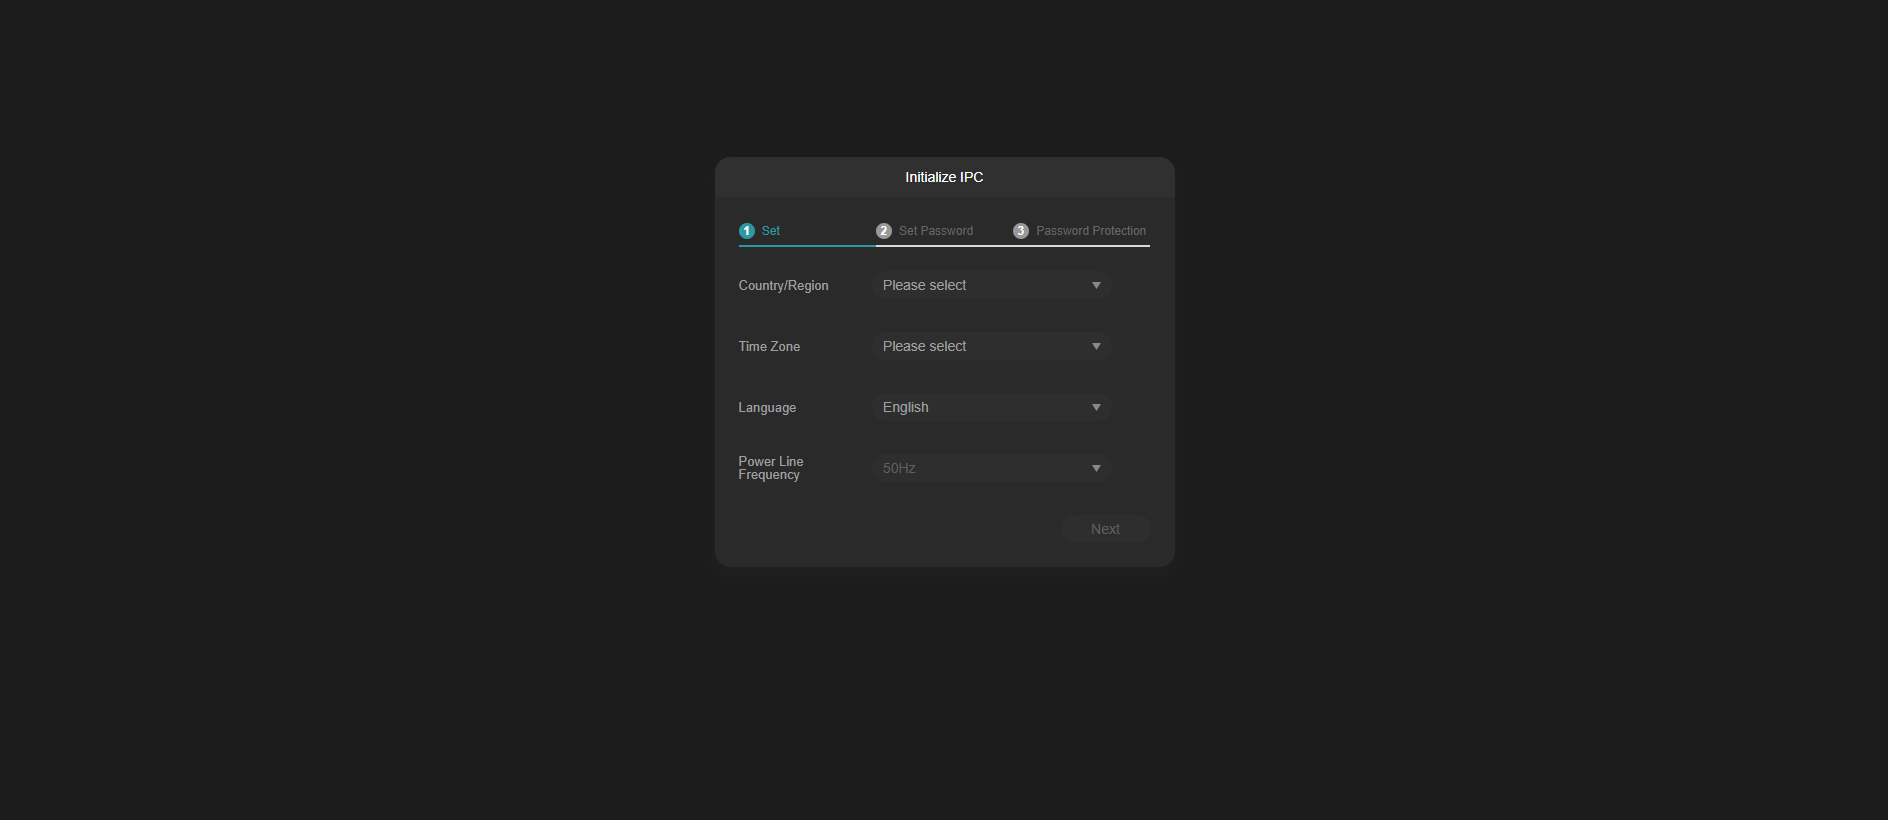
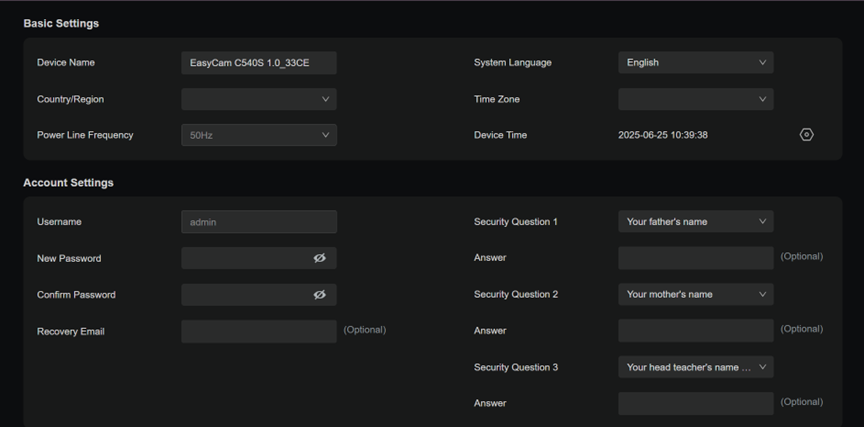
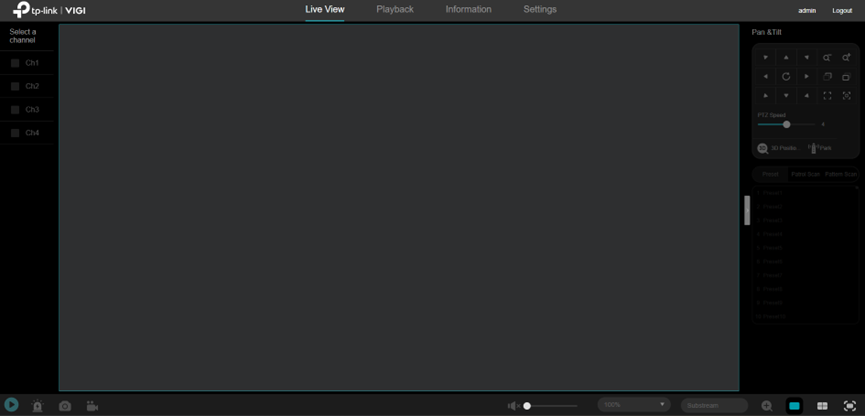
Once clicked, you will be greeted with the IP Camera’s initial configuration interface, as shown below:
How to Log into a VIGI NVR
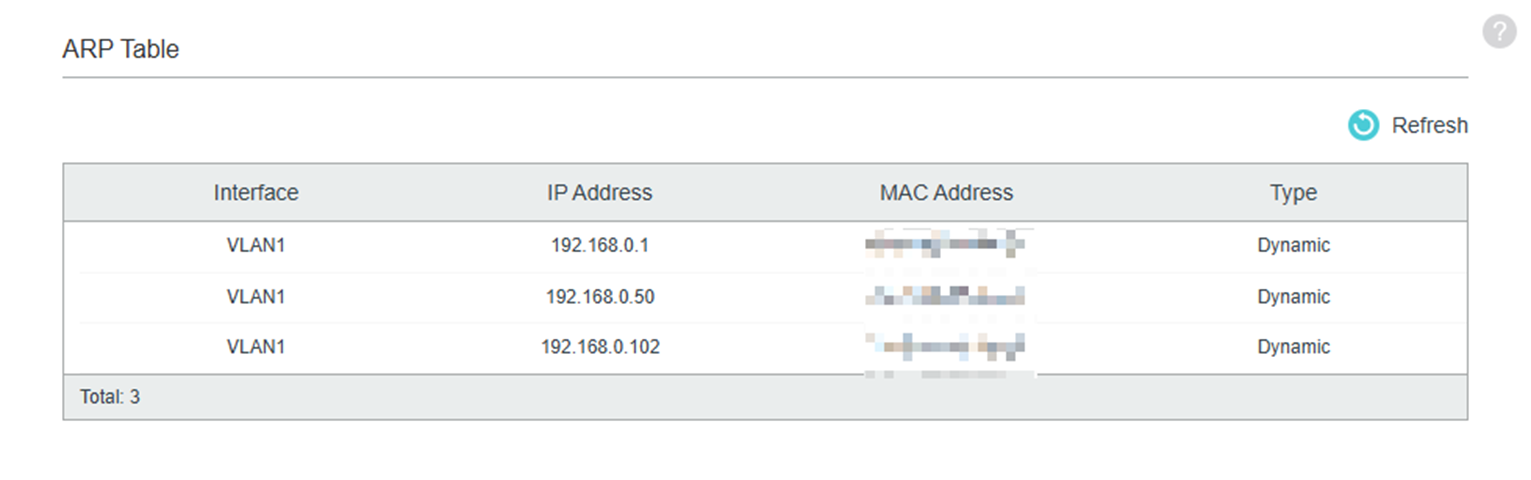
You can find the IP address of the NVR using the router client list, the switch ARP table (as shown below), or an IP scanning tool. Additionally, it is recommended to use the VIGI Config Tool to detect and identify the NVR’s IP address on the network. This is the most official and reliable method, as the VIGI Config Tool is designed specifically for VIGI devices. For installation instructions, please refer to How to install and uninstall VIGI Config Tool
Step 2: Inputting the IP Address in the Web Browser’s URL Bar:
For the best experience, it is recommended to use Google Chrome with the latest version installed, as this browser is fully supported and provides optimal compatibility and performance. Other modern web browsers may function, but features and stability are best ensured when using a supported version of Chrome.
Once the NVR’s IP address has been identified, enter it into your web browser’s address bar to access the NVR’s web-based interface, as shown below.
Access NVR’s Web Interface:
Once the IP address has been inputted in the Web Browser, the Web Management Interface of the NVR can now be accessed, as shown below.
How to Use the VIGI Config Tool to Get the IP Address of the VIGI Device
Step 1: Install VIGI Config Tool:
The VIGI Config Tool is a free PC utility from TP-Link that helps you quickly find, activate, and do basic setups on VIGI cameras and NVRs on your local network. It’s mainly used for initial discovery and access, especially when you don’t yet know the device’s IP address.
You can install the VIGI Config Tool at: https://www.VIGI.com/support/download/VIGI-config-tool/
Step 2: Run VIGI Config Tool:
Once the VIGI Config Tool is run, the application will look like the one shown below:
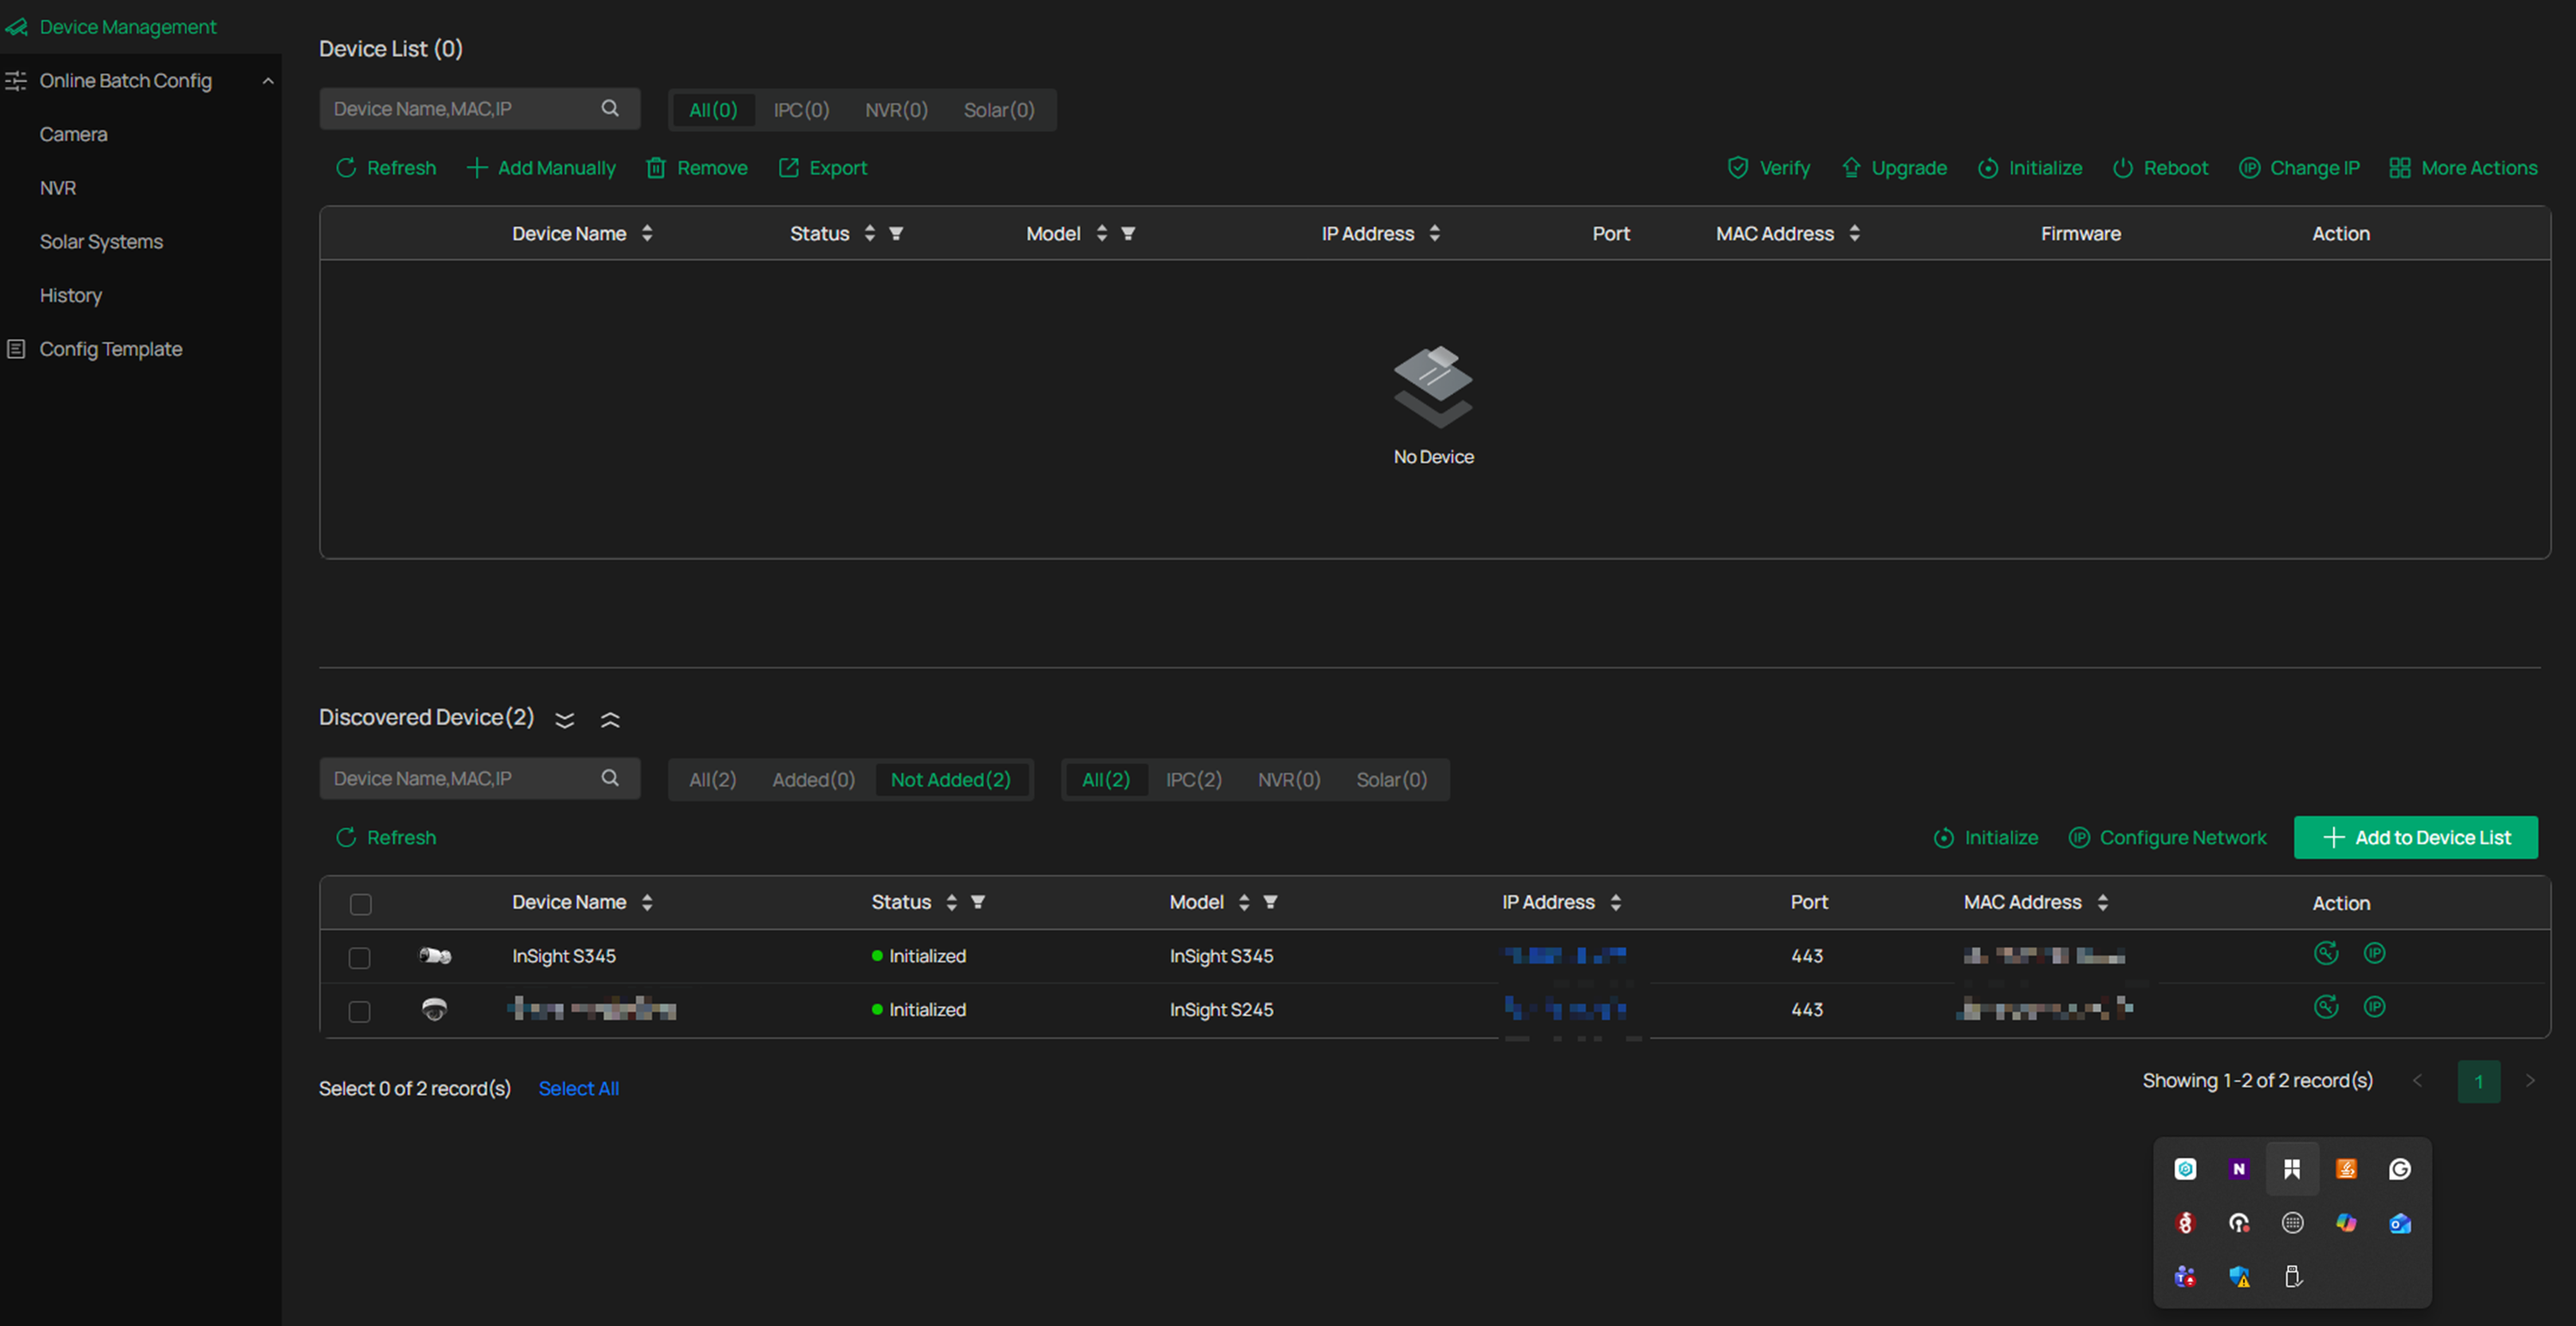
Once the VIGI Config Tool is launched, it will automatically scan the local network and detect any VIGI devices. From there, you can easily view each device’s IP address and basic details, which you can then use to access the VIGI device’s web interface for management and configuration.
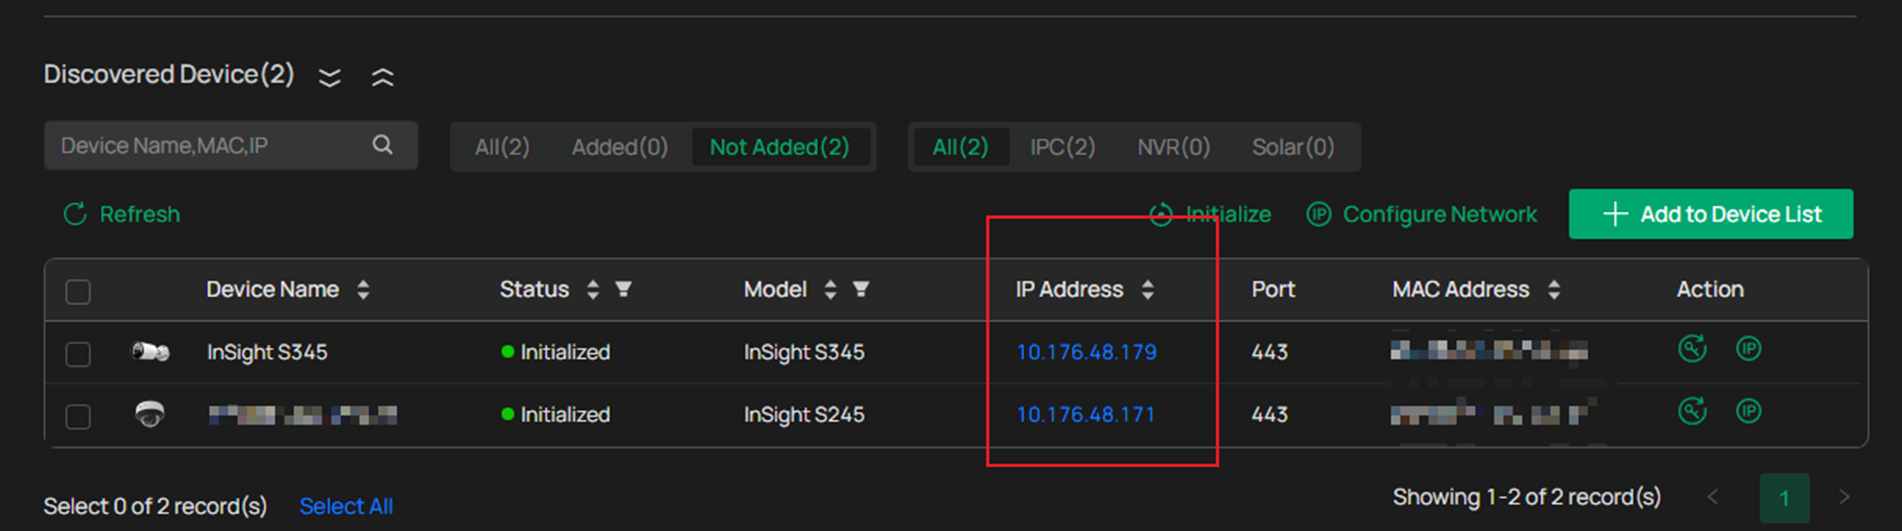
To get the IP address of VIGI Cameras, run the VIGI Config Tool, navigate to Device Management>Discovered Device, and under Discovered Device, you will get the Discovered Device list with the Device Name, Device Status, Model, IP Address, Device Port, MAC Address, and an Action Menu.
Note: It is suggested to use the following web browser to access your NVR's web interface: Chrome >= 107, Safari >= 16.
Get to know more details of each function and configuration. Please go to Download Center to download the manual for your product.
QA
Q1: Can VIGI IPC and NVR devices be accessed without VIGI VMS?
A1: Yes. VIGI IPC and NVR devices can operate in standalone mode, which allows you to log in directly to their web management interface without using VIGI VMS.
Q2: What do I need before logging into a VIGI IPC or NVR web interface?
A2: You will need a VIGI IPC or NVR, a web browser, and a PC that is connected to the same network as the device.
Q3: How do I find the IP address of a VIGI IPC or NVR?
A3: The IP address can be found by checking your router’s client list, VIGI Config Tool, the switch’s ARP table, or by using an IP scanning tool on the local network.
Q4: How do I access the web interface once I have the IP address?
A4: Open a web browser on a PC connected to the same network as the device and enter the device’s IP address into the browser’s address bar to access the web management interface, noting that access is typically supported only over HTTPS using https://NVR_IP, and if the HTTPS port has been changed, the updated port number must be included in the URL, such as https://NVR_IP:new_port; if the web interface cannot be accessed, first try pinging the NVR’s IP address from the PC to confirm network connectivity.
Q5: Does this method work when the device is using DHCP?
A5: Yes. When the VIGI IPC or NVR is connected to a network with a DHCP server, it will automatically obtain an IP address that can be used to access the web interface.
Q6: Is there a difference between logging into a VIGI IPC and a VIGI NVR?
A6: The process is very similar for both devices. The main difference is how the IP address is located, but once the IP address is known, access through a web browser works the same way.
Q7: Where can I find more information about configuration options and features?
A7: For detailed configuration steps and feature explanations, please visit the Download Center and download the user manual for your specific VIGI IPC or NVR model.
¿Es útil esta pregunta frecuente?
Sus comentarios nos ayudan a mejorar este sitio.
_1.0_normal_1599113143630v.png)

