


How to set up rate limit through EAP controller
Suitable for: Omada Controller 2.5.1 or above and EAP products with corresponding firmware.
What is Rate Limit?
Rate Limit is used to set the limit of download rate and upload rate for the clients. With Rate Limit configured, we can protect the network bandwidth from being occupied too much by some of the clients.
Omada Controller supports three types of rate limit: Rate Limit Based on SSID, Rate Limit Based on Clients and Rate Limit Based on Voucher/Local User. When you configure more than one type of rate limit at the same time, only the configuration with minimum rate limit value will take effect.
Note: Only Omada Controller 2.6.0 or above supports Rate Limit Based on Clients.
How Do I Configure Rate Limit?
1. Click  on the upper right corner of the management interface. Go to Wireless Settings > Basic Wireless Setting to load the following page.

2. Click  to configure the corresponding SSID, and click Rate Limit to load the following page.

3. In the Rate Limit section, enable Rate Limit and specify the download limit and upload limit. Click Apply.
Note: Before configuring Rate Limit Based on Clients, make sure that there are clients connected to the controller.
1. Go to Clients and click  to configure the corresponding client. Then click Rate Limit to load the following page.
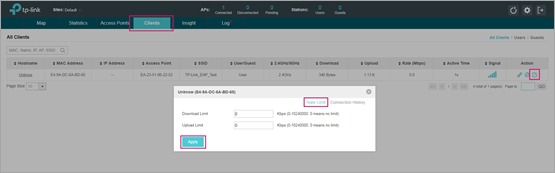
2. Specify the download limit and upload limit. Click Apply.
Note: Before configuring Rate Limit Based on Voucher/Local User, configure Voucher/Local User Portal first.
For Voucher
1. Click  on the upper right corner of the management interface. Go to Wireless Control > Portal to load the following page.

2. Click  to configure the corresponding Voucher Portal. Click Voucher Manager to manage the vouchers.

3. On the Management page, go to Voucher and click  to create vouchers and specify the download limit and upload limit. Click Apply.

For Local User
1. Click  on the upper right corner of the management interface. Go to Wireless Control > Portal to load the following page.

2. Click  to configure the corresponding Local User Portal. Click User Management to manage the users.

3. On the Management page, go to User and click  to create local users and specify the download limit and upload limit. Click Apply.

Is this faq useful?
Your feedback helps improve this site.
4.0-F_normal_1593323303811i.png)
4.0-F_normal_1593323197059j.png)

TP-Link Community
Still need help? Search for answers, ask questions, and get help from TP-Link experts and other users around the world.