NVR RTSP 서버를 구성하는 방법
목차
RTSP URL을 사용하여 타사 클라이언트에서 스트리밍하기
소개
최신 버전의 NVR 펌웨어는 RTSP 서버 구성을 지원합니다. 이 구성을 통해 고객은 장치의 비디오를 타사 클라이언트로 스트리밍하고 클라이언트에서 미리보기 및 재생 결과를 볼 수 있습니다. 하드 드라이브가 설치된 NVR을 준비한 다음, IPC를 NVR 채널 관리에 추가해야 합니다.
요구 사항
- VIGI IPC 및 NVR
- 타사 클라이언트
구성
NVR에서 RTSP 서버 구성
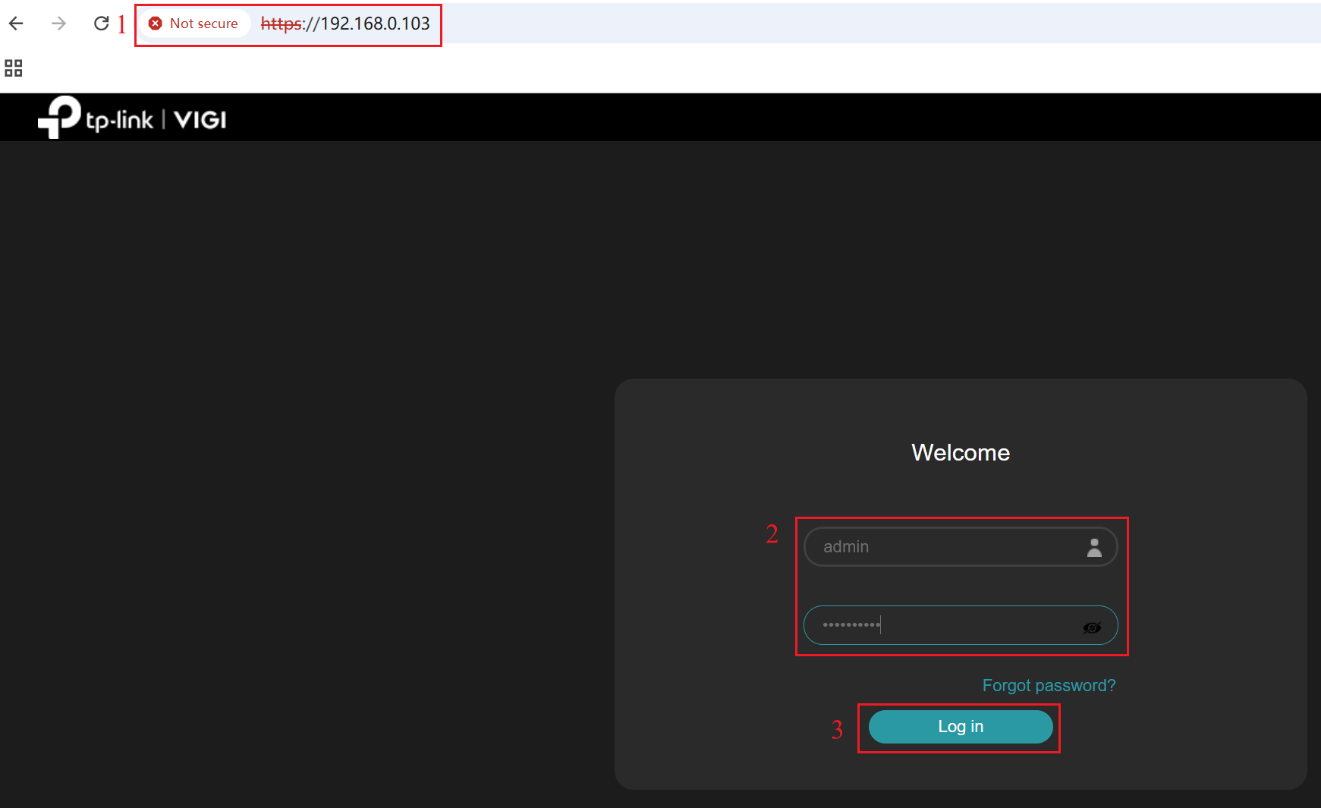
1단계. NVR의 웹 인터페이스에 IP 주소로 로그인합니다. 사용자 이름과 비밀번호를 입력한 다음 로그인을 클릭합니다.
2단계. 설정 > 네트워크 > 네트워크 서비스 > RTSP로 이동합니다. 현재 NVR은 기본적으로 RTSP 서버 기능을 활성화합니다. 기본 RTSP 포트 는 554이며, 기본 인증 알고리즘 은 MD5입니다., 그리고 SRTP 기능은 기본값으로 꺼져 있습니다. RTSP 포트 와 인증 알고리즘을 수정하고 필요에 따라 SRTP 기능을 활성화할 수 있습니다.
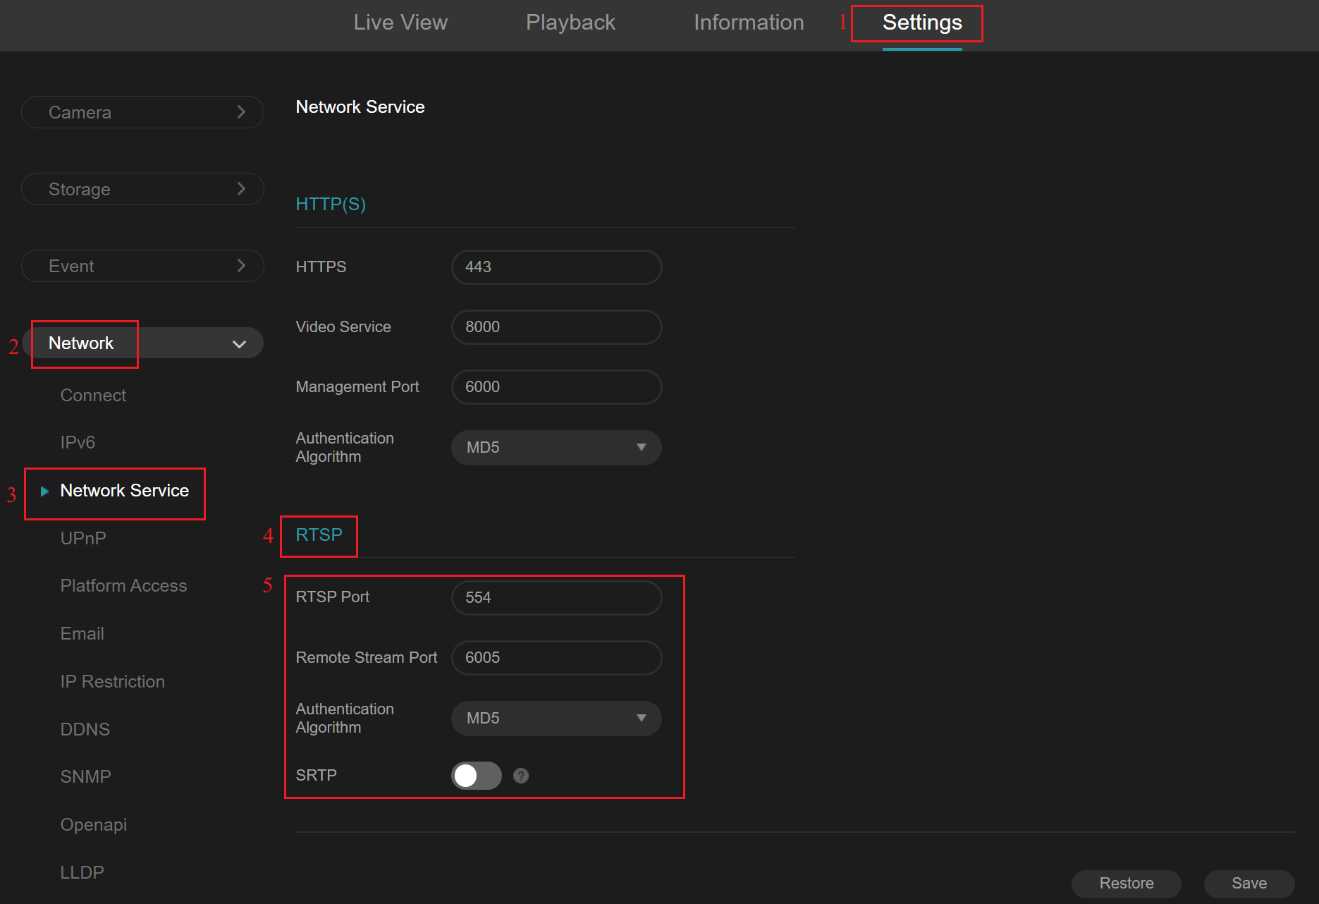
참고:
- 기본 RTSP 포트 554를 사용하여 방화벽 차단을 피하는 것이 좋습니다.
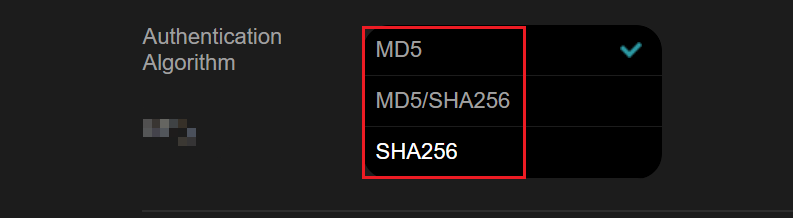
- 인증을 위해 세 가지 옵션이 있습니다: MD5, SHA256, 및 MD5/SHA256. 기본적으로, MD5가 사용되며, 이는 가장 넓은 호환성을 제공합니다. SHA256는 더 높은 보안을 제공하지만, 대부분의 타사 클라이언트는 이를 지원하지 않습니다. MD5/SHA256 옵션은 호환성과 보안의 균형을 이루지만, 실제 사용되는 방법은 타사 클라이언트에 따라 다릅니다. 많은 타사 클라이언트에서는 여전히 MD5(더 안전한 SHA256를 채택하지 않고)로 되돌아갈 수 있으며, 일부 클라이언트는 혼합 모드를 전혀 지원하지 않습니다.
- SRTP 기능이 활성화되면 타사 클라이언트와 NVR은 더 이상 RTSP 서버 기능으로 스트림을 가져올 수 없습니다. 현재, 저희 VIGI 제품 라인 소프트웨어 클라이언트만 SRTP가 활성화된 스트리밍을 지원합니다.

타사 클라이언트에서 RTSP URL을 사용하여 스트리밍하기
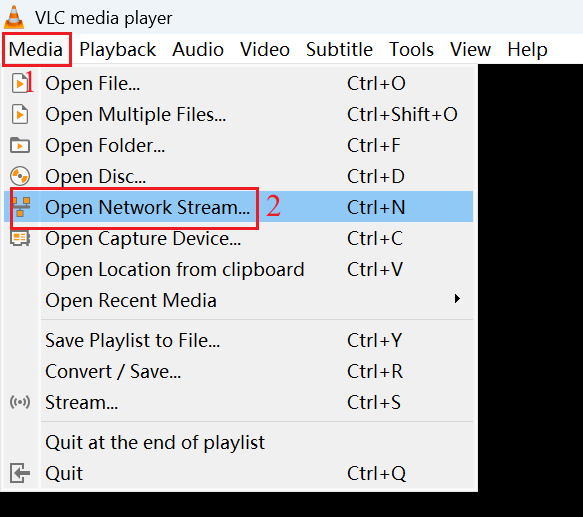
1단계. RTSP URL을 통한 스트리밍을 지원하는 타사 클라이언트를 실행합니다. 이 예제에서는 VLC 미디어 플레이어를 사용합니다.
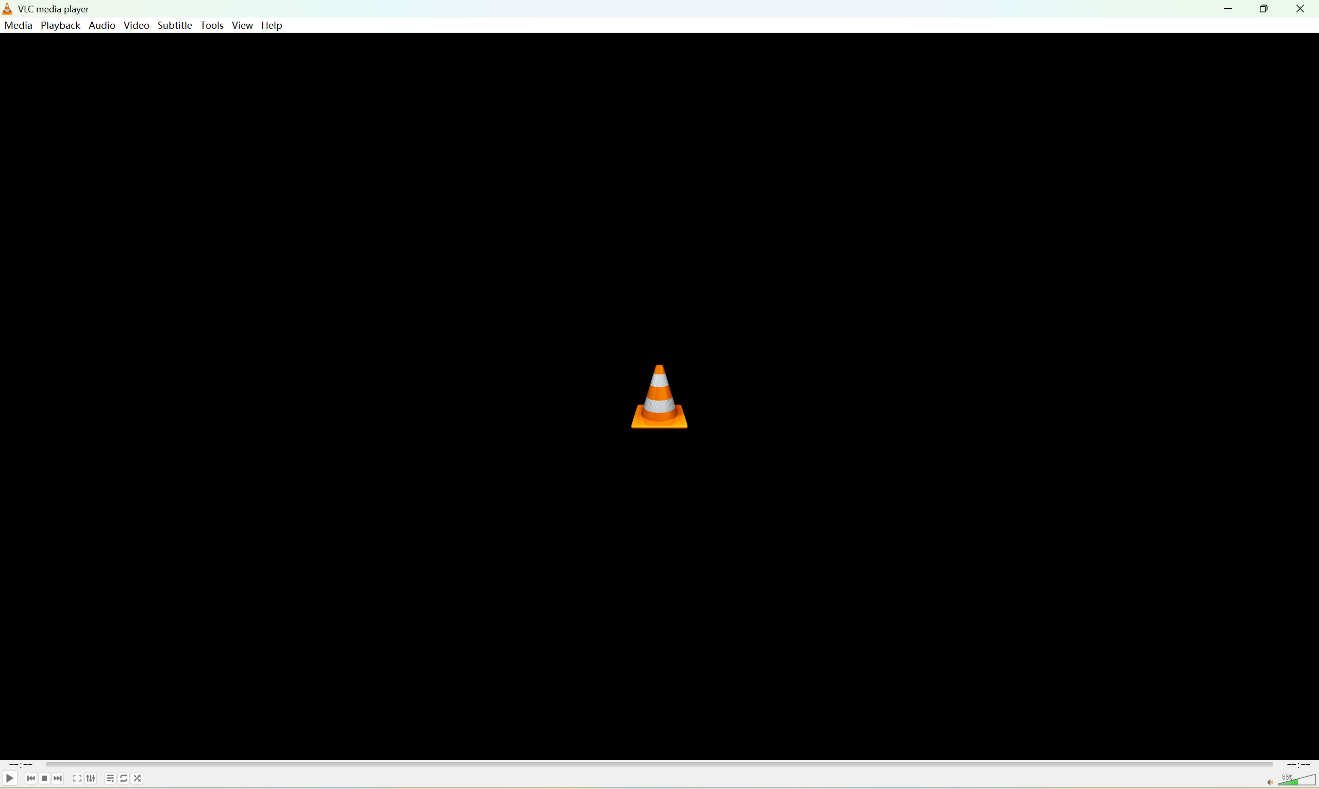
2단계. Media를 클릭한 다음 Open Network Stream을 클릭합니다.
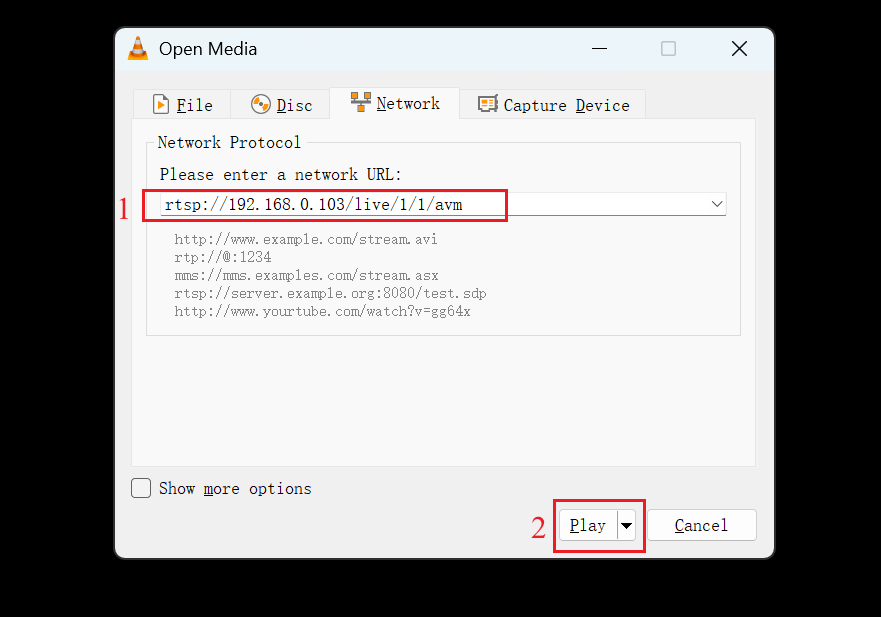
라이브 뷰
1단계. 팝업 창에 라이브 스트림의 RTSP URL을 입력하고 Play를 클릭하세요.
참고:
라이브 스트림의 RTSP URL 형식은 다음과 같습니다:
rtsp://ip/live/ch/stream/avm
IP는 NVR의 IP 주소입니다.
Ch는 채널 번호입니다(IPC 채널은 1부터 최대 숫자까지 시작합니다; 채널 0은
- IP는 NVR의 IP 주소입니다.
- Ch는 채널 번호입니다(IPC 채널은 1부터 최대 숫자까지 시작합니다. 채널 0은 채널 제로를 의미합니다.
- >스트림은 스트림 번호입니다(메인 스트림은 1, 서브 스트림은 2. 현재 채널 제로는 메인 스트림만 지원합니다).
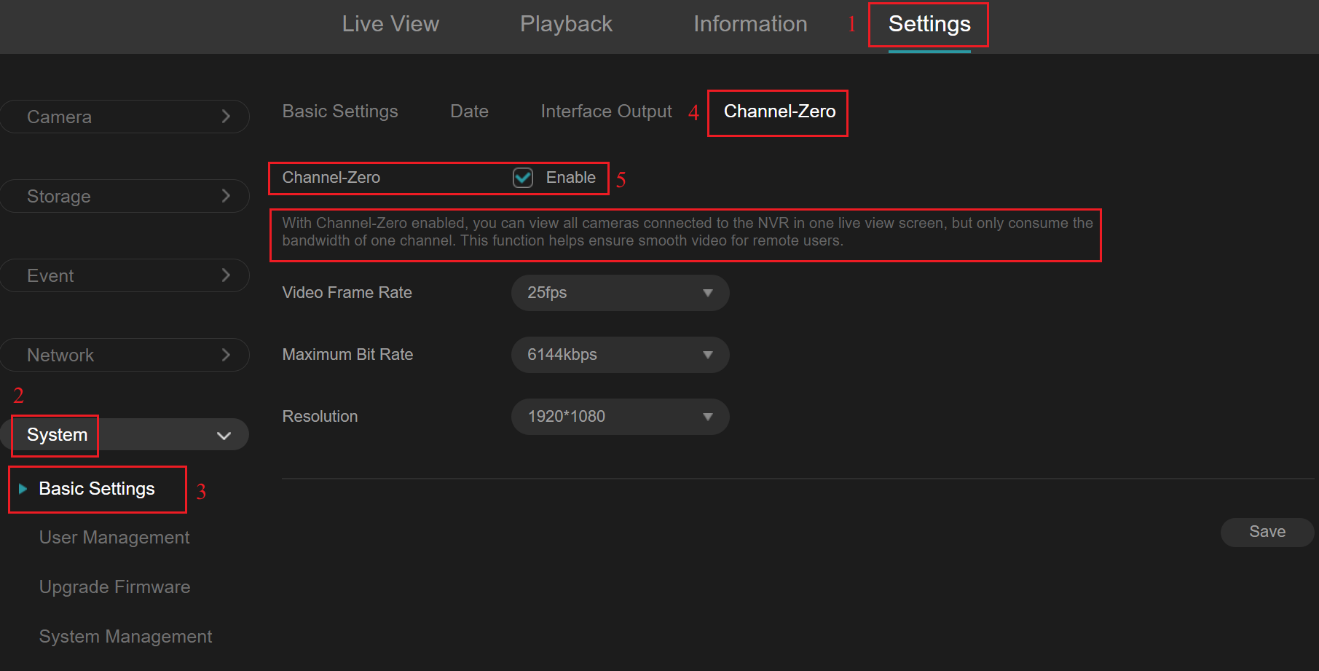
- 설정 > 시스템 > 기본 설정 > 채널 제로로 이동하세요. 채널 제로 기능의 활성화 여부를 선택할 수 있습니다. 채널 제로 기능이 활성화되면 모든 카메라를 단일 라이브 비디오에서 볼 수 있습니다.
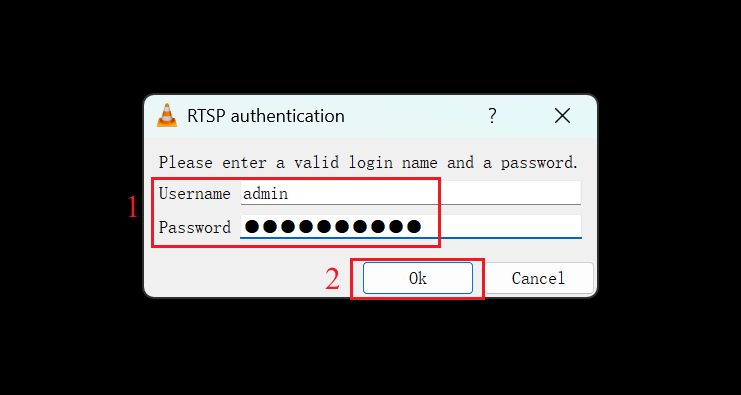
2단계. 팝업 창에서 NVR의 사용자 이름과 비밀번호를 입력한 후 확인을 클릭하여 RTSP 인증을 완료합니다.
재생
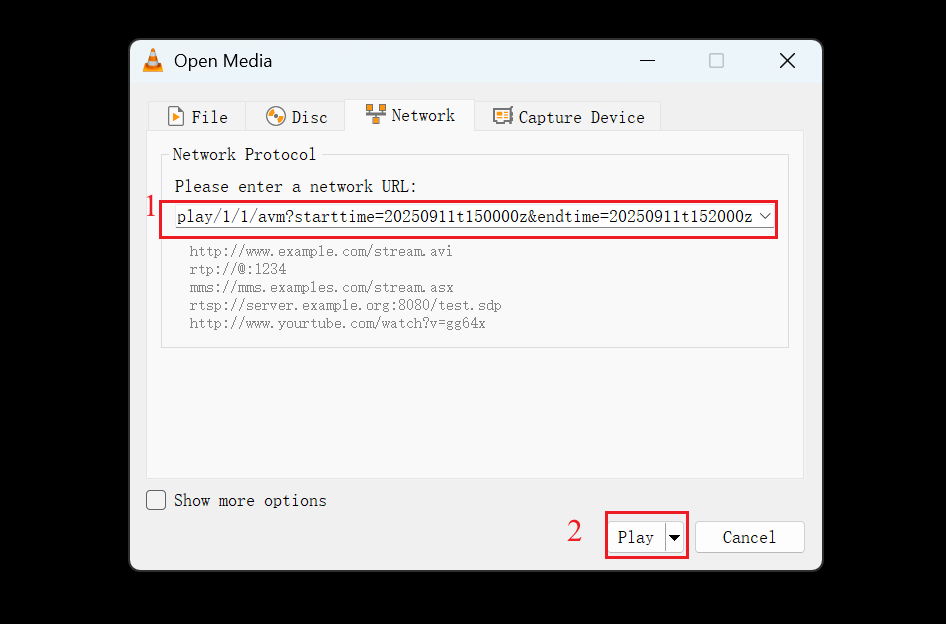
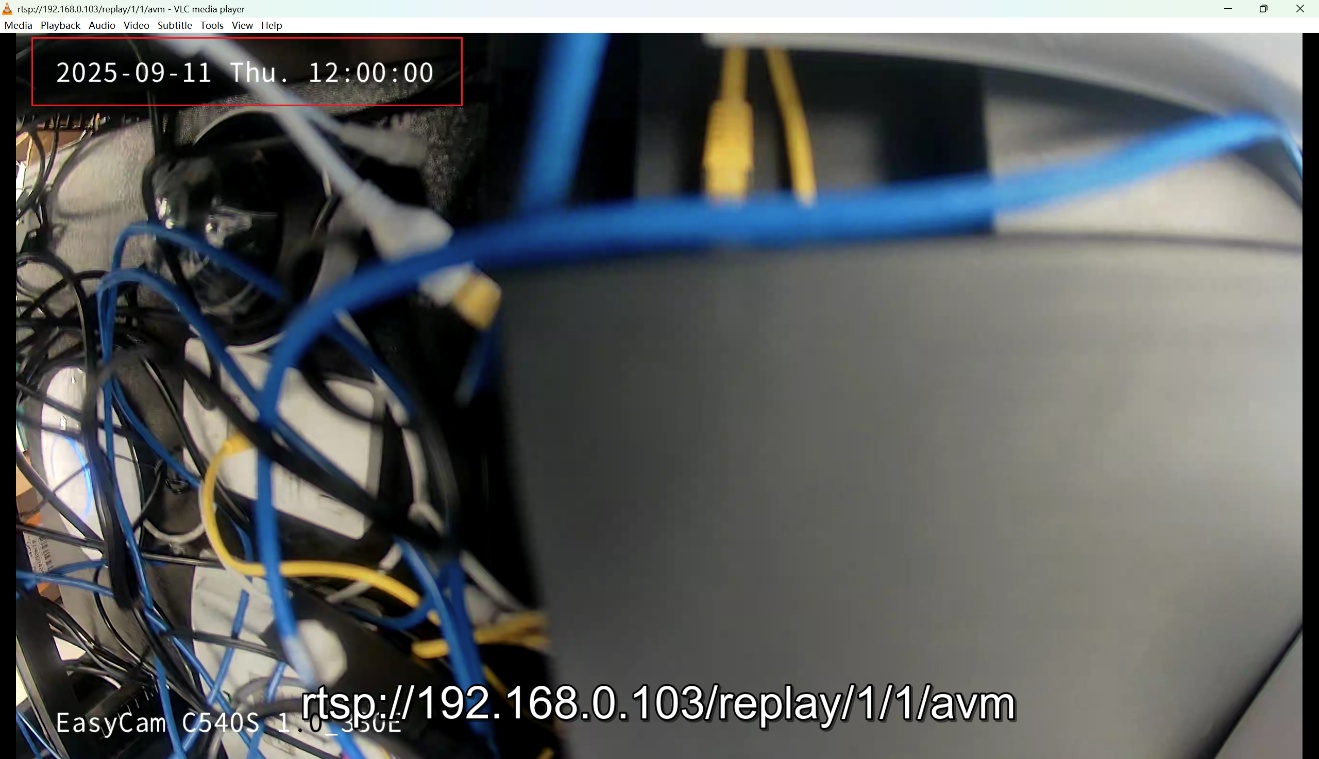
1단계. 팝업 창에서 RTSP URL 을 입력합니다. 아래 URL은 2025년 9월 11일 12:00에서 12:20까지의 재생 스트림을 의미합니다.그리고 Play를 클릭합니다.
 참고:
참고:
참고:
재생 스트림을 위한 RTSP URL 형식은 다음과 같습니다.
rtsp://ip/replay/ch/stream/avm?starttime=YYYYMMDDtHHMMSSz&endtime=YYYYMMDDtHHMMSSz
- IP는 NVR의 IP 주소입니다.
- Ch는 채널 번호입니다(IP 카메라 채널은 1부터 시작하여 최대 카메라 수량까지 증가. 현재 채널 제로는 재생을 지원하지 않습니다).
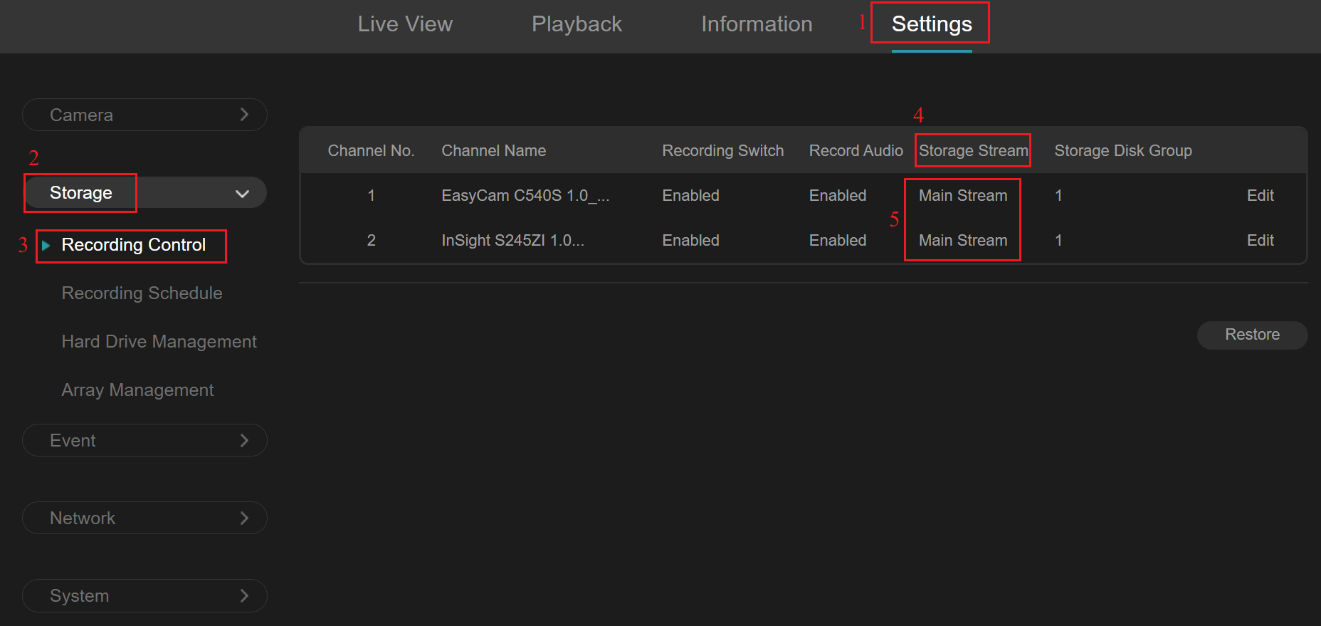
- Stream은 스트림 유형입니다(1은 메인 스트림, 2는 서브스트림). 이는 설정한 스토리지 스트림에 따라 달라집니다. 설정한 스트림 유형으로만 재생할 수 있습니다. 설정 > 스토리지 > 녹화 제어 > 저장 스트림 에서 어느 스트림 유형을 녹화용으로 설정했는지 확인할 수 있습니다.
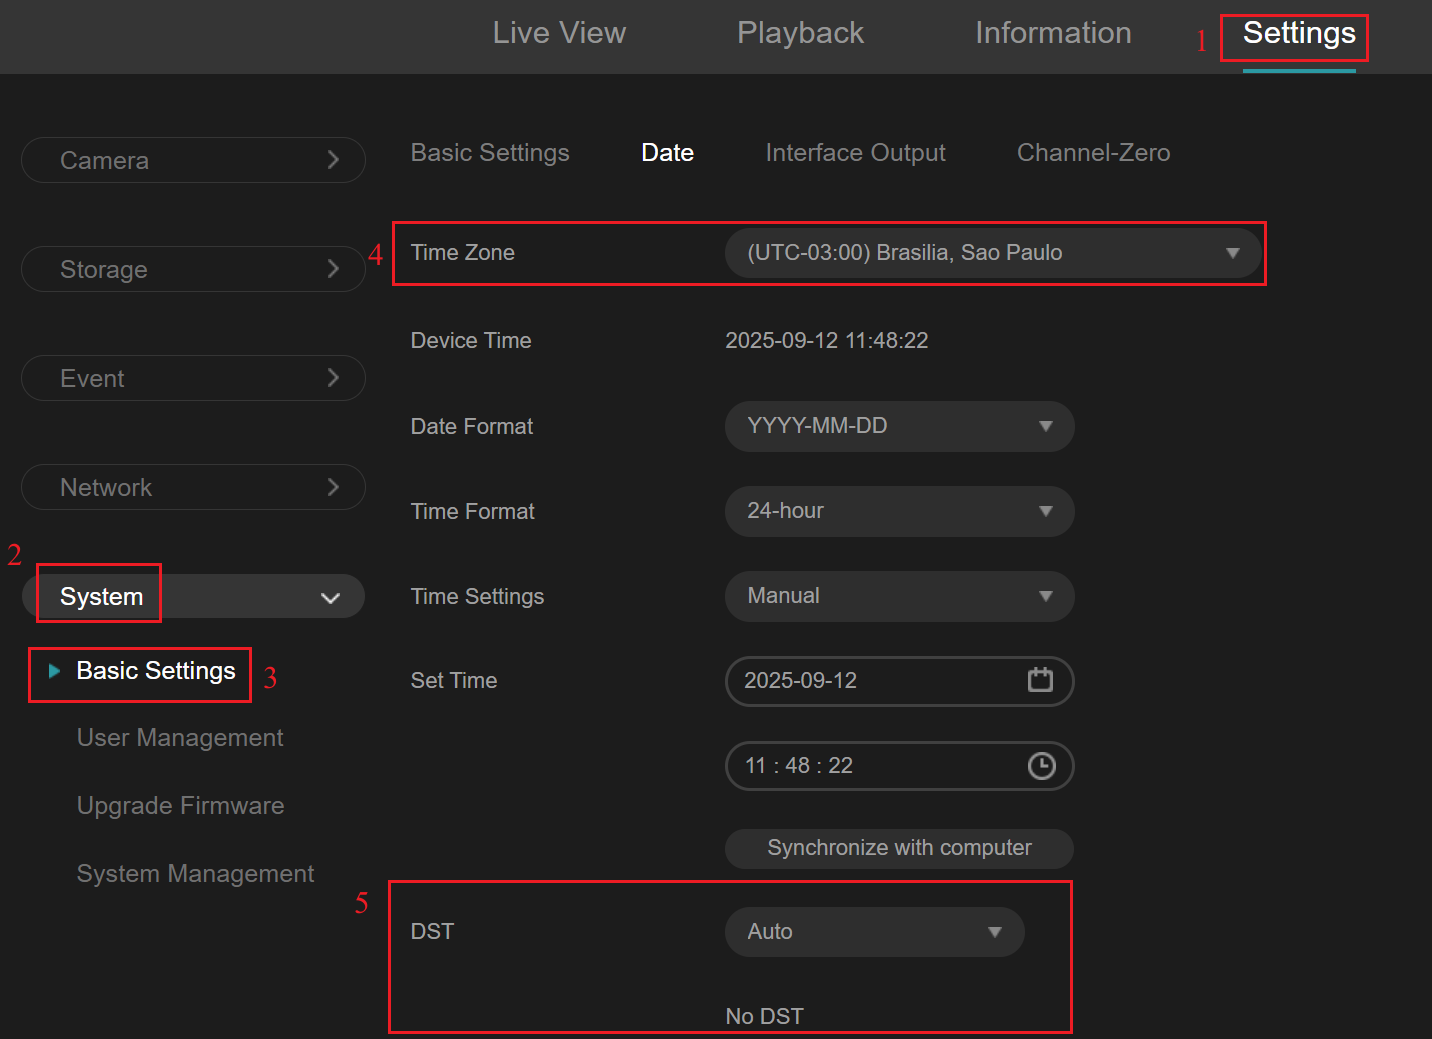
- starttime과 endtime은 시작 및 종료 시간입니다, 모두 UTC+0입니다. 시간 형식은 YYYYMMDDHHMMSS (년, 월, 일, 시, 분, 초)입니다. 이는 다른 시간대에 있을 때, 특정 시간에 대한 녹화를 재생하려면 UTC+0으로 변환해야 합니다. 설정으로 이동하여 시스템 > 기본 설정 > 날짜에서 장치의 시간대를 확인할 수 있습니다. 예를 들어, 내 장치의 시간대가 UTC-3이고 2025년 9월 11일 12:00부터 12:20까지 스트림을 재생하고 싶다면, UTC+0으로 변환하여 다음과 같이 입력해야 합니다: starttime=20250911t150000z&endtime=20250911t152000z. 일부 지역은 일광 절약 시간제를 적용하므로 장치에서 DST가 활성화되어 있고 현재 사용 중인지 확인하세요.
2단계. 팝업 창에서 NVR의 사용자 이름 비밀번호를 입력한 후, 확인을 클릭하여 RTSP 인증을 완료합니다.

검증
실시간 보기
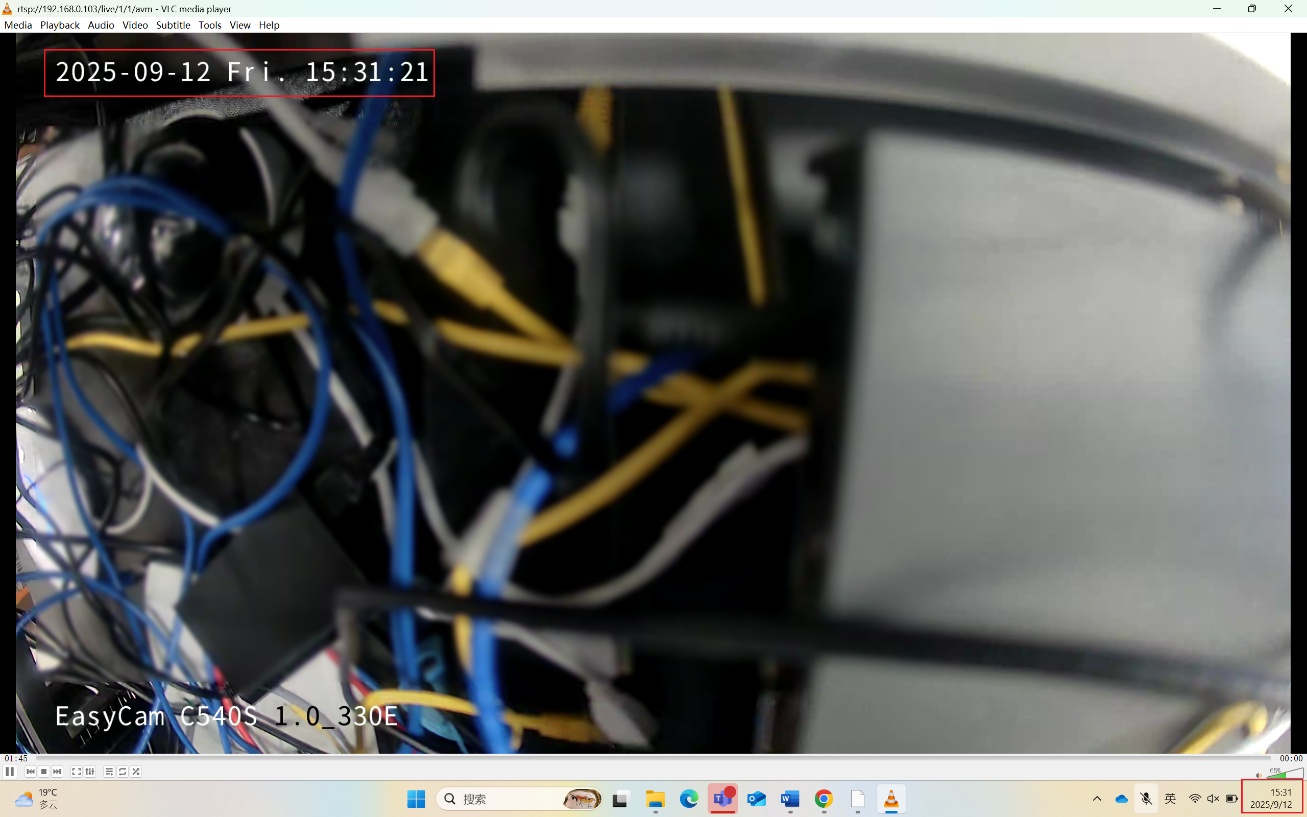
실시간 스트림 URL을 사용하여 RTSP 인증을 완료한 후, 실시간 스트림을 볼 수 있습니다. OSD에 표시된 시간은 귀하의 시간대와 일치해야 합니다.
재생
재생 스트림 URL을 사용하여 RTSP 인증을 완료한 후, 2025년 9월 11일 12:00부터 12:20까지 기록된 스트림을 볼 수 있습니다.
결론
NVR의 RTSP 서버 기능을 성공적으로 사용하여 비디오 스트림을 끌어와서 서드파티 클라이언트에서 재생했습니다.
각 기능 및 구성의 자세한 내용을 보려면 다운로드 센터 | TP-Link 로 가셔서 제품 설명서를 다운로드하세요.
이 문서에는 기계 번역이 적용되었으며, 정확한 내용을 확인하려면 원본 영문 문서를 참고하시기 바랍니다.
해당 FAQ가 유용했나요?
여러분의 의견은 사이트 개선을 위해 소중하게 사용됩니다.


1.0-package-cmyk_normal_20231211022459k.png)