


How to login to the Pharos-Series’ web management page
In this article, we take the CPE as an example and introduce how to log into the web management page in the following operating systems:
To log into the web management page, your computer should be connected correctly in the network and have a static IP address. The computer is not required to access the internet.
1. Connecting the TP-Link device to your computer
Connect the devices as shown in the figure below.

A.Connect the CPE’s LAN0 port to the PoE port of the PoE adapter.
B.Connect the computer to the LAN port of the PoE adapter.
C.Plug the PoE adapter into the power socket.
2. Assigning a static IP address to your computer
Step 1
Here we introduce three methods to open Control Panel.
Method 1 (for Win 7/Vista/8/8.1/10): Press “Windows  + R”, then a Run box comes out. Input control panel and press Enter to open the control panel.

Method 2 (for Win 7/Vista): Go to Start > Control Panel.

Method 3 (for Win 8/8.1): Right Click on Start, then click Control Panel in the list.

Step 2
Windows 7/8/8.1/10: Go to Network and Internet > Network and Sharing Center. Select
Change adapter settings on the left.


Windows Vista: Go to Network and Internet > Network and Sharing Center. Select Manage network connections on the left.


Step 3
Right-click Local Area Connection/Ethernet Connection(Network Connection), select Properties, and then double-click Internet Protocol Version 4.


Step 4
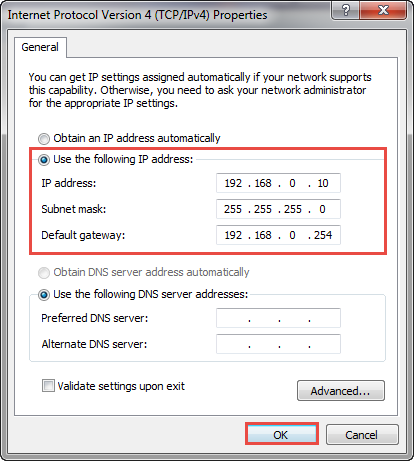
Select Use the Following IP address: and type in the IP address, Subnet mask and Default gateway as shown below. (The IP address should be 192.168.0.X. X ranges between 2 and 253, e.g. 192.168.0.10.)
Click OK to apply the settings.
Step 1
Go to the Apple > System Preferences > Network.


Step 2
Select Ethernet on the left, then select Manually from the drop- down list and input the IP Address (The IP address should be 192.168.0.X. X ranges between 2 and 253, e.g. 192.168.0.10.). Click Apply.

3. Logging into the Management Page
Before logging into the management page, please check the following points:
A.Your computer and devices are connected correctly.
B.Your computer has a static IP address.
Note: It is recommended to use the latest version of Google Chrome, Firefox, IE or Safari.
Step 1
Open a Web Browser, type 192.168.0.254 in the address bar and press Enter (Return for Mac Os) to load the login page.

Step 2
Enter admin for both User Name and Password, then select the Region and Language from the drop-down list. Read TERMS OF USE and check the box “I agree to these terms of use”, then click Login.

Step 3
Change the user name and password for security purpose. Click Finish to log into the web management page.

Είναι χρήσιμο αυτό το FAQ;
Τα σχόλιά σας συμβάλλουν στη βελτίωση αυτού του ιστότοπου.


2.0-package-2000px_v2_normal_20231207094510m.png)