How to mitigate ghosting issues in the live preview
Contents
Objective
This article explains the root causes of ghosting in the preview image and the measures to mitigate ghosting issues. It also provides configuration steps to help reduce ghosts. When users encounter ghosting issues in the video preview, they can refer to this guide to optimize the display quality.
Requirements
- VIGI Camera
- Mobile Phone and VIGI APP
Introduction
In surveillance camera images, ghosting is a common non-ideal optical phenomenon. It refers to extra optical artifacts in the image that resemble a light source (such as the sun, streetlights, etc.) but appear in abnormal positions with varying brightness and should not normally exist. Common characteristics include:
- Appearing as circular, polygonal, or ripple-like light spots in various shapes.
- Typically occurring near light sources, and under certain angles, symmetrically distributed relative to the light source.
- Often accompanied by colored fringes.
Configuration
To modify ghosting in the preview image through configuration adjustments, it is first necessary to understand the root causes of ghosting so that targeted changes can be made.
Root Cause of Ghosting
Ghosting is not a device malfunction. Its fundamental cause lies in the lens optics: the lens cannot perfectly refract all incident light. A small portion of light is reflected on the lens surfaces, and this stray light follows unintended paths inside the device. The result is the scattered, attenuated light spots that we observe as ghosts.
Strategies for Mitigating Ghosting
Currently, no lens can eliminate ghosting at its source. The relatively effective approach is to minimize and avoid ghosting during installation and deployment. The core principle for reducing lens ghosting is to avoid direct exposure to strong light sources and prevent strong light sources from appearing in the optical center of the lens.
Configuration Steps
Step 1. Use the VIGI APP to monitor the live view and check the positioning of strong light sources in the scene.
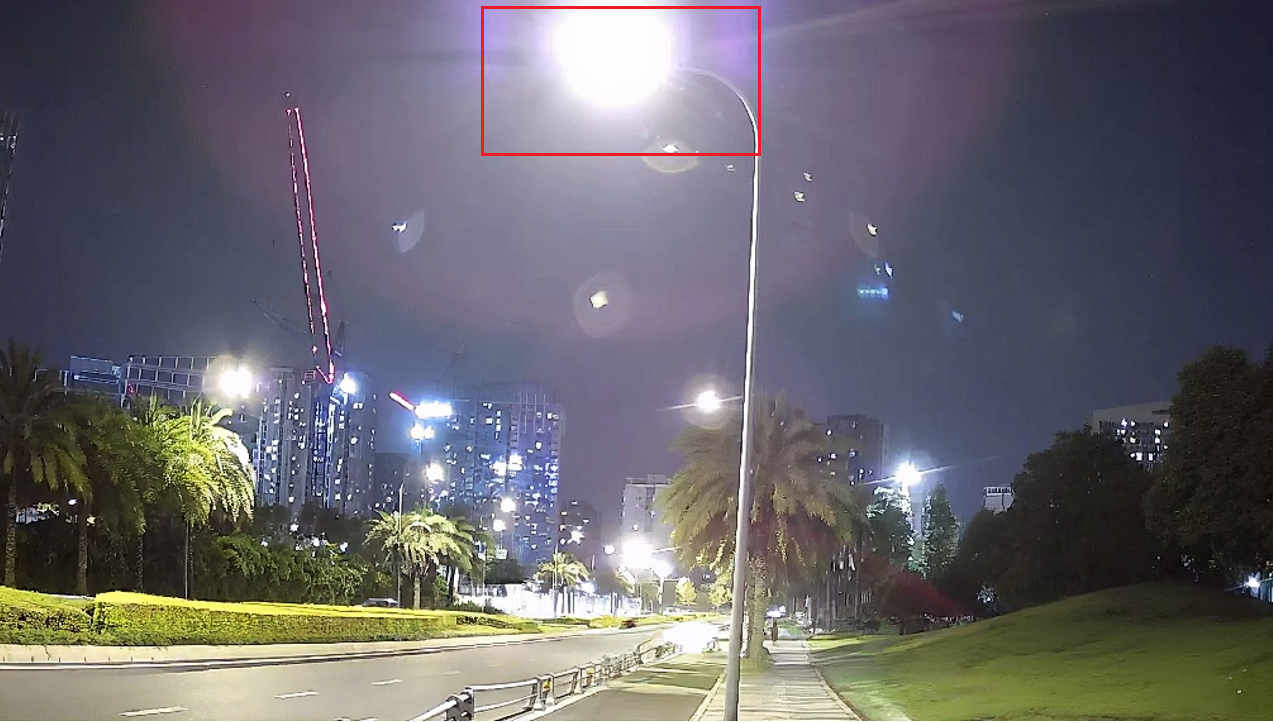
Step 2. Adjust the camera angle so that the strong light source is moved to the edge of the image or even outside the frame. If it is a PTZ model, you can use the PTZ function; for other models, manual adjustment is required.
Notes:
- When adjusting the monitoring angle of the camera, please observe the changes in the position and intensity of the ghosting in real time. Adjust the direction and degree of the angle according to your needs, while ensuring that the core monitoring area remains within the view.
- If your monitoring scene is at a longer distance and you need to ensure that the telephoto view is not affected while minimizing visible ghosting in the image, we recommend using our optical zoom products, such as Insight S245ZI, Insight S345ZI, or Insight S445ZI.
Verification
Open the VIGI APP to check the preview after adjustment and observe the effect of ghosting in the image.

Conclusion
You have successfully optimized the ghosting issue in the preview image.
Get to know more details of each function and configuration please go to Download Center | TP-Link to download the manual of your product.
Est-ce que ce FAQ a été utile ?
Vos commentaires nous aideront à améliorer ce site.


