


Which ports do Omada SDN Controller and Omada Discovery Utility use? (above Controller 5.0.15)
Programs use specific ports to send or receive data via a network. An Omada SDN Controller or Omada Discovery Utility uses the ports on the host, while an Omada hardware controller uses the ports on its hardware.
Ports fall into two groups: TCP (Transmission Control Protocol) ports and UDP (User Datagram Protocol) ports. Port numbers are limited, ranging from 1 to 65535 among each group. Such a fact gives rise to a port collision when a program tries to use a certain port on a host, only to find another program occupies the port.
From this article, you can learn which ports an Omada SDN Controller (5.0.15 and above) and an Omada Discovery Utility (5.0.8 and above) use, and how to troubleshoot when a port-related problem happens.
1. An overview of the default ports
The default ports used by the Omada SDN Controller and Omada Discovery Utility are listed in the table below.
|
Ports |
Omada Hardware Controller |
Omada Software Controller |
Omada Discovery Utility |
When the port is required |
|
Web Management and Portal |
||||
|
TCP 80 |
✔ |
|
|
1. When you visit the management page of Omada Hardware Controller via an HTTP connection. |
|
TCP 443 |
✔ |
|
|
1. When you visit the management page of Omada Hardware Controller via an HTTPS connection. |
|
TCP 8088 |
✔ |
✔ |
|
1. When you visit the management page of Omada Software Controller via an HTTP connection. |
|
TCP 8043 |
|
✔ |
|
1. When you visit the management page of Omada Software Controller via an HTTPS connection. |
|
TCP 8843 |
✔ |
✔ |
|
When the clients visit the Portal page via an HTTPS connection. |
|
Device Discovery, Adoption, Management, and Upgrade |
||||
|
UDP 29810 |
✔ |
✔ |
✔ |
Omada Controller and Omada Discovery Utility discover Omada devices. |
|
TCP 29814 |
✔ |
✔ |
✔ |
Omada Controller and Omada Discovery Utility manage the Omada devices running firmware fully adapted to Omada Controller v5*. |
|
TCP 29815 |
✔ |
✔ |
|
Starting from v5.9, Omada Controller receives Device Info, Packet Capture Files, and DPI Application Statistic Data from the Omada devices. |
|
TCP 29816 |
✔ |
✔ |
|
Starting from v5.9, Omada Controller establishes the remote control terminal session with the Omada devices. |
|
TCP 29811/29812 |
✔ |
✔ |
✔ |
Omada Controller and Omada Discovery Utility manage the Omada devices running firmware fully adapted to Omada Controller v4*. |
|
TCP 29813 |
✔ |
✔ |
|
When upgrading the firmware for the Omada devices running firmware fully adapted to Omada Controller v4*. |
|
Initialization Check |
||||
|
UDP 27001 |
✔ |
✔ |
|
Omada Controller can be discovered by the Omada APP within the same network through this port. |
|
Database Access |
||||
|
TCP 27217 |
|
✔ |
|
Omada Software Controller accesses the MongoDB database through this port. |
*New firmware released since 2022 is fully adapted to Omada Controller v5 and upgrades the Omada SDN management protocol. Release notes for new firmware include key phrases like “fully adapt to Omada SDN Controller v5.x”.
2. Examples of Omada using ports
In this section, we will explain how Omada SDN Controller and Omada Discovery Utility use ports, using the example of how they discover devices.
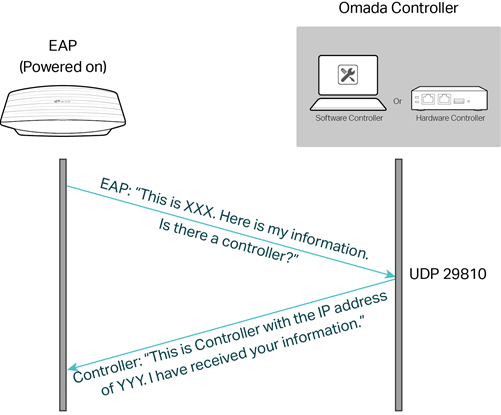
|
Step 1 |
EAP does not know exactly where the controller is, so it broadcasts a self-introductory message to UDP port 29810 in the LAN. |
|
Step 2 |
Omada SDN Controller or Omada Discovery Utility is listening to the port and receives the EAP introductory message, then replies to the EAP via the same port. |
3. Port Forwarding Settings
If there is a router performing NAT (Network Address Translation) between the controller and the devices, Port Forwarding rules should be created so that the controller and the devices can communicate with each other properly.
1) For the ports used for device discovery, adoption, management, and upgrade, the source and destination ports of the Port Forwarding rules should be all the same as the above Omada ports, like shown below.

2) For those ports used for web management and portal, if you are using an Omada controller version lower than v5.9, the source and destination ports of the Port Forwarding rules should be all the same as the Omada ports, as shown below.

3) If you are using an Omada controller v5.9 and above, flexible settings are supported and the source ports can be customized.

4. How to change the ports used by Omada SDN Controller
4.1 Web Management and Portal Port
Omada SDN Controller supports changing the ports for Web management and Portal via its management page.
Go to Global Settings > System Settings > Access Config, you can change three ports:
- HTTPS Port for Controller Management,
- HTTPS Port for Portal,
- HTTP Port for Portal.
The modification of the port number will only take effect after you restart the controller.

Note that if you are using Omada Controller on Linux, avoid using port 443, because non-root users are not allowed to run services on this port, which will cause the controller to fail to start. If you have encountered the issue, please refer to What to Do If the Omada Software Controller Fails to Start on Linux After Modifying the Port ( Controller 5.5.6 or Above).
4.2 Device Management Port
Omada Software Controller allows changing the following device management ports by editing the “omada.properties” file. The configuration takes effect after saving the modification and restarting the controller.
For Windows Controller, the default file path is “C:\Users\XXX\Omada Controller\properties” (XXX for your Windows account).
For Linux Controller, the default file path is “/opt/tplink/EAPController/properties”.
It is recommended that you keep the default ports. If you do need to change ports, make sure you do not use duplicate ports or well-known ports. If you change the port for “port.discovery”, you need to use the Omada Discovery Utility to inform the devices of the new controller port.
- port.adopt.v1=29812
- port.upgrade.v1=29813
- port.manager.v1=29811
- port.manager.v2=29814
- port.discovery=29810
- port.transfer.v2=29815
- port.rtty=29816
4.3 Examples
You have two Omada SDN Controllers in your office to manage other networks over the Internet. You can modify the ports of one controller, for example, change the HTTPS management port from 8043 to 18043, and modify the “omada.properties” file to change ports 29810-29816 to 29820-29826.


After you modify these ports, you need to update the Port Forwarding rules settings on the router following Chapter 3.
Since the port.discovery has been changed to 29820, run the Omada Discovery Utility and add port 29820 to the Inform URL.

Is this faq useful?
Your feedback helps improve this site.
TP-Link Community
Still need help? Search for answers, ask questions, and get help from TP-Link experts and other users around the world.