


How to configure MAC ACL on Smart and L2 Managed switches using the new GUI
This article applies to:
T1500G-10PS v2 or above, T1500G-8T v2 or above, T1500G-10MPS v2 or above, T1500-28PCT v3 or above, T1600G-52TS v3 or above, T1600G-52PS v3 or above, T1600G-28PS v3 or above, T1600G-28TS v3 or above, T1600G-18TS v2 or above, T1700X-16TS, T2600G-52TS v3 or above, T2600G-28TS v3 or above, T2600G-28MPS v3 or above, T2600G-28SQ v1 or above.
MAC ACL can be used to control packet transmission based on MAC addresses. In a simple scenario, the administrator can use MAC ACL to restrict the communication between different devices.
Example:
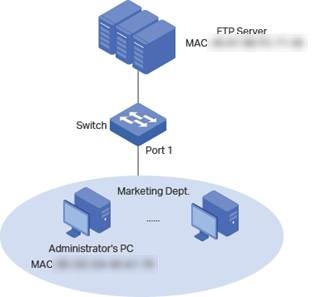
As the following topology shows, the Marketing department is connected under port 1 of the switch. It is required that the Marketing department cannot visit the FTP server, except the administrator.
Configuration Scheme:
In this scenario, MAC ACL is recommended to fulfill the requirement. We can only create several MAC ACL rules to permit the access of the administrator and deny the access of the other marketing department members.
1. Go to SECURITY > ACL > ACL Config page, create a MAC ACL 100 for the marketing department.

2.After the above step, the MAC ACL 100 will appear in the ACL Config table. Click  to add ACL rules.

3.Click  to add MAC ACL rules.

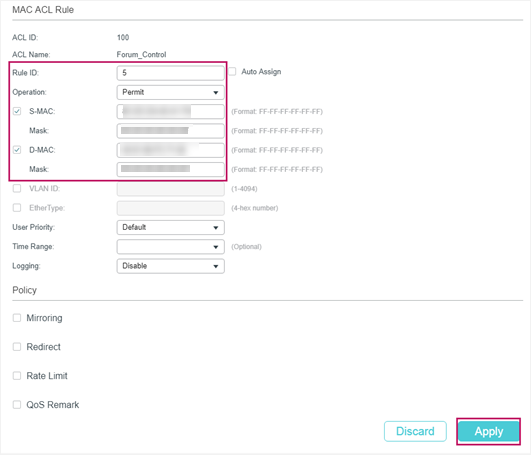
4.Configure rule 5 to permit packets from the administrator host to the FTP server with the source MAC address XX-XX-XX-XX-XX-79 and destination MAC address XX-XX-XX-XX-XX-56.
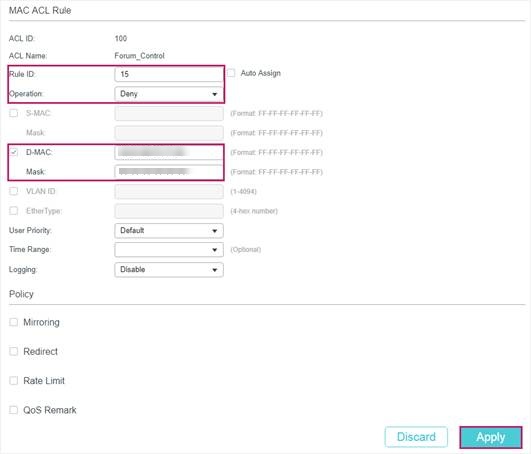
5.Configure rule 15 to deny other packets to the FTP server with destination MAC address XX-XX-XX-XX-XX-56.
6.Configure rule 25 to permit all the other packets that match neither of the above rules.

7.Go to SECURITY > ACL > ACL Binding > Port Binding page, click  to load the following page. Bind MAC ACL 100 to port 1 to make the ACL rules take effect.

Note:
Every ACL has an implicit “deny all” rule at the end of an ACL rule list. That is, if an ACL is applied to a packet and none of the explicit rules match, then the final implicit deny all rule takes effect and the packet is dropped.
Is this faq useful?
Your feedback helps improve this site.
TP-Link Community
Still need help? Search for answers, ask questions, and get help from TP-Link experts and other users around the world.