


How to configure VLAN VPN on L2 Managed switches using the new GUI
VLAN VPN (Virtual Private Network), also known as QinQ, is a simple and flexible layer 2 tunneling technology. VLAN VPN enables the packets sent from the private network to be forwarded through the ISP network with double VLAN tags.
With VLAN VPN enabled, when forwarding packets from the private VLAN to the ISP VLAN, the switch adds an outer VLAN tag (VLAN tag of the ISP VLAN) to the packets. Thus, packets can be transmitted through the ISP network with double VLAN tags. In the ISP network, packets are forwarded according to the outer VLAN tag, while the inner VLAN tag is treated as part of the payload. When the packets get to the peer private network, the switch removes the outer VLAN tag of the packets and then forwards the packets to the corresponding VLAN according to the inner VLAN tag.
Here is a configuration example for VLAN VPN.
A company has two stations, and the computers belong to VLAN 100 and VLAN 200 respectively. The ISP VLAN is VLAN 1050 and VLAN 1060, and the TPID adopted by the ISP network is 0x9100.
The two stations need to communicate with each other through the ISP network. And it is required that the traffic from VLAN 100 should be transmitted in VLAN 1050, while the traffic from VLAN 200 should be transmitted in VLAN 1060.
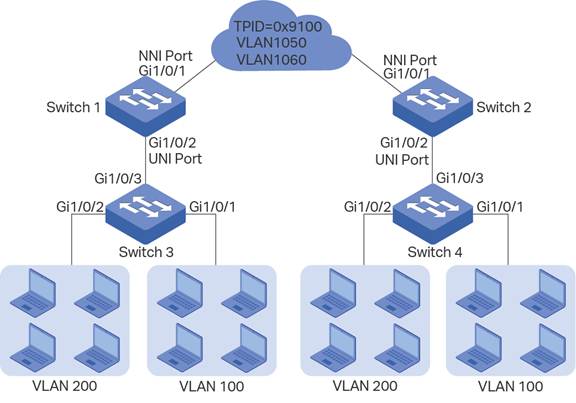
Configurations on Switch 1:
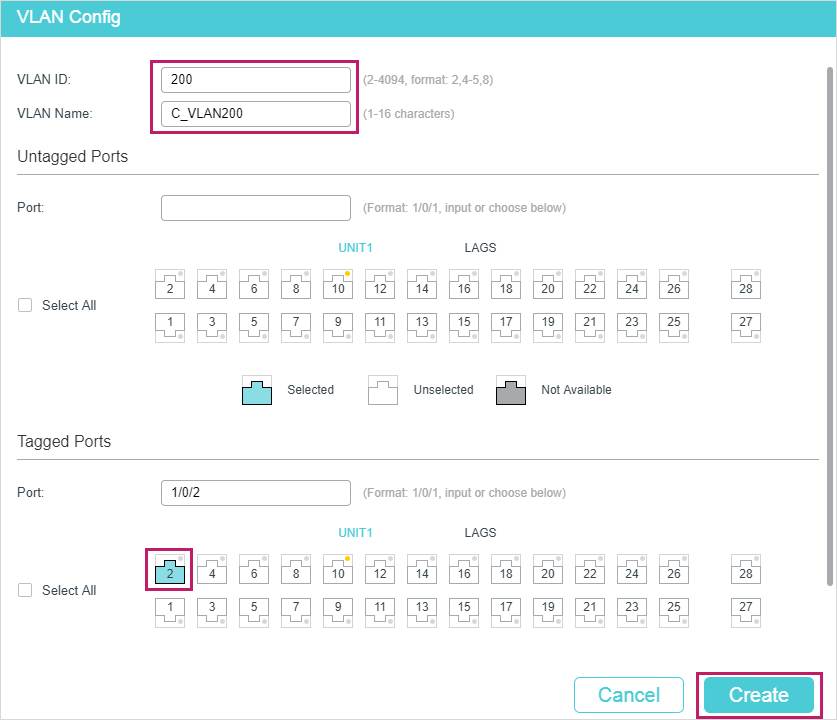
- Go to L2 FEATURES > VLAN > 802.1Q VLAN > VLAN Config to create VLAN 100 and VLAN 200 for the private network. Add the Tagged port 1/0/2 to VLAN 100 and VLAN 200.

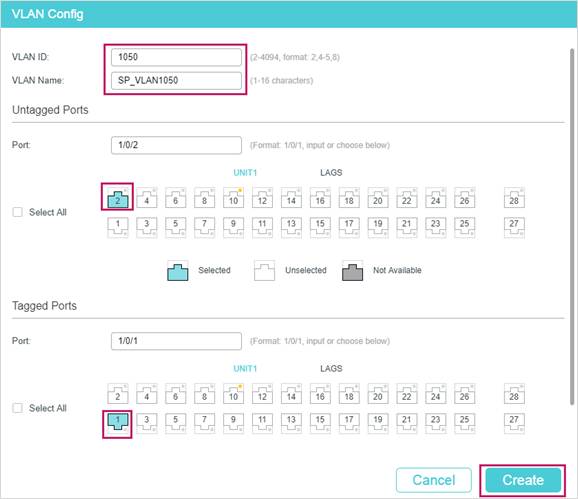
- Create VLAN 1050 and VLAN 1060 for the ISP network. Add the Tagged port 1/0/1 and Untagged port 1/0/2 to VLAN 1050 and VLAN 1060.

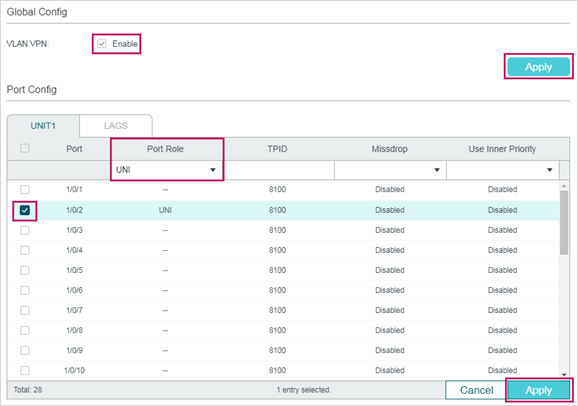
- Go to L2 FEATURES > VLAN > VLAN VPN > VPN Config, enable VLAN VPN globally, set port 1/0/1 as the NNI port and port /1/0/2 as UNI port. Specify the TPID of port 1/0/1 as 9100.

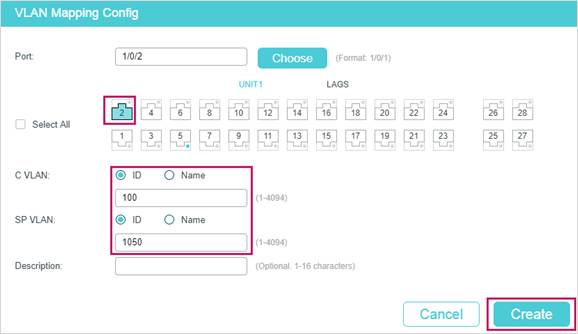
- Go to L2 FEATURES > VLAN > VLAN VPN > VLAN Mapping, enable VLAN Mapping globally. Then configure VLAN mapping for the UNI port 1/0/2.


Configurations on Switch 3:
- Go to L2 FEATURES > VLAN > 802.1Q VLAN > VLAN Config to create VLAN 100 and VLAN 200 for the private network. Add the Untagged port 1/0/1 and Tagged port 1/0/3 to VLAN 100; add the Untagged port 1/0/2 and Tagged port 1/0/3 to VLAN 200.


- Go to L2 FEATURES > VLAN > 802.1Q VLAN > Port Config to set the PVID of port 1/0/1 as 100 and the PVID of port 1/0/2 to 200.

Configurations on Switch 2 and Switch 4:
The configurations on switch 2 are the same as that on switch 1, and the configurations on switch 4 are the same as that on switch 3.
¿Es útil esta pregunta frecuente?
Sus comentarios nos ayudan a mejorar este sitio.
