


How to configure OpenSSH 7.0(and above) to login smart and managed switches?
SSH is a security protocol for network communication. It is an encrypted shell which provides a secure tunnel for different kinds of network protocols such as telnet, ftp, pop, etc.
When we use OpenSSH client on Linux to login switch, sometimes it will turns out an error info as shown below:

This is because OpenSSH 7.0 (and above) disable the algorithm by default that our switches are applying. We need to enable the corresponding algorithm on OpenSSH client manually.
Generally speaking, OpenSSH client had been installed on Linux system by default. We can type in dpkg –L|grep ssh to check what version our OpenSSH client is. OpenSSH client version on this system is 7.2.

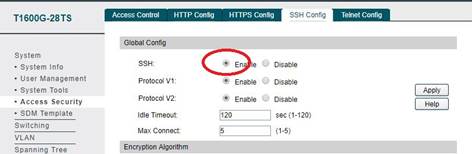
Let’s start from the beginning and take T1600G-28TS( IP address 192.168.1.52) as an example. We are aimed to login switch via OpenSSH client with Ubuntu 1604. Before everything, we should enable SSH by WebUI (you can also use telnet). Go to System--->Access Security--->SSH Config, Enable SSH. Click Apply.
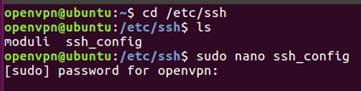
Because here our OpenSSH client version is 7.2, we need to modify configuration file of OpenSSH client under this condition. Turn to /etc/ssh floder On Ubuntu. We open ssh_config via nano. After entering sudo nano ssh_config, we need type system login password. Here is root.
cd /etc/ssh
sudo nano ssh_config
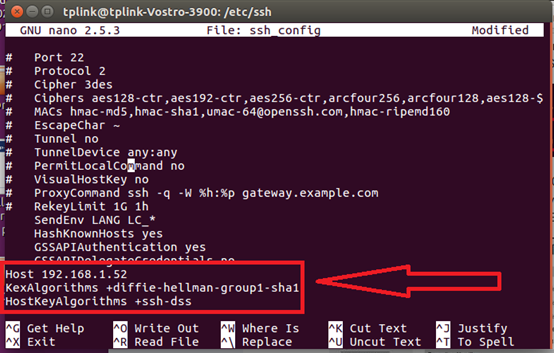
Add
Host 192.168.1.52
KexAlgorithms +diffie-hellman-group1-sha1
HostKeyAlgorithms +ssh-dss
to the bottom of ssh_config as picture below. This step we enable the corresponding algorithms for 192.168.1.52. Then press Ctrl+O to save. Ctrl+X to exit.
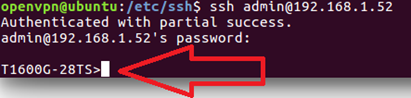
Now let’s try to login. Type command ssh admin@192.168.1.52, then enter defdult password admin. We login successfully!
¿Es útil esta pregunta frecuente?
Sus comentarios nos ayudan a mejorar este sitio.

3.0_overview_normal_1599720750009t.png)