


How to setup site-to-site PPTP VPN on TP-Link Router
Site-to-Site PPTP VPN connection is established between two VPN routers.To setup Site-to-Site PPTP VPN on TL-LINK Routers, please follow the instructions below.
- Verify the settings needed for PPTP VPN on Router
- Configuring a PPTP Server on TP-Link router(Router A)
- Configuring a PPTP Client on TP-Link router(Router B)
Verify the settings need for PPTP VPN on Router
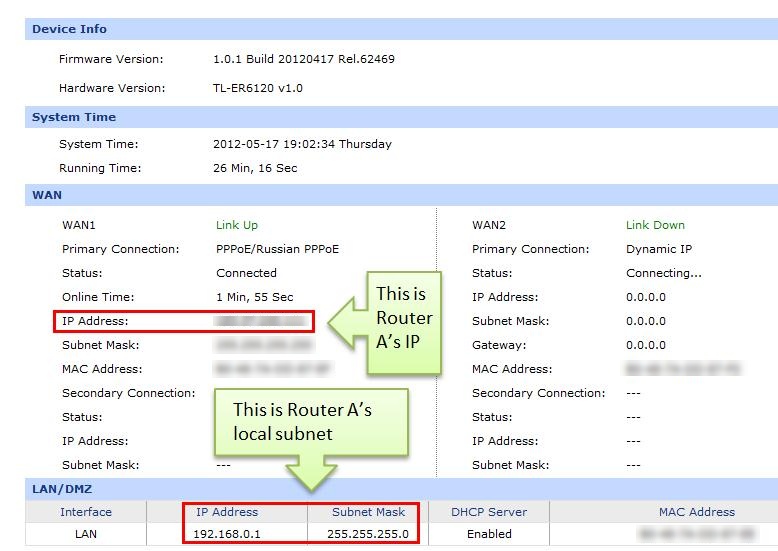
Router A’s Status Page:
Router B’s Status Page:

Configuring a PPTP Server on TP-Link router
Step 1 : Access Router A’s management page, click on VPN->L2TP/PPTP->IP Address Pool, enter Pool Name and IP Address Range, and then click on Add.
.jpg)
NOTE: IP Address pool must be different range from LAN IP address range.
Step 2 : Go to L2TP/PPTP Tunnel, look for protocol, select PPTP; the Mode should be Server.
.jpg)
Step 3 : Enter Account Name and Password whatever you like, here we use “pptp” as account name, password is “pptp”.
Step 4 : Under Tunnel, select LAN-to-LAN.
Step 5 : Under IP Address Pool, select “VPN” we have added before.
Step 6 : Under Remote Subnet, enter Router B’s local subnet, we enter “192.168.1.0/24” in this example.
Step 7 : Look for Status, select Active.
Step 8 : Click on Add and then click on Save.
Configuring a PPTP client on TP-Link Router
Step 1 : Access Router B’s management page, go to L2TP/PPTP Tunnel, look for protocol, select PPTP; the Mode should be Client.
Step 2 : Enter “pptp” as Account Name and “pptp” as Password.
.jpg)
Step 3 : Under Server IP, enter Router A’s IP address, which is 183.37.240.111.
Step 4 : Under Remote Subnet, enter Router A’s local subnet, we enter “192.168.0.0/24” in this example.
Step 5 : Look for Status, select Active.
Step 6 : Click on Add and then click on Save.
Step 7: If the PPTP tunnel is established successfully, you can check it on List of Tunnel.
.jpg)
Also, PC within the local subnet of Router B, can ping Router A’s LAN IP (192.168.0.1).
.jpg)
Is this faq useful?
Your feedback helps improve this site.
TP-Link Community
Still need help? Search for answers, ask questions, and get help from TP-Link experts and other users around the world.