


How to Restrict a Specific Group of Clients from Accessing URLs
The URL is the acronym of Uniform Resource Locator, it represents a standard location of Internet resource, defined in RFC1738. The URL consists of scheme and IP address/server name, scheme decides what protocol we use to get the resource; IP address/server name means where the resource located on the Internet, when we surf the Internet, we use numerous of URL to get what we want from the Internet, e.g. we use http://google.com to get google resource, via http protocol; we use https://amazon.com to establish a secured SSL link with amazon, via https protocol. That’s the most common way how we surf the Internet.
Sometimes as network administrator or parent, you may have the need to restrict some clients (usually are defined into a group) behind the router from visiting specific URL, define the URL that could be access some other ones that should be filtered, make flexible and easy control scheme.
The TP-Link Safestream Routers offer a URL filter feature that helps you to achieve your goal by just several steps on the web-gui. It could help to filter http websites by keywords or URL. Let’s learn how to set up this feature step by step.
In this example, we assume that we need to restrict a client named solidsnake from accessing any Internet resources related to tp-link, here we go with a TL-ER6120:
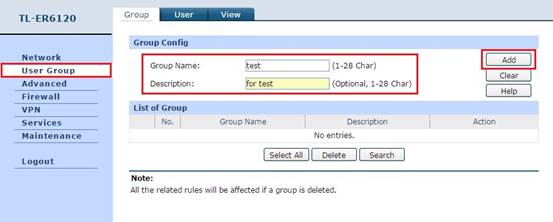
Step 1. We need to create user group first (even there is only one restricted user ), the member of the group could be one or more, all this members within a group would has the same authority in URL access. First select User Group in the main menu, then create a group with its name and description (optional), click Add to continue.
In this case, we create an example group named test:
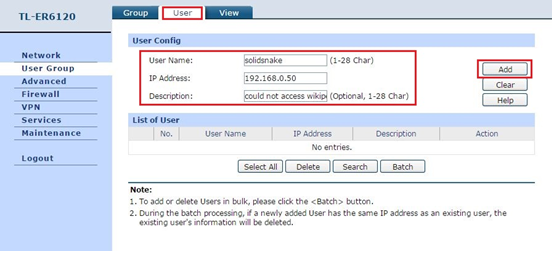
Step 2. After creating a group, next we need to create user. The user here represents specific IP address, one user equals to one client. Changing the sheet from Group to User, the creating way is the same as creating a group, don’t forget the Add button.
In this case, we assume the IP address of solidsnake is 192.168.0.50:
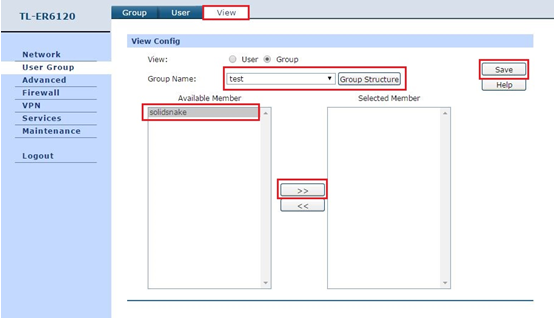
Step 3. When we have finished creating both group and user, we need to put the user into specific group, make sure a group could include one or several members, we click the View sheet, then we could see it could be selected User or Group in the View selection. When you choose Group, you could find the below box showing Available Member and Selected Member, click the >> button to put selected user into current group; when you choose User, you could find the below box showing Available Group and Selected Group, you could also click the >> button to make selected group include the current user:
Step 4. Until now we have finished creating a group including one user, now it’s time to configure the URL filter. Go to FirewallàAccess Controlà URL filtering.

Step 5. In the URL Filtering, first we should check the Enable URL Filtering, then select Permit URL listed below and deny the rest or Deny URL listed below and permit the rest. When Permit URL listed below and deny the rest was selected, only the rules in the list will take effect, any other clients not within the Permit list would be totally blocked; when Deny URL listed below and permit the rest was selected, the filtering will only take effect on the rules you set. The mode keywords and URL Path is easy to understand: you could define keywords for URL filtering, or a complete URL Path.
In this case, we set Deny rule, keywords as tp-link, the chosen group is test. Click on Add button.
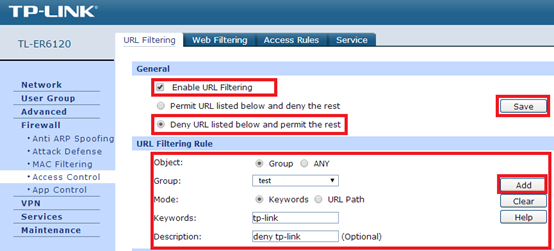
Finally we have succeeded to make a filtering rule that the user solidsnake could not visit any URL which including the keyword tp-link, other clients in the network would not be influenced.
Note:
- URL Filtering would be invalid for https website.
- This article is applied to URL filtering for specific user group, if you suppose to make rule for all hosts in the network, on the Step 5 you should choose “Any” in the “Object” selection.
- When you set the “Permit URL listed below and deny the rest” for specific group, other clients would totally lose the access to any URL because that they are not in the “Permit” list, this is very important.
Looking For More
Is this faq useful?
Your feedback helps improve this site.


TP-Link Community
Still need help? Search for answers, ask questions, and get help from TP-Link experts and other users around the world.