


How to configure Multiple SSIDs with Multiple Subnets on CAP&AC products
Apply to: CAP products
In enterprise network, we usually need to divide the network into different VLANs to isolate broadcast domain. The enterprise network is usually divided by different apartments, such as R&D, Marketing, and Product, etc. While nowadays since the wireless devices (like smartphone and laptop, etc.) are being used more and more frequently in the office environment, the IT department has to configure each VLAN with the different wireless network (SSID) to meet these office needs. In this document, we will give a simple step-by-step guide to this kind of configuration based on TP-Link SMB router/switch and CAP/AC solution.
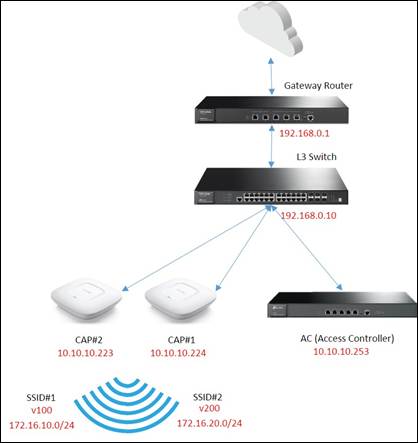
Topology:
Step1. Configure Multi-Nets NAT and Static Route on the Gateway Router
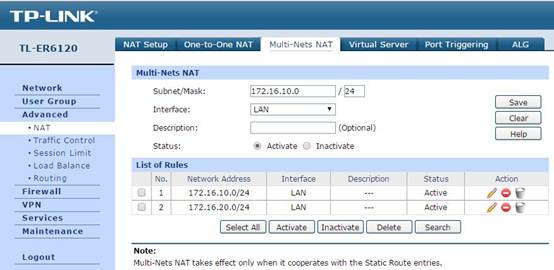
(1)Multi-Nets NAT Configuration:
Since there are multiple subnets requiring NAT service, the gateway which works as a NAT device needs to support Multi-Nets NAT. In gateway router’s Web UI, you can configure it in Advanced -> NAT -> Multi-Nets NAT as the figure shows below.
Configure the IP and subnet mask of each subnet, and each item works for one subnet. Leave Interface as LAN.
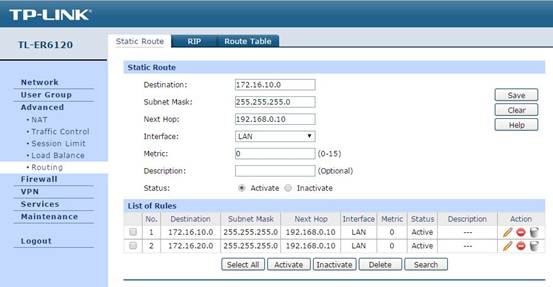
(2)Static Route configuration
In Advanced -> Routing -> Static Route, you can configure the static route items, the static route configuration helps the data packet from WAN find the next hop, the L3 switch. So in this part, the Destination is the subnet’s network address, and Next Hop is the switch’s IP, and Interface is still LAN.
Now the configuration on the gateway router is done, next we will configure the switch.
Step2. Configure VLAN and Port Attribute on Switch
(1)Port Attribute Configuration:
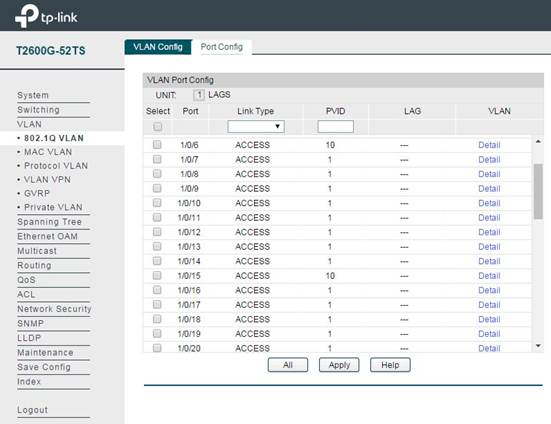
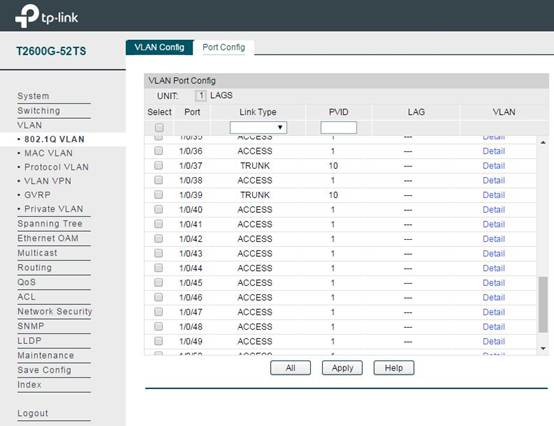
In VLAN -> 802.1q VLAN -> Port Config, set the ports connected to CAP as Trunk mode (Port 1/0/37 and 1/0/39 in this topology). The port in Trunk mode can transmit data packets with different VLAN tags. Other ports remain as Access mode.
(2)VLAN Configuration:
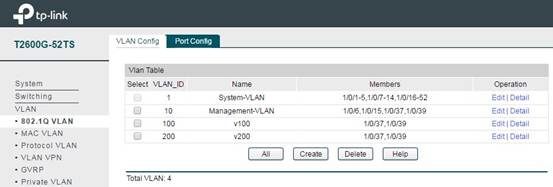
In VLAN -> 802.1q VLAN -> VLAN Config, add VLAN items. You need to add the ports connecting switch and CAP to the VLAN associated with the SSID of CAP. Here we take VLAN100 and VLAN200 as examples, the member ports of VLAN100 and VLAN200 are 1/0/37 and 1/0/39.
For Management VLAN (if you need Management VLAN in your network), here we take VLAN10 as an example, add port of AC (1/0/15), ports of CAP (1/0/37,1/0/39) and a port for manage PC (1/0/6) into VLAN10, and then set these ports PVID as 10. In this way we can make only the PC connected to the management port can access the AC and manage the wireless network.
Step3. Configure L3 Interface for VLAN and DHCP Server on Switch
(1)VLAN’s L3 Interface Configuration:
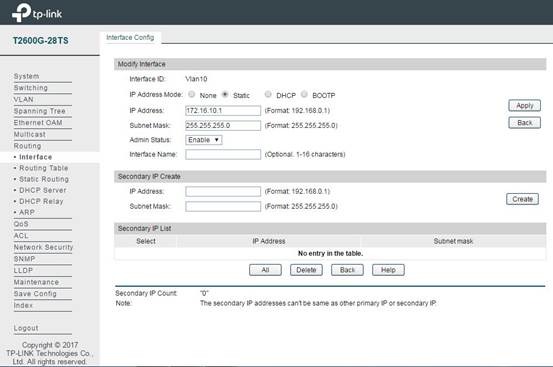
In Routing -> Interface -> Interface Config, add L3 interface for the VLAN configured in previous steps. IP Address Mode usually is selected as Static. In IP Address and Subnet Mask, you can configure the IP address and the network size.
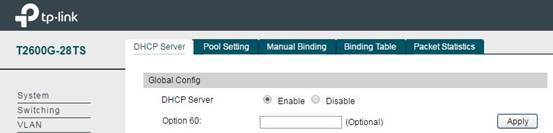
(2)DHCP Server Configuration for each subnet:
After configuring L3 interface for VLAN, we also need to set up DHCP Server for each subnet to assign IP for the wireless clients. In Routing -> DHCP Server -> Pool Setting, you can configure IP address pool for each subnet. Network Address and Subnet Mask indicate which subnet this pool works for and how large this pool is. Default Gateway is the gateway of this subnet, and DNS Server will give the DNS server for this subnet.
Note: The switch doesn’t support DNS proxy, so in the DNS server, you need to fill in the IP address of the gateway router or some public DNS Server address like 8.8.8.8.
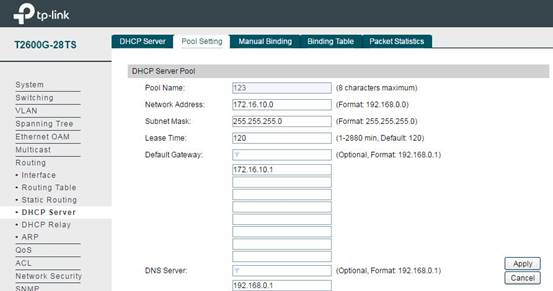
Note: The DHCP Server is Disable by default, so after configuring the DHCP address pool, please don’t forget to enable the DHCP Server. Or your wireless device connected to the SSID can’t obtain an IP address. The switch is as below:
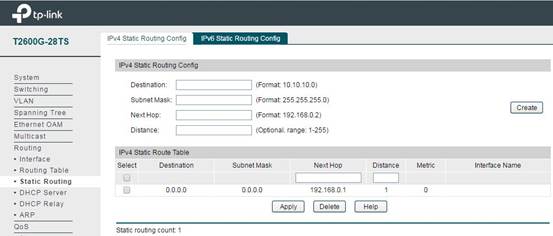
Step4. Static Route Item Configuration on Switch
In Routing -> Static Routing -> IPv4 Static Routing Config, you can add the static route items like the following figure shows. The purpose of this static route item is to make all the data packets to the switch forward to the gateway router successfully. So the Destination is 0.0.0.0, which means any data packets will be forwarded to 192.168.0.1 (the gateway router).
Then the configuration on the gateway router is also done, and next we will configure the AC.
Step5. Configure SSID Items and Bing to VLAN
First get the AC started up and manage all the CAPs successfully. Then in Wireless -> Wireless Service, you can add new SSID items.
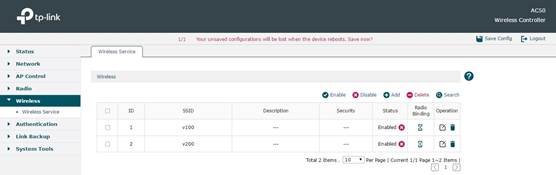
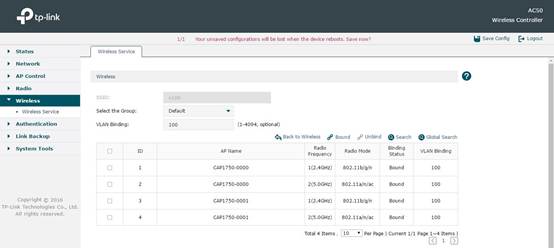
After adding SSID successfully, click Radio Binding to bind the SSID to a Radio. At the same time you can bind this SSID to a VLAN. In the following figure, for example, we bind SSID named”v100” to VLAN100.
Step5. Configure DHCP Server on AC and address segment
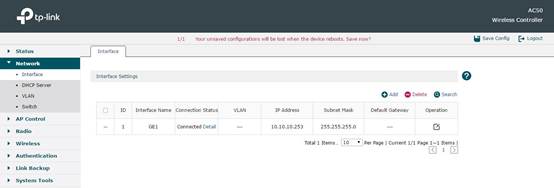
In Network -> Interface, you can configure the IP address in AC’s default interface and subnet mask. Here we take 10.10.10.253 as an example.
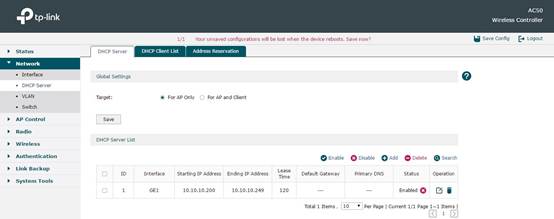
In Network -> DHCP Server, you can configure DHCP Server on AC. Here we configure and make AC only assign IP for CAP, so in Global Settings we choose For AP Only. In DHCP Server List, there is a default DHCP Server. Its network address segment will automatically change along with the IP change in default Interface configuration. So usually this part doesn’t need any other configuration.
Here we configure 2 SSIDs for example, SSID v100 and SSID v200. We use a wireless device to connect to these two SSIDs, and you will see the wireless device get an IP address like 172.16.10.3 (in SSID: v100) and 172.16.20.3 (in SSID: v200). So all devices can access to Internet normally. If we use the management port to open the AC’s Web management page, and in the Web UI we can see the AC has successfully managed the CAP with IP address in 10.10.10.0/24. Now we can say the settings have come into effect.
Is this faq useful?
Your feedback helps improve this site.
TP-Link Community
Still need help? Search for answers, ask questions, and get help from TP-Link experts and other users around the world.