


How to install CPE210 to extend Wi-Fi with Repeater mode
CPE devices, such as CPE210 and CPE510, are equipped with powerful directional antennas, and mainly designed for PtP or PtMP long-distance transmission. For an outdoor wireless network extension, we recommend Outdoor-AP series products, such as EAP225-Outdoor and EAP110-Outdoor. Working with the Omada controller, the strong performance and seamless roaming of the MESH network will provide you a much better experience. Please refer to this link for the Outdoor-AP products: https://www.tp-link.com/en/business-networking/omada-eap/#outdoor-ap.Nevertheless, we provide the following installation guide to choose a better location and have a better experience with CPE210 with the repeater mode.
Step 1. Determine the installation distance between CPE210 and the wireless router
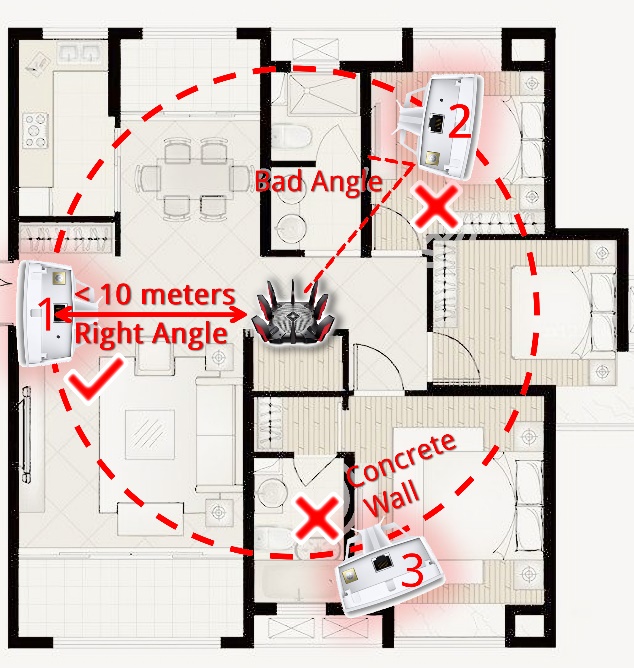
We recommend that please install CPE210 at a distance of no more than 10 meters from the wireless router. There should be no obstacles that seriously affect the wireless signal, such as concrete walls or ceilings. As for the wood walls or plasterboards, it should be no more than two layers.
In the below figure, CPE-1 has a distance less than 10 meters from the wireless router, this is a correct installation location. As for CPE-3, there are several concrete walls between it and the router, which will significantly influence the wireless signal, it is necessary to adjust the position of CPE-3.
Step 2. Determine the installation angle
Please install CPE210 vertically, and face the back of CPE210 directly to the wireless router.
Note: If the network performance is not good enough (How to determine the network performance, please refer to Step 4), you may slightly rotate CPE210 clockwise or counterclockwise, but no more than 20°, which means keeping the back of CPE210 basically facing the router. CPE-2 in the below figure has a big angle between its back and the router, which will strongly influence the signal transmission.
Step 3. Determine the installation height
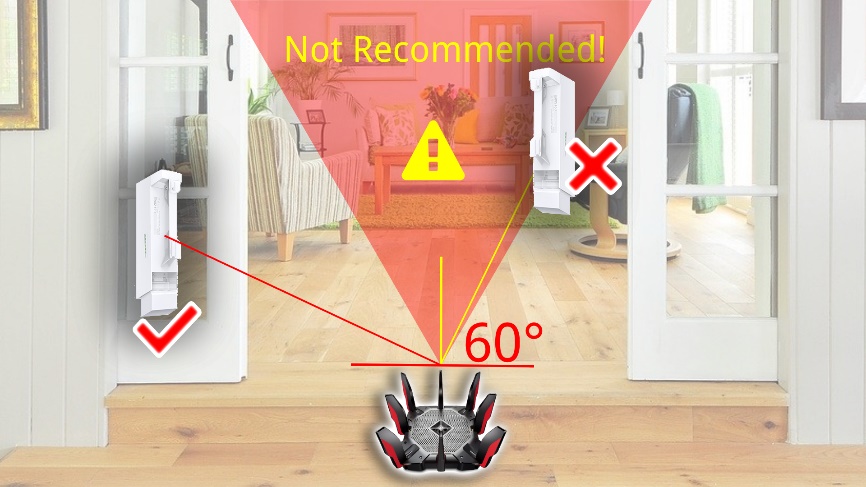
At last, in terms of height, there are no significant requirements for the installation, but it is still necessary to avoid the ceiling, as well as a steep position. Imagine that you connect the wireless router and CPE210 with a wooden board, if an ant try to climb from the wireless router to CPE210, it should not be too steep to climb, quantitatively speaking, the angle between the line of two devices and the ground should not exceed 60 degrees.
Step 4. Do a network performance test before installation
At the location planned to install CPE210, please connect your phone to the wireless router and check if you are satisfied with the network performance. We recommend testing with your frequently used APPs. For example, watch online videos on YouTube, or check the image loading speed on Twitter or Instagram, which all depends on your own network behavior. With this test, you will know the wireless environment and network performance of this location.
Note: The above recommendations are based on the antenna parameters and test results in a specific environment, which can meet most of the usage scenarios. However, the recommendations are impossible to adapt to all kinds of environments due to complexity. We do not assume legal responsibility for the above recommendations.
Is this faq useful?
Your feedback helps improve this site.

TP-Link Community
Still need help? Search for answers, ask questions, and get help from TP-Link experts and other users around the world.