Quick Start Guide (CPE and WBS)
CHAPTERS
1. Check the System Requirements
3. Set Up the Wireless Network
|
|
This guide applies to: CPE610(UN) 1.0, CPE520(UN) 3.0, CPE510(UN) 3.0, CPE210(UN) 3.0, CPE210(EU) 3.0, CPE220(UN) 3.0, CPE510(UN) 1.0, CPE510(UN) 2.0, CPE210(UN) 1.0, CPE210(UN) 2.0, CPE220(UN) 1.0, CPE220(UN) 2.0, CPE520(UN) 1.0, CPE520(UN) 2.0, WBS210(UN) 1.0, WBS210(UN) 2.0, WBS510(UN) 1.0, WBS510(UN) 2.0. |

This guide introduces how to build a wireless network using the CPE/WBS products:
1. Check the System Requirements
2. Log In to the Device
3. Set Up the Wireless Network
The following parts detailedly introduces these steps.
1Check the System Requirements
Operating System:
Microsoft Windows XP, Windows Vista, Windows 7, Windows 8, Windows 10, Linux, or Mac OS X.
Web Browser
Google Chrome, Safari, Firefox, and Apple Safari. IE browsers are not recommended.
Before configuring the device, you need to access the PharOS configuration interface. Follow the steps below:
1)Connect your PC to the device.
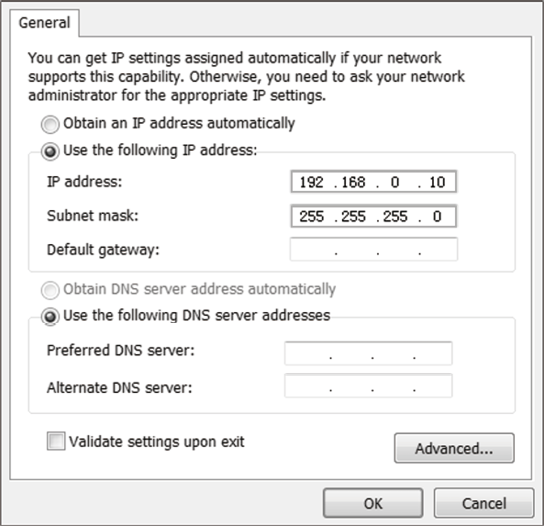
2)Set the IP address of your PC as static IP address on 192.168.0.X subnet (X ranges from 2 to 253, e.g.192.168.0.10)
Figure 2-1 Specifying the IP Address
3)Launch a web browser on and enter the management IP address of the device (192.168.0.254 by default) in the address bar to load the login page of the PharOS configuration interface.
Figure 2-2 Entering the Management IP Address

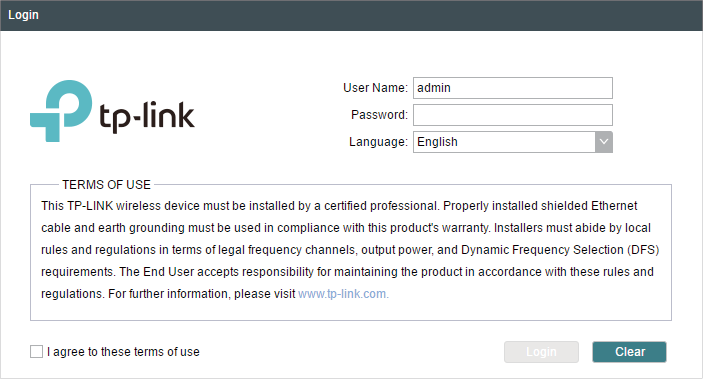
4)Use admin for both of User Name and Password. Select the appropriate language from the Language drop-down list. Read and agree the terms of use, then click Login.
Figure 2-3 Loging In
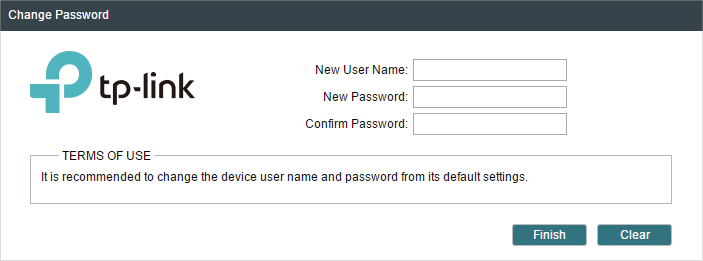
5)Create a new username and password for network security. Click Finish to log in to the PharOS.
Figure 2-4 Creating a New Account
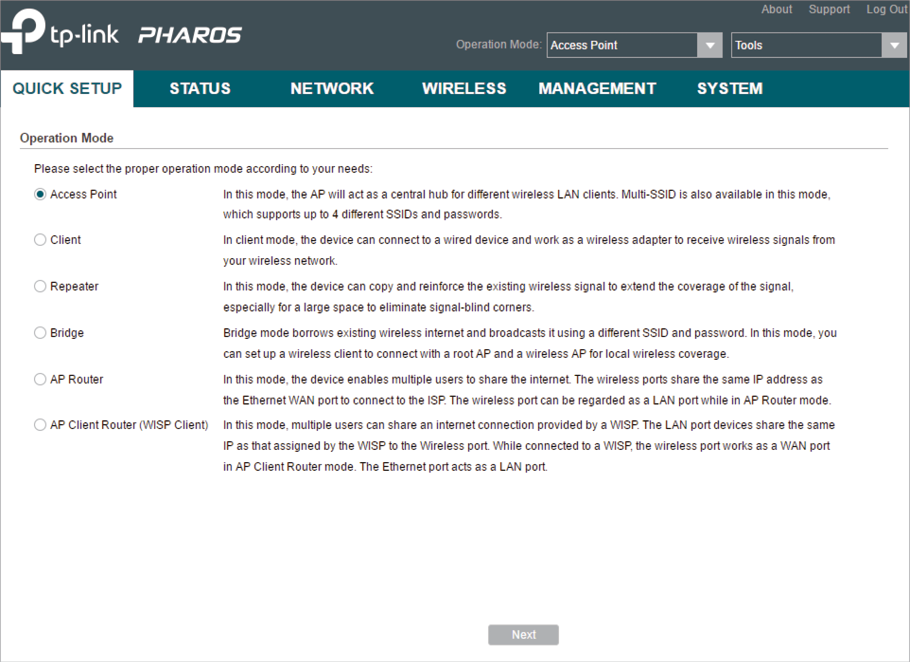
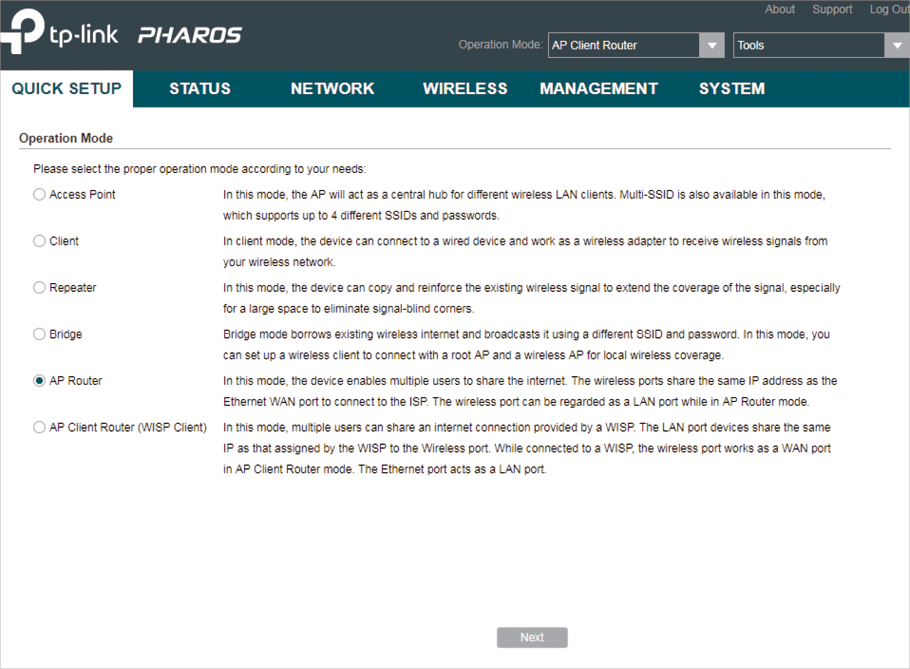
You can use the Quick Setup wizard to quickly configure your device step by step. Choose the suitable operation mode according to your network environment and follow the step-by-step instructions.
3.1Access Point
Follow the steps below to configure the device as Access Point mode:
1)Go to the QUICK SETUP page, select Access Point and click Next.
Figure 3-1 Selecting an Operation Mode
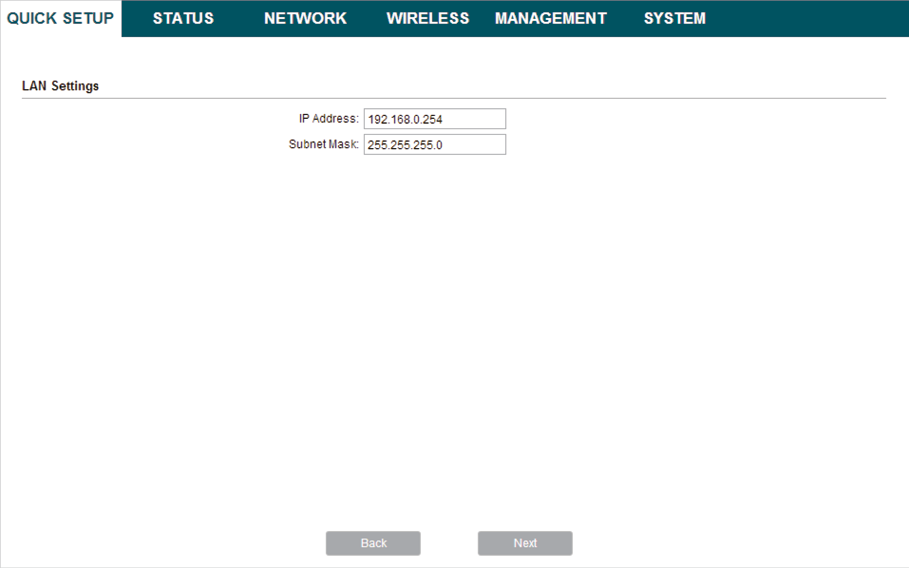
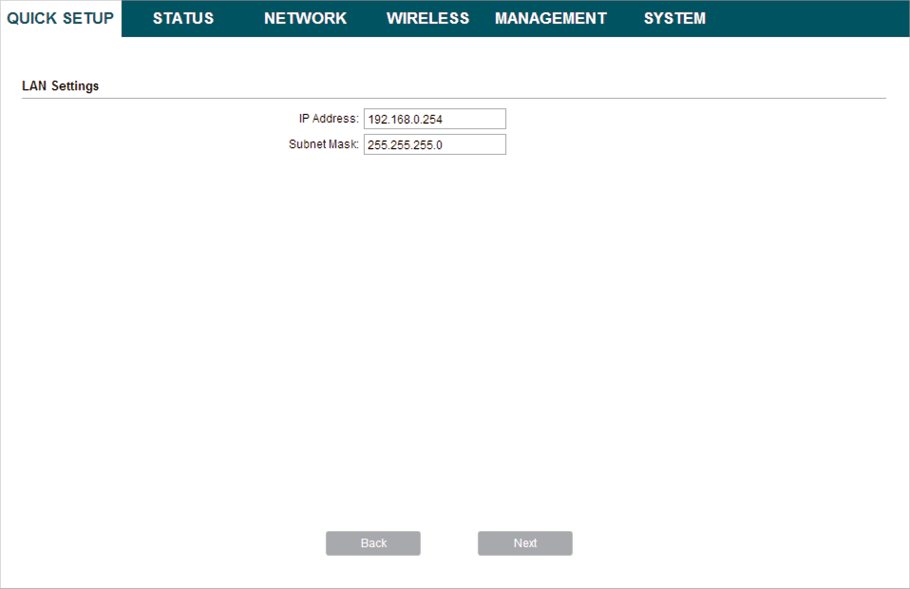
2)In the LAN Settings section, specify the LAN IP address and the Subnet Mask for the device. Then, click Next.
Figure 3-2 Specifying the LAN Settings
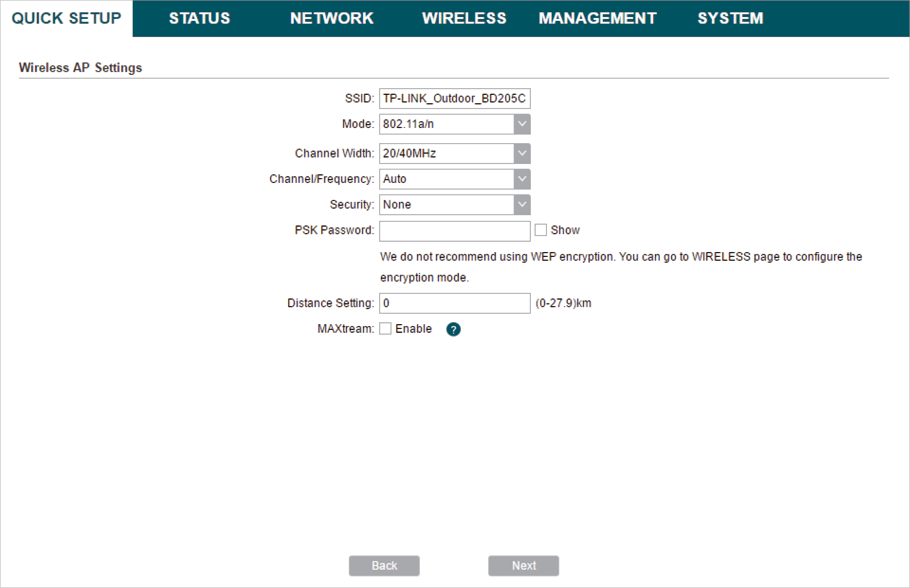
3)In the Wireless AP Settings section, specify the basic wireless parameters to create a wireless network. Click Next.
|
|
Note: It is recommended to specify Security as WPA-PSK/WPA2-PSK for the network security. You can keep the default settings or specify the parameters according to your need. For details, refer to Configure the Wireless Parameters. |

Figure 3-3 Specifying the Wireless AP Settings
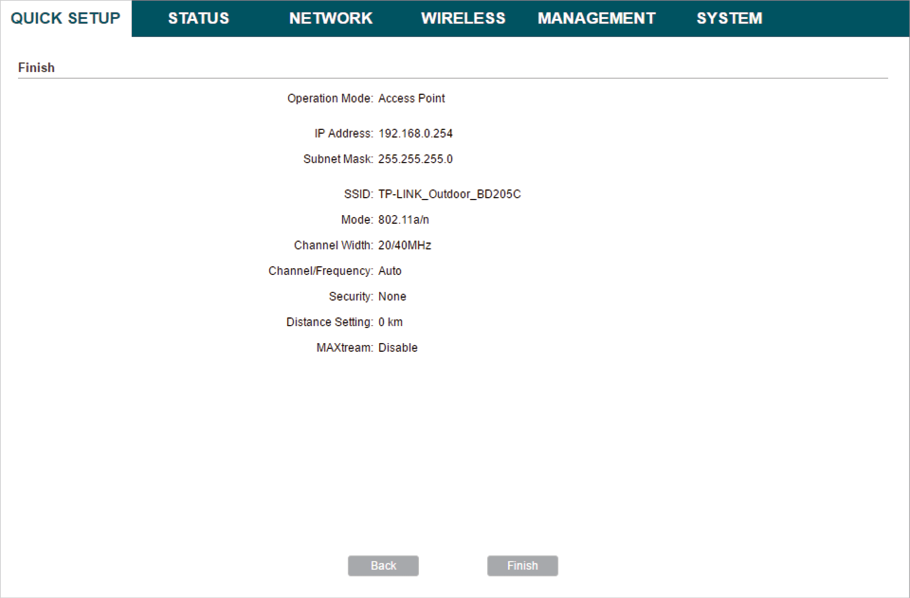
4)In the Finish section, review the configurations and click Finish to complete the quick setup.
Figure 3-4 Checking the Settings
5)Connect the device according to your network topology and use it normally.
3.2Client
Follow the steps below to configure the device as Client mode:
1)Go to the QUICK SETUP page, select Client and click Next.
Figure 3-5 Selecting an Operation Mode

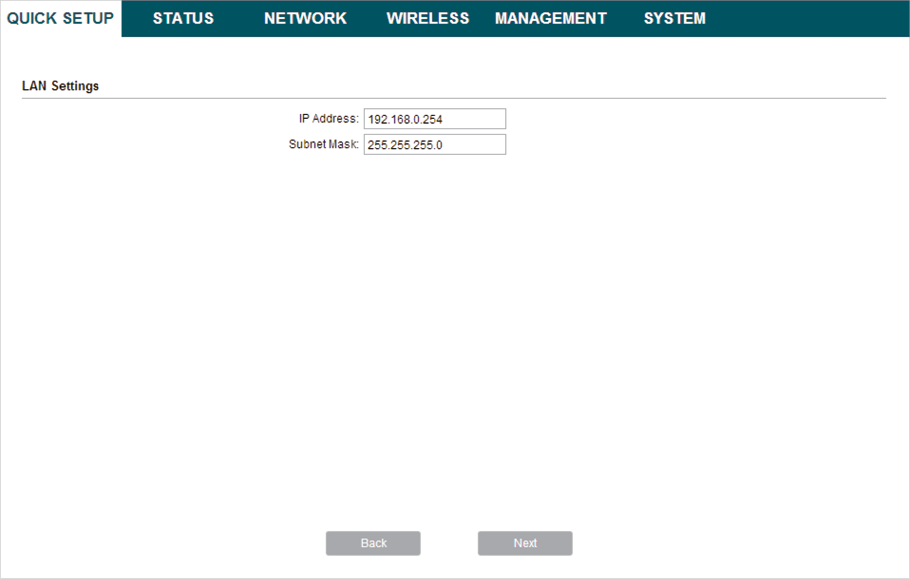
2)In the LAN Settings section, specify the LAN IP Address and the Subnet Mask for the device. Then, click Next.
Figure 3-6 Specifying the LAN Settings
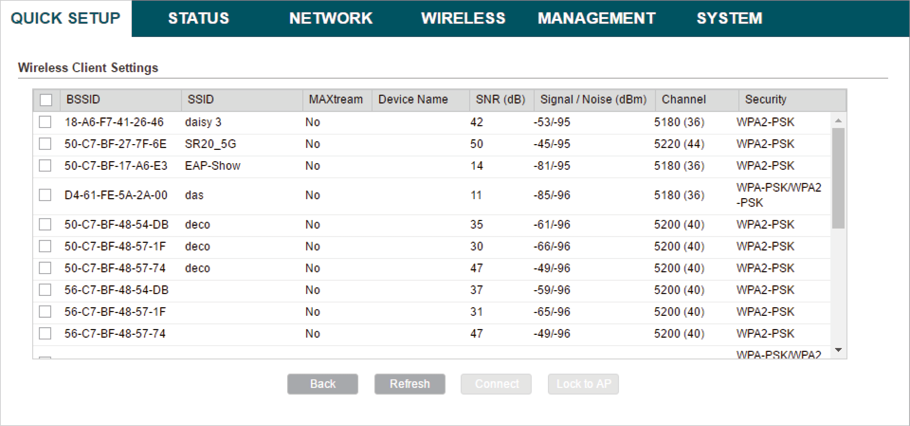
3)In the Wireless Client Settings section, click Survey to search for the upstream wireless network.
Figure 3-7 Searching for Upstream Wireless Networks

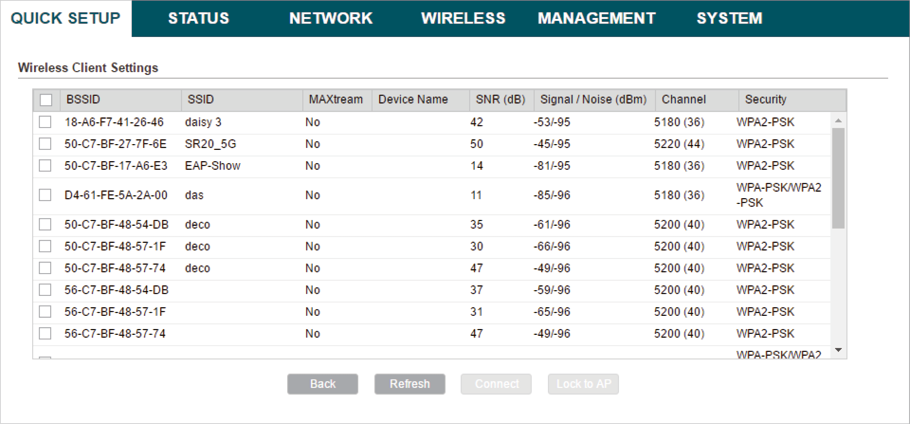
4)Select the desired wireless network and click Connect.
|
|
Note: There may be two or more networks with the same SSID in the AP list. Click Lock to AP to select the SSID and AP simultaneously, which can make the device connect to the specific AP next time. |
Figure 3-8 Selecting an Upstream Wireless Network
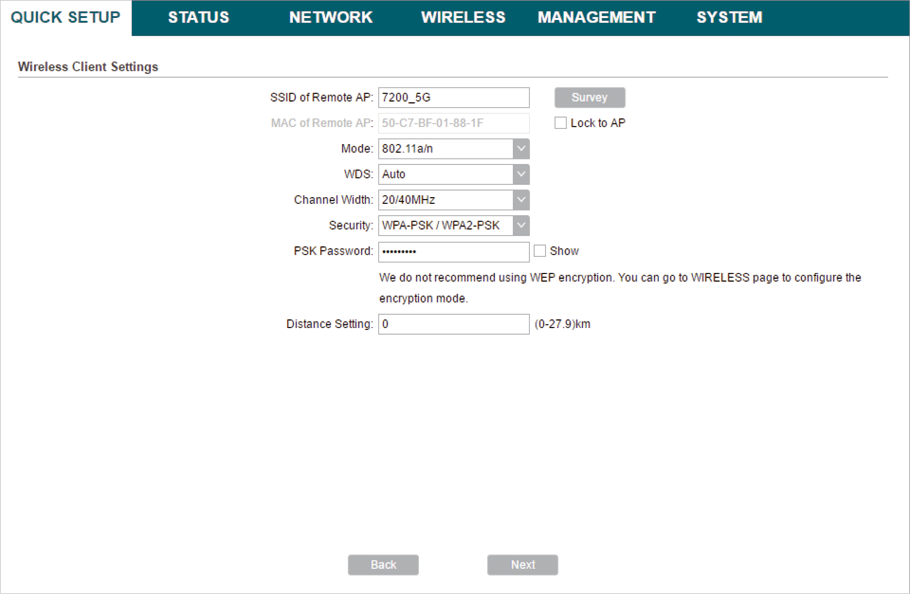
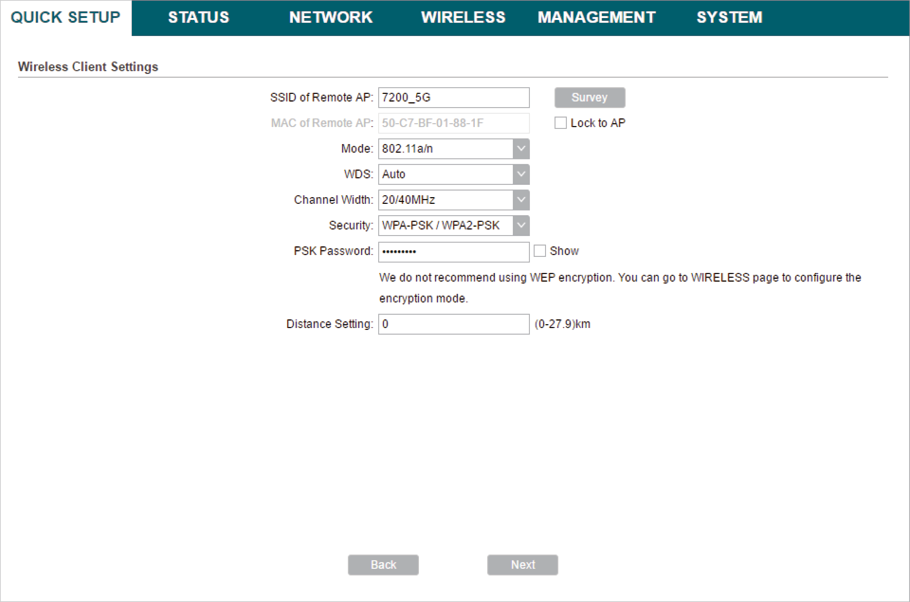
5)In the Wireless Client Settings section, specify the wireless parameters to connect to the specified wireless network. Click Next.
|
|
Note: Make sure that Security and PSK Password are the same as the upstream wireless network’s. Other parameters set in this page and those of the upstream wireless network should be compatible with each other. For details, refer to Configure the Wireless Parameters. |
Figure 3-9 Specifying the Wireless Client Settings
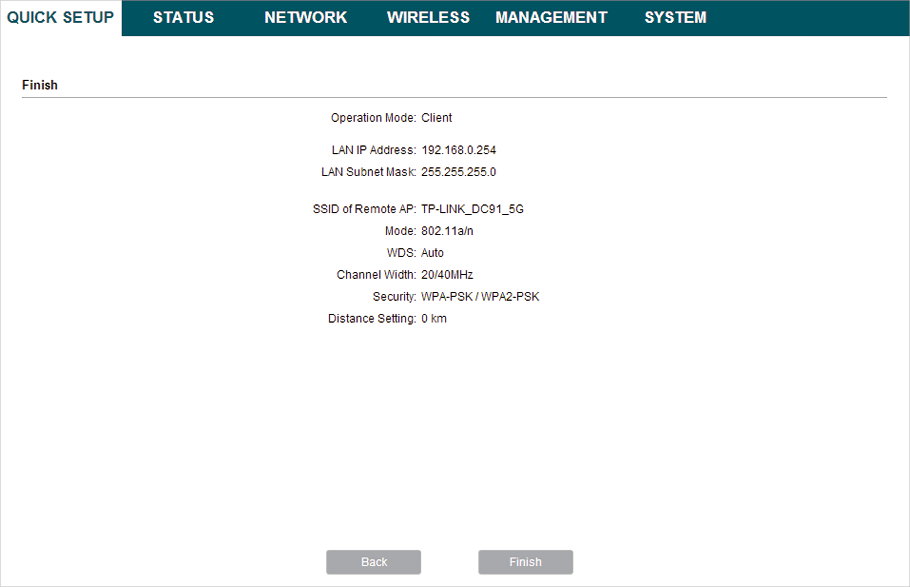
6)In the Finish section, review the configurations and click Finish to complete the quick setup.
Figure 3-10 Checking the Settings
7)Connect the device according to your network topology and use it normally.
3.3Repeater (Range Extender)
Follow the steps below to configure the device as Repeater (Range Extender) mode:
1)Go to the QUICK SETUP page, select Repeater and click Next.
Figure 3-11 Selecting an Operation Mode

2)In the LAN Settings section, specify the LAN IP address and the Subnet Mask for the device. Then, click Next.
Figure 3-12 Specifying the LAN Settings
3)In the Wireless Client Settings section, click Survey to search for the upstream wireless network.
Figure 3-13 Searching for Upstream Wireless Networks

4)Select the desired wireless network and click Connect.
|
|
Note: There may be two or more networks with the same SSID in the AP list. Click Lock to AP to select the SSID and AP simultaneously, which can make the device connect to the specific AP next time. |
Figure 3-14 Selecting an Upstream Wireless Network
5)In the Wireless Client Settings section, specify the wireless parameters to connect to the specified wireless network. Click Next.
|
|
Note: Make sure that Security and PSK Password are the same as the upstream wireless network’s. Other parameters set in this page and those of the upstream wireless network should be compatible with each other. For details, refer to Configure the Wireless Parameters. |
Figure 3-15 Specifying the Wireless Client Settings
6)In the Finish section, review the configurations and click Finish to complete the quick setup.
Figure 3-16 Checking the Settings

7)Connect the device according to your network topology and use it normally.
3.4Bridge
Follow the steps below to configure the device as Bridge mode:
1)Go to the QUICK SETUP page, select Bridge and click Next.
Figure 3-17 Selecting an Operation Mode

2)In the LAN Settings section, specify the LAN IP address and the Subnet Mask for the device. Then, click Next.
Figure 3-18 Specifying the LAN Settings

3)In the Wireless Client Settings section, click Survey to search for the upstream wireless network.
Figure 3-19 Searching for Upstream Wireless Networks

4)Select the desired wireless network and click Connect.
|
|
Note: There may be two or more networks with the same SSID in the AP list. Click Lock to AP to select the SSID and AP simultaneously, which can make the device connect to the specific AP next time. |
Figure 3-20 Selecting an Upstream Wireless Network
5)In the Wireless Client Settings section, specify the wireless parameters to connect to the specified wireless network. Click Next.
|
|
Note: Make sure that the Security and PSK Password are the same as the upstream wireless network’s. Other parameters set in this page and those of the upstream wireless network should be compatible with each other. For details, refer to Configure the Wireless Parameters. |
Figure 3-21 Specifying the Wireless Client Settings
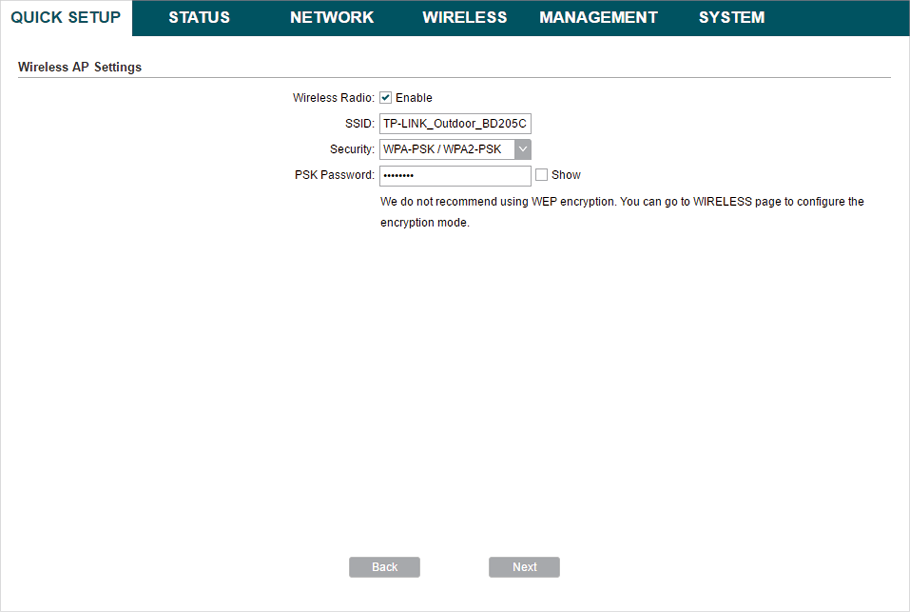
6)In the Wireless AP Settings section, specify the parameters to create a new wireless network for the downstream clients. Click Next.
Figure 3-22 Specifying the Wireless AP Settings
7)In the Finish section, review the configurations and click Finish to complete the quick setup.
Figure 3-23 Checking the Settings
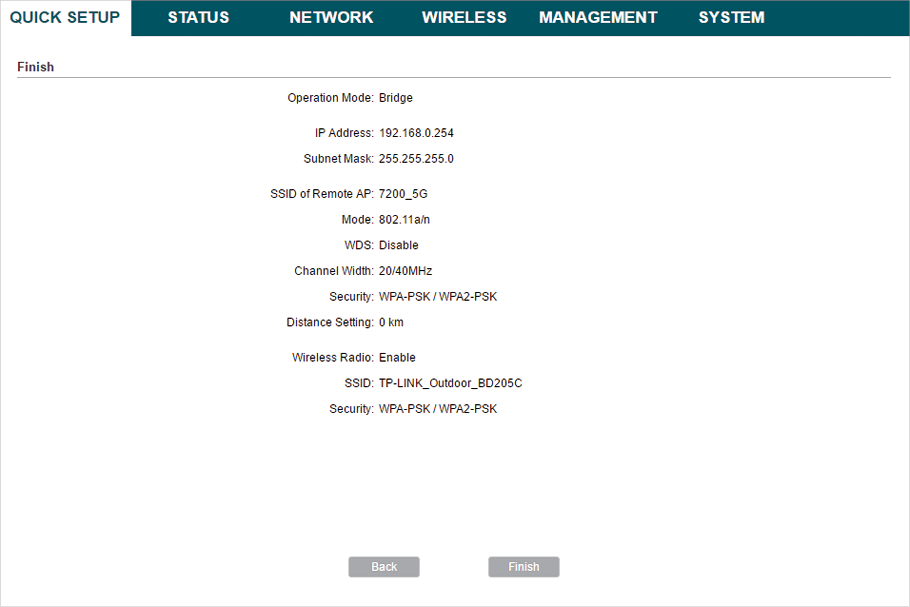
8)Connect the device according to your network topology and use it normally.
3.5AP Router
Follow the steps below to configure the device as AP Router mode:
1)Go to the QUICK SETUP page, select AP Router and click Next.
Figure 3-24 Selecting an Operation Mode
2)In the WAN Connection Type section, specify the connection type according to your need and click Next.
Figure 3-25 Specifying the WAN Connection Type
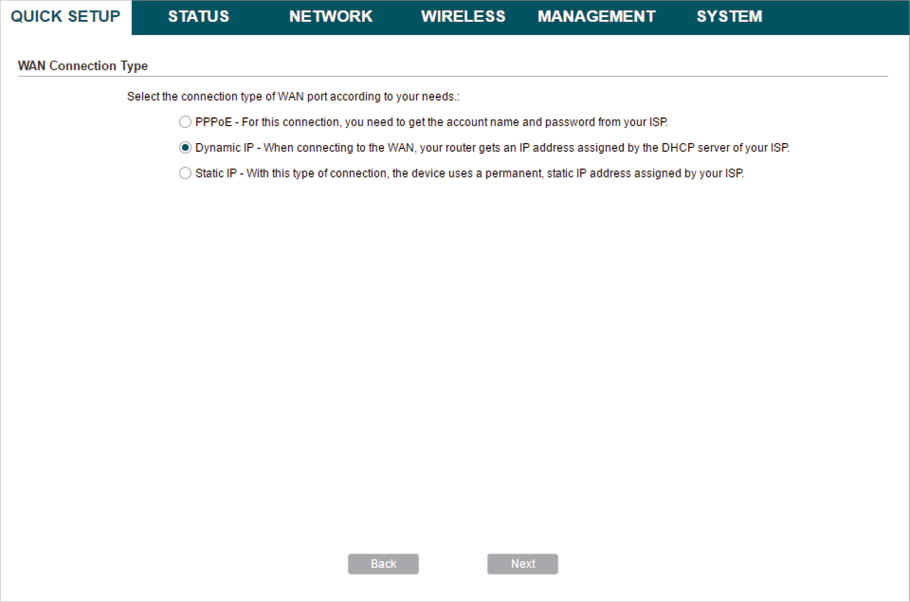
The device supports three types of the WAN connection, including PPPoE, Dynamic IP and Static IP. You can contact with your ISP to confirm your WAN connection type.
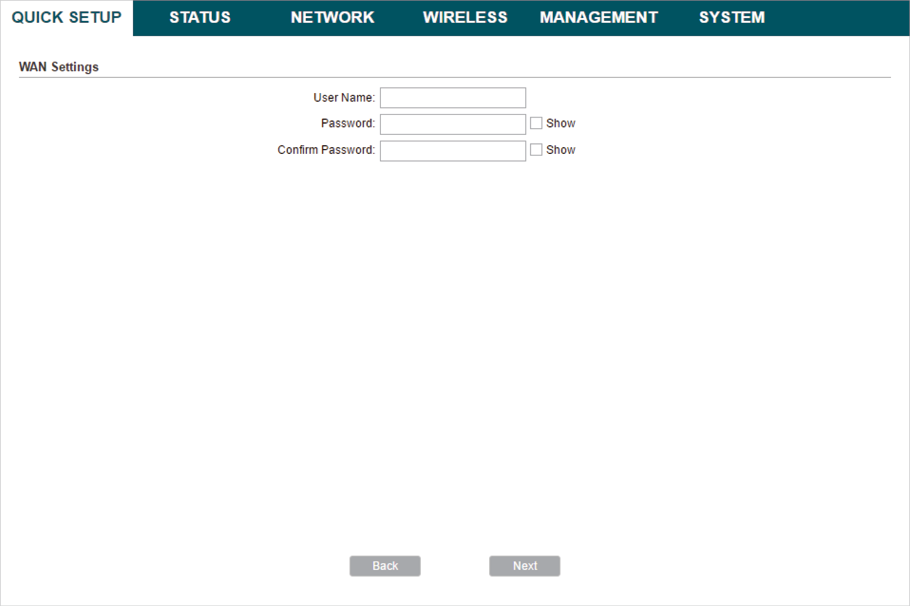
»PPPoE
Select PPPoE and click Next, then the following page will appear. In the WAN Settings section, specify the parameters that are provided by your ISP and click Next.
Figure 3-26 Specifying the WAN Settings
»Dynamic IP
Select Dynamic IP and click Next. In this type, the device will obtain a WAN connection automatically without any WAN configurations.
»Static IP
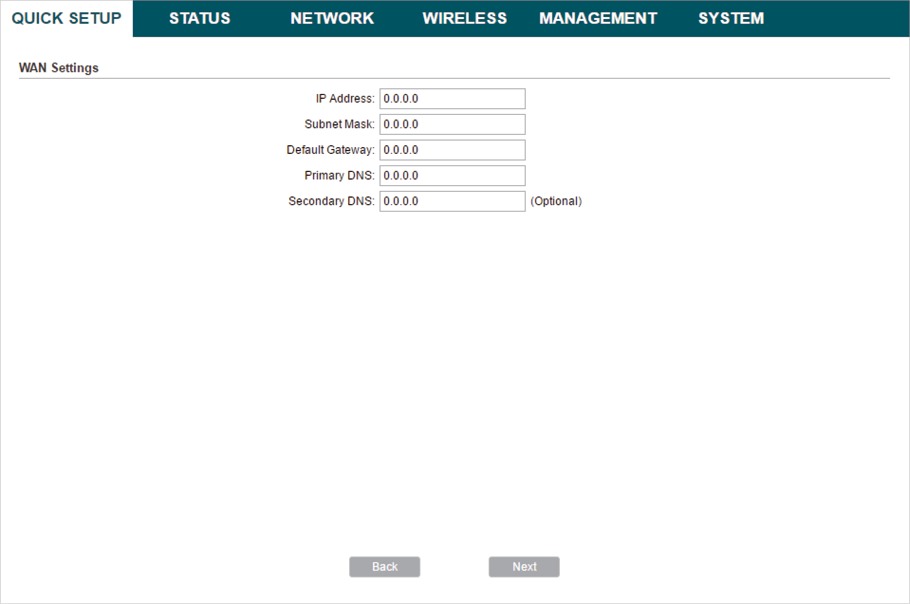
Select Static IP and click Next, then the following page will appear. In the WAN Settings section, specify the parameters that are provided by your ISP and click Next.
Figure 3-27 Specifying the WAN Settings
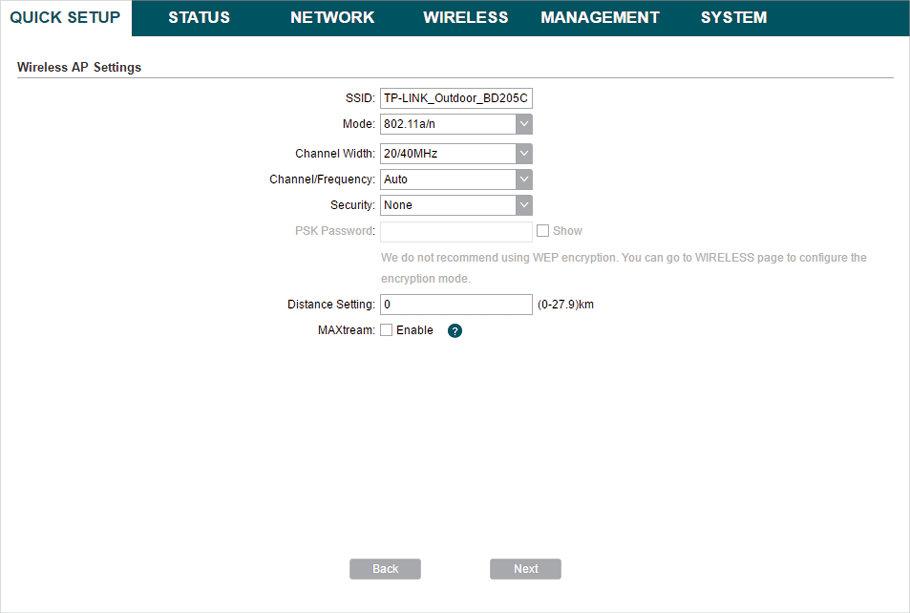
3)In the Wireless AP Settings section, specify the basic wireless parameters to create a wireless network. Click Next.
|
|
Note: It is recommended to specify Security as WPA-PSK/WPA2-PSK for the network security. You can keep the default settings or specify the parameters according to your need. For details, refer to Configure the Wireless Parameters. |
Figure 3-28 Specifying the Wireless AP Settings
4)In the Finish section, review the configurations and click Finish to complete the quick setup.
Figure 3-29 Checking the Settings

5)Connect the device according to your network topology and use it normally.
3.6AP Client Router (WISP Client)
Follow the steps below to configure the device as AP Client Router (WISP Client) mode:
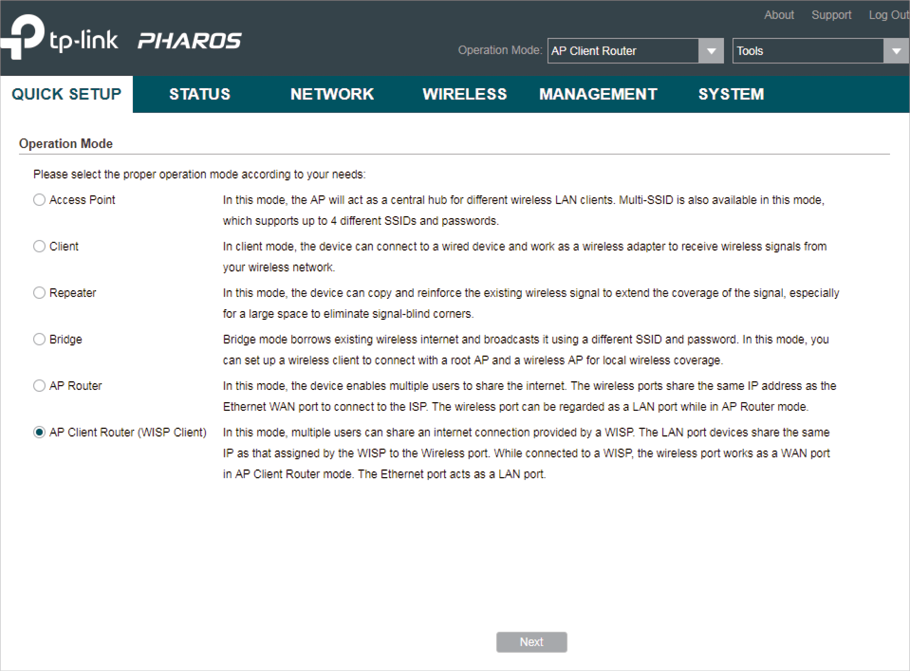
1)Go to the QUICK SETUP page, select AP Client Router (WISP Client) and click Next.
Figure 3-30 Selecting an Operation Mode
2)In the WAN Connection Type section, choose the connection type according to your need and click Next.
Figure 3-31 Specifying the WAN Connecting Type

The device supports types, PPPoE, Dynamic IP and Static IP for the WAN connection. You can contact with your ISP to confirm your WAN connection type.
»PPPoE
Select PPPoE and click Next, then the following page will appear. In the WAN Settings section, specify the parameters that are provided by your ISP and click Next.
Figure 3-32 Specifying the WAN Settings
»Dynamic IP
Select Dynamic IP and click Next. In this type, the device will obtain a WAN connection automatically without any WAN configurations.
»Static IP
Select Static IP and click Next, then the following page will appear. In the WAN Settings section, specify the parameters that are provided by your ISP and click Next.
Figure 3-33 Specifying the WAN Settings
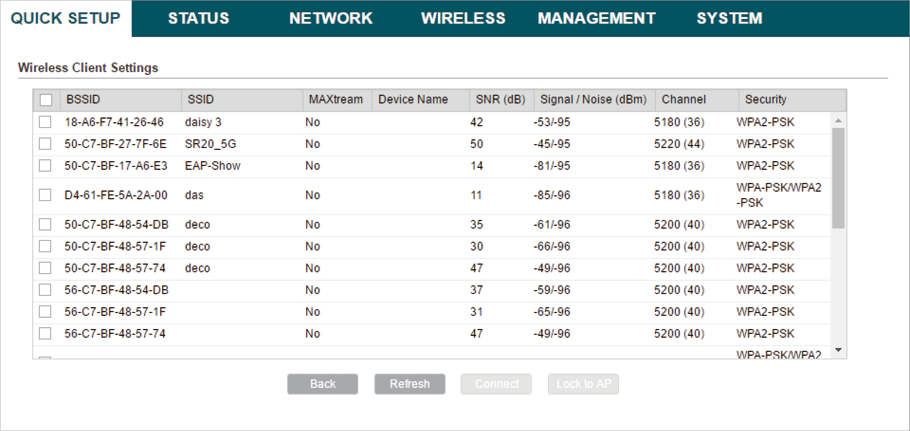
3)In the Wireless Client Settings section, click Survey to search for the upstream wireless network.
Figure 3-34 Searching for Upstream Wireless Networks
4)Select the desired wireless network and click Connect.
|
|
Note: There may be two or more networks with the same SSID in the AP list. Click Lock to AP to select the SSID and AP simultaneously, which can make the device connect to the specific AP next time. |
Figure 3-35 Selecting an Upstream Wireless Network
5)In the Wireless Client Settings section, specify the wireless parameters to connect to the specified wireless network. Click Next.
|
|
Note: Make sure that Security and PSK Password are the same as the upstream wireless network’s. Other parameters set in this page and those of the upstream wireless network should be compatible with each other. For details, refer to Configure the Wireless Parameters. |
Figure 3-36 Specifying the Wireless Client Settings
6)In the Wireless AP Settings section, specify the parameters to create a new wireless network for the downstream clients. Click Next.
Figure 3-37 Specifying the Wireless AP Settings
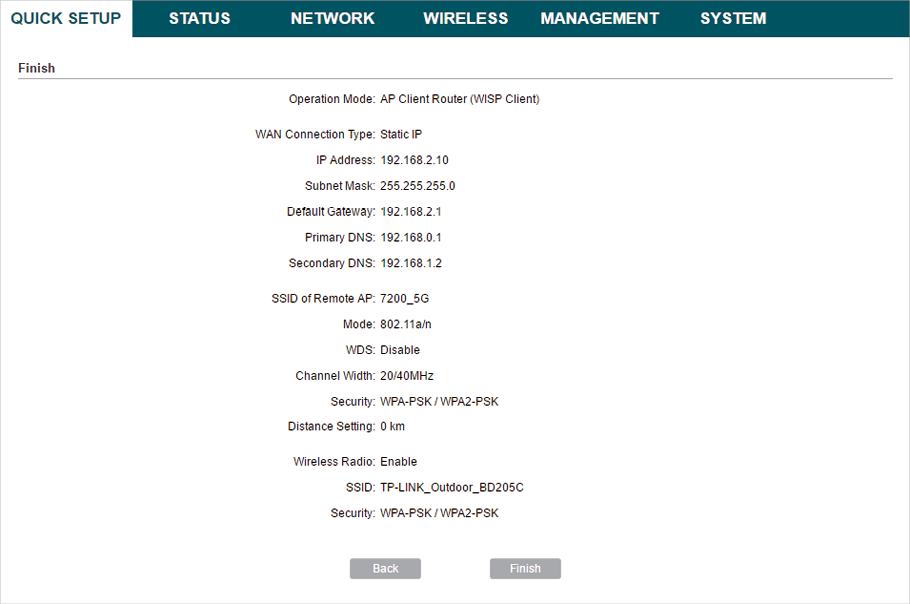
7)In the Finish section, review the configurations and click Finish to complete the quick setup.
Figure 3-38 Checking the Settings
8)Connect the device according to your network topology and use it normally.