Managing Services
CHAPTERS
4. Configuration Example for Dynamic DNS
|
|
This guide applies to: TL-R470T+ v6 or above, TL-R480T+ v9 or above, TL-600VPN v4 or above, TL-ER5120 v3 or above, TL-ER6020 v2 or above, TL-ER6120 v3 or above |

1.1Overview
The Services module incorporates two functions, Dynamic DNS (DDNS) and UPnP (Universal Plug and Play) to provide convenient network services.
1.2Support Features
Dynamic DNS
Nowadays, network protocols such as PPPoE and DHCP are widely employed by ISPs to assign public IP addresses to users. The use of these protocols can cause the user’s public IP address to change dynamically. DDNS is an internet service that ensures a fixed domain name can be used to access a network with a varying public IP address. This means the user’s network can be more easily accessed by internet hosts.
UPnP
With the development of networking and advanced computing techniques, greater numbers of devices feature in networks. UPnP is designed to solve the problem of communication between these network devices. UPnP function allows devices dynamically discover and communicate with each other without additional configurations. For example, it allows the download of P2P software without opening ports.
With Dynamic DNS configurations, you can:
Configure and view Peanuthull DDNS
Configure and view Comexe DDNS
Configure and view DynDNS
Configure and view NO-IP DDNS
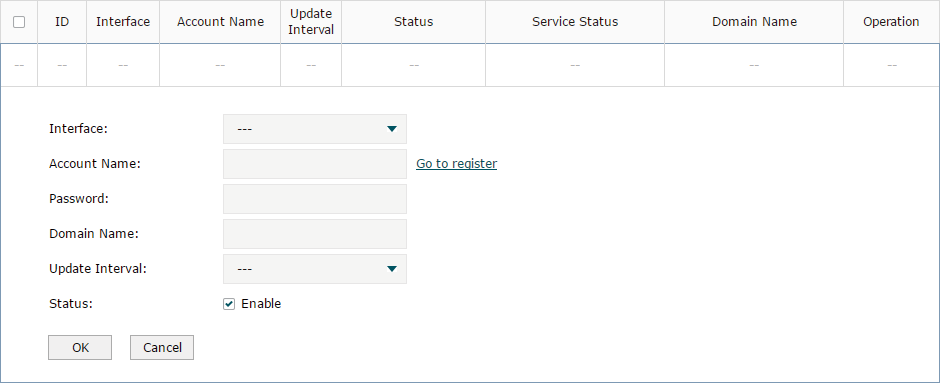
2.1Configure and View Peanuthull DDNS
Choose the menu Service > Dynamic DNS > Peanuthull and click Add to load the following page.
Figure 2-1 Configure Peanuthull DDNS
Follow these steps to configure Peanuthull DDNS.
1)Click Go to register to visit the official website of Peanuthull, register an account and a domain name.
2)Configure the following parameters and click OK.
|
Interface |
Select the interface for the DDNS service. |
|
Account Name |
Enter the account name of your DDNS account. You can click Go to register to visit the official website of Peanuthull to register an account. |
|
Password |
Enter the password of your DDNS account. |
|
Update Interval |
Specify the Update Interval that the device dynamically updates IP addresses for registered domain names. |
|
Status |
Check the box to enable the DDNS service. |
3)View the DDNS status.
Figure 2-2 View the Status of Peanuthull DDNS

|
Status |
Displays whether the corresponding DDNS service is enabled. |
|
Service Status |
Displays the current status of DDNS service. Offline: DDNS service is offline. Connecting: DDNS client is connecting to the server. Online: DDNS is working normally. Incorrect account name or password: The account name or password is incorrect. |
|
Domain Name |
Displays the Domain Names obtained from the DDNS server. |
|
Service Type |
Displays the DDNS service type, including Professional service and Standard service. |
2.2Configure and View Comexe DDNS
Choose the menu Service > Dynamic DNS > Comexe and click Add to load the following page.
Figure 2-3 Configure Comexe DDNS
Follow these steps to configure Comexe DDNS.
1)Click Go to register to visit the official website of Comexe, register an account and a domain name.
2)Configure the following parameters and click OK.
|
Interface |
Select the interface for the DDNS service. |
|
Account Name |
Enter the account name of your DDNS account. You can click Go to register to visit the official website of Comexe to register an account. |
|
Password |
Enter the password of your DDNS account. |
|
Update Interval |
Specify the Update Interval that the device dynamically updates IP addresses for registered domain names. |
|
Status |
Check the box to enable the DDNS service. |
3)View the DDNS status.
Figure 2-4 View the Status of Comexe DDNS

|
Status |
Displays whether the corresponding DDNS service is enabled. |
|
Service Status |
Displays the current status of DDNS service. Offline: DDNS service is offline. Connecting: DDNS client is connecting to the server. Online: DDNS is working normally. Incorrect account name or password: The account name or password is incorrect. |
|
Domain Name |
Displays the Domain Names obtained from the DDNS server. |
2.3Configure and View DynDNS
Choose the menu Service > Dynamic DNS > DynDNS and click Add to load the following page.
Figure 2-5 Configure DynDNS
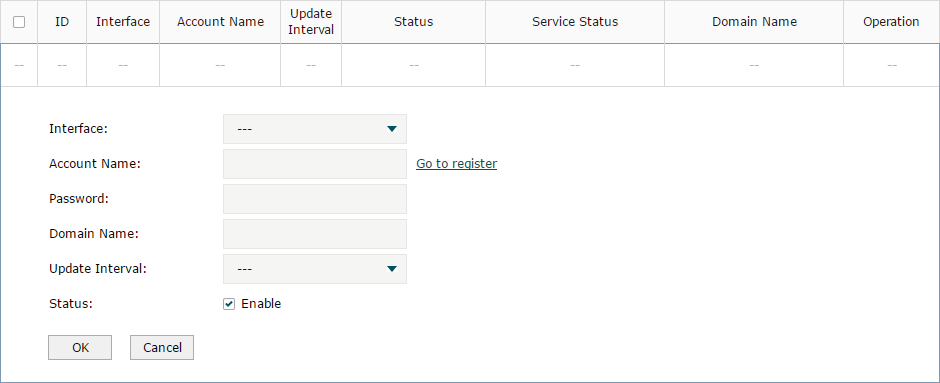
Follow these steps to configure DynDNS.
1)Click Go to register to visit the official website of DynDNS and register an account and a domain name.
2)Configure the following parameters and click OK.
|
Interface |
Select the interface for the DDNS service. |
|
Account Name |
Enter the account name of your DDNS account. You can click Go to register to visit the official website of DynDNS to register an account. |
|
Password |
Enter the password of your DDNS account. |
|
Domain Name |
Specify the domain name that you registered with your DDNS service provider. |
|
Update Interval |
Specify the Update Interval that the device dynamically updates IP addresses for registered domain names. |
|
Status |
Check the box to enable the DDNS service. |
3)View the DDNS status.
Figure 2-6 View the Status of DynDNS

|
Status |
Displays whether the corresponding DDNS service is enabled. |
|
Service Status |
Displays the current status of DDNS service. Offline: DDNS service is offline. Connecting: DDNS client is connecting to the server. Online: DDNS is working normally. Incorrect account name or password: The account name or password is incorrect. Incorrect domain name: The domain name is incorrect. |
|
Domain Name |
Displays the Domain Names obtained from the DDNS server. |
2.4Configure and View NO-IP DDNS
Choose the menu Service > Dynamic DNS > NO-IP and click Add to load the following page.
Figure 2-7 View NO-IP DDNS
Follow these steps to configure NO-IP DDNS.
1)Click Go to register to visit the official website of NO-IP and register an account and a domain name.
2)Configure the following parameters and click OK.
|
Interface |
Select the interface for the DDNS service. |
|
Account Name |
Enter the account name of your DDNS account. You can click Go to register to visit the official website of NO-IP to register an account. |
|
Password |
Enter the password of your DDNS account. |
|
Domain Name |
Specify the domain name that you registered with your DDNS service provider. |
|
Update Interval |
Specify the Update Interval that the device dynamically updates IP addresses for registered domain names. |
|
Status |
Check the box to enable the DDNS service. |
3)View the DDNS status.
Figure 2-8 View the Status of NO-IP DDNS

|
Status |
Displays whether the corresponding DDNS service is enabled. |
|
Service Status |
Displays the current status of DDNS service. Offline: DDNS service is offline. Connecting: DDNS client is connecting to the server. Online: DDNS is working normally. Incorrect account name or password: The account name or password is incorrect. Incorrect domain name: The domain name is incorrect. |
|
Domain Name |
Displays the Domain Names obtained from the DDNS server. |
Choose the menu Service > UPnP to load the following page.
Figure 3-1 Configure UPnP Function
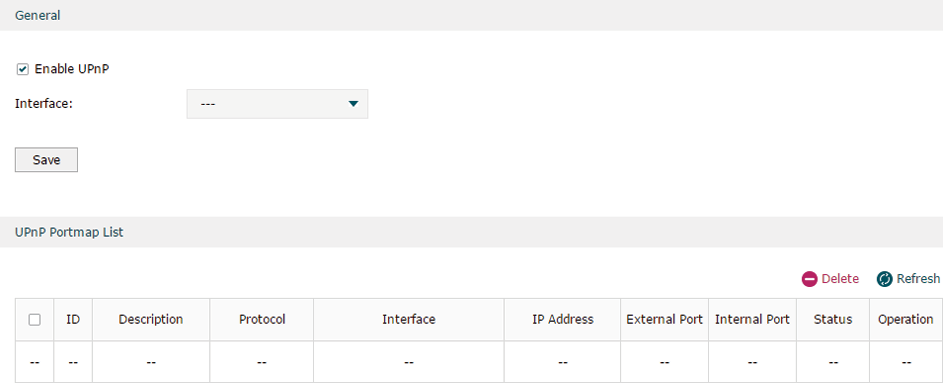
Follow these steps to configure UPnP function:
1)In the General section, enable the UPnP function and select the interface. Then click Save.
|
Enable UPnP |
Check the box to enable the UPnP function. |
|
Interface |
Select the interface for the UPnP function. |
2)(Optional) In the UPnP Portmap List section, view the portmap list.
|
Description |
Displays the description of the application using UPnP protocol. |
|
Protocol |
Displays the protocol type used in the process of UPnP. |
|
Interface |
Displays the interface used in the process of UPnP. |
|
IP Address |
Displays the IP address of the local host. |
|
External Port |
Displays the external port that is opened for the application by the router. |
|
Internal Port |
Displays the internal port that is opened for the application by the local host. |
|
Status |
Displays the status of the corresponding UPnP entry. Enabled: The mapping is active. Disabled: The mapping is inactive. |
4Configuration Example for Dynamic DNS
4.1Network Requirement
Host A gets internet services from an ISP (Internet Service Provider) via a PPPoE dial-up connection. The user wants to visit the router’s web management interface using another host on the internet.
Figure 4-1 Network Topology

4.2Configuration Scheme
For security management, the internet hosts attempting to manage the router must be permitted by the router. Remote Management is used to manage the IP addresses of these hosts.
Because the user uses PPPoE to access to the network, the public IP address of the router may be changed each time the dial-up connection is established. When the public IP address of the router changes, DDNS service ensures the DNS server rebinds the current domain name to the new IP address. This means the user can always reach the router using the same domain name, even if the public IP address has been changed.
4.3Configuration Procedure
4.3.1Specifying the IP Address of the Host
Before configuring DDNS, it is required to specify the IP address of the internet host for remote management. For details, go to System Tools > Admin Setup > Remote Management page.
4.3.2Configuring the DDNS function
There are four DDNS servers supported by the router, we take Peanuthull DNS as an example here.
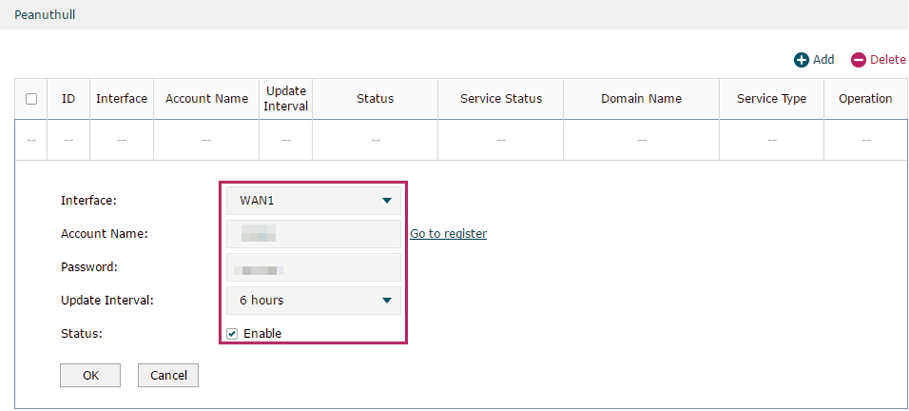
1)Choose the menu Services > Dynamic DNS > Peanuthull and click Add to load the following page. Click Go to register to register a domain name on the official website of Peanuthull.
Figure 4-2 Registering a Domain Name
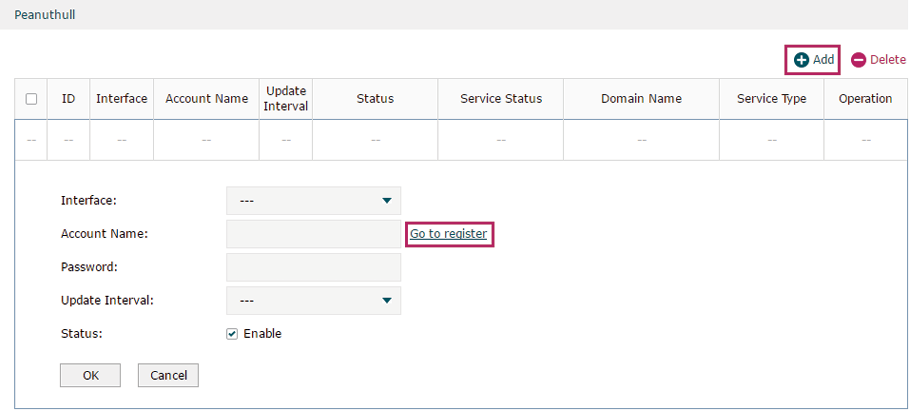
2)Set the Interface as WAN1, set the Update Interval as 6 hours, and enter the Account Name and Password previously registered before. Click OK.
Figure 4-3 Specifying Peanuthull DDNS Parameters