How to Configure Cloud Access for Remote Management
CHAPTERS
1. How to Configure Cloud Access
|
|
This guide applies to: EAP110 / EAP115 / EAP225 / EAP245 / EAP320 / EAP330 / EAP115-Wall / EAP225-Wall / EAP110-Outdoor / EAP225-Outdoor / EAP Controller (Omada Software Controller) / OC200 |

You can use a controller to manage EAP devices in your wireless network. In the local network, it’s easy to access the controller via your management devices, such as a PC or a mobile device, because your controller and management device can communicate with each other directly. However, if you want to access the controller in a remote network, for example, to access your controller at home when you are at the office, your controller and management device cannot communicate with each other directly via the internet. Traditionally, you can use the VPN or port forwarding technology to meet the requirement, but both of them are difficult to configure. To simplify the configuration procedure, you can use the cloud access function of the controller. With this function enabled, it is really convenient to access your controller and manage your wireless network anytime and anywhere.
This article will cover the following topics:
• How to Configure Cloud Access
1How to Configure Cloud Access
Some preparations are required before you can access the controller via the cloud. This section provides detailed steps on how to prepare for it. If you are interested in the principle of the technique, the How Cloud Access Works section will give you an insight into the function.
The configuration procedure differs depending on the controller and management device you use. You can use either an Omada Cloud Controller or an Omada Software Controller as the controller, and either a PC or a mobile device as the management device.
If you use an Omada Cloud Controller as the controller, refer to Using an Omada Cloud Controller as the Controller.
If you use an Omada Software Controller as the controller, refer to Using an Omada Software Controller as the Controller.
Using an Omada Cloud Controller as the Controller
If you use a PC as the management device, refer to Using a PC as the Management Device.
If you use a mobile device as the management device, refer to Using a Mobile Device as the Management Device.
•Using a PC as the Management Device
1. Set Up the Network
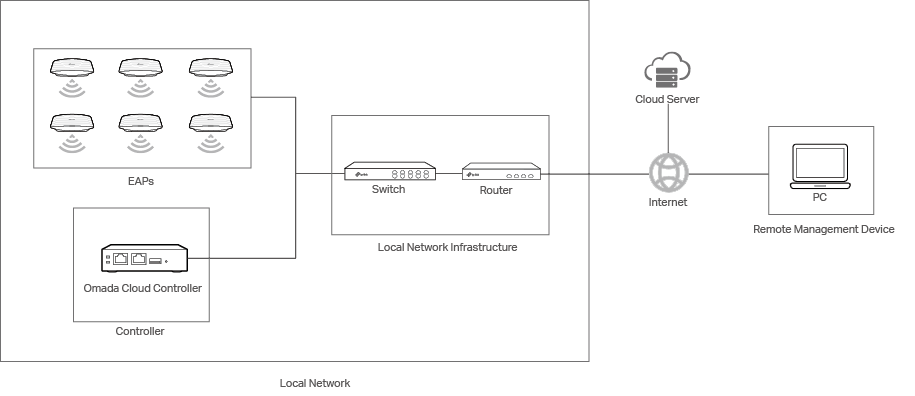
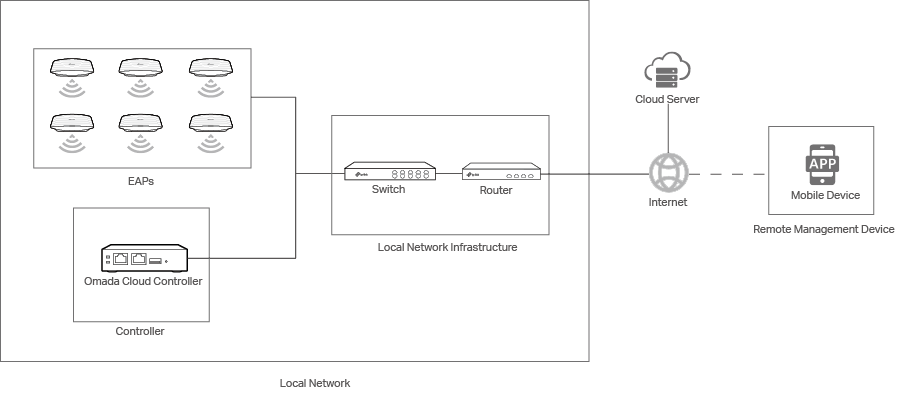
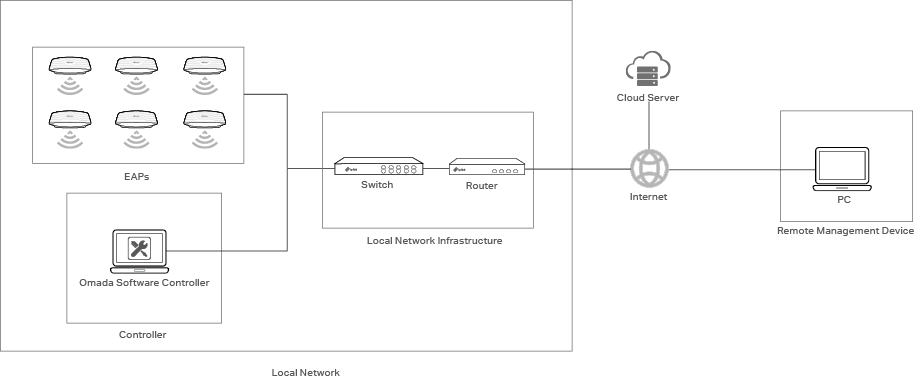
Set up your network according to the following figure. EAPs and the controller are connected to the local network. Devices in the local network can obtain their IP addresses from the router and access the internet via the router. Make sure that both the PC and the Omada Cloud Controller have access to the internet.
2. Register a TP-Link ID
If you already have a TP-Link ID, skip this step. Otherwise, register a TP-Link ID.
1 ) Open a web browser and go to the Omada Cloud: https://omada.tplinkcloud.com
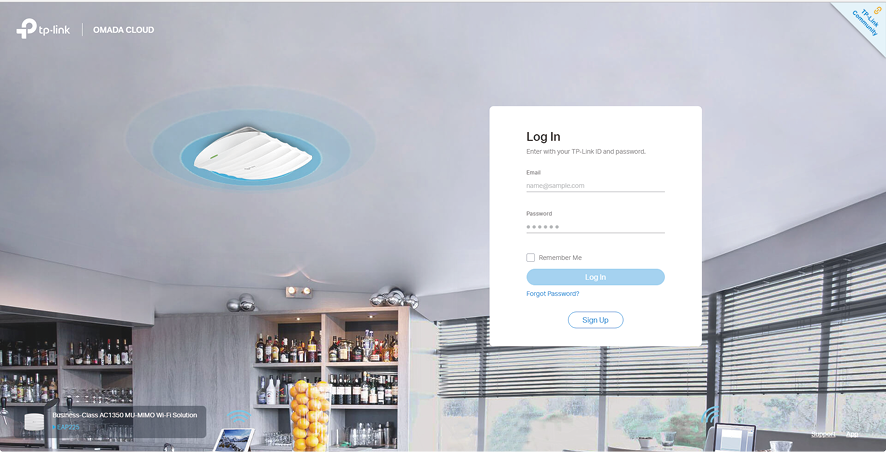
2 ) Click Sign Up to load the following page. Enter your email address and a password, and confirm your password. This email address will be your TP-Link ID. Check the box next to I agree to TP-Link's Term of Use and Privacy Policy, if you agree to them. Click Sign Up. An activation email will be sent to your email address.

3 ) Check your email box for the activation email. Click on the Click to Finish Registration button.
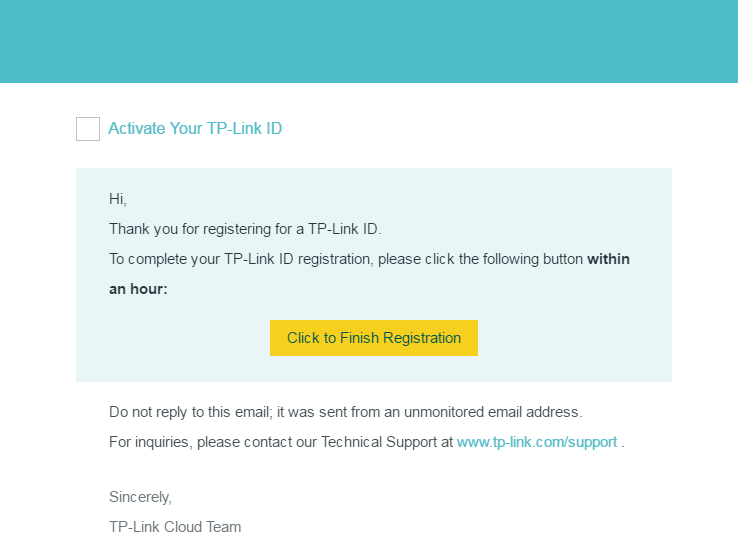
Congratulations! You are now an Omada Cloud user.
3. Bind the Controller to Your TP-Link ID
Log into the Omada Cloud management page with your TP-Link ID and bind the controller to your TP-Link ID.
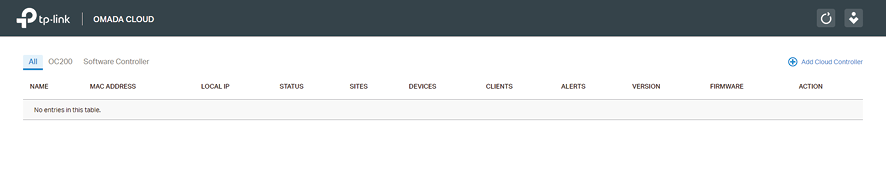
1 ) Open a web browser and go to the Omada Cloud: https://omada.tplinkcloud.com. In the Log In page, enter your TP-Link ID and password. Click Log In.
2 ) You will open the Omada Cloud management page.
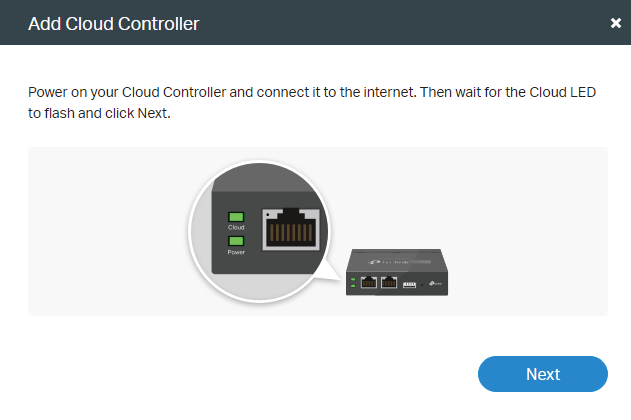
3 ) Click  to load the following page. Make sure the following items:
• The Omada Cloud Controller is powered on and its Cloud LED is flashing, which indicates that it has access to the internet.
• The Cloud Access function of the Omada Cloud Controller is enabled (it is enabled by default).
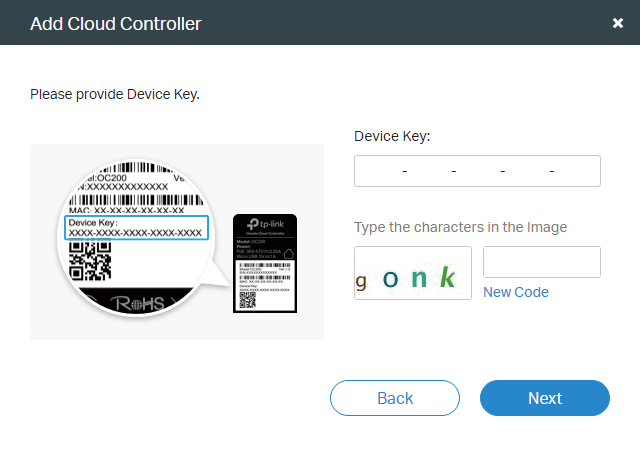
4 ) Click Next to load the following page. Enter the device key, which is displayed on the back of the Omada Cloud Controller. Type the characters in the Image.
5 ) Click Next to load the following page. Click Done.
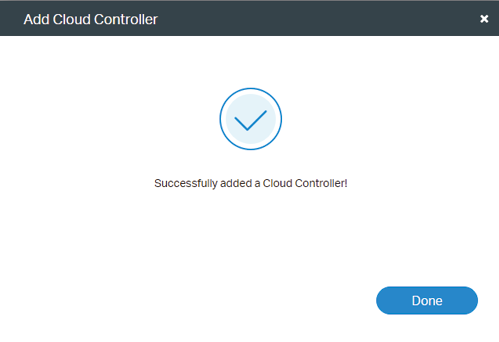
The controller is now bound to your TP-Link ID. The information of controllers which are bound to your TP-Link ID will be displayed in the table on the Omada Cloud management page.

4. Open the Controller Management Page
On the Omada Cloud management page, click  to open the controller management page.

Now you can access the controller remotely. Furthermore, you can configure the controller to adopt the EAPs in the local network and then manage the EAPs centrally.
•Using a Mobile Device as the Management Device
1. Set Up the Network
Set up your network according to the following figure. EAPs and the controller are connected to the local network. Devices in the local network can obtain their IP addresses from the router and access the internet via the router. Make sure that both the mobile device and the Omada Cloud Controller have access to the internet.
2. Register a TP-Link ID
If you already have a TP-Link ID, skip this step. Otherwise, register a TP-Link ID.
1 ) Launch the Omada APP on your mobile device.
If you don’t have an Omada APP, you can download it from APP Store or Google Play, or simply scan the QR Code below.

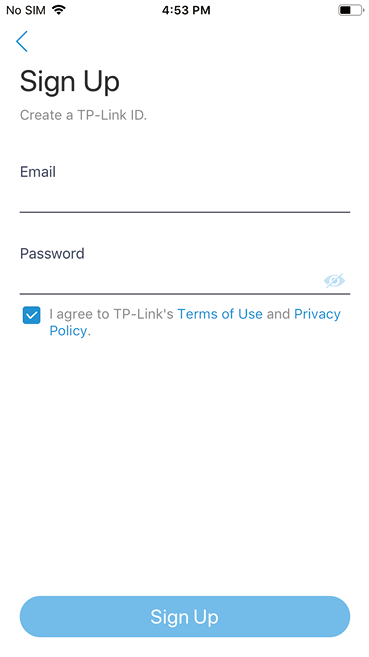
2 ) Go to the Account page, click Login, and click Sign Up to load the following page. Enter your email address and a password. This email address will be your TP-Link ID. Check the box next to I agree to TP-Link's Term of Use and Privacy Policy, if you agree to them. Click Sign Up. An activation email will be sent to your email address.
3 ) Check your email box for the activation email. Click on the Click to Finish Registration button.

Congratulations! You are now an Omada Cloud user.
3. Bind the Controller to Your TP-Link ID
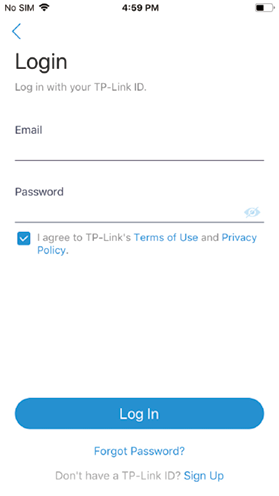
1 ) On the Omada APP, go to the Account page and click Login to load the following page. Enter your email address and password. Check the box next to I agree to TP-Link's Term of Use and Privacy Policy, if you agree to them. Click Log In.
2 ) Go to the Cloud Access page on the Omada APP.
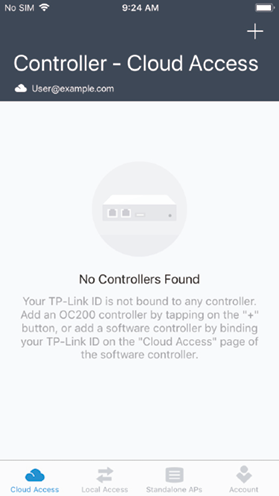
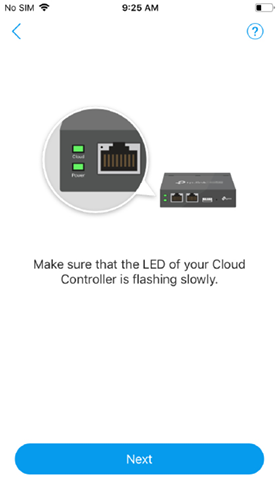
3 ) Click + to load the following page. Make sure the following items:
• The Omada Cloud Controller is powered on and its Cloud LED is flashing, which indicates that it has access to the internet.
• The Cloud Access function of the Omada Cloud Controller is enabled (it is enabled by default).
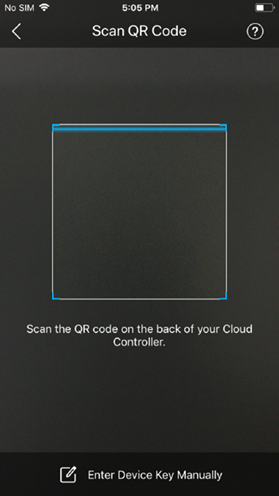
4 ) Click Next. To bind the Omada Cloud Controller to your TP-Link ID, you can either scan the QR Code, or enter the device key manually. The QR Code and device key are displayed on the back of the Omada Cloud Controller.
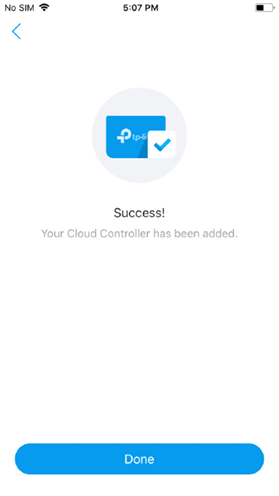
5 ) On the following page, click Done.
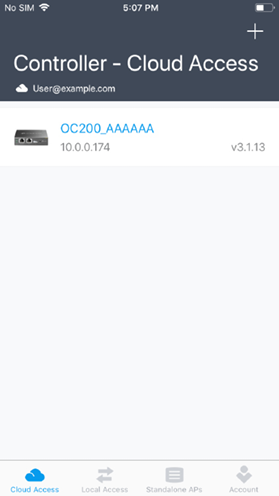
The controller is now bound to your TP-Link ID. The information of controllers which are bound to your TP-Link ID will be displayed on the Cloud Access page.
4. Open the Controller Management Page
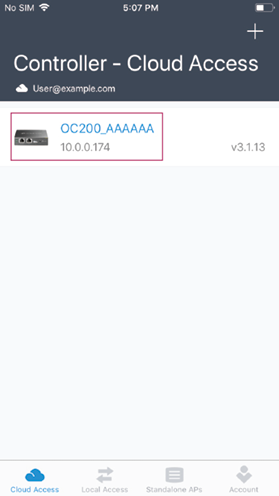
On the Cloud Access page, click on the Omada Cloud Controller to open the controller management page.
Now you can access the controller remotely. Furthermore, you can configure the controller to adopt the EAPs in the local network and then manage the EAPs centrally.
Using an Omada Software Controller as the Controller
If you use a PC as the management device, refer to Using a PC as the Management Device.
If you use a mobile device as the management device, refer to Using a Mobile Device as the Management Device.
•Using a PC as the Management Device
1. Set Up the Network
Set up your network according to the following figure. EAPs and the controller are connected to the local network. Devices in the local network can obtain their IP addresses from the router and access the internet via the router. Make sure that both the PC and the Omada Software Controller have access to the internet.
2. Register a TP-Link ID
If you already have a TP-Link ID, skip this step. Otherwise, register a TP-Link ID.
1 ) Open a web browser and go to the Omada Cloud: https://omada.tplinkcloud.com
2 ) Click Sign Up to load the following page. Enter your email address and a password, and confirm your password. This email address will be your TP-Link ID. Check the box next to I agree to TP-Link's Term of Use and Privacy Policy, if you agree to them. Click Sign Up. An activation email will be sent to your email address.

3 ) Check your email box for the activation email. Click on the Click to Finish Registration button.
Congratulations! You are now an Omada Cloud user.
3. Bind the Controller to Your TP-Link ID
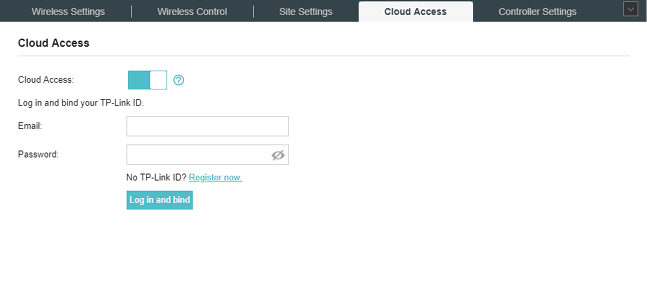
Launch the Omada Software Controller. Launch a web browser to manage the Omada Software Controller. On the management page, click  and go to the Cloud Access page. Enable the Cloud Access function. Enter your email address and password. Click Log in and bind.
The controller is now bound to your TP-Link ID.
4. Log Into the Omada Cloud Management Page
1 ) Open a web browser and go to the Omada Cloud: https://omada.tplinkcloud.com. In the Log In page, enter your TP-Link ID and password. Click Log In.
2 ) You will open the Omada Cloud management page. The information of controllers which are bound to your TP-Link ID will be displayed in the table on the Omada Cloud management page.

5. Open the Controller Management Page
On the Omada Cloud management page, click to open the controller management page.

Now you can access the controller remotely. Furthermore, you can configure the controller to adopt the EAPs in the local network and then manage the EAPs centrally.
•Using a Mobile Device as the Management Device
1. Set Up the Network
Set up your network according to the following figure. EAPs and the controller are connected to the local network. Devices in the local network can obtain their IP addresses from the router and access the internet via the router. Make sure that both the remote management device and the controller have access to the internet.

2. Register a TP-Link ID
If you already have a TP-Link ID, skip this step. Otherwise, register a TP-Link ID.
1 ) Launch the Omada APP on your mobile device.
If you don’t have an Omada APP, you can download it from APP Store or Google Play, or simply scan the QR Code below.
2 ) Go to the Account page, click Login, and click Sign Up to load the following page. Enter your email address and a password. This email address will be your TP-Link ID. Check the box next to I agree to TP-Link's Term of Use and Privacy Policy, if you agree to them. Click Sign Up. An activation email will be sent to your email address.
3 ) Check your email box for the activation email. Click on the Click to Finish Registration button.
Congratulations! You are now an Omada Cloud user.
3. Bind the Controller to Your TP-Link ID
Launch the Omada Software Controller. Launch a web browser to manage the Omada Software Controller. On the management page, click and go to the Cloud Access page. Enable the Cloud Access function. Enter your email address and password. Click Log in and bind.
The controller is now bound to your TP-Link ID.
4. Log In with Your TP-Link ID
On the Omada APP, go to the Account page and click Login to load the following page. Enter your email address and password. Check the box next to I agree to TP-Link’s Term of Use and Privacy Policy, if you agree to them. Click Log In.
5. Open the Controller Management Page
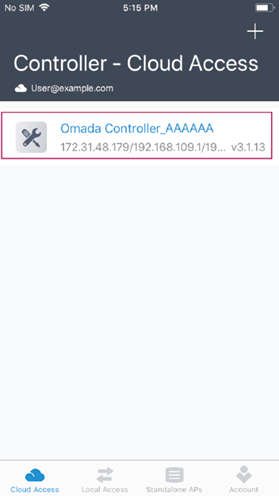
On the Cloud Access page, click on the Omada Controller to open the controller management page.
Now you can access the controller remotely. Furthermore, you can configure the controller to adopt the EAPs in the local network and then manage the EAPs centrally.
The following figure shows the typical network topology of Cloud Access. In this topology, different network devices perform certain functions, which are shown in the table below.
|
Devices |
Descriptions |
|
EAPs |
• EAPs serve as the access points, which your wireless clients are connected to. |
|
Controller: Omada Cloud Controller or Omada Software Controller |
• A controller can manage mass EAPs centrally in the local network. • You can access the controller via a local management device. • You can also access the controller remotely via Omada Cloud. |
|
Management Device: PC or mobile device |
• A management device provides a user interface, where you can manage the controller. • The management device can be located either on the local network or at a remote site. When located at a remote site, it can access the controller with the help of Omada Cloud. • If you run an Omada Software Controller on a PC, the PC is typically the local management device as well. |
|
Local Network Infrastructure: Router and switch |
• Local network infrastructure refers to devices which are essential to a basic network, including routers and switches. • A router serves as a gateway. Local devices can access the internet via the gateway. A router can also serve as a DHCP server, which assigns IP addresses to local devices. • A switch has many ports and can expand the network scale. |
|
Omada Cloud |
• Omada Cloud helps transmit data between the controller and remote management devices. |
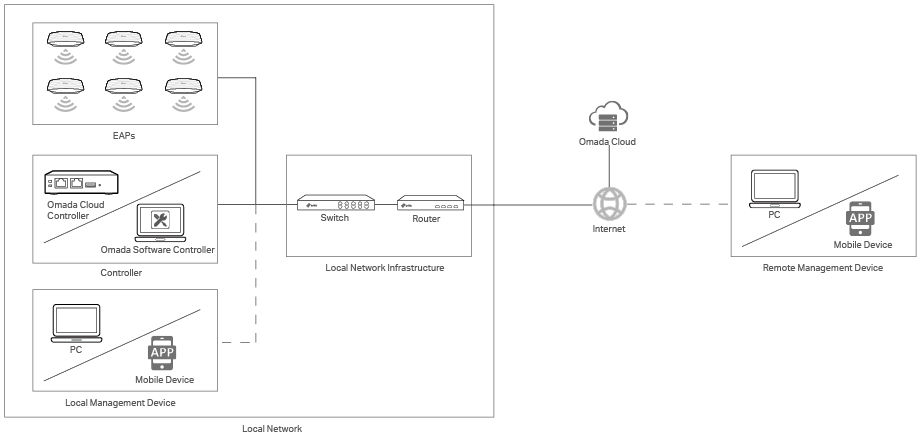
After the Cloud Access function is all set, you can access the controller on the remote management device via Omada Cloud. The data transmission process is illustrated in the following figure. Note that the whole process is instant and transparent to you, as if you were configuring and monitoring the controller directly on the remote management device.
![]()
|
|
• The controller gathers status of EAPs and centrally monitors EAPs in the local network. • The controller can send your configurations to EAPs and the status of EAPs can be changed according to your configurations. |
|
|
• The controller updates its status to Omada Cloud. • Omada Cloud can send your configurations to the controller. The status of the controller can be changed according to your configurations. |
|
|
• The remote management device gets the status of the controller from Omada Cloud and displays the status on the user interface. • You can configure the controller on the user interface and the remote management device will send your configurations to Omada Cloud. |


Process  requires that the controller adopt EAPs. Process
  requires that the remote management device access the internet and you log in with your TP-Link ID, which was previously registered. Process
  requires that Cloud Access be enabled on the controller, and the controller have access to the internet and be bound to your TP-Link ID. For detailed configuration steps, refer to the How to Configure Cloud Access section.