Configuring the Wireless Parameters (CPE and WBS)
CHAPTERS
1. Configure Basic Wireless Parameters
2. Configure Wireless Client Parameters
3. Configure Wireless AP Parameters
5. Configure Wireless MAC Filtering
6. Configure Advanced Wireless Parameters
|
|
This guide applies to: CPE210(UN) 1.0, CPE210(UN) 2.0, CPE210(UN) 3.0, CPE210(EU) 3.0, CPE220(UN) 1.0, CPE220(UN) 2.0, CPE220(UN) 3.0, CPE510(UN) 1.0, CPE510(UN) 2.0, CPE510(UN) 3.0, CPE520(UN) 1.0, CPE520(UN) 2.0, CPE610(UN) 1.0, WBS210(UN) 1.0, WBS210(UN) 2.0, WBS510(UN) 1.0, WBS510(UN) 2.0. |

This guide introduces how to configure wireless parameters using CPE/WBS products:
1. Configure Basic Wireless Parameters
2. Configure Wireless Client Parameters
3. Configure Wireless AP Parameters
4. Configure Multi-SSID
5. Configure Wireless MAC Filtering
6. Configure Advanced Wireless Parameters
The following parts detailedly introduces these features.
1Configure Basic Wireless Parameters
This section allows you to configure wireless basic parameters, such as 802.11 mode, Transmit Power, and data rates.
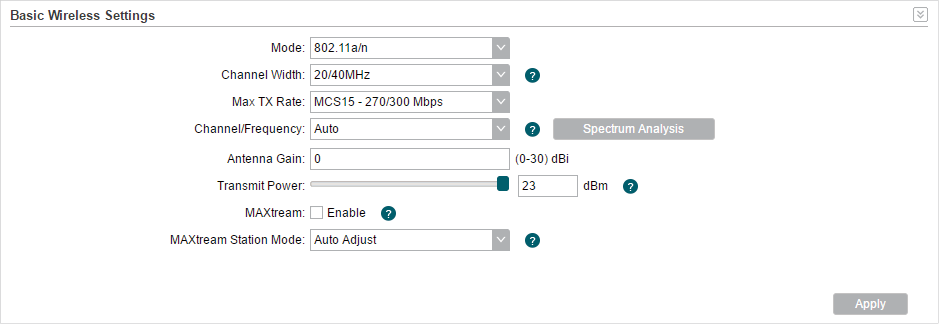
Go to the Wireless Page. In the Basic Wireless Settings section, configure the basic wireless settings and click Apply. Then click Save.
Figure 1-1 Configuring Basic Wireless Parameters
|
Mode |
Select the protocol standard used in the wireless network. With a frequency band of 2.4GHz, CPE210/CPE220/WBS210 supports five wireless modes: 802.11b, 802.11g, 802.11n, 802.11b/g and 802.11b/g/n. We recommend you to set the mode as 11b/g/n mixed, and all of 802.11b, 802.11g and 802.11n wireless stations can connect to the device. CPE610/CPE510/CPE520/WBS510 has a frequency band of 5GHz, supporting 802.11a, 802.11n and 802.11a/n modes. We recommend you to set the mode as 11a/n, allowing both 802.11a and 802.11n wireless stations to access the device. |
|
Channel Width |
Select the channel width of this device. Options include 5MHz, 8MHz, 10MHz, 20MHz, 30MHz, 40MHz and 20/40MHz (the device automatically selects 20MHz/40MHz, and 20MHz will be used if 40MHz is not available). You can select corresponding channel width according to whether their devices support it. According to IEEE 802.11n standard, using a channel width of 40MHz can increase wireless throughput. However, you may need choose lower bandwidth due to the following reasons: Increase the available number of channels within the limited total bandwidth. To avoid interference from overlapping channels occupied by other devices in the environment. Lower bandwidth can concentrate higher transmit power, increasing stability of wireless links over long distances. Subject to the channel width of root AP in Client/ Bridge/ Repeater/ Client Router operation modes. |
|
Max TX Rate |
Set the maximum transmit data rate. |
|
Channel/Frequency |
Select appropriate channel used by this device to improve wireless performance. 1/2412MHz refers to Channel 1 and the frequency is 2412MHz. This setting is only available in Access Point mode and AP Router mode. CPE210/CPE220/WBS210 is a device with a frequency of 2.4GHz and CPE610/CPE510/CPE520/WBS510 has a frequency of 5GHz. We highly recommend that you use the Spectrum Analysis tool to select a proper channel. |
|
Antenna Gain |
Antenna Gain is only available in WBS products. Enter the antenna gain value according to the antennas and the value ranges from 0 to 30dBi. It can work together with the transmit power to improve the transmit signal quality.
|
|
Transmit Power |
Specify the transmit power of the device. You can use the slider or manually enter the transmit power value. For WBS210 and WBS510, the maximum transmit power varies according to the antenna gain value. In most scenarios, it is unnecessary to select the maximum transmit power. Selecting larger transmit power than your need may cause interference to neighborhood. Also it consumes more power and will reduce longevity of the device. Select appropriate transmit power to achieve the best performance. You can use the Speed Test tool to find the best performance |
|
MAXtream |
Enable or disable the MAXtream function. This function is only available in Access Point mode and AP Router mode. MAXtream is a TP-Link proprietary technology. It is based on TDMA (Time Division Multiple Access) so that data streams are transmitted in their own time slots. MAXtream aims to maximize throughput and minimize latency. “Hidden nodes” problem can also be eliminated with MAXtream enabled. MAXtream Technology is only compatible with Pharos series products. Working with products from other manufacturer will cause network fault. |
|
MAXtream Station Mode |
MAXtream Station Mode is available in Client mode, Bridge mode and AP Client Router mode with the wireless AP settings disabled. Auto Adjust: The device will choose the MAXtream station mode automatically. Latency First: Set the MAXtream station mode as Latency First and the time sensitive stream such as VoIP will take precedence in MAXtream system. Throughput First: Set the MAXtream station mode as Throughput First and the stream that needs high throughput such as online games will take precedence in MAXtream system. |

2Configure Wireless Client Parameters
|
|
Note: Wireless Client Settings submenu is only available in Client, Repeater, Bridge and AP client Router (WISP client) mode. |

In this section, you can configure wireless client parameters used for the connection with the root AP.
Figure 2-1 Configuring Wireless Client Settings

1)Go to the Wireless Page. In the Wireless Client Settings section, configure the following parameters.
|
SSID of AP |
Specify the SSID of the root AP. You can enter the SSID of the specific AP manually, or you can directly survey all the APs around by clicking Survey and select one. |
|
Scan Range |
Enable or disable the Scan Range. With the Scan Range enabled, you need to specify the frequency range and the device will survey SSIDs in the coeersponding range. |
|
MAC of AP |
Displays the MAC address of the root AP. It’s possible that two or more networks use the same SSID in the AP list. Enable Lock to AP to select SSID and AP simultaneously, which can make the device connect to the specific AP you had connected before the next time. |
|
WDS |
Displays the status of the WDS (Wireless distribution System) function. WDS is a communication system among multiple wireless networks . It is established between APs through wireless connection. WDS is used to during the connection between the device and the root AP. Enable: Forward data frames to use four address fields. Disable: Forward data frames to use three address fields. Auto: The device automatically negotiates the wireless data frame structure (three or four address fields) with the root AP. The selection of Auto is recommended. |
2)Specify the security mode. Make sure the Security mode and the related parameters are the same as the upstream wireless network’s.
»None
Select this option if the root AP has no encryption. When connecting to the root AP, it’s no need to enter a password to access the wireless network.
»WEP
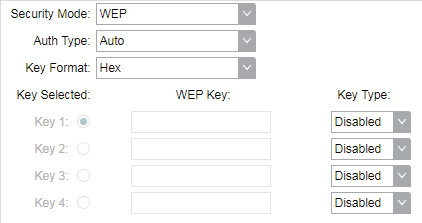
WEP (Wired Equivalent Privacy) is a traditional encryption method. It has been proved that WEP has security flaws and can easily be cracked, so WEP is rarely used in normal wireless network. Select this option if the security mode of the root AP is WEP.
|
|
Note: WEP is not supported in 802.11n mode or 802.11ac mode. If WEP is applied in 802.11n, 802.11 ac or 802.11n/ac mixed mode, the clients may not be able to access the wireless network. If WEP is applied in 802.11b/g/n mode (2.4GHz) or 802.11a/n (5GHz), the device may work at a low transmission rate. |
Figure 2-2 EAP Mode
|
Auth Type |
Select the authentication type for WEP. Auto: The device can select Open System or Shared Key automatically according to the wireless network of the root AP. Open System: The device can pass the authentication and associate with the root wireless network without password. However, correct password is necessary for data transmission. Shared Key: The device needs the correct password to pass the authentication, otherwise the device cannot associate with the root wireless network or transmit data. |
|
Key Format |
Select ASCII or Hex as the WEP key format. ASCII: With this format selected, the WEP key can be any combination of keyboard characters of the specified length. Hex: With this format selected, the WEP key can be any combination of hexadecimal digits (0-9, a-f, A-F) with the specified length. |
|
Key Selected |
Select one key to specify. You can configure four keys at most. |
|
WEP Key |
Enter the WEP keys. The length and valid characters are determined by the key format and key type. |
|
Key Type |
Select the WEP key length for encryption. 64Bit: Enter 10 hexadecimal digits or 5 ASCII characters. 128Bit: Enter 26 hexadecimal digits or 13 ASCII characters. 152Bit: Enter 32 hexadecimal digits or 16 ASCII characters. |
»WPA
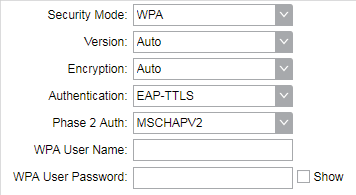
WPA (Wi-Fi Protected Access) is a safer encryption method compared with WEP and WAP-PSK. It requires a RADIUS server to authenticate the clients via 802.1X and EAP (Extensible Authentication Protocol). WPA can generate different passwords for different clients, which ensures higher network security. But it also costs more to maintain the network, so it is more suitable for business networks.
Figure 2-3 WPA Mode
|
Version |
Select the version of WPA. Auto: The device will automatically choose the version used by the root AP. WPA/WPA2: They’re two versions of WPA security mode. WPA2 is an update of WPA. Compared with WPA, WPA2 introduces AES algorithm and CCMP encryption. Theoretically, WPA2 is securer than WPA. |
|
Encryption |
Select the Encryption type. Auto: The default setting is Auto and the device will select TKIP or AES automatically according to the wireless network of root AP. TKIP: Temporal Key Integrity Protocol. TKIP is not supported in 802.11n mode, 802.11ac mode or 802.11n/ac mixed mode. If TKIP is applied in 802.11n, 802.11 ac or 802.11n/ac mixed mode, the device may not be able to access the root wireless network. If TKIP is applied in 11b/g/n mode (2.4GHz) or 11a/n mode(5GHz), the device may work at a low transmission rate. AES: Advanced Encryption Standard. It is securer than TKIP. |
|
Authentication |
Select the type of the authentication. |
|
Phase 2 Auth |
Select the type of Phase 2 Auth. The device only supports MSCHAPV2 currently. |
|
WPA User Name |
Specify the WPA User Name used in the connection with the root AP. |
|
WPA User Password |
Specify the WPA User Password used in the connection with the root AP. |
»WPA-PSK
WPA-PSK (Wi-Fi Protected Access-PSK) is based on a pre-shared key. It is characterized by high safety and simple settings, so it is mostly used by common households and small businesses.
Figure 2-4 WPA-PSK Mode

|
Version |
Select the version of WPA-PSK. WPA-PSK/WPA2-PSK: They’re two versions of WPA-PSK security mode. WPA2-PSK is an update of WPA-PSK. Compared with WPA, Theoretically, WPA2 is securer than WPA. Auto: The device will automatically choose the version used by the root AP. WPA/WPA2: They’re two versions of WPA-PSK security mode normally called WPA-PSK/WPA2-PSK. WPA2-PSK is an update of WPA-PSK. Compared with WPA-PSK, theoretically, WPA2-PSK is securer than WPA-PSK. |
|
Encryption |
Select the Encryption type. Auto: The default setting is Auto and the device will select TKIP or AES automatically according to the wireless network of root AP. TKIP: Temporal Key Integrity Protocol. TKIP is not supported in 802.11n mode, 802.11ac mode or 802.11n/ac mixed mode. If TKIP is applied in 802.11n, 802.11 ac or 802.11n/ac mixed mode, the device may not be able to access the root wireless network. If TKIP is applied in 11b/g/n mode (2.4GHz) or 11a/n mode(5GHz), the device may work at a low transmission rate. AES: Advanced Encryption Standard. It is securer than TKIP. |
|
PSK Password |
Specify the PSK password used in the connection with the root AP. |
3)Click Apply, then click Save.
3Configure Wireless AP Parameters
|
|
Note: Wireless Client Settings submenu is only available in Access Point, Bridge, AP Router and AP client Router (WISP client) mode. |
In this section, you can configure wireless AP parameters used for the connection with the clients.
Figure 3-1 Configuring Wireless AP Parameters
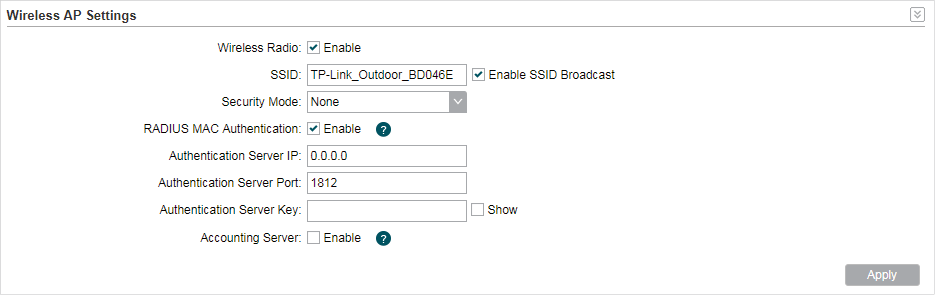
1)Go to the Wireless Page. In the Wireless AP Settings section, specify the SSID.
|
Enable SSID Broadcast |
Enable or disable SSID broadcast. With this function enabled, the device will broadcast the SSID periodically. |
2)Specify the security mode used for the clients to access the wireless network.
»None
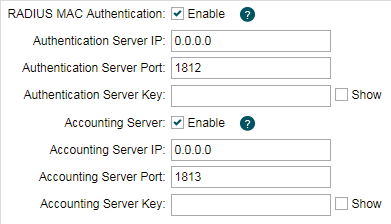
Select None when you want an open network without wireless security. In this mode, network data is not encrypted, but you can still authenticate clients by enabling the RADIUS MAC Authentication function.
Figure 3-2 No Security Settings
|
RADIUS MAC Authentication |
Enable or disable the Radius MAC authentication. With this feature enabled, you can authenticate clients using their MAC addresses on your RADIUS authentication server. Remember to log into your RADIUS authentication server and create authentication entries whose username and password are both the access-enabled clients’ MAC address (for MAC address 11-22-33-AA-BB-CC, create an authentication entry whose username and password are both 112233aabbcc on the RADIUS server). |
|
Authentication Server IP |
Enter the IP address of the RADIUS authentication server. |
|
Authentication Server Port |
Enter the UDP port of the RADIUS authentication server. The most commonly used port is the default, 1812, but this may vary depending on the RADIUS authentication server you are using. |
|
Authentication Server Key |
Enter the shared key used between this device and the authentication server. The shared key is a case-sensitive text string used to validate communication between this device and the RADIUS authentication server. Check the Show box to view the shared key characters. |
|
Accounting Server |
Enable or disable Accounting Server. With this feature enabled, you can keep accounts on users using a RADIUS accounting server. |
|
Accounting Server IP |
Enter the IP address of the RADIUS accounting server. |
|
Accounting Server Port |
Enter the UDP port of the RADIUS accounting server. The most commonly used port is 1813, but this may vary depending on the RADIUS accounting server you are using. |
|
Accounting Server Key |
Enter the password used between this device and the RADIUS accounting server. The shared key is a case-sensitive text string used to validate communication between this device and the RADIUS accounting server. Check the Show box to view the shared key characters. |
»WEP
WEP (Wired Equivalent Privacy) is a traditional encryption method. It has been proved that WEP has security flaws and can easily be cracked, so WEP cannot provide effective protection for wireless networks. Since WPA-PSK and WPA-Enterprise are much safer than WEP, we recommend that you choose WPA-PSK or WPA-Enterprise if your clients also support them.
Figure 3-3 EAP Mode
|
|
Note: WEP is not supported in 802.11n mode or 802.11ac mode. If WEP is applied in 802.11n, 802.11 ac or 802.11n/ac mixed mode, the clients may not be able to access the wireless network. If WEP is applied in 802.11b/g/n mode (2.4GHz) or 802.11a/n (5GHz), the device may work at a low transmission rate. |
|
Auth Type |
Select the authentication type for WEP. Auto: The device can select Open System or Shared Key automatically based on the wireless capability and request of the clients. Open System: Clients can pass the authentication and associate with the wireless network without password. However, correct password is necessary for data transmission. Shared Key: Clients have to input the correct password to pass the authentication, otherwise the clients cannot associate with the wireless network or transmit data. |
|
Key Format |
Select ASCII or Hex as the WEP key format. ASCII: With this format selected, the WEP key can be any combination of keyboard characters of the specified length. Hex: With this format selected, the WEP key can be any combination of hexadecimal digits (0-9, a-f, A-F) with the specified length. |
|
Key Selected |
Select one key to specify. You can configure four keys at most. |
|
WEP Key |
Enter the WEP keys. The length and valid characters are determined by the key format and key type. |
|
Key Type |
Select the WEP key length for encryption. 64Bit: Enter 10 hexadecimal digits or 5 ASCII characters. 128Bit: Enter 26 hexadecimal digits or 13 ASCII characters. 152Bit: Enter 32 hexadecimal digits or 16 ASCII characters. |
»WPA
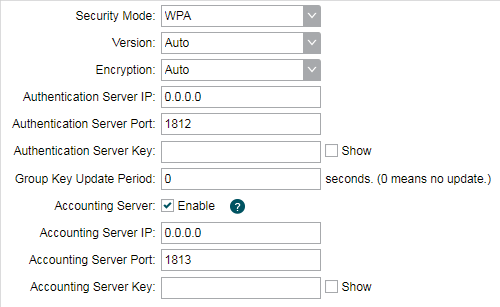
WPA (Wi-Fi Protected Access) is a safer encryption method compared with WEP and WAP-PSK. It requires a RADIUS server to authenticate the clients via 802.1X and EAP (Extensible Authentication Protocol). WPA can generate different passwords for different clients, which ensures higher network security. But it also costs more to maintain the network, so it is more suitable for business networks.
Figure 3-4 WPS Mode
|
Version |
Select the version of WPA. Auto: The device will automatically choose the version used by each client device. WPA/WPA2: They’re two versions of WPA security mode. WPA2 is an update of WPA. Compared with WPA, WPA2 introduces AES algorithm and CCMP encryption. Theoretically, WPA2 is securer than WPA. |
|
Encryption |
Select the Encryption type. Auto: The default setting is Auto and the device will select TKIP or AES automatically based on the client device’s request. TKIP: Temporal Key Integrity Protocol. TKIP is not supported in 802.11n mode, 802.11ac mode or 802.11n/ac mixed mode. If TKIP is applied in 802.11n, 802.11 ac or 802.11n/ac mixed mode, the device may not be able to access the root wireless network. If TKIP is applied in 11b/g/n mode (2.4GHz) or 11a/n mode(5GHz), the device may work at a low transmission rate. AES: Advanced Encryption Standard. It is securer than TKIP. |
|
Authentication Server IP |
Enter the IP address of the Radius Authentication Server. |
|
Authentication Server Port |
Enter the UDP port of the RADIUS authentication server. The most commonly used port is 1812, but this may vary depending on the RADIUS authentication server you are using. |
|
Authentication Server Key |
Enter the shared key used between this device and the authentication server. The shared key is a case-sensitive text string used to validate communication between this device and the RADIUS authentication server. Check the Show box to view the shared key characters. |
|
Group Key Update Period |
Specify an update period of the encryption key. The update period instructs how often the device should change the encryption key. 0 means that the encryption key does not change at anytime. |
|
Accounting Server |
Enable or disable Accounting Server. With this feature enabled, you can keep accounts on users using a RADIUS accounting server. |
|
Accounting Server IP |
Enter the IP address of the RADIUS accounting server. |
|
Accounting Server Port |
Enter the UDP port of the RADIUS accounting server. The most commonly used port is 1813, but this may vary depending on the RADIUS accounting server you are using. |
|
Accounting Server Key |
Enter the password used between this device and the RADIUS accounting server. The shared key is a case-sensitive text string used to validate communication between this device and the RADIUS accounting server. Check the Show box to view the shared key characters. |
»WPA-PSK
WPA-PSK (Wi-Fi Protected Access-PSK) is based on a pre-shared key. It is characterized by high safety and simple settings, so it is mostly used by common households and small businesses.
Figure 3-5 WPA-PSK Mode

|
Version |
Select the version of WPA-PSK. WPA-PSK/WPA2-PSK: They’re two versions of WPA-PSK security mode. WPA2-PSK is an update of WPA-PSK. Compared with WPA, Theoretically, WPA2 is securer than WPA. Auto: The device will automatically choose the version used by the root AP. WPA/WPA2: They’re two versions of WPA-PSK security mode normally called WPA-PSK/WPA2-PSK. WPA2-PSK is an update of WPA-PSK. Compared with WPA-PSK, theoretically, WPA2-PSK is securer than WPA-PSK. |
|
Encryption |
Select the Encryption type. Auto: The default setting is Auto and the device will select TKIP or AES automatically according to the wireless network of root AP. TKIP: Temporal Key Integrity Protocol. TKIP is not supported in 802.11n mode, 802.11ac mode or 802.11n/ac mixed mode. If TKIP is applied in 802.11n, 802.11 ac or 802.11n/ac mixed mode, the device may not be able to access the root wireless network. If TKIP is applied in 11b/g/n mode (2.4GHz) or 11a/n mode(5GHz), the device may work at a low transmission rate. AES: Advanced Encryption Standard. It is securer than TKIP. |
|
PSK Password |
Specify the PSK password used in the connection with the clients. |
|
Group Key Update Period |
Specify an update period of the encryption key. The update period instructs how often the device should change the encryption key. 0 means that the encryption key does not change at anytime. |
3)Click Apply, then click Save.
|
|
Note: Multi-SSID submenu is only available in Access Point mode. |
The device can build up to four virtual wireless networks for users to access. When the Multi-SSID function is enabled, the VLAN function is enabled at the same time. It can work together with switches supporting 802.1 Q VLAN and supports maximum four VLANs. The device adds different VLAN tag to the clients which connect to the corresponding wireless network. The clients in different VLANs cannot directly communicate with each other.
The wired client can communicate with all the wireless clients despite the VLAN settings.
1)Go to the Wireless page. In the Multi-SSID section, Enable Multi-SSID. Click Add and create a new wireless network.
Figure 4-1 Configuring Multi-SSID

|
SSID |
Specify the SSID of the wireless network. |
|
VLAN |
Specify the VLAN to which the new wireless network belongs. The valid value ranges from 1 to 4094. |
|
SSID Broadcast |
Enable or disable SSID broadcast . With this feature enabled, the device will broadcast the SSID. |
|
AP Isolation |
Enable or disable AP Isolation. With this feature enabled, all the hosts cannot communicate with each other. |
2)Select the desired SSID and specify the Security.
Figure 4-2 Configuring Security Parameters

|
SSID |
Select the desired SSID to specify the security settings. |
|
Security |
Specify the security settings for the desired SSID. The device only supports WPA-PSK. |
|
Version |
Select the version of WPA-PSK. WPA-PSK/WPA2-PSK: They’re two versions of WPA-PSK security mode. WPA2-PSK is an update of WPA-PSK. Compared with WPA, Theoretically, WPA2 is securer than WPA. Auto: The device will automatically choose the version used by the root AP. WPA/WPA2: They’re two versions of WPA-PSK security mode normally called WPA-PSK/WPA2-PSK. WPA2-PSK is an update of WPA-PSK. Compared with WPA-PSK, theoretically, WPA2-PSK is securer than WPA-PSK. |
|
Encryption |
Select the Encryption type. Auto: The default setting is Auto and the device will select TKIP or AES automatically according to the wireless network of root AP. TKIP: Temporal Key Integrity Protocol. TKIP is not supported in 802.11n mode, 802.11ac mode or 802.11n/ac mixed mode. If TKIP is applied in 802.11n, 802.11 ac or 802.11n/ac mixed mode, the device may not be able to access the root wireless network. If TKIP is applied in 11b/g/n mode (2.4GHz) or 11a/n mode(5GHz), the device may work at a low transmission rate. AES: Advanced Encryption Standard. It is securer than TKIP. |
|
PSK Password |
Specify the PSK password used in the connection with the clients. |
|
Group Key Update Period |
Specify an update period of the encryption key. The update period instructs how often the device should change the encryption key. 0 means that the encryption key does not change at anytime. |
3)Click Apply, then click Save.
5Configure Wireless MAC Filtering
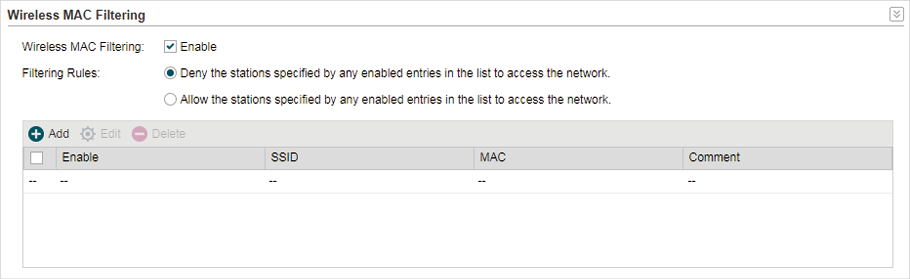
Wireless MAC Filtering function uses MAC addresses to determine whether one host can access the wireless network or not. Thereby it can effectively control the user access in the wireless network. This function is available in all modes except the client mode.
1)Go to the Wireless page. In the Wireless MAC Filtering section, enable this feature and specify the filtering rule.
Figure 5-1 Configuring Wireless MAC Filtering
|
Wireless MAC Filtering |
Enable or disable the Wireless MAC Filtering function. |
|
Filtering Rules |
Specify the filtering rules. Allow the stations specified by any enabled entries in the list to access the network: The stations listed in the table are allowed to access the wireless network under the rules. While others are forbidden to access. Deny the stations specified by any enabled entries in the list to access the network: The stations listed in the table are forbidden to access the wireless network under the rules. While others are allowed to access. |
2)Click Add and specify the following parameters.
Figure 5-2 Creating MAC Filtering Entries

|
Enable |
Enable or disable the desired entry. |
|
SSID |
Select te SSID to which the filtering rules apply. In AP mode, if Multi-SSID is enabled, you should set different filtering rules for each SSID. |
|
MAC |
Enter the MAC address of the wireless host that you need to filter. |
|
Comment |
Enter the description information for the filtering rule |
3)Click Save and click Apply. Then click Save.
6Configure Advanced Wireless Parameters
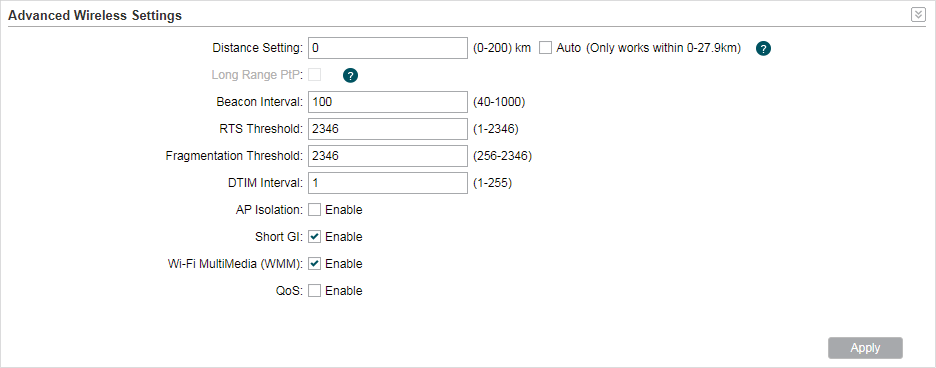
This section is used to specify the advanced wireless parameters, such as Beacon Interval, RTS threshold and DIM Interval.
Go to the Wireless page. In the Advanced Wireless Settings section, specify the following parameters and click Apply. Then click Save.
Figure 6-1 Configuring Advanced Wireless Parameters
|
Distance Setting |
Specify the distance between AP and Station. If this device serves as a client, the value is the distance between this device and the root AP. If this device serves as an AP, the value is the distance between the farthest client and this AP. You can manually enter the value or enable the Auto option. Manual: Enter the distance manually in the input box. The value is limited to 0-200km, and we recommend you set the value to 110% of the real distance. Auto (Only works within 0-xx km): Check the Auto option, then the system will dynamically detect the distance. This function is available only when the distance is less than xx kilometers. The value xx varies according to the channel width you set. CPE210 does not support this option. The distance value will be converted to a corresponding ACK timeout value, and the ACK timeout value will influence the throughput performance to a large extent. |
|
Beacon Interval |
Specify the beacon interval for the device. Beacons are transmitted periodically by the device to announce the presence of a wireless network for the clients. Beacon Interval value determines the time interval of the beacons sent by the device. You can specify a value from 40 to 1,000. The default value is 100. |
|
RTS Threshold |
Specify the RTS threshold for the device. RTS/CTS (Request to Send/Clear to Send) is used to improve the data transmission efficiency of the network with hidden nodes, especially when there are lots of large packets to be transmitted. When the size of a data packet is larger than the RTS Threshold, the RTS/CTS mechanism will be activated. With this mechanism activated, before sending a data packet, the client will send an RTS packet to the device to request data transmitting. And then the device will send CTS packet to inform other clients to delay their data transmitting. In this way, packet collisions can be avoided. For a busy network with hidden nodes, a low threshold value will help reduce interference and packet collisions. But for a not-so-busy network, a too low threshold value will cause bandwidth wasting and reduce the data throughput. The recommended and default value is 2346 bytes. |
|
Fragmentation Threshold |
Specify the fragmentation threshold for packets. The fragmentation function can limit the size of packets transmitted over the network. If the size of a packet exceeds the Fragmentation Threshold, the fragmentation function is activated and the packet will be fragmented into several packets. Fragmentation helps improve network performance if properly configured. However, a too low fragmentation threshold may result in poor wireless performance caused by the extra work of dividing up and reassembling of frames and increased message traffic. The recommended and default value is 2346 bytes. |
|
DTM Interval |
Specify the DTM (Delivery Traffic Indication Message) Interval for the device. The DTIM is contained in some Beacon frames. It indicates whether the device has buffered data for client devices. The DTIM Period indicates how often the clients served by this device should check for buffered data still on the device awaiting pickup. You can specify the value between 1-255 Beacon Intervals. The default value is 1, indicating that clients check for buffered data at every beacon. An excessive DTIM interval may reduce the performance of multicast applications, so we recommend you keep the default value. |
|
AP Isolation |
Enable or disable AP Isolation. With this feature enabled, the clients can not communicate with each other directly. AP Isolation is not available in Client mode. |
|
Short GI |
Enable or disable Short GI. Propagation delays often occurs in data transmission process and influence the capability of the wireless network. It can result from multiple factors, such as multipath effect. GI (Guard Interval) is intended to solve the problem based on delays, and Short GI is used to improve the throughput of the wireless network based on the GI in the environment with small delays. When the delays are small. When Short GI is enabled, the guard interval will be set as 400ns and this function will boost the performance about 11%. In the with serious multipath time delay. Short GI function will reduce the throughput instead of improving it. |
|
Wi-Fi Multimedia (WMM) |
Enable or disable WMM. With WMM enabled, the system will prioritize traffic according to the data type when forwarding data. Time-dependent traffic, such as video or audio packets, gets a higher priority than normal traffic. We recommend you enable this function when you are running the video or audio application. |
|
QoS |
Enable or disable QoS. The QoS function improves the transmission performance of video or audio traffic by optimizing the scheduling policy between the AP and the clients. |