Configuring the System (CPE and WBS)
CHAPTERS
1. Configure Device Information
2. Configure Location Information
|
|
This guide applies to: CPE210(UN) 1.0, CPE210(UN) 2.0, CPE210(UN) 3.0, CPE210(EU) 3.0, CPE220(UN) 1.0, CPE220(UN) 2.0, CPE220(UN) 3.0, CPE510(UN) 1.0, CPE510(UN) 2.0, CPE510(UN) 3.0, CPE520(UN) 1.0, CPE520(UN) 2.0, CPE610(UN) 1.0, WBS210(UN) 1.0, WBS210(UN) 2.0, WBS510(UN) 1.0, WBS510(UN) 2.0. |

This guide introduces how to manage the system of CPE/WBS products:
1. Configure Device Information
2. Configure Location Information
3. Configure User Account
4. Configure Time Settings
5. Update Firmware
6. Configure Other Settings
The following parts detailedly introduces these features.
In this section, you can configure the device name and the system language.
1)Go to the System page. In the Device section, configure the following parameters and click Apply.
Figure 1-1 Specifying the Device Information

|
Device Name |
Specify the device name. |
|
Language |
Specify the system language used in the management interface. |
2)Click Save.
2Configure Location Information
In this section, you can configure the location for the device.
1)Go to the System page. In the Location section, configure the following parameters and click Apply.
Figure 2-1 Specifying the Location Information

|
Longitude |
Enter the longitude of the device’s location in decimal degree. The positive number indicates the east longitude while the negative number indicates the west longitude. |
|
Latitude |
Enter the latitude of the device's location in decimal degree. The positive number indicates the north latitude while the negative number indicates the south latitude. |
2)Click Save.
This section is used to configure user account.
1)Go to the System page. In the User Account section, configure the following parameters and click Apply.
Figure 3-1 Configuring User Account

|
Current User Name |
Displays the current user name. |
|
Current Password |
Enter the current password for the user account. Check the Show box to display what you've entered. |
|
New User Name |
Enter a new user name for the user account. |
|
New Password |
Enter a new password for the user account. Check the Show box to display what you've entered. |
|
Confirm New Password |
Confirm the new password. |
2)Click Save.
In this section, you can configure the system time and the daylight saving time.
1)Go to the System page. In the Time Settings section, configure the system time.
Figure 4-1 Specifying Time Settings
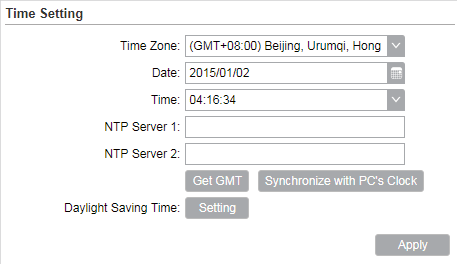
»Manually
Configure the System time manually.
|
Time Zone |
Select your local time zone. |
|
Date |
Click the calendar button to choose the date or enter the date in the format: YYYY/MM/DD. |
|
Time |
Select the time from the drop-down list or enter the time in the format HH:MM:SS. |
»Automatically
Specify the NTP Server, then click the Get GMT button to get the system time from the NTP server
|
NTP Server 1 |
Specify the primary NTP server used to get time automatically. |
|
NTP Server 2 |
Specify the alternate NTP server used to get time automatically. |
Click Synchronize with PC’s Clock to synchronize the system time with the PC’s time.
2)Click the Setting button to specify the daylight saving time.
Figure 4-2 Configuring Daylight Saving Time
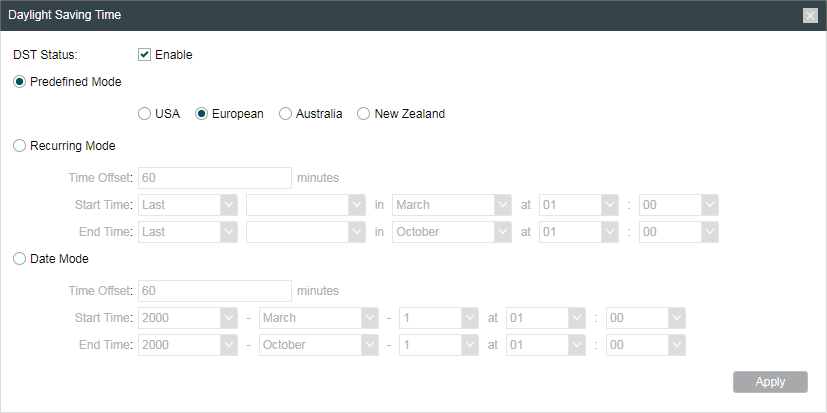
»Predefined mode
Select Predefined mode and select the predefined daylight saving time schedule for the device.
|
USA |
The daylight saving time of USA is from Second Sunday in March, 02:00 to First Sunday in November, 02:00. |
|
European |
The daylight saving time of European is from Last Sunday in March, 01:00 to Last Sunday in October, 01:00. |
|
Australia |
The daylight saving time of Australia is from First Sunday in October, 02:00 to First Sunday in April, 03:00. |
|
New Zealand |
The daylight saving time of New Zealand is from Last Sunday in September, 02:00 to First Sunday in April, 03:00. |
»Recurring mode
Select Recurring mode and configure the related parameters for the device. This configuration will be used every year.
|
Offset |
Specify the time to set the clock forward by. |
|
Start Time |
Specify the start time of Daylight Saving Time. |
|
End Time |
Specify the end time of Daylight Saving Time. |
»Recurring mode
Select Date mode and configure the related parameters for the device. This configuration will be used only one time.
|
Offset |
Specify the time to set the clock forward by. |
|
Start Time |
Specify the start time of Daylight Saving Time. |
|
End Time |
Specify the end time of Daylight Saving Time. |
3)Click Apply, then click Save.
This section is used to view the current firmware and update the firmware of the device.
Go to the System page. In the Firmware Update section, click Browser to select a firmware file then click Upload.
Figure 5-1 Updating Firmware

|
Firmware Version |
Displays the current firmware version of the device. |
|
|
Note: •We recommend that you back up current system configuration before updating the firmware. •Please select the proper software version that matches your hardware to upgrade. You can visit TP-Link website to download the latest firmware. •To avoid damage, please do not power off the device while upgrading. •After upgrading, the device will reboot automatically. |

This section is used to back up or upload the configuration file, reset the device and reboot the device.
Go to the System Page. In the Configuration section, you can perform the following operations.
Figure 6-1 Specifying Other Settings

|
Backup Configuration |
Click Backup to back up the current configuration to your PC. |
|
Upload Configuration |
Click Browser to select the desired configuration file in your PC. Then click Upload to upload the configuration file to your device. We recommend that you back up your current system configuration before uploading the new configuration. |
|
Reset to Factory Defaults |
Click Reset to restore the device to its factory defaults. It’s recommended to back up your current system configuration before restoring the device to its defaults. |
|
Reboot Device |
Click Reboot to reboot the device. Note that any changes that have not been saved will be lost. |
|
|
Note: •After backup, the device will reboot automatically. •To avoid damage, DO NOT turn off the device while uploading. |