Configuring Private VLAN
CHAPTERS
2. Private VLAN Configurations
4. Appendix: Default Parameters
|
|
This guide applies to: T2600G-18TS v2 or above, T2600G-28TS v3 or above, T2600G-28MPS v3 or above, T2600G-28SQ v1 or above, T2600G-52TS v3 or above. |

Common large networks such as ISP networks generally isolate users by VLANs. However, with the increasing number of users, upper-layer devices have to create large amount of VLANs to manage all the users. According to IEEE 802.1Q protocol, each upper-layer device can create no more than 4094 VLANs, which means upper-layer devices in backbone networks will face shortage of VLANs. By creating primary VLAN and secondary VLAN, private VLAN is an effective solution to this problem.
Based on 802.1Q VLAN, private VLAN pairs a secondary VLAN with a primary VLAN. A primary VLAN can pair with more than one secondary VLANs to compose several private VLANs. In a private VLAN, Layer 2 isolation can be achieved between end users with secondary VLANs, while upper-layer devices only need to recognize primary VLANs, which solves the problem of VLAN shortage. Meanwhile, private VLAN resolves the conflicts triggered when users’ need of VLANs is different from what the ISP can provide.
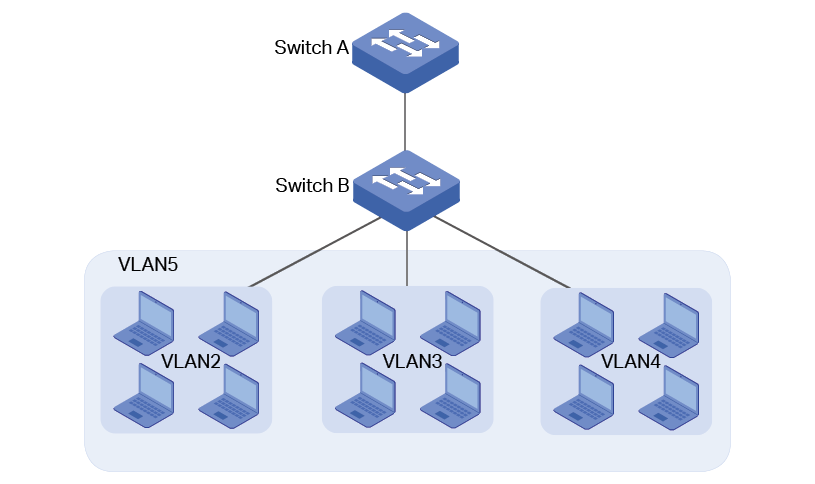
The network models of traditional VLAN and private VLAN are shown in Figure 1-1 and Figure 1-2 respectively. In the network model of traditional VLAN, isolation between users is achieved by creating VLAN2, VLAN3 and VLAN4. In this case, the upper-layer device, Switch A, needs to recognize 3 VLANs including VLAN2, VLAN3 and VLAN4.
Figure 1-1 Topology of Traditional VLAN

If private VLAN is configured on Switch B, Switch A only needs to recognize primary VLAN, VLAN5; and end users can be isolated by secondary VLANs, VLAN2, VLAN3 and VLAN4, saving VLAN resources for Switch A.
Figure 1-2 Topology of Private VLAN
2.1Using the GUI
|
|
Note: If you need to create a private VLAN with existing VLANs, delete all member ports of the existing VLANs before creating the private VLAN. |

Choose the menu L2 FEATURES > VLAN > Private VLAN and click  to load the following page.
Figure 2-1 Configuring Private VLAN
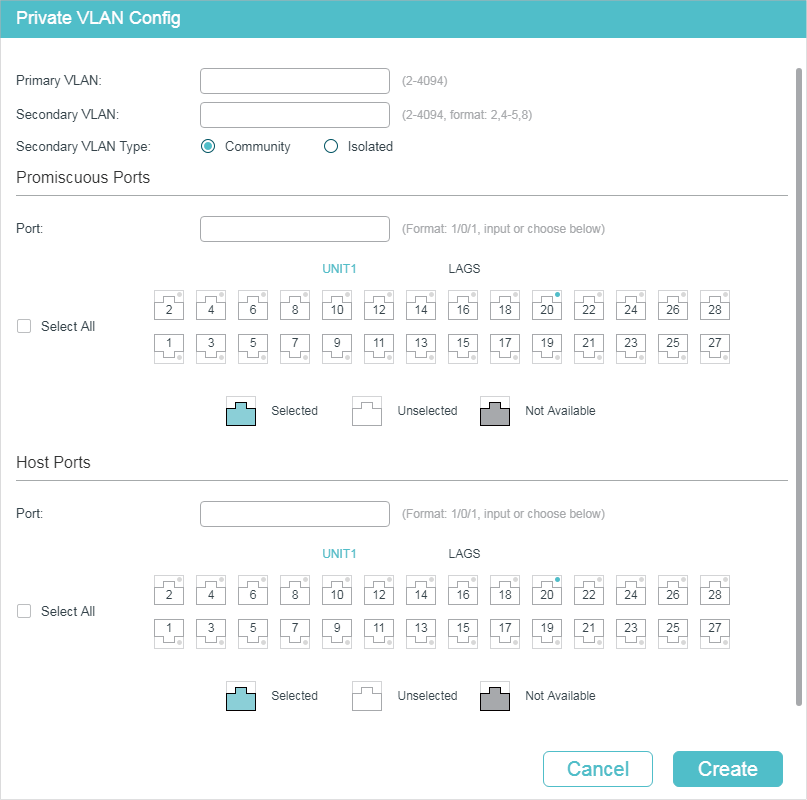
1)Enter the IDs of Primary VLAN and Secondary VLAN, and select Secondary VLAN Type.
|
Primary VLAN |
Enter an ID for Primary VLAN. A primary VLAN can pair with more than one secondary VLANs to compose several private VLANs. |
|
Secondary VLAN |
Enter an ID or an ID list for Secondary VLAN. A secondary VLAN can pair with only one primary VLAN to compose one private VLAN. To avoid long response time of the switch, you are recommended to create less than 10 secondary VLANs at a time. |
|
Secondary VLAN Type |
Select the Secondary VLAN Type. Isolated: Select this option and users in the same isolated VLAN cannot communicate with each other. Community: Select this option and users in the same community VLAN can communicate with each other. |
2)Select promiscuous ports and host ports to be added to the private VLAN.
|
Promiscuous Ports |
Select promiscuous ports to be added to the VLAN. The port type of up-link port in a primary VLAN must be Promiscuous. This type of port is used to connect upper-layer devices or connect the switch with other switches. The PVID of this port is its primary VLAN ID and the egress rule is untagged. |
|
Host Ports |
Select host ports to be added to the VLAN. The port type of down-link port in a secondary VLAN must be Host. This type of port is used to connect to end users and shield information from upper-layer devices. The PVID of this port is its secondary VLAN ID and the egress rule is untagged. |
3)Click Create.
|
|
Note: When configuring the up-link port, you only need to add the port to one private VLAN and set the port type as Promiscuous. The switch will automatically add the port to private VLANs with the same primary VLAN. |

2.2Using the CLI
2.2.1Creating Private VLAN
|
|
Note: If you need to create a private VLAN with existing VLANs, delete all member ports of the existing VLANs before creating the private VLAN. |
Follow these steps to create Private VLAN:
|
Step 1 |
configure Enter global configuration mode. |
|
Step 2 |
vlan vlan-list Specify Primary VLAN ID, and enter VLAN configuration mode. vlan-list: Specify the ID or the ID list of the VLAN(s) for configuration. The ID ranges from 2 to 4094, for example, 2-3,5. |
|
Step 3 |
private-vlan primary Specify the VLAN to be the primary VLAN. |
|
Step 4 |
exit Exit VLAN configuration mode. |
|
Step 5 |
vlan vlan-list Specify Primary VLAN ID, and enter VLAN configuration mode. vlan-list: Specify the ID or the ID list of the VLAN(s) for configuration. The ID ranges from 2 to 4094, for example, 2-3,5. |
|
Step 6 |
private-vlan { community | isolated } Specify the VLAN to be the secondary VLAN, and configure the secondary VLAN type. community: Set the secondary VLAN type as Community. Users in the same isolated VLAN cannot communicate with each other. isolated: Set the secondary VLAN type as Isolated. Users in the same community VLAN can communicate with each other. |
|
Step 7 |
exit Exit VLAN configuration mode. |
|
Step 8 |
vlan vlan-id Specify the primary VLAN ID, and enter VLAN configuration mode. |
|
Step 9 |
private-vlan association vlan-list Specify the ID or the ID list of the secondary VLAN(s) to pair with this primary VLAN. To avoid long response time of the switch, you are recommended to pair less than 10 secondary VLANs with the primary VLAN at a time. vlan-list: Specify the ID or the ID list of the secondary VLAN(s). |
|
Step 10 |
show vlan private-vlan Verify configurations of private VLAN. |
|
Step 11 |
end Return to Privileged EXEC Mode. |
|
Step 12 |
copy running-config startup-config Save the settings in the configuration file. |
The following example shows how to create primary VLAN 6 and secondary VLAN 5, set the secondary VLAN type as community, and pair primary VLAN 6 with secondary VLAN 5 as a private VLAN.
Switch#configure
Switch(config)#vlan 6
Switch(config-vlan)#private-vlan primary
Switch(config-vlan)#exit
Switch(config)#vlan 5
Switch(config-vlan)#private-vlan community
Switch(config-vlan)#exit
Switch(config)#vlan 6
Switch(config-vlan)#private-vlan association 5
Switch(config-vlan)#exit
Switch(config)#show vlan private-vlan
Primary Secondary Type Ports
--------- ------------- --------------- --------------
6 5 Community
Switch(config)#end
Switch#copy running-config startup-config
2.2.2Configuring the Up-link Port
Follow these steps to add up-link ports to Private VLAN:
|
Step 1 |
configure Enter global configuration mode. |
|
Step 2 |
interface {fastEthernet port | range fastEthernet port-list | gigabitEthernet port | range gigabitEthernet port-list | ten-gigabitEthernet port | range ten-gigabitEthernet port-list | port-channel port-channel-id | range port-channel port-channel-list} Enter interface configuration mode. |
|
Step 3 |
switchport private-vlan promiscuous Configure the port type as Promiscuous. The port type of up-link port in a primary VLAN must be Promiscuous. This type of port is used to connect upper-layer devices or connect the switch with other switches. The PVID of this port is its primary VLAN ID. |
|
Step 4 |
switchport private-vlan mapping primary-vlan-id secondary-vlan-id Add the specified port(s) to the private VLAN. primary-vlan-id: Specify the ID of the primary VLAN. The ID ranges from 2 to 4094. secondary-vlan-id: Specify the ID of the secondary VLAN. The ID ranges from 2 to 4094. |
|
Step 5 |
show vlan private-vlan Verify configurations of private VLAN. |
|
Step 6 |
show vlan private-vlan interface [fastEthernet port | gigabitEthernet port | ten-gigabitEthernet port | port-channel lag-id] Verify private VLAN configurations of ports. port: Specify the ID of the port to show information. lag-id: Specify the ID of the LAG to show information. |
|
Step 7 |
end Return to Privileged EXEC Mode. |
|
Step 8 |
copy running-config startup-config Save the settings in the configuration file. |
|
|
Note: When configuring the up-link port, you only need to add the port to one private VLAN and set the port type as Promiscuous. The switch will automatically add the port to private VLANs with the same primary VLAN. |
The following example shows how to configure the port type of port 1/0/2 as Promiscuous, and add it to the private VLAN composed of primary VLAN 6 and secondary VLAN 5.
Switch#configure
Switch(config)#interface gigabitEthernet 1/0/2
Switch(config-if)#switchport private-vlan promiscuous
Swtich(config-if)#switchport private-vlan mapping 6 5
Switch(config-if)#exit
Switch(config)#show vlan private-vlan
Primary Secondary Type Ports
--------- ------------- --------------- --------------
6 5 Community Gi1/0/2
Switch(config)#show vlan private-vlan interface gigabitEthernet 1/0/2
Port type
--------- ----------
Gi1/0/2 Promiscuous
Switch(config)#end
Switch#copy running-config startup-config
2.2.3Configuring the Down-link Port
Follow these steps to add down-link ports to Private VLAN:
|
Step 1 |
configure Enter global configuration mode. |
|
Step 2 |
interface {fastEthernet port | range fastEthernet port-list | gigabitEthernet port | range gigabitEthernet port-list | ten-gigabitEthernet port | range ten-gigabitEthernet port-list | port-channel port-channel-id | range port-channel port-channel-list} Enter interface configuration mode. |
|
Step 3 |
switchport private-vlan host Configure the port type as host. The port type of down-link port in a secondary VLAN must be Host. This type of port is used to connect to end users and shield information from upper-layer devices. The PVID of this port is its secondary VLAN ID. |
|
Step 4 |
switchport private-vlan host-association primary-vlan-id secondary-vlan-id vlantype Add the specified port(s) to the private VLAN. primary-vlan-id: Specify the ID of the primary VLAN. The ID ranges from 2 to 4094. secondary-vlan-id: Specify the ID of the secondary VLAN. The ID ranges from 2 to 4094. vlantype: Specify the secondary VLAN type, either community or isolated. |
|
Step 5 |
show vlan private-vlan Verify configurations of private VLAN. |
|
Step 6 |
show vlan private-vlan interface [fastEthernet port | gigabitEthernet port | ten-gigabitEthernet port | port-channel lag-id] Verify private VLAN configurations of ports. port: Specify the ID of the port to show information. lag-id: Specify the ID of the LAG to show information. |
|
Step 7 |
end Return to Privileged EXEC Mode. |
|
Step 8 |
copy running-config startup-config Save the settings in the configuration file. |
The following example shows how to configure the port type of port 1/0/3 as Host, and add it to the private VLAN composed of primary VLAN 6 and secondary VLAN 5.
Switch#configure
Switch(config)#interface gigabitEthernet 1/0/3
Switch(config-if)#switchport private-vlan host
Swtich(config-if)#switchport private-vlan host-association 6 5 community
Switch(config-if)#exit
Switch(config)#show vlan private-vlan
Primary Secondary Type Ports
--------- ------------- --------------- --------------
6 5 Community Gi1/0/3
Switch(config)#show vlan private-vlan interface gigabitEthernet 1/0/3
Port type
--------- ----------
Gi1/0/3 Host
Switch(config)#end
Switch#copy running-config startup-config
3.1Network Requirements
Usually, an ISP divides its network into subnets to differentiate different areas by using VLAN. Company A belongs to Area VI which is marked as VLAN 6 by the ISP. It is required that departments in Company A can achieve Layer 2 isolation by using VLAN and users in the same department can communicate with each other.
3.2Configuration Scheme
You can create primary VLAN and secondary VLAN and pair them into private VLAN. This allows upper-layer switch to recognize only the primary VLAN instead of all the secondary VLANs. Also, Company A can achieve Layer 2 isolation by using secondary VLAN.
Since it is required that users in the same department can communicate with each other, secondary VLAN type should be configured as Community.
3.3Network Topology
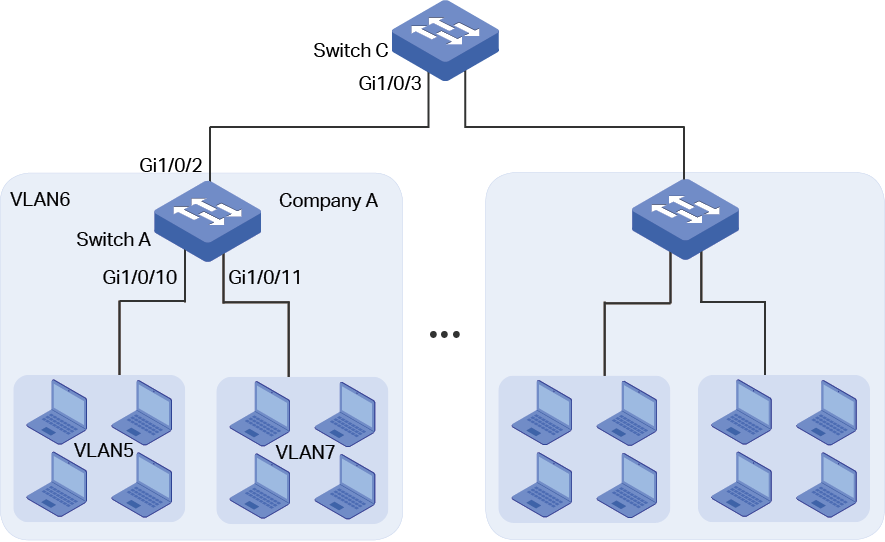
As shown in the following figure, Switch C is the ISP’s central switch, and Switch A is in Company A. To meet the requirement, configure private VLAN on Switch A. This chapter provides configuration procedures in two ways: using the GUI and using the CLI.
Demonstrated with T2600G-28TS, this chapter provides configuration procedures in two ways: using the GUI and using the CLI.
Figure 3-1 Network Topology
3.4Using the GUI
Configurations for Switch A
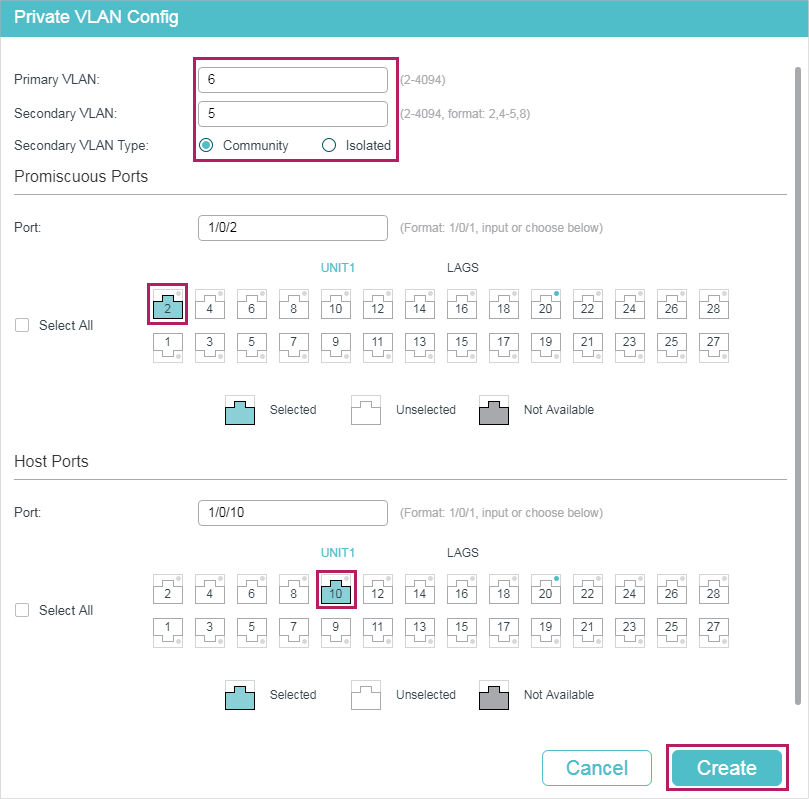
1)Choose the menu L2 FEATURES > VLAN > Private VLAN and click to load the following page. Create primary VLAN 6 and secondary VLAN 5, select Community as the Secondary VLAN Type. Add promiscuous port 1/0/2 and host port 1/0/10 to private VLAN.
Figure 3-2 Creating Primary VLAN 6 and Secondary VLAN 5
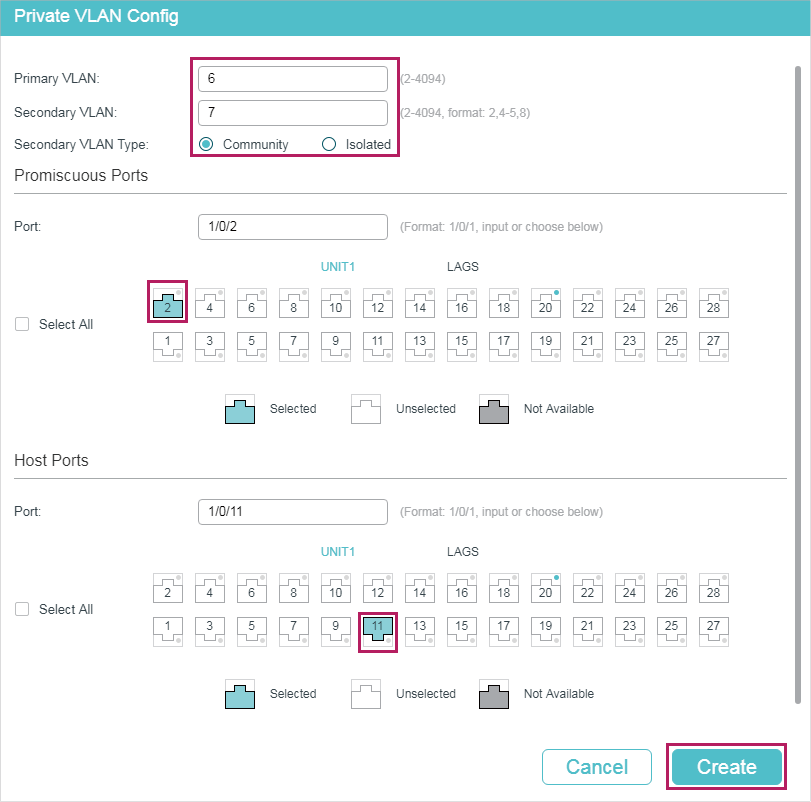
2)Choose the menu L2 FEATURES > VLAN > Private VLAN and click to load the following page. Create primary VLAN 6 and secondary VLAN 7, select Community as the Secondary VLAN Type. Add promiscuous port 1/0/2 and host port 1/0/11 to private VLAN.
Figure 3-3 Creating Primary VLAN 6 and Secondary VLAN 7
3)Click  to save the settings.
Configurations for Switch C
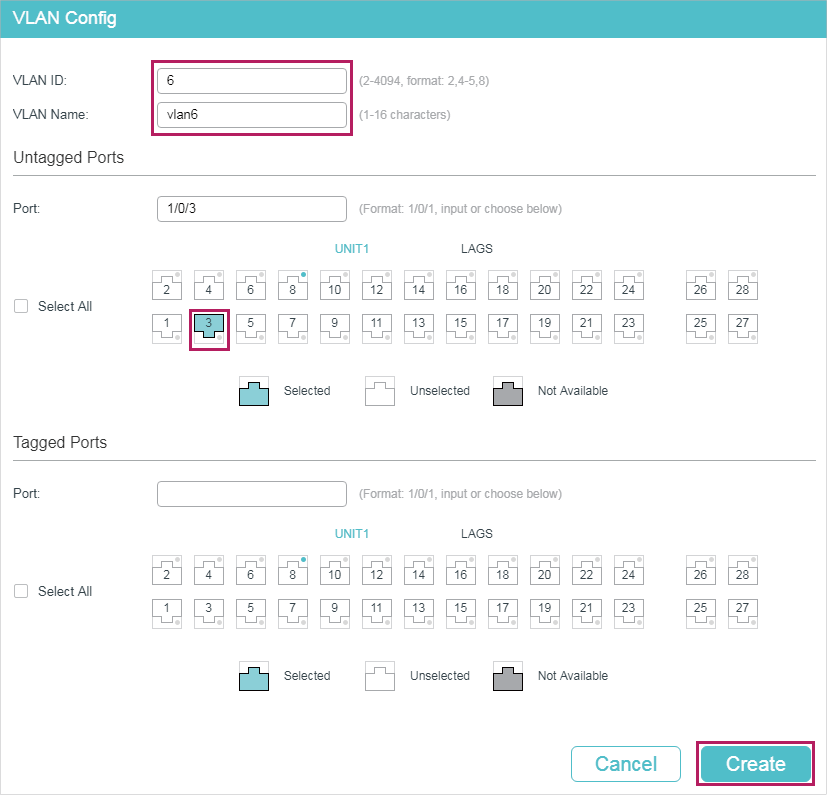
1)Choose the menu L2 FEATURES > VLAN > 802.1Q VLAN > VLAN Config and click to load the following page. Create VLAN 6 and add untagged port 1/0/3 to VLAN 6. Click Create.
Figure 3-4 Creating VLAN 6
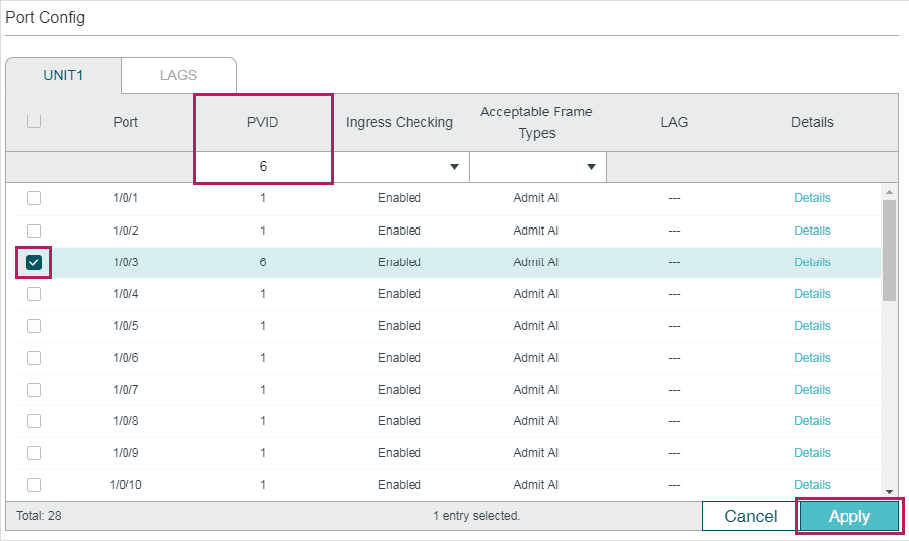
2)Choose the menu L2 FEATURES > VLAN > 802.1Q VLAN > Port Config to load the following page. Set the PVID of port 1/0/3 as 6. Click Apply.
Figure 3-5 Cpecifying the PVID
3)Click to save the settings.
3.5Using the CLI
Configurations for Switch A
1)Enter global configuration mode.
Switch_A>enable
Switch_A#configure
2)Create primary VLAN 6 and secondary VLAN 5, and pair them into a private VLAN.
Switch_A(config)#vlan 6
Switch_A(config-vlan)#private-vlan primary
Switch_A(config-vlan)#exit
Switch_A(config)#vlan 5
Switch_A(config-vlan)#private-vlan community
Switch_A(config-vlan)#exit
Switch_A(config)#vlan 6
Switch_A(config-vlan)#private-vlan association 5
Switch_A(config-vlan)#exit
3)Create secondary VLAN 7, and pair it with primary VLAN 6 into a private VLAN.
Switch_A(config)#vlan 7
Switch_A(config-vlan)#private-vlan community
Switch_A(config-vlan)#exit
Switch_A(config)#vlan 6
Switch_A(config-vlan)#private-vlan association 7
Switch_A(config-vlan)#exit
4)Add up-link port to the corresponding private VLAN and configure the port type as Promiscuous.
Switch_A(config)#interface gigabitEthernet 1/0/2
Switch_A(config-if)#switchport private-vlan promiscuous
Switch_A(config-if)#switchport private-vlan mapping 6 5
Switch_A(config-if)#exit
5)Add down-link port to the corresponding private VLAN and configure the port type as Host.
Switch_A(config)#interface gigabitEthernet 1/0/10
Switch_A(config-if)#switchport private-vlan host
Switch_A(config-if)#switchport private-vlan host-association 6 5 community
Switch_A(config-if)#exit
Switch_A(config)#interface gigabitEthernet 1/0/11
Switch_A(config-if)#switchport private-vlan host
Switch_A(config-if)#switchport private-vlan host-association 6 7 community
Switch_A(config-if)#end
Switch_A#copy running-config startup-config
Configurations for Switch C
1)Enter global configuration mode.
Switch_C>enable
Switch_C#configure
2)Create VLAN 6, add port 1/0/3 to VLAN 6 and set the PVID of port 1/0/3 as 6.
Switch_C(config)#vlan 6
Switch_C(config-vlan)#name vlan6
Switch_C(config-vlan)#exit
Switch_C(config)#interface gigabitEthernet 1/0/3
Switch_C(config-if)#switchport pvid 6
Switch_C(config-if)#switchport general allowed vlan 6 untagged
Switch_C(config-if)#end
Switch_C#copy running-config startup-config
Verify the Configurations
Switch A
Verify the configuration of private VLAN:
Switch_A#show vlan private-vlan
Primary Secondary Type Ports
--------- ------------- --------------- --------------
6 5 Community Gi1/0/2,1/0/10
6 7 Community Gi1/0/2,1/0/11
Verify the configuration of ports:
Swtich_A#show vlan private-vlan interface
Port type
--------- ----------
Gi1/0/1 Normal
Gi1/0/2 Promiscuous
Gi1/0/3 Normal
Gi1/0/4 Normal
Gi1/0/5 Normal
Gi1/0/6 Normal
Gi1/0/7 Normal
Gi1/0/8 Normal
Gi1/0/9 Normal
Gi1/0/10 Host
Gi1/0/11 Host
Gi1/0/12 Normal
......
Switch C
Verify the configuration of 802.1Q VLAN:
Switch_C#show vlan
VLAN Name Status Ports
----- ------------------ --------- ----------------------------------------
1 System-VLAN active Gi1/0/1, Gi1/0/2, Gi1/0/3, Gi1/0/4,
Gi1/0/5, Gi1/0/6, Gi1/0/7, Gi1/0/8,
Gi1/0/9, Gi1/0/10, Gi1/0/11, Gi1/0/12,
Gi1/0/13, Gi1/0/14, Gi1/0/15, Gi1/0/16,
Gi1/0/17, Gi1/0/18, Gi1/0/19, Gi1/0/20,
Gi1/0/21, Gi1/0/22, Gi1/0/23, Gi1/0/24,
Gi1/0/25, Gi1/0/26, Gi1/0/27, Gi1/0/28
6 vlan6 active Gi1/0/3
Primary Secondary Type Ports
------- --------- ------------ ----------------------------------------
Default settings of Private VLAN are listed in the following tables.
Table 4-1Default Settings of Private VLAN
|
Parameter |
Default Setting |
|
Primary VLAN |
None |
|
Secondary VLAN |
None |
|
Secondary VLAN Type |
Community |