Configuring IPv6 IMPB
CHAPTERS
2. IPv6-MAC Binding Configuration
4. IPv6 Source Guard Configuration
6. Appendix: Default Parameters
|
|
This guide applies to: T1500G-8T v2 or above, T1500G-10PS v2 or above, T1500G-10MPS v2 or above, T1500-28PCT v3 or above, T1600G-18TS v2 or above, T1600G-28PS v3 or above, T1600G-28TS v3 or above, T1600G-52TS v3 or above, T1600G-52PS v3 or above, T1700X-16TS v3 or above, T1700G-28TQ v3 or above, T2500G-10TS v2 or above, T2600G-18TS v2 or above, T2600G-28TS v3 or above, T2600G-28MPS v3 or above, T2600G-28SQ v1 or above, T2600G-52TS v3 or above. |

1.1Overview
IPv6 IMPB (IP-MAC-Port Binding) is used to bind the IPv6 address, MAC address, VLAN ID and the connected port number of the specified host. Basing on the binding table, the switch can prevent ND attacks with the ND Detection feature and filter the packets that don’t match the binding entries with the IPv6 Source Guard feature.
1.2Supported Features
IPv6-MAC Binding
This feature is used to add binding entries. The binding entries can be manually configured, or learned by ND Snooping or DHCPv6 snooping. The features ND Detection and IPv6 Source Guard are based on the IPv6-MAC Binding entries.
ND Detection
Because of the absence of security mechanism, IPv6 ND (Neighbor Discovery) protocol is easy to be exploited by attackers. ND detection feature uses the entries in the IPv6-MAC binding table to filter the forged ND packets and prevent the ND attacks.
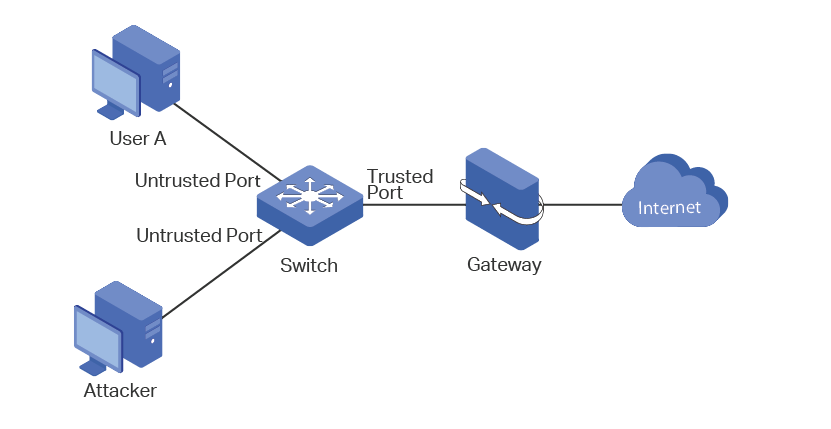
The application topology of ND Detection is as the following figure shows. The port that is connected to the gateway should be configured as trusted port, and other ports should be configured as untrusted ports. The forwarding principles of ND packets are as follows:
All ND packets received on the trusted port will be forwarded without checked.
RS (Router Solicitation) and NS (Neighbor Solicitation) packets with their source IPv6 addresses unspecified, such as the RS packet for IPv6 address request and the NS packet for duplicate address detection, will not be checked on both kinds of ports.
RA (Router Advertisement) and RR (Router Redirect) packets received on the untrusted port will be discarded directly, and other ND packets will be checked: The switch will use the IPv6-MAC binding table to compare the IPv6 address, MAC address, VLAN ID and receiving port between the entry and the ND packet. If a match is found, the ND packet is considered legal and will be forwarded; if no match is found, the ND packet is considered illegal and will be discarded.
Figure 1-1 Network Topology of ND Detection
IPv6 Source Guard
IPv6 Source Guard is used to filter the IPv6 packets based on the IPv6-MAC Binding table. Only the packets that match the binding rules are forwarded.
2IPv6-MAC Binding Configuration
You can add IPv6-MAC Binding entries in three ways:
Manual Binding
Via ND Snooping
Via DHCPv6 Snooping
Additionally, you can view, search and edit the entries in the Binding Table.
2.1Using the GUI
2.1.1Binding Entries Manually
You can manually bind the IPv6 address, MAC address, VLAN ID and the Port number together on the condition that you have got the detailed information of the hosts.
Choose the menu SECURITY > IPv6 IMPB > IPv6-MAC Binding > Manual Binding and click  to load the following page.
Figure 2-1 Manual Binding
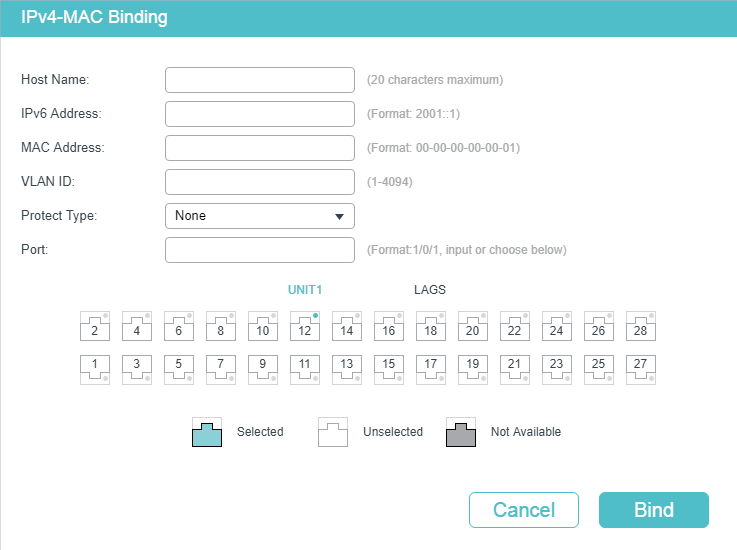
Follow these steps to manually create an IPv6-MAC Binding entry:
1)Enter the following information to specify a host.
|
Host Name |
Enter the host name for identification. |
|
IPv6 Address |
Enter the IPv6 address. |
|
MAC Address |
Enter the MAC address. |
|
VLAN ID |
Enter the VLAN ID. |
2)Select protect type for the entry.
|
Protect Type |
Select the protect type for the entry. The entry will be applied to to the specific feature. The following options are provided: None: This entry will not be applied to any feature. ND Detection: This entry will be applied to the ND Detection feature. IPv6 Source Guard: This entry will be applied to the IPv6 Source Guard feature. Both: This entry will be applied to both of the features. |
3)Enter or select the port that is connected to this host.
4)Click Apply.
2.1.2Binding Entries via ND Snooping
With ND Snooping, the switch monitors the ND packets, and records the IPv6 addresses, MAC addresses, VLAN IDs and the connected port numbers of the IPv6 hosts. You can bind these entries conveniently.
|
|
Note: Before using this feature, make sure that your network is safe and the hosts are not suffering from ND attacks at present; otherwise, you may obtain incorrect IPv6-MAC Binding entries. If your network is being attacked, it’s recommended to bind the entries manually. |

Choose the menu SECURITY > IPv6 IMPB > IPv6-MAC Binding > ND Snooping to load the following page.
Figure 2-2 ND Snooping
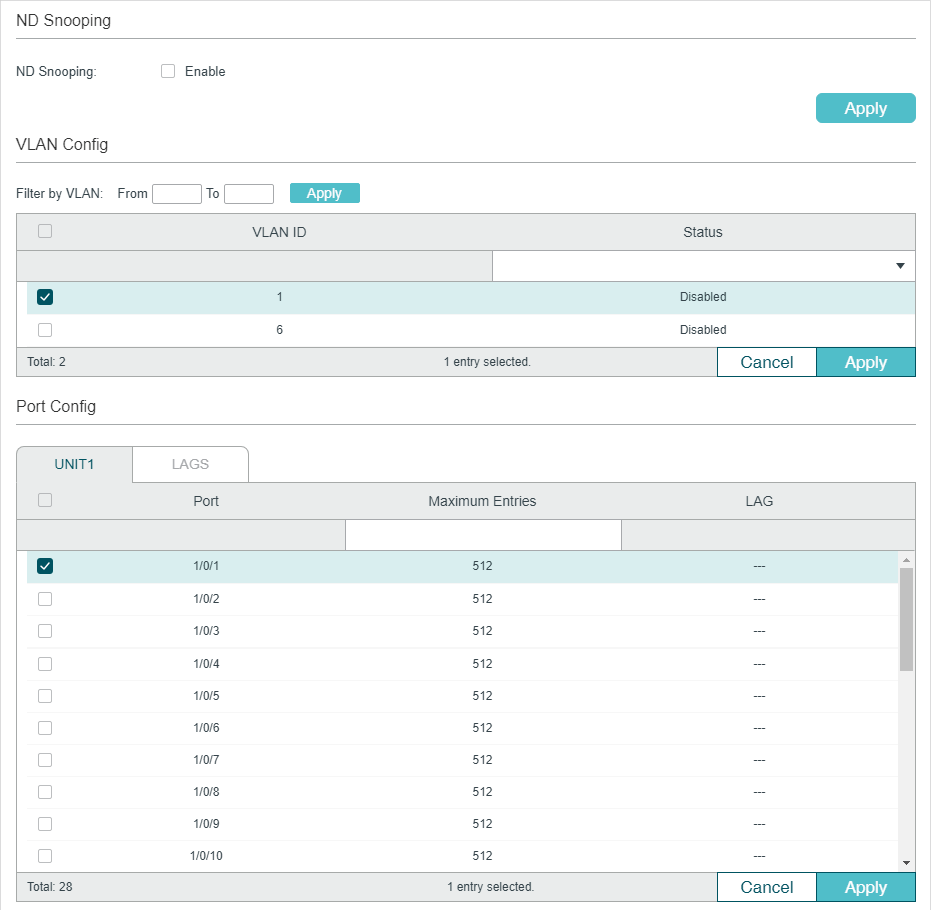
Follow these steps to configure IPv6-MAC Binding via ND Snooping:
1)In the ND Snooping section, enable ND Snooping and click Apply.
2)In the VLAN Config section, select one or more VLANs and enable ND Snooping. Click Apply.
|
VLAN ID |
Displays the VLAN ID. |
|
Status |
Enable or disable ND Snooping on the VLAN. |
3)In the Port Config section, configure the maximum number of entries a port can learn via ND snooping. Click Apply.
|
Port |
Displays the port number. |
|
Maximum Entries |
Configure the maximum number of binding entries a port can learn via ND snooping. |
|
LAG |
Displays the LAG that the port is in. |
4)The learned entries will be displayed in the Binding Table. You can go to SECURITY > IPv6 IMPB > IPv6-MAC Binding > Binding Table to view or edit the entries.
2.1.3Binding Entries via DHCPv6 Snooping
With DHCPv6 Snooping enabled, the switch can monitor the IP address obtaining process of the host, and record the IPv6 address, MAC address, VLAN ID and the connected port number of the host.
Choose the menu SECURITY > IPv6 IMPB > IPv6-MAC Binding > DHCPv6 Snooping to load the following page.
Figure 2-3 DHCPv6 Snooping
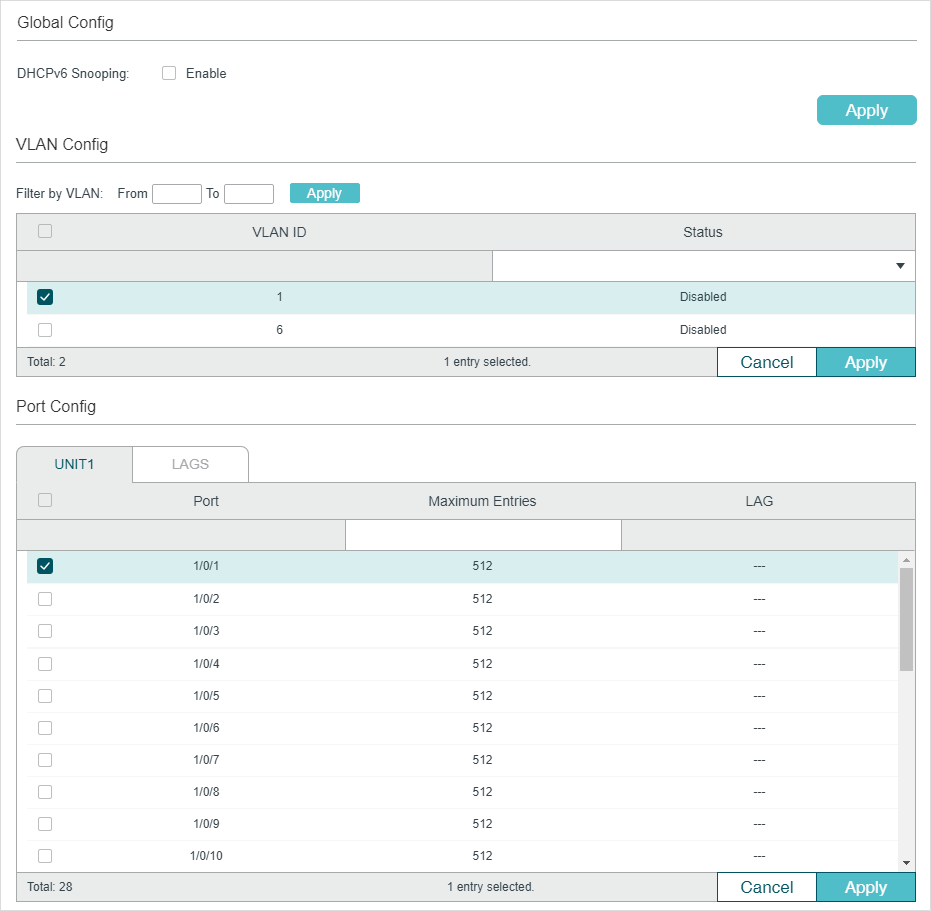
Follow these steps to configure IPv6-MAC Binding via DHCPv6 Snooping:
1)In the Global Config section, globally enable DHCPv6 Snooping. Click Apply.
2)In the VLAN Config section, enable DHCPv6 Snooping on a VLAN or range of VLANs. Click Apply.
|
VLAN ID |
Displays the VLAN ID. |
|
Status |
Enable or disable DHCPv6 Snooping on the VLAN. |
3)In the Port Config section, configure the maximum number of binding entries a port can learn via DHCPv6 snooping. Click Apply.
|
Port |
Displays the port number. |
|
Maximum Entries |
Configure the maximum number of binding entries a port can learn via DHCPv6 snooping. |
|
LAG |
Displays the LAG that the port is in. |
4)The learned entries will be displayed in the Binding Table. You can go to SECURITY > IPv6 IMPB > IPv6-MAC Binding > Binding Table to view or edit the entries.
2.1.4Viewing the Binding Entries
In the Binding Table, you can view, search and edit the specified binding entries.
Choose the menu SECURITY > IPv6 IMPB > IPv6-MAC Binding > Binding Table to load the following page.
Figure 2-4 Binding Table
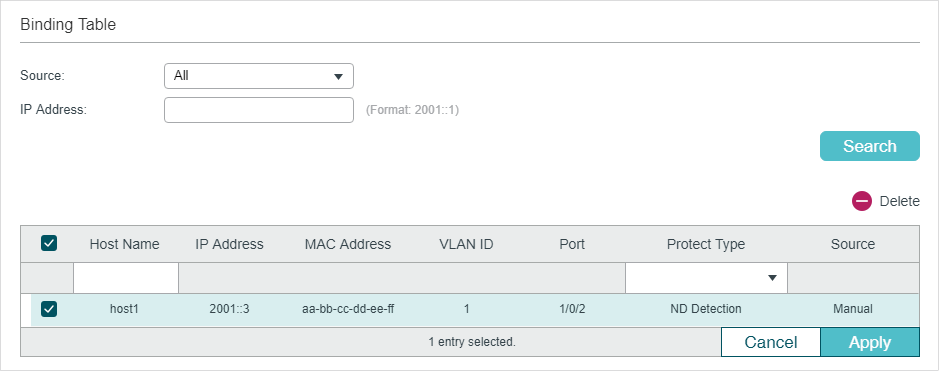
You can specify the search criteria to search your desired entries.
|
Source |
Select the source of the entry and click Search. All: Displays the entries from all sources. Manual Binding: Displays the manually bound entries. ND Snooping: Displays the binding entries learned from ND Snooping. DHCPv6 Snooping: Displays the binding entries learned from DHCP Snooping. |
|
IP |
Enter an IP address and click Search to search the specific entry. |
Additionally, you select one or more entries to edit the host name and protect type and click Apply.
|
Host Name |
Enter a host name for identification. |
|
IP Address |
Displays the IPv6 address. |
|
MAC Address |
Displays the MAC address. |
|
VLAN ID |
Displays the VLAN ID. |
|
Port |
Displays the port number. |
|
Protect Type |
Select the protect type for the entry. The entry will be applied to to the specific feature. The following options are provided: None: This entry will not be applied to any feature. ND Detection: This entry will be applied to the ND Detection feature. IPv6 Source Guard: This entry will be applied to the IP Source Guard feature. Both: This entry will be applied to both of the features. |
|
Source |
Displays the source of the entry. |
2.2Using the CLI
The following sections introduce how to bind entries manually and via ND Snooping and DHCP Snooping, and how to view the binding entries.
2.2.1Binding Entries Manually
You can manually bind the IPv6 address, MAC address, VLAN ID and the Port number together on the condition that you have got the detailed information of the hosts.
Follow these steps to manually bind entries:
|
Step 1 |
configure Enter global configuration mode. |
|
Step 2 |
ipv6 source binding hostname ipv6-addr mac-addr vlan vlan-id interface { fastEthernet port | gigabitEthernet port | ten-gigabitEthernet port | port-channel port-channel-id } { none | nd-detection | ipv6-verify-source | both } Manually bind the host name, IP address, MAC address, VLAN ID and port number of the host, and configure the protect type for the host. hostname: Specify a name for the host. It contains 20 characters at most. ipv6-addr: Enter the IPv6 address of the host. mac-addr: Enter the MAC address of the host, in the format of xx:xx:xx:xx:xx:xx. vlan-id: Enter the VLAN ID of the host. port: Enter the number of the port on which the host is connected. none | nd-detection | ipv6-verify-source | both: Specify the protect type for the entry. None indicates this entry will not be applied to any feature; nd-detection indicates this entry will be applied to ND Detection; ipv6-verify-source indicates this entry will be applied to IP Source Guard; both indicates this entry will be applied to both ND Detection and IP Source Guard. |
|
Step 3 |
show ip source binding Verify the binding entry. |
|
Step 4 |
end Return to privileged EXEC mode. |
|
Step 5 |
copy running-config startup-config Save the settings in the configuration file. |
The following example shows how to bind an entry with the hostname host1, IPv6 address 2001:0:9d38:90d5::34, MAC address AA-BB-CC-DD-EE-FF, VLAN ID 10, port number 1/0/5, and enable this entry for ND Detection.
Switch#configure
Switch(config)#ipv6 source binding host1 2001:0:9d38:90d5::34 aa:bb:cc:dd:ee:ff vlan 10 interface gigabitEthernet 1/0/5 nd-detection
Switch(config)#show ipv6 source binding
U Host IP-Addr MAC-Addr VID Port ACL Source
- ---- ------- -------- --- ---- --- ------
1 host1 2001:0:9d38:90d5::34 aa:bb:cc:dd:ee:ff 10 Gi1/0/5 ND-D Manual
Switch(config)#end
Switch#copy running-config startup-config
2.2.2Binding Entries via ND Snooping
Follow these steps to bind entries via ND Snooping:
|
Step 1 |
configure Enter global configuration mode. |
|
Step 2 |
ipv6 nd snooping Globally enable ND Snooping. |
|
Step 3 |
ipv6 nd snooping vlan vlan-range Enable ND Snooping on the specified VLAN. vlan-range: Enter the vlan range in the format of 1-3, 5. |
|
Step 4 |
interface { fastEthernet port | range fastEthernet port-list | gigabitEthernet port | range gigabitEthernet port-list | ten-gigabitEthernet port | range ten-gigabitEthernet port-list} Enter interface configuration mode. |
|
Step 5 |
ipv6 nd snooping max-entries value Configure the maximum number of ND binding entries a port can learn via ND snooping. value: Enter the maximum number of ND binding entries a port can learn via ND snooping. The valid values are from 0 to 1024, and the default is 1024. |
|
Step 6 |
show ipv6 nd snooping Verify the global configuration of IPv6 ND Snooping |
|
Step 7 |
show ipv6 nd snooping interface { fastEthernet port | gigabitEthernet port | ten-gigabitEthernet port } Verify the IPv6 ND Snooping configuration of the specific port. |
|
Step 8 |
end Return to privileged EXEC mode. |
|
Step 9 |
copy running-config startup-config Save the settings in the configuration file. |
The following example shows how to enable ND Snooping globally and on VLAN 1.
Switch#configure
Switch(config)#ipv6 nd snooping
Switch(config)#ipv6 nd snooping vlan 1
Switch(config)#show ipv6 nd snooping
Global Status: Enable
VLAN ID: 1
Switch(config)#end
Switch#copy running-config startup-config
The following example shows how to configure the maximum number of entries that can be learned on port 1/0/1:
Switch#configure
Switch(config)#interface gigabitEthernet 1/0/1
Switch(config-if)#ipv6 nd snooping max-entries 1000
Switch(config-if)#show ipv6 nd snooping interface gigabitEthernet 1/0/1
Interface max-entries LAG
--------- ----------- -----
Gi1/0/1 1000 N/A
Switch(config-if)#end
Switch#copy running-config startup-config
2.2.3Binding Entries via DHCPv6 Snooping
Follow these steps to bind entries via DHCP Snooping:
|
Step 1 |
configure Enter global configuration mode. |
|
Step 2 |
ipv6 dhcp snooping Globally enable DHCPv6 Snooping. |
|
Step 3 |
ipv6 dhcp snooping vlan vlan-range Enable DHCPv6 Snooping on the specified VLAN. vlan-range: Enter the vlan range in the format of 1-3, 5. |
|
Step 4 |
interface { fastEthernet port | range fastEthernet port-list | gigabitEthernet port | range gigabitEthernet port-list | ten-gigabitEthernet port | range ten-gigabitEthernet port-list | interface port-channel port-channel-id | interface range port-channel port-channel-id-list } Enter interface configuration mode. |
|
Step 5 |
ipv6 dhcp snooping max-entries value Configure the maximum number of binding entries the port can learn via DHCPv6 snooping. value: Enter the value of maximum number of entries. The valid values are from 0 to 512. |
|
Step 6 |
show ip dhcp snooping Verify global configuration of DHCPv6 Snooping. |
|
Step 7 |
end Return to privileged EXEC mode. |
|
Step 8 |
copy running-config startup-config Save the settings in the configuration file. |
The following example shows how to enable DHCPv6 Snooping globally and on VLAN 5, and set the maximum number of binding entries port 1/0/1 can learn via DHCPv6 snooping as 100:
Switch#configure
Switch(config)#ipv6 dhcp snooping
Switch(config)#ipv6 dhcp snooping vlan 5
Switch(config)#interface gigabitEthernet 1/0/1
Switch(config-if)#ipv6 dhcp snooping max-entries 100
Switch(config-if)#show ipv6 dhcp snooping
Global Status: Enable
VLAN ID: 5
Switch(config-if)#show ipv6 dhcp snooping interface gigabitEthernet 1/0/1
Interface max-entries LAG
--------- ----------- ---
Gi1/0/1 100 N/A
Switch(config-if)#end
Switch#copy running-config startup-config
2.2.4Viewing Binding Entries
On privileged EXEC mode or any other configuration mode, you can use the following command to view binding entries:
|
show ipv6 source binding View the information of binding entries, including the host name, IP address, MAC address, VLAN ID, port number and protect type. |
To complete ND Detection configuration, follow these steps:
1)Add IPv6-MAC Binding entries.
2)Enable ND Detection.
3)Configure ND Detection on ports.
4)View ND statistics.
3.1Using the GUI
3.1.1Adding IPv6-MAC Binding Entries
The ND Detection feature allows the switch to detect the ND packets based on the binding entries in the IPv6-MAC Binding Table and filter out the illegal ND packets. Before configuring ND Detection, complete IPv6-MAC Binding configuration.
3.1.2Enabling ND Detection
Choose the menu SECURITY > IPv6 IMPB > ND Detection > Global Config to load the following page.
Figure 3-1 ND Detection Global Config
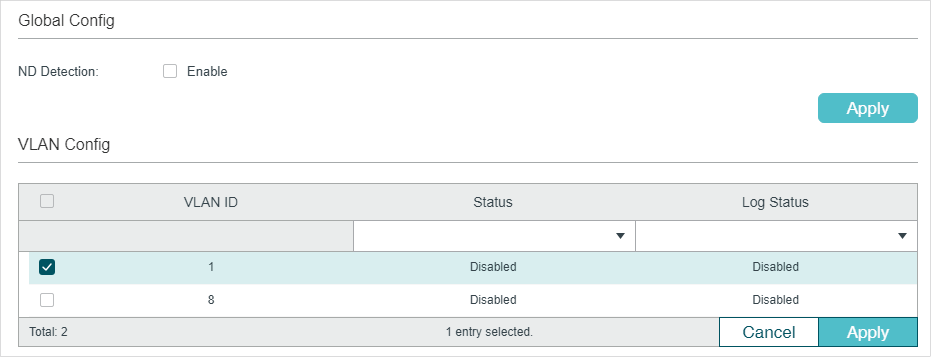
Follow these steps to enable ND Detection:
1)In the Global Config section, enable ND Detection and configure the related parameters. Click Apply.
|
ND Detection |
Enable or disable ND Detection globally. |
2)In the VLAN Config section, enable ND Detection on the selected VLANs. Click Apply.
|
VLAN ID |
Displays the VLAN ID. |
|
Status |
Enable or disable ND Detection on the VLAN. |
|
Log Status |
Enable or disable Log feature on the VLAN. With this feature enabled, the switch generates a log when an illegal ND packet is discarded. |
3.1.3Configuring ND Detection on Ports
Choose the menu SECURITY > IPv6 IMPB > ND Detection >Port Config to load the following page.
Figure 3-2 ND Detection on Port
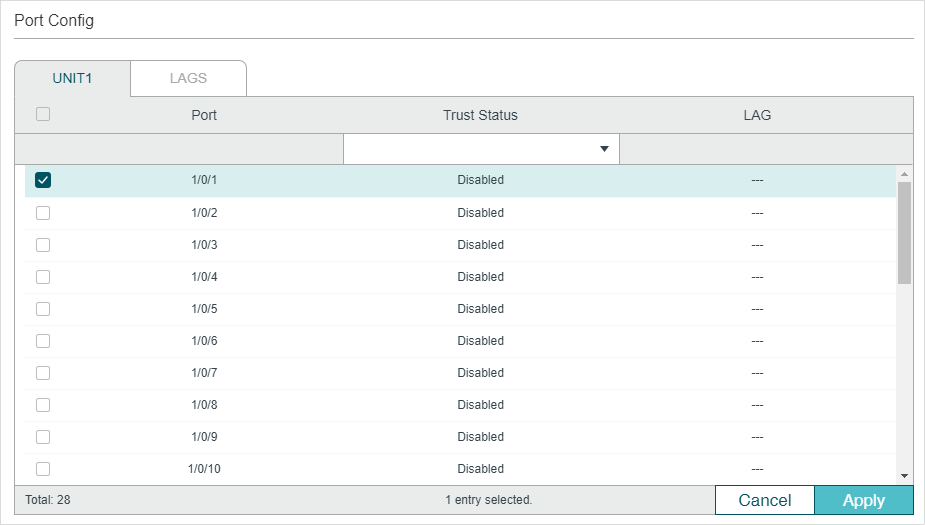
Follow these steps to configure ND Detection on ports:
1)Select one or more ports and configure the parameters.
|
Port |
Displays the port number. |
|
Trust Status |
Enable or disable this port to be a trusted port. On a trusted port, the ND packets are forwarded directly without checked. The specific ports, such as up-link ports and routing ports are suggested to be set as trusted. |
|
LAG |
Displays the LAG that the port is in. |
2)Click Apply.
3.1.4Viewing ND Statistics
You can view the number of the illegal ND packets received on each port, which facilitates you to locate the network malfunction and take the related protection measures.
Choose the menu SECURITY > IPv6 IMPB > ND Detection > ND Statistics to load the following page.
Figure 3-3 View ND Statistics
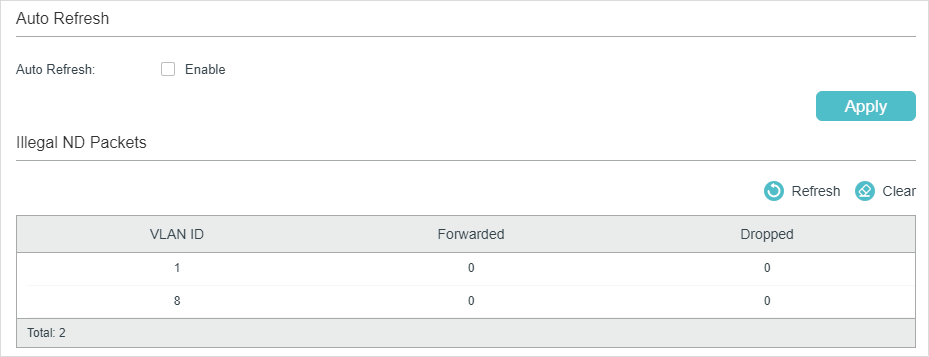
In the Auto Refresh section, you can enable the auto refresh feature and specify the refresh interval, and thus the web page will be automatically refreshed.
In the Illegal ND Packet section, you can view the number of illegal ND packets in each VLAN.
|
VLAN ID |
Displays the VLAN ID. |
|
Forwarded |
Displays the number of forwarded ND packets in this VLAN. |
|
Dropped |
Displays the number of dropped ND packets in this VLAN. |
3.2Using the CLI
3.2.1Adding IPv6-MAC Binding Entries
The ND Detection feature allows the switch to detect the ND packets based on the binding entries in the IPv6-MAC Binding Table and filter out the illegal ND packets. Before configuring ND Detection, complete IPv6-MAC Binding configuration.
3.2.2Enabling ND Detection
Follow these steps to enable ND Detection:
|
Step 1 |
configure Enter global configuration mode. |
|
Step 2 |
ipv6 nd detection Globally enable the ND Detection feature. |
|
Step 3 |
ipv6 nd detection vlan vlan-range Enable ND Detection on the specified VLAN. vlan-range: Enter the vlan range in the format of 1-3, 5. |
|
Step 5 |
show ipv6 nd detection Verify the global ND Detection configuration. |
|
Step 6 |
end Return to privileged EXEC mode. |
|
Step 7 |
copy running-config startup-config Save the settings in the configuration file. |
The following example shows how to enable ND Detection globally and on VLAN 1:
Switch#configure
Switch(config)#ipv6 nd detection
Switch(config)#ipv6 nd detection vlan 1
Switch(config)#show ipv6 nd detection
Global Status: Enable
VLAN ID: 1
Switch(config)#end
Switch#copy running-config startup-config
3.2.3Configuring ND Detection on Ports
Follow these steps to configure ND Detection on ports:
|
Step 1 |
configure Enter global configuration mode. |
|
Step 2 |
interface { fastEthernet port | range fastEthernet port-list | gigabitEthernet port | range gigabitEthernet port-list | ten-gigabitEthernet port | range ten-gigabitEthernet port-list }Enter interface configuration mode. |
|
Step 3 |
ipv6 nd detection trust Configure the port as a trusted port, on which the ND packets will not be checked. The specific ports, such as up-linked ports and routing ports are suggested to be set as trusted ports. |
|
Step 4 |
show ipv6 nd detection interface { fastEthernet port | gigabitEthernet port | ten-gigabitEthernet port | port-channel port-channel-id } Verify the global ND Detection configuration of the port. |
|
Step 5 |
end Return to privileged EXEC mode. |
|
Step 6 |
copy running-config startup-config Save the settings in the configuration file. |
The following example shows how to configure port 1/0/1 as trusted port:
Switch#configure
Switch(config)#interface gigabitEthernet 1/0/1
Switch(config-if)#ipv6 nd detection trust
Switch(config-if)#show ipv6 nd detection interface gigabitEthernet 1/0/1
Interface Trusted LAG
--------- ------- ---
Gi1/0/1 Enable N/A
Switch(config-if)#end
Switch#copy running-config startup-config
3.2.4Viewing ND Statistics
On privileged EXEC mode or any other configuration mode, you can use the following command to view ND statistics:
|
show ipv6 nd detection statistics View the ND statistics on each port, including the number of forwarded ND packets and the number of dropped ND packets. |
4IPv6 Source Guard Configuration
To complete IPv6 Source Guard configuration, follow these steps:
1)Add IP-MAC Binding entries.
2)Configure IPv6 Source Guard.
4.1Using the GUI
4.1.1Adding IPv6-MAC Binding Entries
The ND Detection feature allows the switch to detect the ND packets based on the binding entries in the IPv6-MAC Binding Table and filter out the illegal ND packets. Before configuring ND Detection, complete IPv6-MAC Binding configuration.
4.1.2Configuring IPv6 Source Guard
Before configuring IPv6 Source Guard, you need to configure the SDM template as EnterpriseV6.
Choose the menu SECURITY > IPv6 IMPB > IPv6 Source Guard to load the following page.
Figure 4-1 IPv6 Source Guard Config
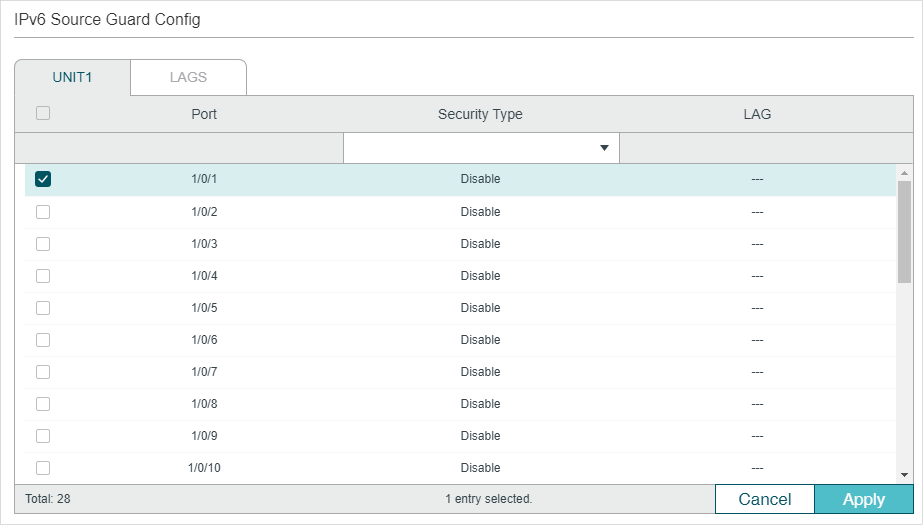
Follow these steps to configure IPv6 Source Guard:
1)Select one or more ports and configure the protect type for ports.
|
Port |
Displays the port number. |
|
Security Type |
Select Security Type on the port for IPv6 packets. The following options are provided: Disable: The IP Source Guard feature is disabled on the port. SIPv6+MAC: Only the packet with its source IPv6 address, source MAC address and port number matching the IPv6-MAC binding rules can be processed, otherwise the packet will be discarded. SIPv6: Only the packet with its source IPv6 address and port number matching the IPv6-MAC binding rules can be processed, otherwise the packet will be discarded. |
|
LAG |
Displays the LAG that the port is in. |
2)Click Apply.
4.2Using the CLI
4.2.1Adding IPv6-MAC Binding Entries
The ND Detection feature allows the switch to detect the ND packets based on the binding entries in the IPv6-MAC Binding Table and filter out the illegal ND packets. Before configuring ND Detection, complete IPv6-MAC Binding configuration.
4.2.2Configuring IPv6 Source Guard
Before configuring IPv6 Source Guard, you need to configure the SDM template as EnterpriseV6.
Follow these steps to configure IPv6 Source Guard:
|
Step 1 |
configure Enter global configuration mode. |
|
Step 2 |
interface { fastEthernet port | range fastEthernet port-list | gigabitEthernet port | range gigabitEthernet port-list | ten-gigabitEthernet port | range ten-gigabitEthernet port-list } Enter interface configuration mode. |
|
Step 3 |
ipv6 verify source { sipv6+mac | sipv6} Enable IPv6 Source Guard for IPv6 packets. sipv6+mac: Only the packet with its source IP address, source MAC address and port number matching the IPv6-MAC binding rules can be processed, otherwise the packet will be discarded. sipv6: Only the packet with its source IPv6 address and port number matching the IPv6-MAC binding rules can be processed, otherwise the packet will be discarded. |
|
Step 4 |
show ipv6 verify source [ interface { fastEthernet port | gigabitEthernet port | ten-gigabitEthernet port | port-channel port-channel-id } ] Verify the IP Source Guard configuration for IPv6 packets. |
|
Step 5 |
end Return to privileged EXEC mode. |
|
Step 6 |
copy running-config startup-config Save the settings in the configuration file. |
The following example shows how to enable IPv6 Source Guard on port 1/0/1:
Switch#configure
Switch(config)#interface gigabitEthernet 1/0/1
Switch(config-if)#ipv6 verify source sipv6+mac
Switch(config-if)#show ipv6 verify source interface gigabitEthernet 1/0/1
Port Security-Type LAG
---- ------------- ----
Gi1/0/1 SIPv6+MAC N/A
Switch(config-if)#end
Switch#copy running-config startup-config
5.1Example for ND Detection
5.1.1Network Requirements
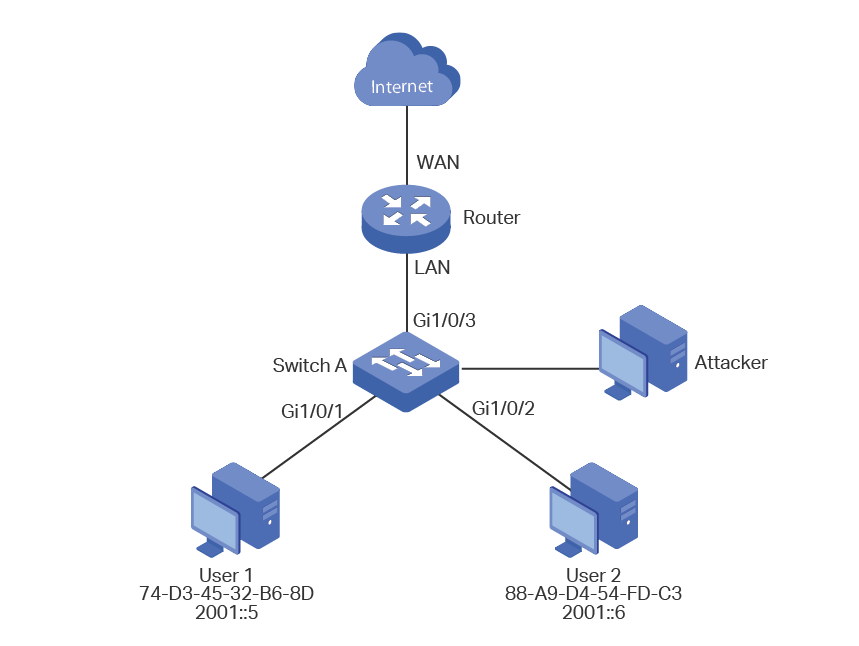
As shown below, User 1 and User 2 are legal IPv6 users in the LAN and connected to port 1/0/1 and port 1/0/2. Both of them are in the default VLAN 1. The router has been configured with security feature to prevent attacks from the WAN. Now the network administrator wants to configure Switch A to prevent ND attacks from the LAN.
Figure 5-1 Network Topology
5.1.2Configuration Scheme
To meet the requirement, you can configure ND Detection to prevent the network from ND attacks in the LAN.
The overview of configurations on the switch is as follows:
1)Configure IPv6-MAC Binding. The binding entries for User 1 and User 2 should be manually bound.
2)Configure ND Detection globally.
3)Configure ND Detection on ports. Since port 1/0/3 is connected to the gateway router, set port 1/0/3 as trusted port.
Demonstrated with T2600G-28TS, the following sections provide configuration procedure in two ways: using the GUI and using the CLI.
5.1.3Using the GUI
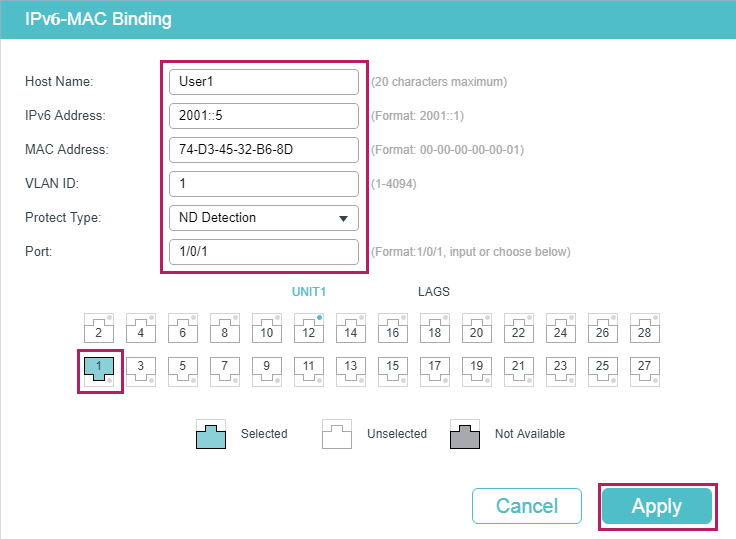
1)Choose the menu SECURITY > IPv6 IMBP > IPv6-MAC Binding > Manual Binding and click  to load the following page. Enter the host name, IPv6 address, MAC address and VLAN ID of User 1, select the protect type as ND Detection, and select port 1/0/1 on the panel. Click Apply.
Figure 5-2 Binding Entry for User 1
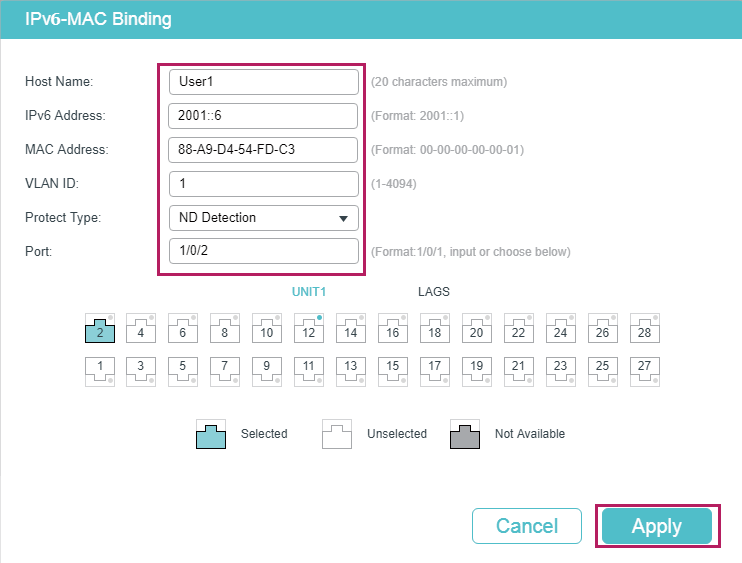
2)In the same way, add a binding entry for User 2. Enter the host name, IPv6 address, MAC address and VLAN ID of User 2, select the protect type as ND Detection, and select port 1/0/2 on the panel. Click Apply.
Figure 5-3 Binding Entry for User 2
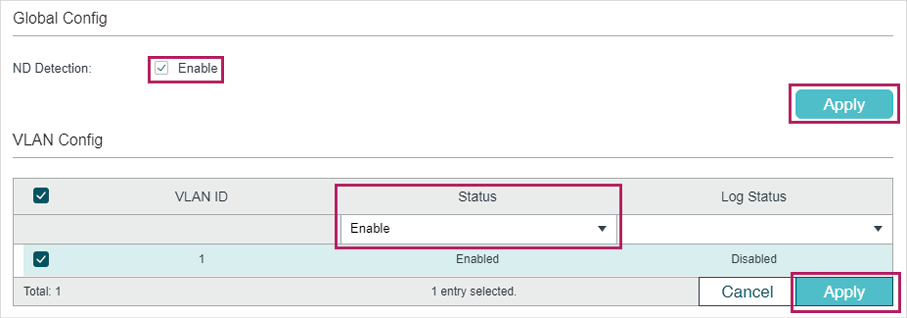
3)Choose the menu SECURITY > IPv6 IMBP > ND Detection > Global Config to load the following page. Enable ND Detection and click Apply. Select VLAN 1, change Status as Enabled and click Apply.
Figure 5-4 Enable ND Detection
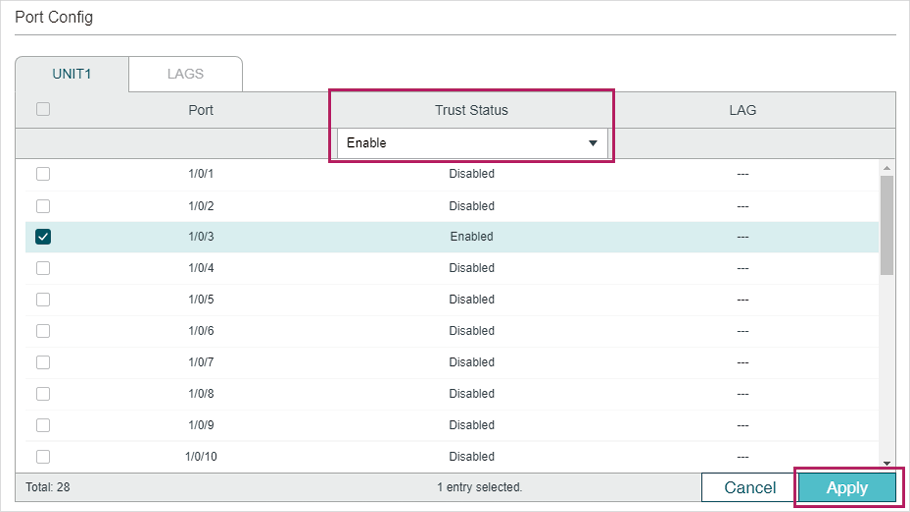
4)Choose the menu SECURITY > IPv6 IMBP > ND Detection > Port Config to load the following page. By default, all ports are enabled with ND Detection. Since port 1/0/3 is connected to the gateway router, configure port 1/0/3 as trusted port. Click Apply.
Figure 5-5 Port Config
5)Click  to save the settings.
5.1.4Using the CLI
1)Manually bind the entries for User 1 and User 2.
Switch_A#configure
Switch_A(config)#ipv6 source binding User1 2001::5 74:d3:45:32:b6:8d vlan 1 interface gigabitEthernet 1/0/1 nd-detection
Switch_A(config)#ip source binding User1 2001::6 88:a9:d4:54:fd:c3 vlan 1 interface gigabitEthernet 1/0/2 nd-detection
2)Enable ND Detection globally and on VLAN 1.
Switch_A(config)#ipv6 nd detection vlan 1
3)Configure port 1/0/3 as trusted port.
Switch_A(config)#interface gigabitEthernet 1/0/3
Switch_A(config-if)#ipv6 nd detection trust
Switch_A(config-if)#end
Switch_A#copy running-config startup-config
Verify the Configuration
Verify the IPv6-MAC Binding entries:
Switch_A#show ipv6 source binding
U Host IP-Addr MAC-Addr VID Port ACL SOURCE
- ---- ------- -------- --- ---- --- ------
1 User1 2001::5 74:d3:45:32:b6:8d 1 Gi1/0/1 ND-D Manual
1 User2 2001::6 88:a9:d4:54:fd:c3 1 Gi1/0/2 ND-D Manual
Notice:
1.Here, ‘ND-D’ for ‘ND-Detection’,and’IP-V-S’ for ‘IP-Verify-Source’.
Verify the global configuration of ND Detection:
Switch_A#show ipv6 nd detection
Global Status: Enable
Verify the ND Detection configuration on VLAN:
Switch_A#show ipv6 nd detection vlan
VID Enable status Log Status
---- ------------- ----------
1 Enable Disable
Verify the ND Detection configuration on ports:
Switch_A#show ipv6 nd detection interface
Interface Trusted LAG
--------- ----------- ---
Gi1/0/1 Disable N/A
Gi1/0/2 Disable N/A
Gi1/0/3 Enable N/A
...
5.2Example for IPv6 Source Guard
5.2.1Network Requirements
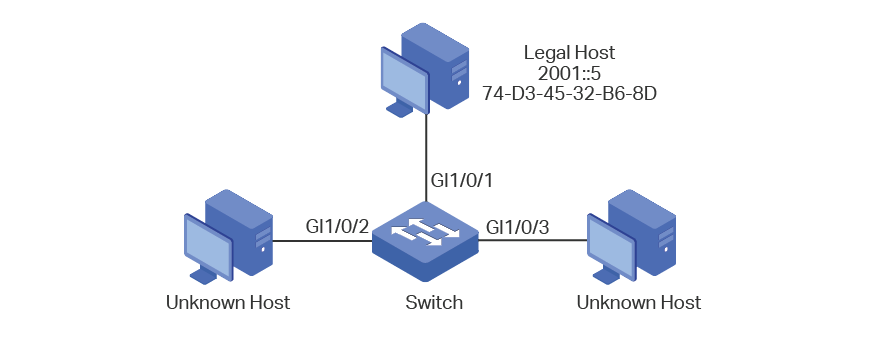
As shown below, the legal IPv6 host connects to the switch via port 1/0/1 and belongs to the default VLAN 1. It is required that only the legal host can access the network via port 1/0/1, and other unknown hosts will be blocked when trying to access the network via ports 1/0/1-3.
Figure 5-6 Network Topology
5.2.2Configuration Scheme
To implement this requirement, you can use IPv6-MAC Binding and IPv6 Source Guard to filter out the packets received from the unknown hosts. The overview of configuration on the switch is as follows:
1)Bind the MAC address, IPv6 address, connected port number and VLAN ID of the legal host with IPv6-MAC Binding.
2)Enable IPv6 Source Guard on ports 1/0/1-3.
Demonstrated with T2600G-28TS, the following sections provide configuration procedure in two ways: using the GUI and using the CLI.
5.2.3Using the GUI
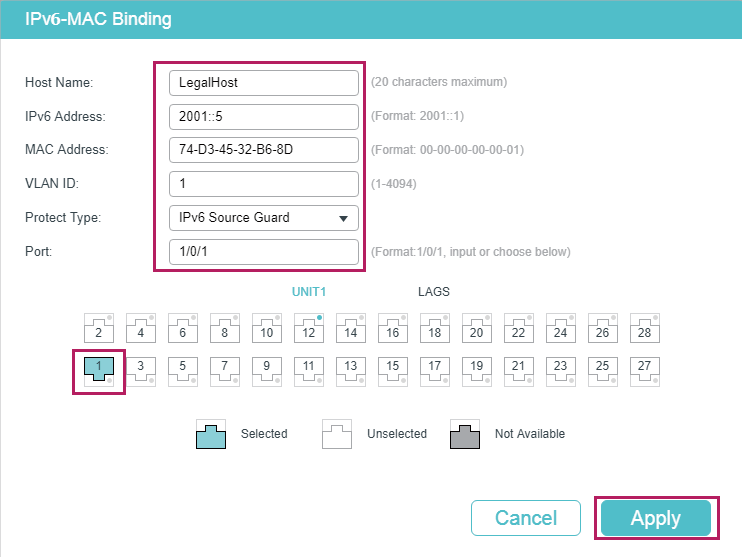
1)Choose the menu SECURITY > IPv6 IMPB > IPv6-MAC Binding > Manual Binding and click  to load the following page. Enter the host name, IPv6 address, MAC address and VLAN ID of the legal host, select the protect type as , and select port 1/0/1 on the panel. Click Apply.
Figure 5-7 Manual Binding
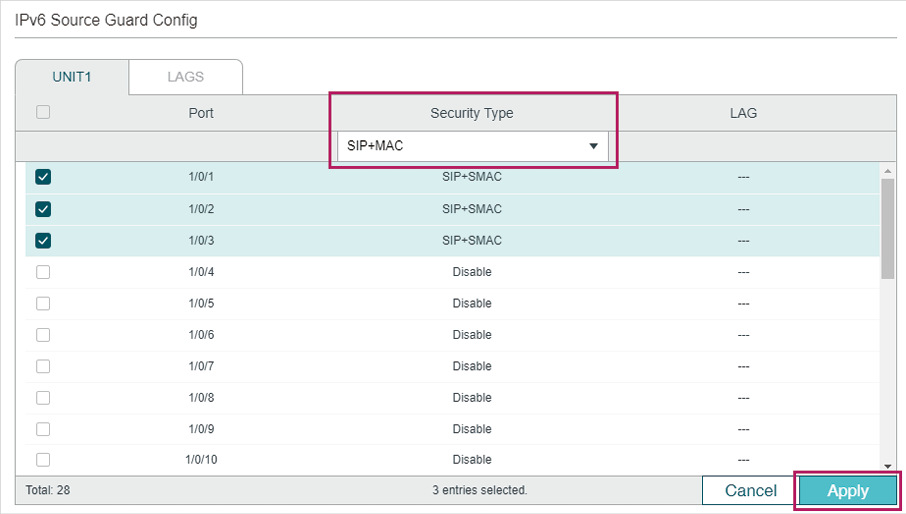
2)Choose the menu SECURITY > IPv6 IMPB > IPv6 Source Guard to load the following page. Select ports 1/0/1-3, configure the Security Type as SIP+MAC, and click Apply.
Figure 5-8 IPv6 Source Guard
3)Click  to save the settings.
5.2.4Using the CLI
1)Manually bind the IPv6 address, MAC address, VLAN ID and connected port number of the legal host, and apply this entry to the IPv6 Source Guard feature.
Switch#configure
Switch(config)#ipv6 source binding legal-host 2001::5 74:d3:45:32:b6:8d vlan 1 interface gigabitEthernet 1/0/1 ipv6-verify-source
2)Enable IPv6 Source Guard on ports 1/0/1-3.
Switch(config)# ipv6 verify source
Switch(config)# interface range gigabitEthernet 1/0/1-3
Switch(config-if-range)#ipv6 verify source sipv6+mac
Switch(config-if-range)#end
Switch#copy running-config startup-config
Verify the Configuration
Verify the binding entry:
Switch#show ip source binding
U Host IP-Addr MAC-Addr VID Port ACL SOURCE
- ---- ------- -------- --- ---- --- ------
1 legal-host 2001::5 74:d3:45:32:b6:8d 1 Gi1/0/1 IP-V-S Manual
Notice:
1.Here, ‘ND-D’ for ‘ND-Detection’,and’IP-V-S’ for ‘IP-Verify-Source’.
Verify the configuration of IPv6 Source Guard:
Switch#show ipv6 verify source
Port Security-Type LAG
Gi1/0/1 SIP+MAC N/A
Gi1/0/2 SIP+MAC N/A
Gi1/0/3 SIP+MAC N/A
...
Default settings of DHCPv6 Snooping are listed in the following table:
Table 6-1DHCPv6 Snooping
|
Parameter |
Default Setting |
|
Global Config |
|
|
DHCPv6 Snooping |
Disable |
|
VLAN Config |
|
|
Status |
Disable |
|
Port Config |
|
|
Maximum Entry |
512 |
Default settings of ND Detection are listed in the following table:
Table 6-2ND Detection
|
Parameter |
Default Setting |
|
Global Config |
|
|
ND Detection |
Disable |
|
VLAN Config |
|
|
Status |
Disable |
|
Log Status |
Disable |
|
Port Config |
|
|
Trust Status |
Disable |
Default settings of IPv6 Source Guard are listed in the following table:
Table 6-3IPv6 Source Guard
|
Parameter |
Default Setting |
|
Global Config |
|
|
Security Type |
Disable |