Configuring Behavior Control
CHAPTERS
2. Behavior Control Configuration
|
|
This guide applies to: TL-ER5120 v3, TL-ER6120 v2, TL-ER6020 v2, TL-R600VPN v4, TL-R480T+ v9, TL-R470T+ v6. |

With the Behavior Control feature, you can control the online behavior of local hosts. You can block specific hosts’ access to specific websites using URLs or keywords, block HTTP posts and prevent certain types of files from being downloaded from the internet.
1.2Supported Features
The Behavior Control module supports two features: Web Filtering and Web Security.
Web Filtering
Web Filtering is used to filter specific websites. The router provides two ways to filter websites: Web Group Filtering and URL Filtering.
Web Group Filtering: You can configure multiple websites as a web group, and set a filtering rule for the group. More than one group can be created and several groups can share a same filtering rule.
URL Filtering: You can directly set a filtering rule for specific entire URLs or keywords.
Web Security
Web Security is used to control the specific online behaviors of local users. You can configure this feature to block HTTP post, which means that the local users cannot log in, submit comments or perform any other operation which needs HTTP post. Also, you can prohibit local users from downloading specific types of files from the internet.
2Behavior Control Configuration
In Behavior Control module, you can configure the following features:
Web Filtering
Web Security
2.1Configuring Web Filtering
There are two methods to filter websites: Web Group Filtering and URL Filtering.
2.1.1Configure Web Group Filtering
To configure Web Group Filtering, add one or more web groups first, and then add web group filtering entries using the created groups.
Add Web Groups
Choose the menu Behavior Control> Web Filtering > Web Group and click Add to load the following page.
Figure 2-1 Web Group Page
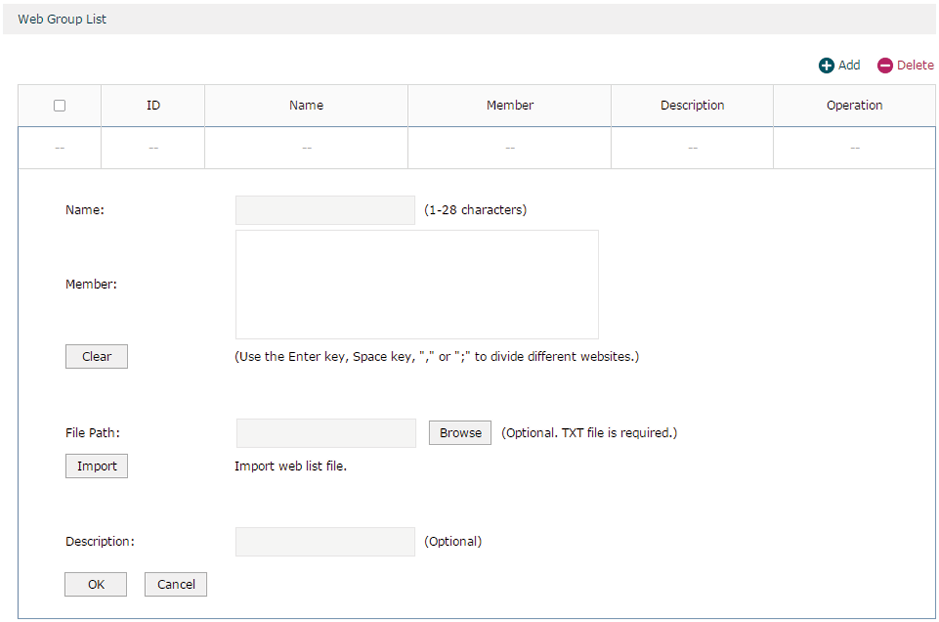
Configure the following parameters and click OK.
|
Name |
Specify a name for the group. The name of each group cannot be repeated. |
|
Member |
Add one or more website members to the group. The format of the website members is “www.tp-link.com” or “*.tp-link.com”, in which “*” is a wildcard. Use Enter key, Space key, “,” or “;” to divide different websites. |
|
File Path |
Import member list in your TXT file from your host. The format is “www.tp-link.com” or “*.tp-link.com”, in which “*” is a wildcard. Use Enter key, Space key, “,” or “;” to divide different websites. |
|
Description |
Enter a brief description for the group. |
Add Web Group Filtering Entries
Before configuring web group entries, go to the Preferences module to configure the IP Group and Effective Time according to your needs.
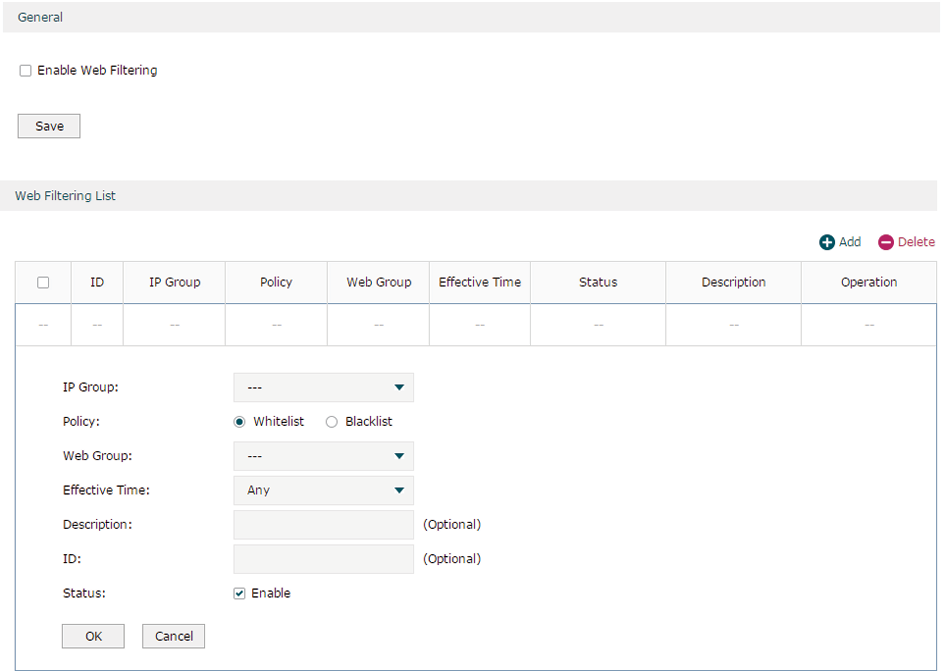
Choose the menu Behavior Control > Web Filtering > Web Group Filtering and click Add to load the following page.
Figure 2-2 Web Group Filtering Page
Follow the steps below to add Web group filtering entries:
1)In the Web Filtering List section, configure the required parameters and click OK.
|
IP Group |
Select an IP group for the rule. The IP group referenced here can be created on the Preferences > IP Group page. |
|
Policy |
Choose to allow or deny the websites that are in the selected web group(s). |
|
Web Group |
Select one or more web groups. The web group referenced here can be created on the Behavior Control > Web Filtering > Web Group page. |
|
Effective Time |
Select the effective time. The effective time referenced here can be created on the Preferences > Time Range page. |
|
Description |
Enter a brief description for the group. |
|
ID |
Specify a rule ID. A smaller ID means a higher priority. This value is optional. A newly added rule with this field left blank will get the largest ID among all rules, which means that the newly added rule has the lowest priority. |
|
Status |
Check the box to enable the rule. |
2)In the General section, enable Web Filtering. Click Save.
2.1.2Configuring URL Filtering
Before configuring URL Filtering, go to the Preferences module to configure the IP Group and Effective Time according to your needs.
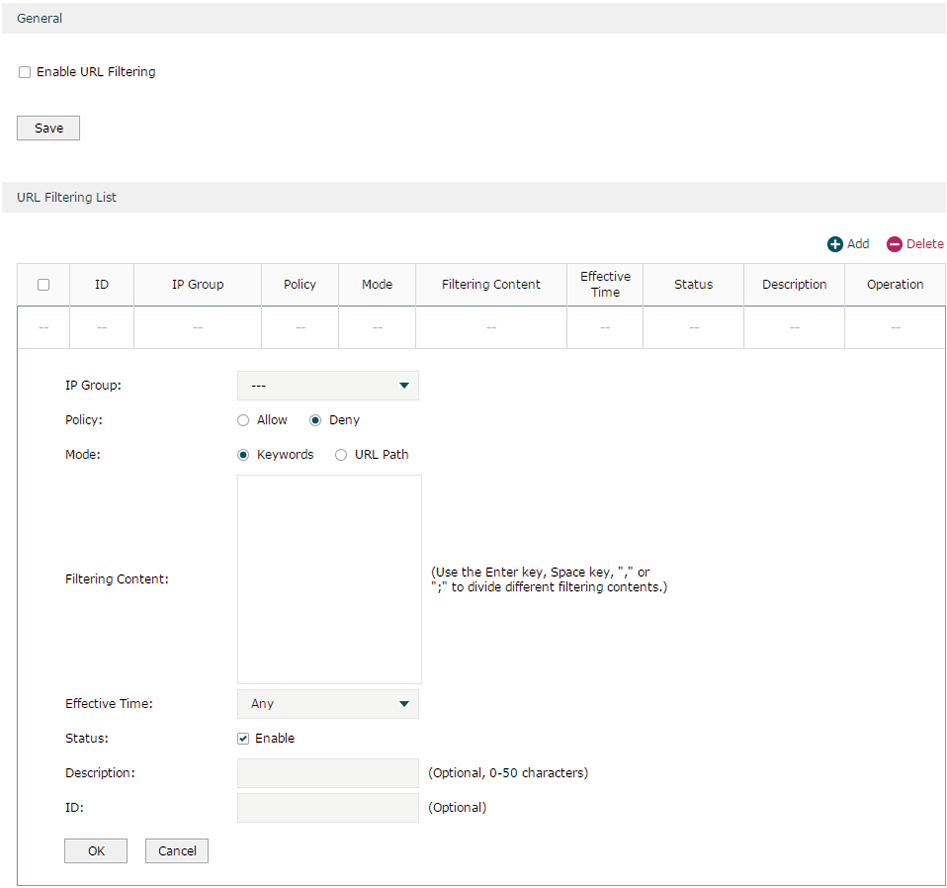
Choose the menu Behavior Control > Web Filtering > URL Filtering and click Add to load the following page.
Figure 2-3 URL Filtering Page
Follow the steps below to configure URL filtering:
1)In the URL Filtering List section, click Add and configure the required parameters. Click OK.
|
IP Group |
Select an IP group for the rule. The IP group referenced here can be created on the Preferences > IP Group page. |
|
Policy |
Choose to allow or deny the websites that match the filtering content. |
|
Mode |
Select the filtering mode. Keywords: If a website address contains any of the keywords, the policy will be applied to this website. URL Path: If a website address is the same as any of the entire URLs, the policy will be applied to this website. |
|
Filtering Content |
Add filtering contents. Use the Enter key, Space key, “,” or “;” to divide different filtering contents. “.” means that this rule will be applied to any website. For example, if you want to allow website A and deny other websites, you can add an Allow rule with the filtering content “A” and add a Deny rule with the filtering content “.”. Note that “.” rule should have the largest ID number, which means that it has the lowest priority. |
|
Effective Time |
Select the effective time. The effective time referenced here can be created on the Preferences > Time Range page. |
|
Status |
Check the box to enable the rule. |
|
Description |
Enter a brief description for the group. |
|
ID |
Specify a rule ID. A smaller ID means a higher priority. This value is optional. The newly added rule without this value configured will get the largest ID among all rules, which means that the newly added rule has the lowest priority. |
2)In the General section, enable URL filtering. Click Save.
2.2Configuring Web Security
Before configuring Web Security, go to Preferences module to configure the IP Group and Effective Time according to your needs.
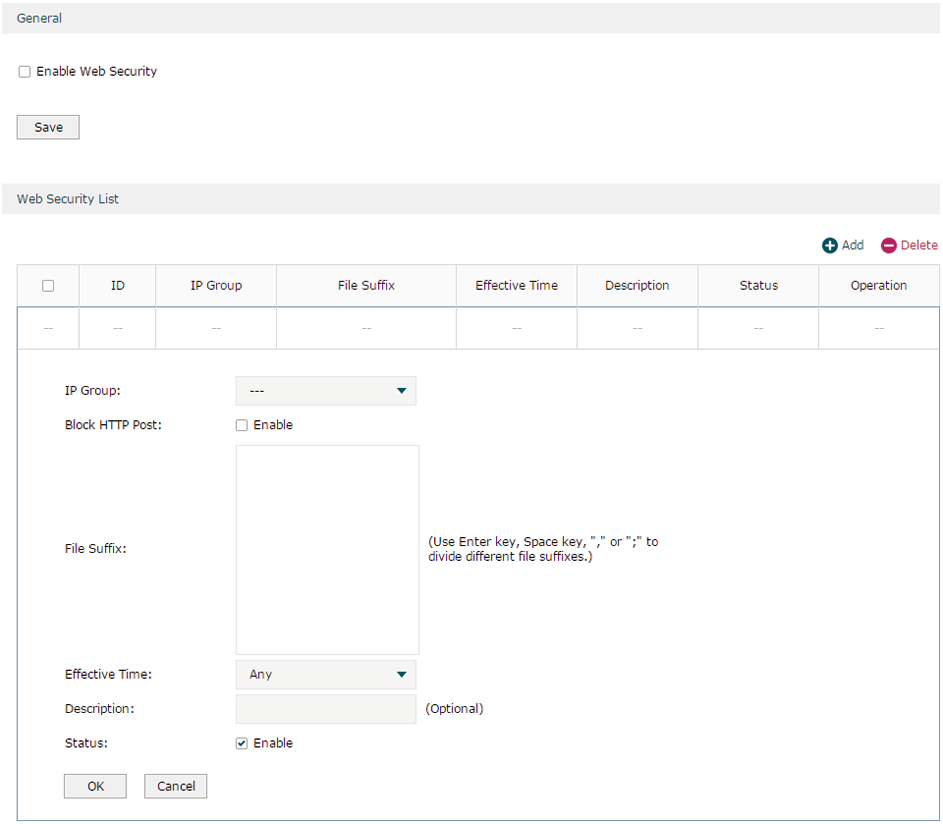
Choose the menu Behavior Control > Web Security > Web Security and click Add to load the following page.
Figure 2-4 Web Security Page
Follow the steps below to configure Web Security.
1)In the Web Security List section, configure the following parameters and click OK to add a Web Security rule.
|
IP Group |
Select an IP group for the rule. The IP group referenced here can be created on the Preferences > IP Group page. |
|
Block HTTP Post |
With this option enabled, HTTP posts will be blocked. The hosts of the selected IP group cannot log in, submit comments or do any operation using HTTP post. |
|
File Suffix |
Enter file suffixes to specify the file types. Use Enter key, Space key, “,” or “;” to divide different file suffixes. The hosts of the selected IP group cannot download these types of files from the internet. |
|
Effective |
Select the effective time. The effective time referenced here can be created on the Preferences > Time Range page. |
|
Description |
Enter a brief description for the group. |
|
Status |
Check the box to enable the rule. |
2)In the General section, enable Web Security and click Save:
3.1Example for Access Control
3.1.1Network Requirements
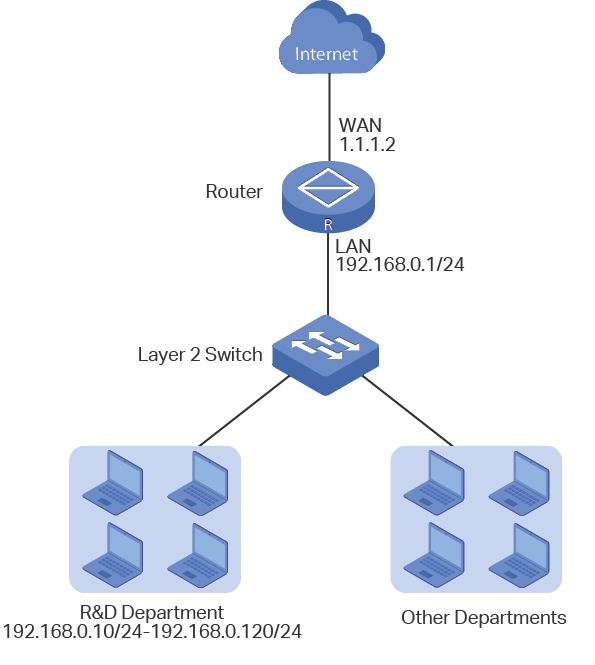
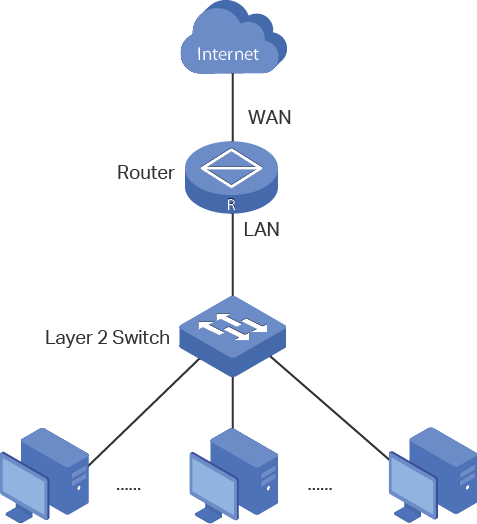
In the diagram below, the R&D and some other departments are connected to a layer 2 switch and access the internet via the router. For data security purposes, it is required that the R&D department users can only visit the official website of the company, for example: http://www.tp-link.com. For other departments, there is no limitation of website access.
Figure 3-1 Network Topology
3.1.2Configuration Scheme
We can configure Web Filtering to limit the website access of the specific hosts. Both Web Group Filtering and URL Filtering can achieve this. In this example, the configuration difference between Web Group Filtering and URL Filtering is as follows:
In Web Group Filtering, you need to add the official website address to a web group before configuring the filtering rule.
In URL Filtering, you can directly specify the official website address in the filtering rule.
Here we take Web Group Filtering as an example. The configuration overview is as follows:
1)Add an IP group for the R&D department in the Preferences module.
2)Create a web group with the group member www.tp-link.com.
3)Add a Whitelist rule to allow the R&D department users to access www.tp-link.com.
4)Add a Blacklist rule to forbid the R&D department users from accessing all websites. Note that the priority of this rule should be lower than the Whitelist rule.
3.1.3Configuration Procedure
Follow the steps below to complete the configuration:
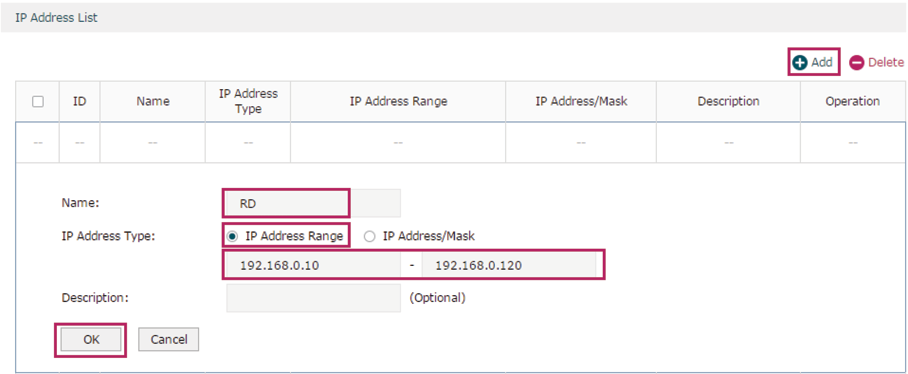
1)Choose the menu Preferences > IP Group > IP Address to load the configuration page, and click Add. Specify a name “RD”, select IP Address Range and enter the IP address range of the R&D department. Click OK.
Figure 3-2 Configure IP Address Range
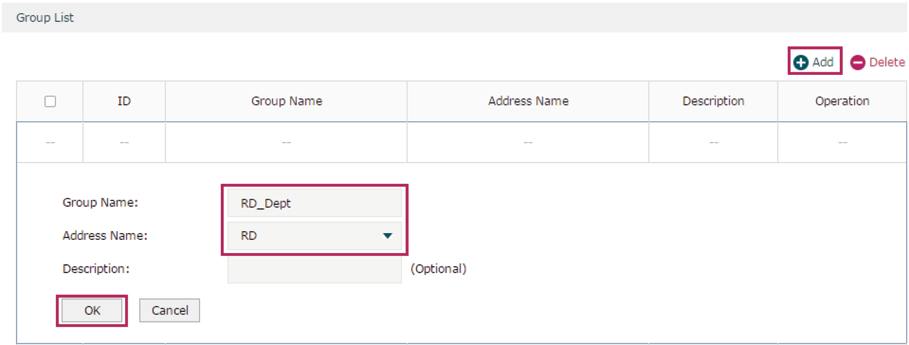
2)Choose the menu Preferences > IP Group > IP Group to load the configuration page, and click Add. Specify a group name “RD_Dept”, select the preset address range “RD” and click OK.
Figure 3-3 Configure IP Group
3)Choose the menu Behavior Control > Web Filtering > Web Group to load the configuration page, and click Add. Specify a name “RD_Filtering” for this web group and add the member “www.tp-link.com”. Click OK.
Figure 3-4 Configure Web Group

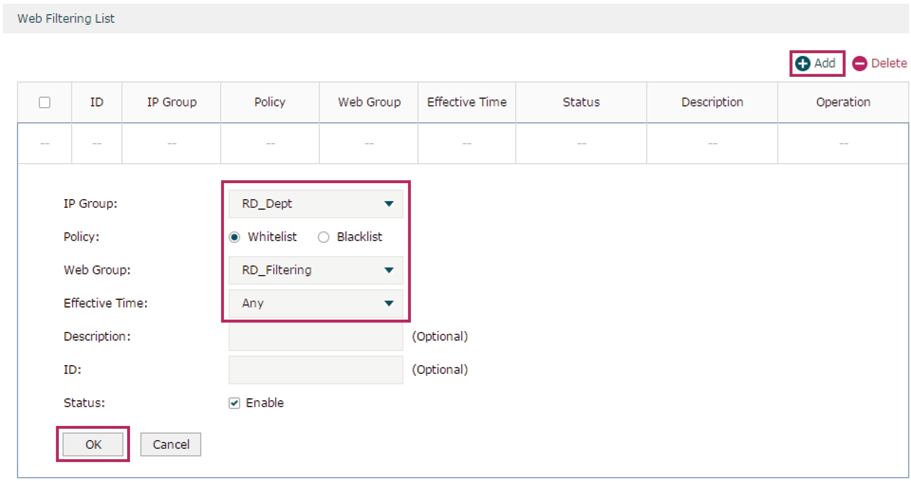
4)Choose the menu Behavior Control > Web Filtering > Web Group Filtering to load the configuration page, and click Add. Select “RD_Dept” as the IP Group, “Whitelist” as the Policy, “RD_Filtering“ as the Web Group, and “Any” as the Effective Time. Click OK.
This rule means that the hosts in the R&D department are allowed to access the website www.tp-link.com at any time.
Figure 3-5 Configure Whitelist Rule
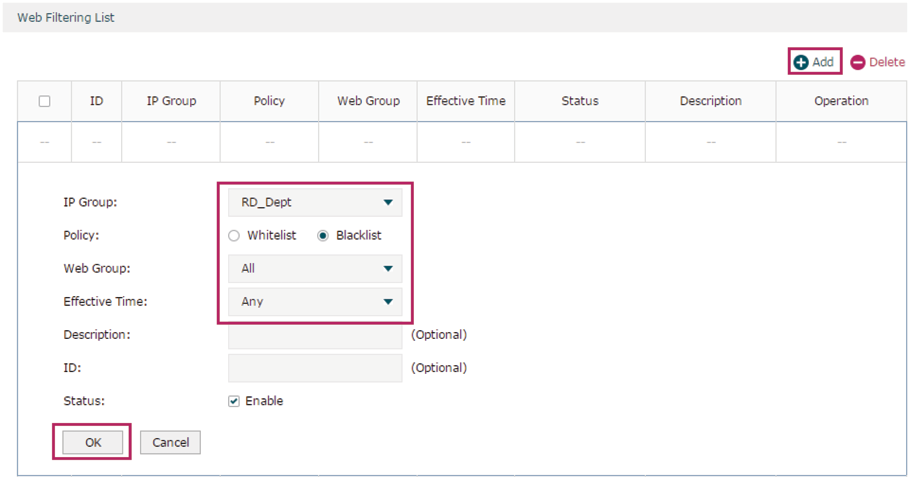
5)On the same page, click Add. Select “RD_Dept” as the IP Group, “Blacklist” as the Policy, “All” as the Web Group, and “Any” as the Effective Time. Click OK.
This rule means that the hosts in the R&D department are denied access to all websites at all times.
Figure 3-6 Configure Blacklist Rule
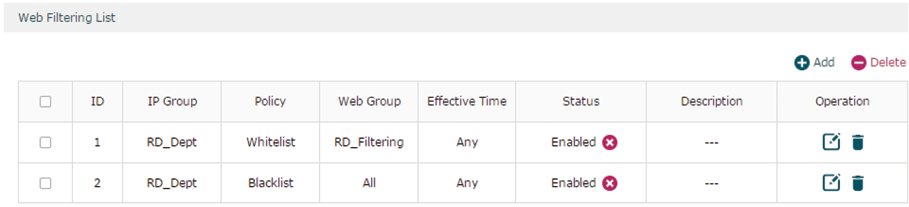
6)On the same page, verify your configurations. In the Web Filtering List, the rule with a smaller ID has a higher priority. Since the router matches the rules beginning with the highest priority, make sure the Whitelist rule has the smaller ID number. In this way, the router allows the hosts to access the Whitelist website and denies them to access others.
Figure 3-7 Verify Configuration Result
7)In the General section on the same page, enable Web Filtering globally and click Save.
Figure 3-8 Enable Web Filtering

3.2Example for Web Security
3.2.1Network Requirements
In the diagram below, the company’s hosts are connected to a layer 2 switch and access the internet via the router. For security reasons, it is required that the users in the LAN cannot log in, submit comments or download rar files on the internet.
Figure 3-1 Network Topology
3.2.2Configuration Scheme
We can configure Web Security to meet these requirements. To block behaviors such as login and comment submitting, we can configure the router to block HTTP post; to block downloading of rar files, we can specify the suffix “rar” in the file suffix column.
3.2.3Configuration Procedure
Follow the steps below to complete the configuration:
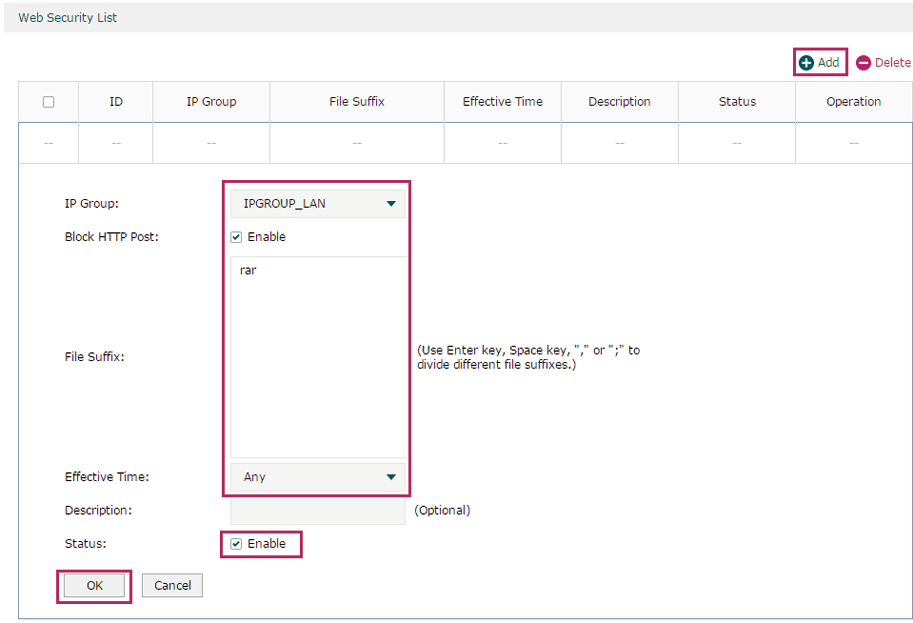
1)Choose the menu Behavior Control > Web Security > Web Security and click Add to load the following page. Select “IPGROUP_LAN” as the IP Group, enable Block HTTP Post, enter “rar” in the File Suffix filed, select “Any” as the Effective Time, and keep the Status as “Enable”. Click OK.
Figure 3-2 Configure Web Security Entry
2)In the General section on the same page, enable Web Security and click Save.
Figure 3-3 Enable Web Security
