Configuring AAA
CHAPTERS
4. Appendix: Default Parameters
|
|
This guide applies to: T1500G-10PS v2 or above, T1500G-8T v2 or above, T1500G-10MPS v2 or above, T1500-28PCT v3 or above, T1600G-18TS v2 or above, T1600G-28PS v3 or above, T1600G-28TS v3 or above, T1600G-52TS v3 or above, T1600G-52PS v3 or above, T1700X-16TS v3 or above, T1700G-28TQ v3 or above, T2500G-10TS v2 or above, T2600G-18TS v2 or above, T2600G-28TS v3 or above, T2600G-28MPS v3 or above, T2600G-28SQ v1 or above, T2600G-52TS v3 or above. |

AAA stands for authentication, authorization and accounting. On TP-Link switches, this feature is mainly used to authenticate the users trying to log in to the switch or get administrative privileges. The administrator can create guest accounts and an Enable password for other users. The guests do not have administrative privileges without the Enable password provided.
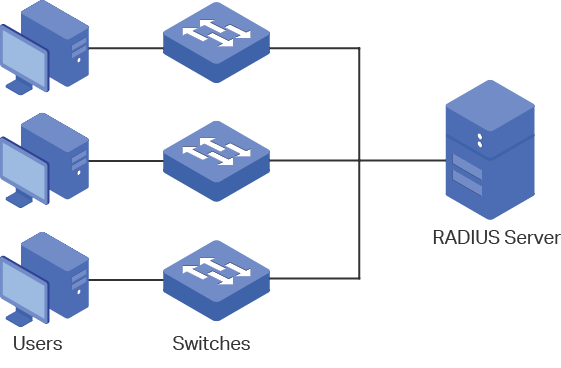
AAA provides a safe and efficient authentication method. The authentication can be processed locally on the switch or centrally on the RADIUS/TACACS+ server(s). As the following figure shows, the network administrator can centrally configure the management accounts of the switches on the RADIUS server and use this server to authenticate the users trying to access the switch or get administrative privileges.
Figure 1-1 Network Topology of AAA
In the AAA feature, the authentication can be processed locally on the switch or centrally on the RADIUS/TACACS+ server(s). To ensure the stability of the authentication system, you can configure multiple servers and authentication methods at the same time. This chapter introduces how to configure this kind of comprehensive authentication in AAA.
To complete the configuration, follow these steps:
1)Add the servers.
2)Configure the server groups.
3)Configure the method list.
4)Configure the AAA application list.
5)Configure the login account and the Enable password.
Configuration Guidelines
The basic concepts and working mechanism of AAA are as follows:
■AAA Default Setting
By default, the AAA feature is enabled and cannot be disabled.
■Server Group
Multiple servers running the same protocol can be added to a server group, and the servers in the group will authenticate the users in the order they are added. The server that is first added to the group has the highest priority, and is responsible for authentication under normal circumstances. If the first one breaks down or doesn’t respond to the authentication request for some reason, the second sever will start working for authentication, and so on.
■Method List
A server group is regarded as a method, and the local authentication is another method. Several methods can be configured to form a method list. The switch uses the first method in the method list to authenticate the user, and if that method fails to respond, the switch selects the next method. This process continues until the user has a successful communication with a method or until all defined methods are exhausted. If the authentication succeeds or the secure server or the local switch denies the user’s access, the authentication process stops and no other methods are attempted.
Two types of method list are provided: Login method list for users of all types to access the switch, and Enable method list for guests to get administrative privileges.
■AAA Application List
The switch supports the following access applications: Console, Telnet, SSH and HTTP. You can select the configured authentication method lists for each application.
2.1Using the GUI
2.1.1Adding Servers
You can add one or more RADIUS/TACACS+ servers on the switch for authentication. If multiple servers are added, the server that is first added to the group has the highest priority and authenticates the users trying to access the switch. The others act as backup servers in case the first one breaks down.
■Adding RADIUS Server
Choose the menu SECURITY > AAA > RADIUS Config and click  to load the following page.
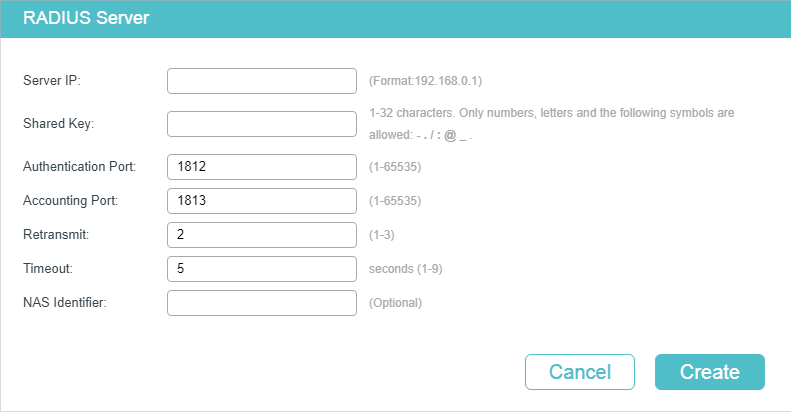
Figure 2-1 RADIUS Server Configuration
Follow these steps to add a RADIUS server:
1)Configure the following parameters.
|
Server IP |
Enter the IP address of the server running the RADIUS secure protocol. |
|
Shared Key |
Enter the shared key between the RADIUS server and the switch. The RADIUS server and the switch use the key string to encrypt passwords and exchange responses. |
|
Authentication Port |
Specify the UDP destination port on the RADIUS server for authentication requests. The default setting is 1812. |
|
Accounting Port |
Specify the UDP destination port on the RADIUS server for accounting requests. The default setting is 1813. Usually, it is used in the 802.1x feature. |
|
Retransmit |
Specify the number of times a request is resent to the server if the server does not respond. The default setting is 2. |
|
Timeout |
Specify the time interval that the switch waits for the server to reply before resending. The default setting is 5 seconds. |
|
NAS Identifier |
Specify the name of the NAS (Network Access Server) to be contained in RADIUS packets for identification. It ranges from 1 to 31 characters. The default value is the MAC address of the switch. Generally, the NAS indicates the switch itself. |
2)Click Create to add the RADIUS server on the switch.
■Adding TACACS+ Server
Choose the menu SECURITY > AAA > TACACS+ Config and click  to load the following page.
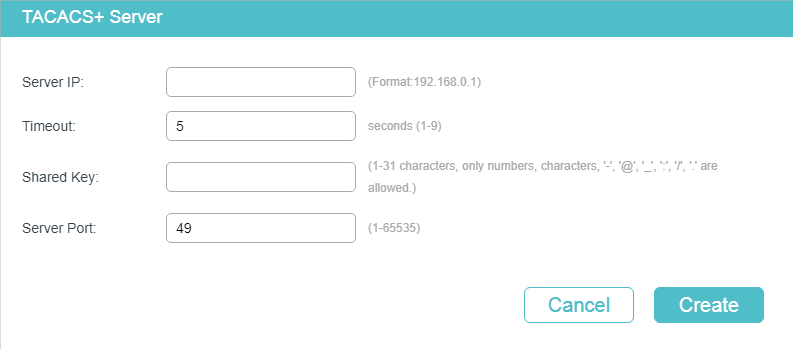
Figure 2-2 TACACS+ Server Configuration
Follow these steps to add a TACACS+ server:
1)Configure the following parameters.
|
Server IP |
Enter the IP address of the server running the TACACS+ secure protocol. |
|
Timeout |
Specify the time interval that the switch waits for the server to reply before resending. The default setting is 5 seconds. |
|
Shared Key |
Enter the shared key between the TACACS+ server and the switch. The TACACS+ server and the switch use the key string to encrypt passwords and exchange responses. |
|
Server Port |
Specify the TCP port used on the TACACS+ server for AAA. The default setting is 49. |
2)Click Create to add the TACACS+ server on the switch.
2.1.2Configuring Server Groups
The switch has two built-in server groups, one for RADIUS servers and the other for TACACS+ servers. The servers running the same protocol are automatically added to the default server group. You can add new server groups as needed.
Choose the menu SECURITY > AAA > Server Group to load the following page.
Figure 2-3 Add New Server Group
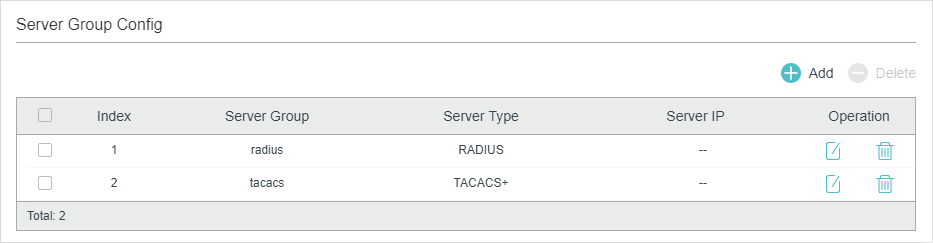
There are two default server groups in the list. You can edit the default server groups or follow these steps to configure a new server group:
1)Click  and the following window will pop up.
Figure 2-4 Add Server Group
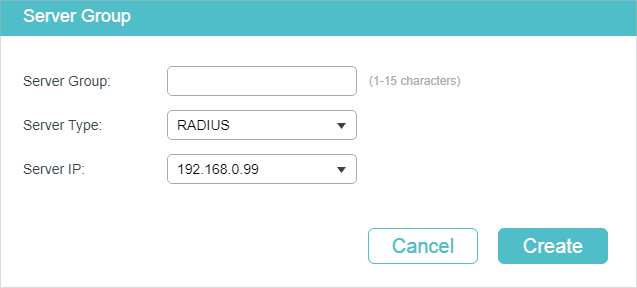
Configure the following parameters:
|
Server Group |
Specify a name for the server group. |
|
Server Type |
Select the server type for the group. The following options are provided: RADIUS and TACACS+. |
|
Server IP |
Select the IP address of the server which will be added to the server group. |
2)Click Create.
2.1.3Configuring the Method List
A method list describes the authentication methods and their sequence to authenticate the users. The switch supports Login Method List for users of all types to gain access to the switch, and Enable Method List for guests to get administrative privileges.
Choose the menu SECURITY > AAA > Method Config to load the following page.
Figure 2-5 Method List
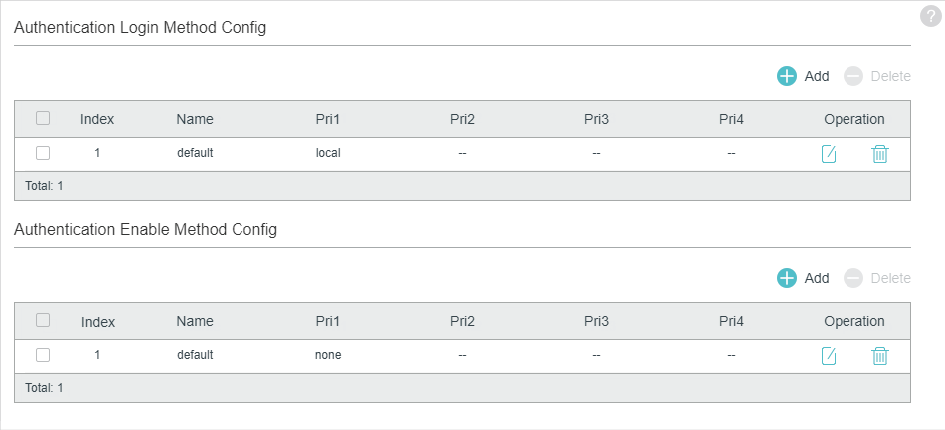
There are two default methods respectively for the Login authentication and the Enable authentication.
You can edit the default methods or follow these steps to add a new method:
1)Click  in the Authentication Login Method Config section or Authentication Enable Method Config section to add corresponding type of method list. The following window will pop up.
Figure 2-6 Add New Method
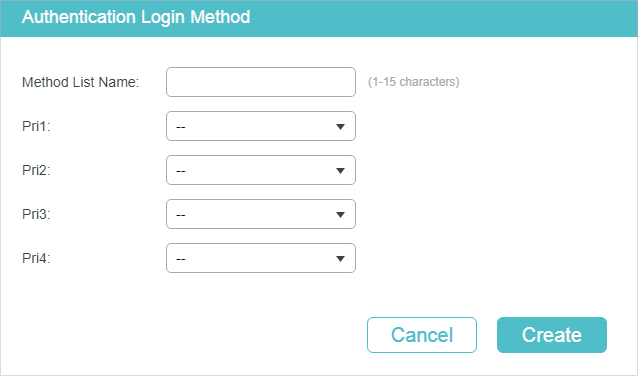
Configure the parameters for the method to be added.
|
Method List Name |
Specify a name for the method. |
|
Pri1- Pri4 |
Specify the authentication methods in order. The method with priority 1 authenticates a user first, the method with priority 2 is tried if the previous method does not respond, and so on. local: Use the local database in the switch for authentication. none: No authentication is used. radius: Use the remote RADIUS server/server groups for authentication. tacacs: Use the remote TACACS+ server/server groups for authentication. Other user-defined server groups: Use the user-defined server groups for authentication. |
2)Click Create to add the new method.
2.1.4Configuring the AAA Application List
Choose the menu SECURITY > AAA > Global Config to load the following page.
Figure 2-7 Configure Application List
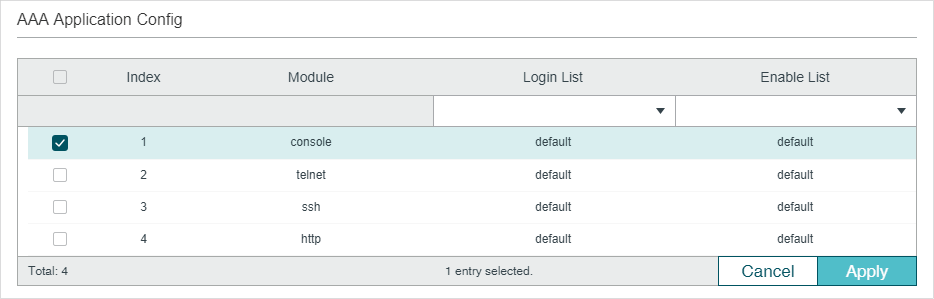
Follow these steps to configure the AAA application list.
1)In the AAA Application List section, select an access application and configure the Login list and Enable list.
|
Module |
Displays the configurable applications on the switch: console, telnet, ssh and http. |
|
Login List |
Select a previously configured Login method list. This method list will authenticate the users trying to log in to the switch. |
|
Enable List |
Select a previously configured Enable method list. This method list will authenticate the users trying to get administrative privileges. |
2)Click Apply.
2.1.5Configuring Login Account and Enable Password
The login account and Enable password can be configured locally on the switch or centrally on the RADIUS/TACACS+ server(s).
■On the Switch
The local username and password for login can be configured in the User Management feature. For details, refer to Managing System.
To configure the local Enable password for getting administrative privileges, choose the menu SECURITY > AAA > Global Config to load the following page.
Figure 2-8 Configure Enable Password

There are two options: Clear Password and Set Password. You can choose whether the local Enable password is required when the guests try to get administrative privileges. Click Apply.
Tips: The logged-in guests can enter the local Enable password on this page to get administrative privileges.
■On the Server
The accounts created by the RADIUS/TACACS+ server can only view the configurations and some network information without the Enable password.
Some configuration principles on the server are as follows:
■For Login authentication configuration, more than one login account can be created on the server. Besides, both the user name and password can be customized.
■For Enable password configuration:
On RADIUS server, the user name should be set as $enable$, and the Enable password is customizable. All the users trying to get administrative privileges share this Enable password.
On TACACS+ server, configure the value of “enable 15“ as the Enable password in the configuration file. All the users trying to get administrative privileges share this Enable password.
2.2Using the CLI
2.2.1Adding Servers
You can add one or more RADIUS/TACACS+ servers on the switch for authentication. If multiple servers are added, the server with the highest priority authenticates the users trying to access the switch, and the others act as backup servers in case the first one breaks down.
■Adding RADIUS Server
Follow these steps to add RADIUS server on the switch:
|
Step 1 |
configure Enter global configuration mode. |
|
Step 2 |
radius-server host ip-address [ auth-port port-id ] [ acct-port port-id ] [ timeout time ] [ retransmit number ] [ nas-id nas-id ] key { [ 0 ] string | 7 encrypted-string } Add the RADIUS server and configure the related parameters as needed. host ip-address: Enter the IP address of the server running the RADIUS protocol. auth-port port-id: Specify the UDP destination port on the RADIUS server for authentication requests. The default setting is 1812. acct-port port-id: Specify the UDP destination port on the RADIUS server for accounting requests. The default setting is 1813. Usually, it is used in the 802.1X feature. timeout time: Specify the time interval that the switch waits for the server to reply before resending. The valid values are from 1 to 9 seconds and the default setting is 5 seconds. retransmit number: Specify the number of times a request is resent to the server if the server does not respond. The valid values are from 1 to 3 and the default setting is 2. nas-id nas-id: Specify the name of the NAS (Network Access Server) to be contained in RADIUS packets for identification. It ranges from 1 to 31 characters. The default value is the MAC address of the switch. Generally, the NAS indicates the switch itself. key { [ 0 ] string | 7 encrypted-string }: Specify the shared key. 0 and 7 represent the encryption type. 0 indicates that an unencrypted key will follow. 7 indicates that a symmetric encrypted key with a fixed length will follow. By default, the encryption type is 0. string is the shared key for the switch and the server, which contains 31 characters at most. encrypted-string is a symmetric encrypted key with a fixed length, which you can copy from the configuration file of another switch. The key or encrypted-key you configure here will be displayed in the encrypted form. |
|
Step 3 |
show radius-server Verify the configuration of RADIUS server. |
|
Step 4 |
end Return to privileged EXEC mode. |
|
Step 5 |
copy running-config startup-config Save the settings in the configuration file. |
The following example shows how to add a RADIUS server on the switch. Set the IP address of the server as 192.168.0.10, the authentication port as 1812, the shared key as 123456, the timeout as 8 seconds and the retransmit number as 3.
Switch#configure
Switch(config)#radius-server host 192.168.0.10 auth-port 1812 timeout 8 retransmit 3 key 123456
Switch(config)#show radius-server
Server Ip Auth Port Acct Port Timeout Retransmit NAS Identifier Shared key
192.168.0.10 1812 1813 5 2 000AEB132397 123456
Switch(config)#end
Switch#copy running-config startup-config
■Adding TACACS+ Server
Follow these steps to add TACACS+ server on the switch:
|
Step 1 |
configure Enter global configuration mode. |
|
Step 2 |
tacacs-server host ip-address [ port port-id ] [ timeout time ] [ key { [ 0 ] string | 7 encrypted-string } ] Add the RADIUS server and configure the related parameters as needed. host ip-address: Enter the IP address of the server running the TACACS+ protocol. port port-id: Specify the TCP destination port on the TACACS+ server for authentication requests. The default setting is 49. timeout time: Specify the time interval that the switch waits for the server to reply before resending. The valid values are from 1 to 9 seconds and the default setting is 5 seconds. key { [ 0 ] string | 7 encrypted-string }: Specify the shared key. 0 and 7 represent the encryption type. 0 indicates that an unencrypted key will follow. 7 indicates that a symmetric encrypted key with a fixed length will follow. By default, the encryption type is 0. string is the shared key for the switch and the server, which contains 31 characters at most. encrypted-string is a symmetric encrypted key with a fixed length, which you can copy from the configuration file of another switch. The key or encrypted-key you configured here will be displayed in the encrypted form. |
|
Step 3 |
show tacacs-server Verify the configuration of TACACS+ server. |
|
Step 4 |
end Return to privileged EXEC mode. |
|
Step 5 |
copy running-config startup-config Save the settings in the configuration file. |
The following example shows how to add a TACACS+server on the switch. Set the IP address of the server as 192.168.0.20, the authentication port as 49, the shared key as 123456, and the timeout as 8 seconds.
Switch#configure
Switch(config)#tacacs-server host 192.168.0.20 auth-port 49 timeout 8 key 123456
Switch(config)#show tacacs-server
Server Ip Port Timeout Shared key
192.168.0.20 49 8 123456
Switch(config)#end
Switch#copy running-config startup-config
2.2.2Configuring Server Groups
The switch has two built-in server groups, one for RADIUS and the other for TACACS+. The servers running the same protocol are automatically added to the default server group. You can add new server groups as needed.
The two default server groups cannot be deleted or edited. Follow these steps to add a server group:
|
Step 1 |
configure Enter global configuration mode. |
|
Step 2 |
aaa group { radius | tacacs } group-name Create a server group. radius | tacacs: Specify the group type. group-name: Specify a name for the group. |
|
Step 3 |
server ip-address Add the existing servers to the server group. ip-address: Specify IP address of the server to be added to the group. |
|
Step 4 |
show aaa group [ group-name ] Verify the configuration of server group. |
|
Step 5 |
end Return to privileged EXEC mode. |
|
Step 6 |
copy running-config startup-config Save the settings in the configuration file. |
The following example shows how to create a RADIUS server group named RADIUS1 and add the existing two RADIUS servers whose IP address is 192.168.0.10 and 192.168.0.20 to the group.
Switch#configure
Switch(config)#aaa group radius RADIUS1
Switch(aaa-group)#server 192.168.0.10
Switch(aaa-group)#server 192.168.0.20
Switch(aaa-group)#show aaa group RADIUS1
192.168.0.10
192.168.0.20
Switch(aaa-group)#end
Switch#copy running-config startup-config
2.2.3Configuring the Method List
A method list describes the authentication methods and their sequence to authenticate the users. The switch supports Login Method List for users of all types to gain access to the switch, and Enable Method List for guests to get administrative privileges.
Follow these steps to configure the method list:
|
Step 1 |
configure Enter global configuration mode. |
|
Step 2 |
aaa authentication login { method-list } { method1 } [ method2 ] [ method3 ] [ method4 ] Configure a login method list. method-list: Specify a name for the method list. method1/method2/method3/method4: Specify the authentication methods in order. The first method authenticates a user first, the second method is tried if the previous method does not respond, and so on. The default methods include radius, tacacs, local and none. None means no authentication is used for login. |
|
Step 3 |
aaa authentication enable { method-list } { method1 } [ method2 ] [ method3 ] [ method4 ] Configure an Enable password method list. method-list: Specify a name for the method list. method1/method2/method3/method4: Specify the authentication methods in order. The default methods include radius, tacacs, local and none. None means no authentication is used for getting administrative privileges. |
|
Step 4 |
show aaa authentication [ login | enable ] Verify the configuration method list. |
|
Step 5 |
end Return to privileged EXEC mode. |
|
Step 6 |
copy running-config startup-config Save the settings in the configuration file. |
The following example shows how to create a Login method list named Login1, and configure the method 1 as the default radius server group and the method 2 as local.
Switch#configure
Switch(config)##aaa authentication login Login1 radius local
Switch(config)#show aaa authentication login
Methodlist pri1 pri2 pri3 pri4
default local -- -- --
Login1 radius local -- --
Switch(config)#end
Switch#copy running-config startup-config
The following example shows how to create an Enable method list named Enable1, and configure the method 1 as the default radius server group and the method 2 as local.
Switch#configure
Switch(config)##aaa authentication enable Enable1 radius local
Switch(config)#show aaa authentication enable
Methodlist pri1 pri2 pri3 pri4
default local -- -- --
Enable1 radius local -- --
Switch(config)#end
Switch#copy running-config startup-config
2.2.4Configuring the AAA Application List
You can configure authentication method lists on the following access applications: Console, Telnet, SSH and HTTP.
■Console
Follow these steps to apply the Login and Enable method lists for the application Console:
|
Step 1 |
configure Enter global configuration mode. |
|
Step 2 |
line console linenum Enter line configuration mode. linenum: Enter the number of users allowed to login through console port. Its value is 0 in general, for the reason that console input is only active on one console port at a time. |
|
Step 3 |
login authentication { method-list } Apply the Login method list for the application Console. method-list: Specify the name of the Login method list. |
|
Step 4 |
enable authentication { method-list } Apply the Enable method list for the application Console. method-list: Specify the name of the Enable method list. |
|
Step 5 |
show aaa global Verify the configuration of application list. |
|
Step 6 |
end Return to privileged EXEC mode. |
|
Step 7 |
copy running-config startup-config Save the settings in the configuration file. |
The following example shows how to apply the existing Login method list named Login1 and Enable method list named Enable1 for the application Console.
Switch#configure
Switch(config)#line console 0
Switch(config-line)#login authentication Login1
Switch(config-line)#enable authentication Enable1
Switch(config-line)#show aaa global
Module Login List Enable List
Console Login1 Enable1
Telnet default default
Ssh default default
Http default default
Switch(config-line)#end
Switch#copy running-config startup-config
■Telnet
Follow these steps to apply the Login and Enable method lists for the application Telnet:
|
Step 1 |
configure Enter global configuration mode. |
|
Step 2 |
line telnet Enter line configuration mode. |
|
Step 3 |
login authentication { method-list } Apply the Login method list for the application Telnet. method-list: Specify the name of the Login method list. |
|
Step 4 |
enable authentication { method-list } Apply the Enable method list for the application Telnet. method-list: Specify the name of the Enable method list. |
|
Step 5 |
show aaa global Verify the configuration of application list. |
|
Step 6 |
end Return to privileged EXEC mode. |
|
Step 7 |
copy running-config startup-config Save the settings in the configuration file. |
The following example shows how to apply the existing Login method list named Login1 and Enable method list named Enable1 for the application Telnet.
Switch#configure
Switch(config)#line telnet
Switch(config-line)#login authentication Login1
Switch(config-line)#enable authentication Enable1
Switch(config-line)#show aaa global
Module Login List Enable List
Console default default
Telnet Login1 Enable1
Ssh default default
Http default default
Switch(config-line)#end
Switch#copy running-config startup-config
■SSH
Follow these steps to apply the Login and Enable method lists for the application SSH:
|
Step 1 |
configure Enter global configuration mode. |
|
Step 2 |
line ssh Enter line configuration mode. |
|
Step 3 |
login authentication { method-list } Apply the Login method list for the application SSH. method-list: Specify the name of the Login method list. |
|
Step 4 |
enable authentication { method-list } Apply the Enable method list for the application SSH. method-list: Specify the name of the Enable method list. |
|
Step 5 |
show aaa global Verify the configuration of application list. |
|
Step 6 |
end Return to privileged EXEC mode. |
|
Step 7 |
copy running-config startup-config Save the settings in the configuration file. |
The following example shows how to apply the existing Login method list named Login1 and Enable method list named Enable1 for the application SSH.
Switch#configure
Switch(config)#line ssh
Switch(config-line)#login authentication Login1
Switch(config-line)#enable authentication Enable1
Switch(config-line)#show aaa global
Module Login List Enable List
Console default default
Telnet default default
Ssh Login1 Enable1
Http default default
Switch(config-line)#end
Switch#copy running-config startup-config
■HTTP
Follow these steps to apply the Login and Enable method lists for the application HTTP:
|
Step 1 |
configure Enter global configuration mode. |
|
Step 2 |
ip http login authentication { method-list } Apply the Login method list for the application HTTP. method-list: Specify the name of the Login method list. |
|
Step 3 |
ip http enable authentication { method-list } Apply the Enable method list for the application HTTP. method-list: Specify the name of the Enable method list. |
|
Step 4 |
show aaa global Verify the configuration of application list. |
|
Step 5 |
end Return to privileged EXEC mode. |
|
Step 6 |
copy running-config startup-config Save the settings in the configuration file. |
The following example shows how to apply the existing Login method list named Login1 and Enable method list named Enable1 for the application HTTP:
Switch#configure
Switch(config)#ip http login authentication Login1
Switch(config)#ip http enable authentication Enable1
Switch(config)#show aaa global
Module Login List Enable List
Console default default
Telnet default default
Ssh default default
Http Login1 Enable1
Switch(config)#end
Switch#copy running-config startup-config
2.2.5Configuring Login Account and Enable Password
The login account and Enable password can be configured locally on the switch or centrally on the RADIUS/TACACS+ server(s).
■On the Switch
The local username and password for login can be configured in the User Management feature. For details, refer to Managing System.
To configure the local Enable password for getting administrative privileges, follow these steps:
|
Step 1 |
configure Enter global configuration mode. |
|
Step 2 |
Use the following command to create an enable password unencrypted or symmetric encrypted. enable admin password { [ 0 ] password | 7 encrypted-password } 0 indicates that an unencrypted key will follow. password is a string with 31 characters at most, which can contain only English letters (case-sensitive), digits and 17 kinds of special characters. The special characters are !$%’()*,-./[]_{|}. 7 indicates that a symmetric encrypted key with a fixed length will follow. By default, the encryption type is 0. encrypted-password is a symmetric encrypted key with a fixed length, which you can copy from the configuration file of another switch. The key or encrypted-key you configured here will be displayed in the encrypted form. Use the following command to create an enable password unencrypted or MD5 encrypted. enable admin secret { [ 0 ] password | 5 encrypted-password } 0 indicates that an unencrypted key will follow. password is a string with 31 characters at most, which can contain only English letters (case-sensitive), digits and 17 kinds of special characters. The special characters are !$%’()*,-./[]_{|}. 5 indicates that an MD5 encrypted password with fixed length will follow. By default, the encryption type is 0. encrypted-password is an MD5 encrypted password with fixed length, which you can copy from another switch’s configuration file. |
|
Step 3 |
end Return to privileged EXEC mode. |
|
Step 4 |
copy running-config startup-config Save the settings in the configuration file. |
■On the Server
The accounts created by the RADIUS/TACACS+ server can only view the configurations and some network information without the Enable password.
Some configuration principles on the server are as follows:
■For Login authentication configuration, more than one login account can be created on the server. Besides, both the user name and password can be customized.
■For Enable password configuration:
On RADIUS server, the user name should be set as $enable$, and the Enable password is customizable. All the users trying to get administrative privileges share this Enable password.
On TACACS+ server, configure the value of “enable 15“ as the Enable password in the configuration file. All the users trying to get administrative privileges share this Enable password.
Tips: The logged-in guests can get administrative privileges by using the command enable-admin and providing the Enable password.
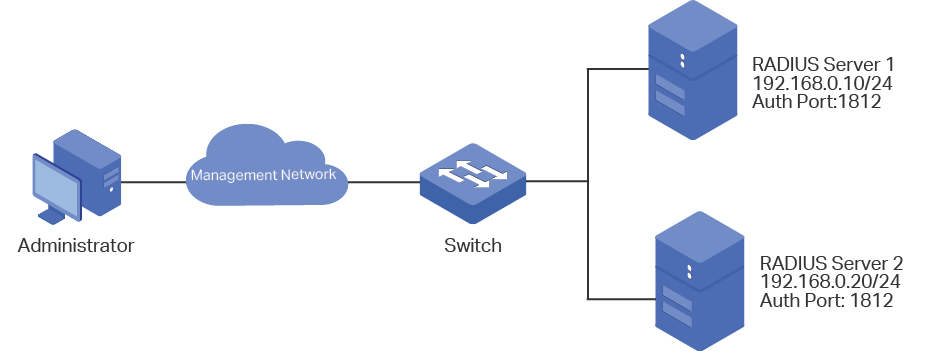
3.1Network Requirements
As shown below, the switch needs to be managed remotely via Telnet. In addition, the senior administrator of the company wants to create an account for the less senior administrators, who can only view the configurations and some network information without the Enable password provided.
Two RADIUS servers are deployed in the network to provide a safer authenticate method for the administrators trying to log in or get administrative privileges. If RADIUS Server 1 breaks down and doesn’t respond to the authentication request, RADIUS Server 2 will work, so as to ensure the stability of the authentication system.
Figure 3-1 Network Topology
3.2Configuration Scheme
To implement this requirement, the senior administrator can create the login account and the Enable password on the two RADIUS servers, and configure the AAA feature on the switch. The IP addresses of the two RADIUS servers are 192.168.0.10/24 and 192.168.0.20/24; the authentication port number is 1812; the shared key is 123456.
The overview of configuration on the switch is as follows:
1)Add the two RADIUS servers on the switch.
2)Create a new RADIUS server group and add the two servers to the group. Make sure that RADIUS Server 1 is the first server for authentication.
3)Configure the method list.
4)Configure the AAA application list.
Demonstrated with T2600G-28TS, the following sections provide configuration procedure in two ways: using the GUI and using the CLI.
3.3Using the GUI
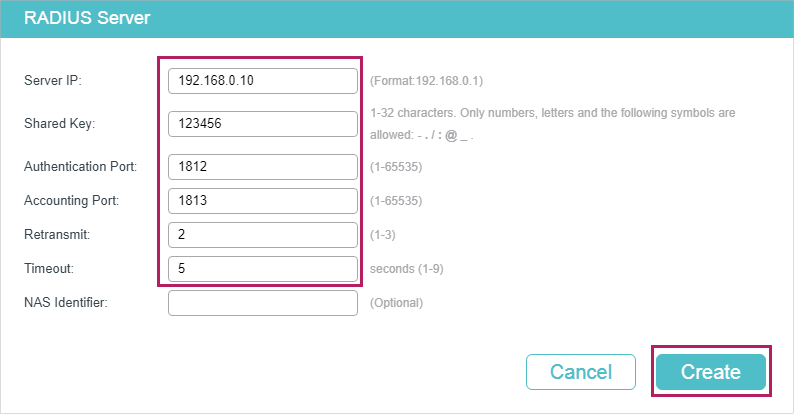
1)Choose the menu SECURITY > AAA > RADIUS Config and click to load the following page. Configure the Server IP as 192.168.0.10, the Shared Key as 123456, the Authentication Port as 1812, and keep the other parameters as default. Click Create to add RADIUS Server 1 on the switch.
Figure 3-2 Add RADIUS Server 1
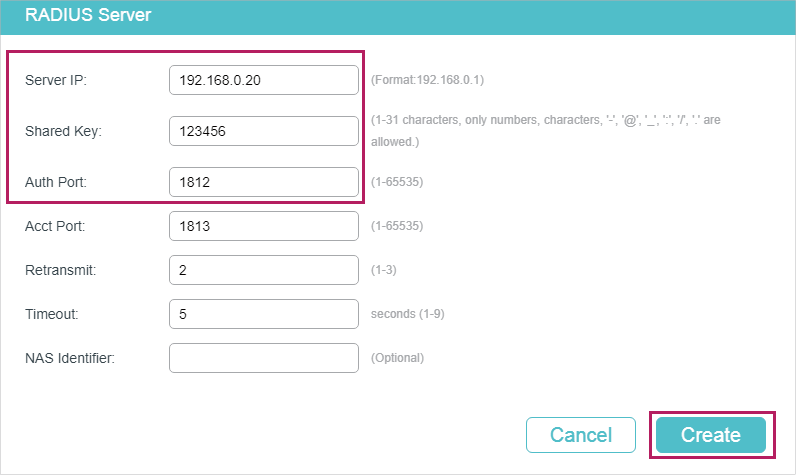
2)On the same page, click  to load the following page. Configure the Server IP as 192.168.0.20, the Shared Key as 123456, the Auth Port as 1812, and keep the other parameters as default. Click Create to add RADIUS Server 2 on the switch
Figure 3-3 Add RADIUS Server 2
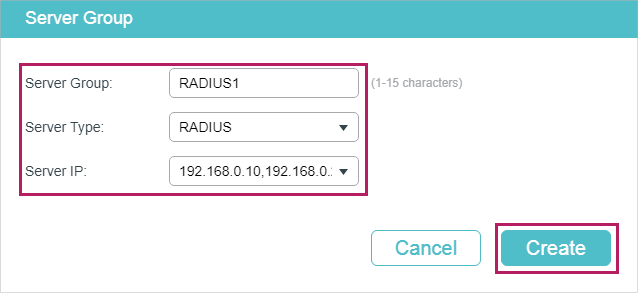
3)Choose the menu SECURITY > AAA > Server Group to load the following page. Click  . Specify the group name as RADIUS1 and the server type as RADIUS. Select 192.168.0.10 and 192.168.0.20 to from the drop-down list. Click Create to create the server group.
Figure 3-4 Create Server Group
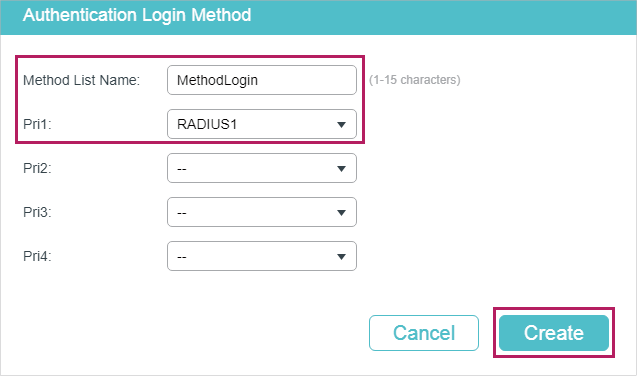
4)Choose the menu SECURITY > AAA > Method Config and click  in the Authentication Login Method Config section. Specify the Method List Name as MethodLogin and select the Pri1 as RADIUS1. Click Create to set the method list for the Login authentication.
Figure 3-5 Configure Login Method Config
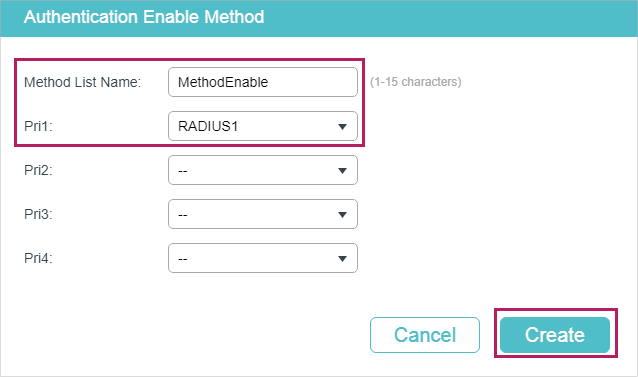
5)On the same page, click in the Authentication Eanble Method Config section. Specify the Method List Name as MethodEnable and select the Pri1 as RADIUS1. Click Create to set the method list for the Enable password authentication.
Figure 3-6 Configure Enable Method Config
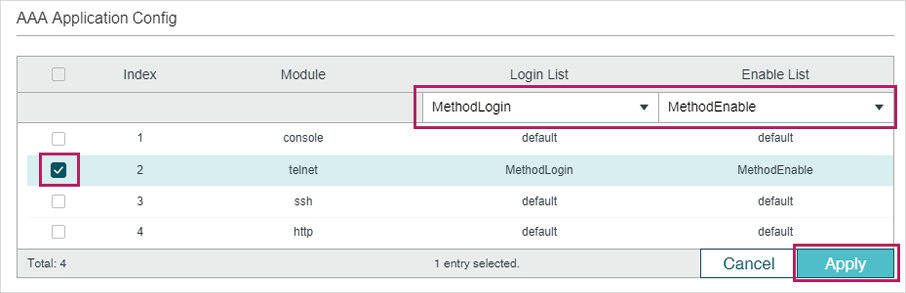
6)Choose the menu SECURITY > AAA > Global Config to load the following page. In the AAA Application List section, select telnet and configure the Login List as Method-Login and Enable List as Method-Enable. Then click Apply.
Figure 3-7 Configure AAA Application Config
7)Click  to save the settings.
3.4Using the CLI
1)Add RADIUS Server 1 and RADIUS Server 2 on the switch.
Switch(config)#radius-server host 192.168.0.10 auth-port 1812 key 123456
Switch(config)#radius-server host 192.168.0.20 auth-port 1812 key 123456
2)Create a new server group named RADIUS1 and add the two RADIUS servers to the server group.
Switch(config)#aaa group radius RADIUS1
Switch(aaa-group)#server 192.168.0.10
Switch(aaa-group)#server 192.168.0.20
Switch(aaa-group)#exit
3)Create two method lists: Method-Login and Method-Enable, and configure the server group RADIUS1 as the authentication method for the two method lists.
Switch(config)#aaa authentication login Method-Login RADIUS1
Switch(config)#aaa authentication enable Method-Enable RADIUS1
4)Configure Method-Login and Method-Enable as the authentication method for the Telnet application.
Switch(config)#line telnet
Switch(config-line)#login authentication Method-Login
Switch(config-line)#enable authentication Method-Enable
Switch(config-line)#end
Switch#copy running-config startup-config
Verify the Configuration
Verify the configuration of the RADIUS servers:
Switch#show radius-server
Server Ip Auth Port Acct Port Timeout Retransmit NAS Identifier Shared key
192.168.0.10 1812 1813 5 2 000AEB132397 123456
192.168.0.20 1812 1813 5 2 000AEB132397 123456
Verify the configuration of server group RADIUS1:
Switch#show aaa group RADIUS1
192.168.0.10
192.168.0.20
Verify the configuration of the method lists:
Switch#show aaa authentication
Authentication Login Methodlist:
Methodlist pri1 pri2 pri3 pri4
default local -- -- --
Method-Login RADIUS1 -- -- --
Authentication Enable Methodlist:
Methodlist pri1 pri2 pri3 pri4
default none -- -- --
Method-Enable RADIUS1 -- -- --
...
Verify the status of the AAA feature and the configuration of the AAA application list:
Switch#show aaa global
Module Login List Enable List
Console default default
Telnet Method-Login Method-Enable
SSH default default
Http default default
Default settings of AAA are listed in the following tables.
Table 4-1AAA
|
Parameter |
Default Setting |
|
Global Config |
|
|
AAA Feature |
Enabled |
|
RADIUS Config |
|
|
Server IP |
None |
|
Shared Key |
None |
|
Auth Port |
1812 |
|
Acct Port |
1813 |
|
Retransmit |
2 |
|
Timeout |
5 seconds |
|
NAS Identifier |
The MAC address of the switch. |
|
TACACS+ Config |
|
|
Server IP |
None |
|
Timeout |
5 seconds |
|
Shared Key |
None |
|
Port |
49 |
|
Server Group: There are two default server groups: radius and tacacs. |
|
|
Method List |
|
|
Authentication Login Method List |
List name: default Pri1: local |
|
Authentication Enable Method List |
List name: default Pri1: none |
|
AAA Application List |
|
|
console |
Login List: default Enable List: default |
|
telnet |
Login List: default Enable List: default |
|
ssh |
Login List: default Enable List: default |
|
http |
Login List: default Enable List: default |