Configuring 802.1x
CHAPTERS
4. Appendix: Default Parameters
|
|
This guide applies to: T1500G-10PS v2 or above, T1500G-8T v2 or above, T1500G-10MPS v2 or above, T1500-28PCT v3 or above, T1600G-18TS v2 or above, T1600G-28PS v3 or above, T1600G-28TS v3 or above, T1600G-52TS v3 or above, T1600G-52PS v3 or above, T1700X-16TS v3 or above, T1700G-28TQ v3 or above, T2500G-10TS v2 or above, T2600G-18TS v2 or above, T2600G-28TS v3 or above, T2600G-28MPS v3 or above, T2600G-28SQ v1 or above, T2600G-52TS v3 or above. |

802.1x protocol is a protocol for port-based Network Access Control. It is used to authenticate and control access from devices connected to the ports. If the device connected to the port is authenticated by the authentication server successfully, its request to access the LAN will be accepted; if not, its request will be denied.
802.1x authentication uses client-server model which contains three device roles: client/supplicant, authenticator and authentication server. This is described in the figure below:
Figure 1-1 802.1x Authentication Model
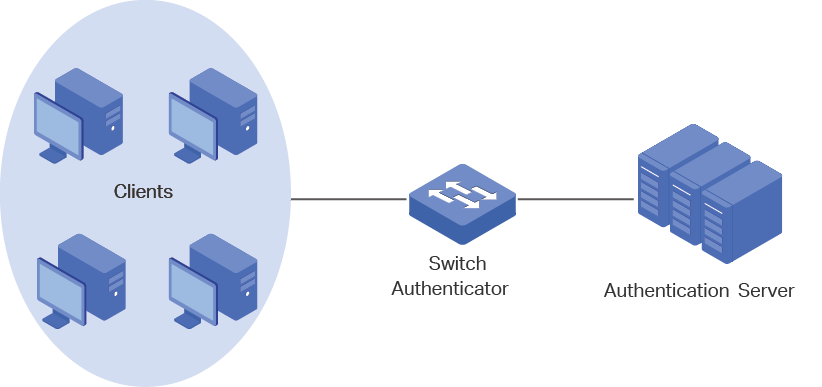
Client
A client, usually a computer, is connected to the authenticator via a physical port. We recommend that you install TP-Link 802.1x authentication client software on the client hosts, enabling them to request 802.1x authentication to access the LAN.
Authenticator
An authenticator is usually a network device that supports 802.1x protocol. As the above figure shows, the switch is an authenticator.
The authenticator acts as an intermediate proxy between the client and the authentication server. The authenticator requests user information from the client and sends it to the authentication server; also, the authenticator obtains responses from the authentication server and send them to the client. The authenticator allows authenticated clients to access the LAN through the connected ports but denies the unauthenticated clients.
Authentication Server
The authentication server is usually the host running the RADIUS server program. It stores information of clients, confirms whether a client is legal and informs the authenticator whether a client is authenticated.
To complete the 802.1x configuration, follow these steps:
1)Configure the RADIUS server.
2)Configure 802.1x globally.
3)Configure 802.1x on ports.
In addition, you can view the authenticator state.
Configuration Guidelines
802.1x authentication and Port Security cannot be enabled at the same time. Before enabling 802.1x authentication, make sure that Port Security is disabled.
2.1Using the GUI
2.1.1Configuring the RADIUS Server
Configure the parameters of RADIUS sever and configure the RADIUS server group.
Adding the RADIUS Server
Choose the menu SECURITY > AAA > RADIUS Config and click  to load the following page.
Figure 2-1 Adding RADIUS Server
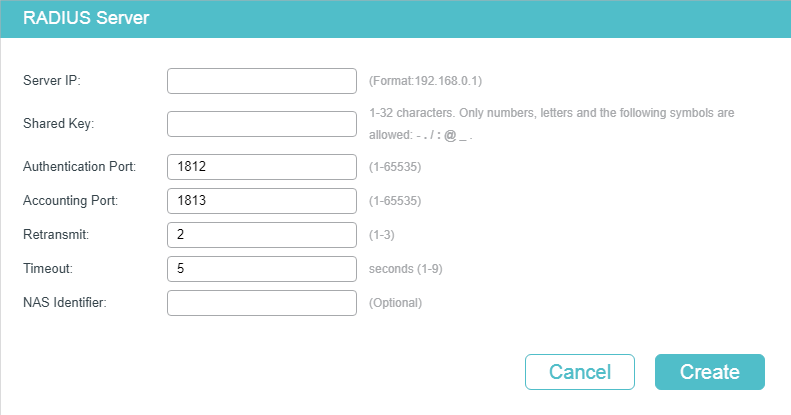
Follow these steps to add a RADIUS server:
1)Configure the parameters of the RADIUS server.
|
Server IP |
Enter the IP address of the server running the RADIUS secure protocol. |
|
Shared Key |
Enter the shared key between the RADIUS server and the switch. The RADIUS server and the switch use the key string to encrypt passwords and exchange responses. |
|
Authentication Port |
Specify the UDP destination port on the RADIUS server for authentication requests. The default setting is 1812. |
|
Accounting Port |
Specify the UDP destination port on the RADIUS server for accounting requests. The default setting is 1813. |
|
Retransmit |
Specify the number of times a request is resent to the server if the server does not respond. The default setting is 2. |
|
Timeout |
Specify the time interval that the switch waits for the server to reply before resending. The default setting is 5 seconds. |
|
NAS Identifier |
Specify the name of the NAS (Network Access Server) to be contained in RADIUS packets for identification. It ranges from 1 to 31 characters. The default value is the MAC address of the switch. Generally, the NAS indicates the switch itself. |
2)Click Apply.
Configuring the RADIUS Server Group
Choose the menu SECURITY > AAA > Server Group to load the following page.
Figure 2-2 Adding a Server Group
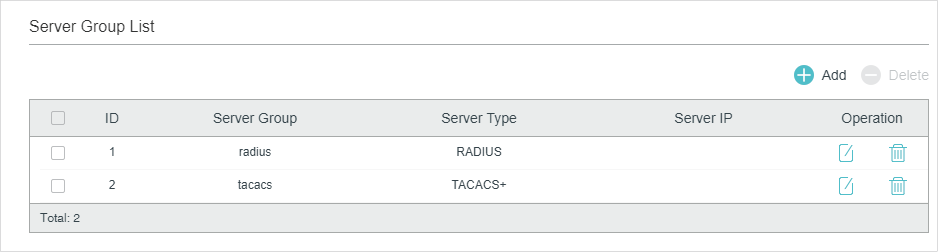
Follow these steps to add the RADIUS server to a server group:
1)Click  to edit the default radius server group or click to add a new server group.
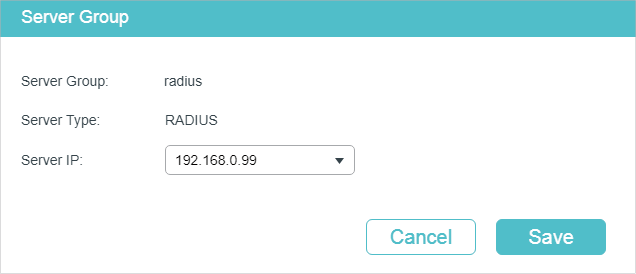
If you click  , the following window will pop up. Select a RADIUS server and click Save.
Figure 2-3 Editing Server Group
If you click  , the following window will pop up. Specify a name for the server group, select the server type as RADIUS and select the IP address of the RADIUS server. Click Save.
Figure 2-4 Adding Server Group
Configuring the Dot1x List
Choose the menu SECURITY > AAA > Dot1x List to load the following page.
Figure 2-5 Configuring the Dot1x List
Follow these steps to configure RADIUS server groups for 802.1x authentication and accounting:
1)In the Authentication Dot1x Method section, select an existing RADIUS server group for authentication from the Pri1 drop-down list and click Apply.
2)In the Accounting Dot1x Method section, select an existing RADIUS server group for accounting from the Pri1 drop-down list and click Apply.
2.1.2Configuring 802.1x Globally
Choose the menu SECURITY > 802.1x > Global Config to load the following page.
Figure 2-6 Global Config
Follow these steps to configure 802.1x global parameters:
1)In the Global Config section, configure the following parameters.
|
802.1x |
Enable or disable 802.1x globally. |
|
Auth Protocol |
Select the 802.1x authentication protocol. PAP: The 802.1x authentication system uses EAP packets to exchange information between the switch and the client. The transmission of EAP (Extensible Authentication Protocol) packets is terminated at the switch and the EAP packets are converted to other protocol (such as RADIUS) packets, and transmitted to the authentication server. EAP: The 802.1x authentication system uses EAP packets to exchange information between the switch and the client. The EAP packets with authentication data are encapsulated in the advanced protocol (such as RADIUS) packets, and transmitted to the authentication server. |
|
Accounting |
Enable or disable 802.1x accounting feature. |
|
Handshake |
Enable or disable the Handshake feature. The Handshake feature is used to detect the connection status between the TP-Link 802.1x Client and the switch. Please disable Handshake feature if you are using other client softwares instead of TP-Link 802.1x Client. |
|
VLAN Assignment |
Enable or disable the 802.1x VLAN assignment feature. 802.1x VLAN assignment is a technology allowing the RADIUS server to send the VLAN assignment to the port when the port is authenticated. If the assigned VLAN does not exist on the switch, the switch will create the related VLAN automatically, add the authenticated port to the VLAN and change the PVID based on the assigned VLAN. If the assigned VLAN exists on the switch, the switch will directly add the authenticated port to the related VLAN and change the PVID instead of creating a new VLAN. If no VLAN is supplied by the RADIUS server or if 802.1x authentication is disabled, the port will be in its original VLAN after successful authentication. |
2)Click Apply.
2.1.3Configuring 802.1x on Ports
Choose the menu SECURITY > 802.1x > Port Config to load the following page.
Figure 2-7 Port Config
Follow these steps to configure 802.1x authentication on the desired port:
1)Select one or more ports and configure the following parameters:
|
Status |
Enable 802.1x authentication on the port. |
|
MAB |
Select whether to enable the MAB (MAC-Based Authentication Bypass) feature for the port. With MAB feature enabled, the switch automatically sends the authentication server a RADIUS access request frame with the client’s MAC address as the username and password. It is also necessary to configure the RADIUS server with the client’s information for authentication. You can enable this feature on IEEE 802.1x ports connected to devices without 802.1x capability. For example, most printers, IP phones and fax machines do not have 802.1x capability. Note: MAB cannot work if Guest VLAN is enabled. |
|
Guest VLAN |
Specify a Guest VLAN ID. 0 means that Guest VLAN is disabled. The configured VLAN must be an existing 802.1Q VLAN. With Guest VLAN enabled, a port can access resources in the guest VLAN even though the port is not yet authenticated; if guest VLAN is disabled and the port is not authenticated, the port cannot visit any resource in the LAN. |
|
Port Control |
Select the control mode for the port. By default, it is Auto. Auto: If this option is selected, the port can access the network only when it is authenticated. Force-Authorized: If this option is selected, the port can access the network without authentication. Force-Unauthorized: If this option is selected, the port can never be authenticated. |
|
Port Method |
Select the port method. By default, it is MAC Based. MAC Based: All clients connected to the port need to be authenticated. Port Based: If a client connected to the port is authenticated, other clients can access the LAN without authentication. |
|
Maximum Request (1-9) |
Specify the maximum number of attempts to send the authentication packet. It ranges from 1 to 9 times and the default is 3 times. |
|
Quiet Period (1-999) |
Specify the Quiet Period. It ranges from 1 to 999 seconds and the default time is 10 seconds. The quiet period starts after the authentication fails. During the quiet period, the switch does not process authentication requests from the same client. |
|
Supplicant Timeout (1-9) |
Specify the maximum time which the switch waits for a response from the client. It ranges from 1 to 9 seconds and the default time is 3 seconds. If the switch does not receive any reply from the client within the specified time, it will resend the request. |
|
Authorized |
Displays whether the port is authorized or not. |
|
LAG |
Displays the LAG the port belongs to. |
2)Click Apply.
|
|
Note: If a port is in an LAG, its 802.1x authentication function cannot be enabled. Also, a port with 802.1x authentication enabled cannot be added to any LAG. |

2.1.4View the Authenticator State
Choose the menu SECURITY > 802.1x > Authenticator State to load the following page.
Figure 2-8 View Authenticator State

On this page, you can view the authentication status of each port:
|
Port |
Displays the port number. |
|
MAC Address |
Displays the MAC address of the authenticated device. When the port method is Port Based, the MAC address of the first authenticated device wil be displayed with a suffix “p”. |
|
PAE State |
Displays the current state of the authenticator PAE state machine. Possible values are: Initialize, Disconnected, Connecting, Authenticating, Authenticated, Aborting, Held, ForceAuthorized and ForceUnauthorized. |
|
Backend State |
Displays the current state of the backend authentication state machine. Possible values are: Request, Response, Success, Fail, Timeout, Initialize and Idle. |
|
Status |
Displays whether the port is authorized or not. |
|
VID |
Displays the VLAN ID assigned by the authenticator to the supplicant device when the related port is authorized. If the related port is unauthorized and there is a Guest VLAN ID, the Guest VLAN ID will be displayed. |
2.2Using the CLI
2.2.1Configuring the RADIUS Server
Follow these steps to configure RADIUS:
|
Step 1 |
configure Enter global configuration mode. |
|
Step 2 |
radius-server host ip-address [ auth-port port-id ] [ acct-port port-id ] [ timeout time ] [ retransmit number ] [ nas-id nas-id ] key { [ 0 ] string | 7 encrypted-string } Add the RADIUS server and configure the related parameters as needed. host ip-address: Enter the IP address of the server running the RADIUS protocol. auth-port port-id: Specify the UDP destination port on the RADIUS server for authentication requests. The default setting is 1812. acct-port port-id: Specify the UDP destination port on the RADIUS server for accounting requests. The default setting is 1813. Generally, the accounting feature is not used in the authentication account management. timeout time: Specify the time interval that the switch waits for the server to reply before resending. The valid values are from 1 to 9 seconds and the default setting is 5 seconds. retransmit number: Specify the number of times a request is resent to the server if the server does not respond. The valid values are from 1 to 3 and the default setting is 2. nas-id nas-id: Specify the name of the NAS (Network Access Server) to be contained in RADIUS packets for identification. It ranges from 1 to 31 characters. The default value is the MAC address of the switch. Generally, the NAS indicates the switch itself. key { [ 0 ] string | 7 encrypted-string }: Specify the shared key. 0 and 7 prevent the encryption type. 0 indicates that an unencrypted key will follow. 7 indicates that a symmetric encrypted key with a fixed length will follow. By default, the encryption type is 0. string is the shared key for the switch and the server, which contains 31 characters at most. encrypted-string is a symmetric encrypted key with a fixed length, which you can copy from the configuration file of another switch. The key or encrypted-key you configured here will be displayed in the encrypted form. |
|
Step 3 |
aaa group radius group-name Create a RADIUS server group. radius: Specify the group type as radius. group-name: Specify a name for the group. |
|
Step 4 |
server ip-address Add the existing servers to the server group. ip-address: Specify IP address of the server to be added to the group. |
|
Step 5 |
exit Return to global configuration mode. |
|
Step 6 |
aaa authentication dot1x default { method } Select the RADIUS group for 802.1x authentication. method: Specify the RADIUS group for 802.1x authentication. aaa accounting dot1x default { method } Select the RADIUS group for 802.1x accounting. method: Specify the RADIUS group for 802.1x accounting. Note: If multiple RADIUS servers are available, you are suggested to add them to different server groups respectively for authentication and accounting. |
|
Step 7 |
show radius-server (Optional) Verify the configuration of RADIUS server. |
|
Step 8 |
show aaa group [ group-name ] (Optional) Verify the configuration of server group. |
|
Step 9 |
show aaa authentication dot1x (Optional) Verify the authentication method list. |
|
Step 10 |
show aaa accounting dot1x (Optional) Verify the accounting method list. |
|
Step 11 |
end Return to privileged EXEC mode. |
|
Step 12 |
copy running-config startup-config Save the settings in the configuration file. |
The following example shows how to enable AAA, add a RADIUS server to the server group named radius1, and apply this server group to the 802.1x authentication. The IP address of the RADIUS server is 192.168.0.100; the shared key is 123456; the authentication port is 1812; the accounting port is 1813.
Switch#configure
Switch(config)#radius-server host 192.168.0.100 auth-port 1812 acct-port 1813 key 123456
Switch(config)#aaa group radius radius1
Switch(aaa-group)#server 192.168.0.100
Switch(aaa-group)#exit
Switch(config)#aaa authentication dot1x default radius1
Switch(config)#aaa accounting dot1x default radius1
Switch(config)#show radius-server
Server Ip Auth Port Acct Port Timeout Retransmit NAS Identifier Shared key
192.168.0.100 1812 1813 5 2 000AEB132397 123456
Switch(config)#show aaa group radius1
192.168.0.100
Switch(config)#show aaa authentication dot1x
Methodlist pri1 pri2 pri3 pri4
default radius1 -- -- --
Switch(config)#show aaa accounting dot1x
Methodlist pri1 pri2 pri3 pri4
default radius1 -- -- --
Switch(config)#end
Switch#copy running-config startup-config
2.2.2Configuring 802.1x Globally
Follow these steps to configure 802.1x globally:
|
Step 1 |
configure Enter global configuration mode. |
|
Step 2 |
dot1x system-auth-control Enable 802.1x authentication globally. |
|
Step 3 |
dot1x auth-protocol { pap | eap } Configure the 802.1x authentication protocol. pap: Specify the authentication protocol as PAP. If this option is selected, the 802.1x authentication system uses EAP (Extensible Authentication Protocol) packets to exchange information between the switch and the client. The transmission of EAP packets is terminated at the switch and the EAP packets are converted to other protocol (such as RADIUS) packets, and transmitted to the authentication server. eap: Specify the authentication protocol as EAP. If this option is selected, the 802.1x authentication system uses EAP packets to exchange information between the switch and the client. The EAP packets with authentication data are encapsulated in the advanced protocol (such as RADIUS) packets, and transmitted to the authentication server. |
|
Step 4 |
dot1x accounting (Optional) Enable the accounting feature. |
|
Step 5 |
dot1x handshake (Optional) Enable the Handshake feature. The Handshake feature is used to detect the connection status between the TP-Link 802.1x Client and the switch. Please disable Handshake feature if you are using other client softwares instead of TP-Link 802.1x Client. |
|
Step 6 |
dot1x vlan-assignment (Optional) Enable or disable the 802.1x VLAN assignment feature. 802.1x VLAN assignment is a technology allowing the RADIUS server to send the VLAN assignment to the port when the port is authenticated. If the assigned VLAN does not exist on the switch, the switch will create the related VLAN automatically, add the authenticated port to the VLAN and change the PVID based on the assigned VLAN. If the assigned VLAN exists on the switch, the switch will directly add the authenticated port to the related VLAN and change the PVID instead of creating a new VLAN. If no VLAN is supplied by the RADIUS server or if 802.1x authentication is disabled, the port will be in its original VLAN after successful authentication. |
|
Step 7 |
show dot1x global (Optional) Verify global configurations of 802.1x. |
|
Step 8 |
end Return to privileged EXEC mode. |
|
Step 9 |
copy running-config startup-config Save the settings in the configuration file. |
The following example shows how to enable 802.1x authentication, configure PAP as the authentication method and keep other parameters as default:
Switch#configure
Switch(config)#dot1x system-auth-control
Switch(config)#dot1x auth-protocol pap
Switch(config)#show dot1x global
802.1X State: Enabled
Authentication Protocol: PAP
Handshake State: Enabled
802.1X Accounting State: Disabled
802.1X VLAN Assignment State: Disabled
Switch(config)#end
Switch#copy running-config startup-config
2.2.3Configuring 802.1x on Ports
Follow these steps to configure the port:
|
Step 1 |
configure Enter global configuration mode. |
|
Step 2 |
interface {fastEthernet port | range fastEthernet port-list | gigabitEthernet port | range gigabitEthernet port-list | ten-gigabitEthernet port | range ten-gigabitEthernet port-list } Enter interface configuration mode. port: Enter the ID of the port to be configured. |
|
Step 3 |
dot1x Enable 802.1x authentication for the port. |
|
Step 4 |
dot1x mab Enable the MAB (MAC-Based Authentication Bypass) feature for the port. With MAB feature enabled, the switch automatically sends the authentication server a RADIUS access request frame with the client’s MAC address as the username and password. It is also necessary to configure the RADIUS server with the client’s information for authentication. You can enable this feature on IEEE 802.1x ports connected to devices without 802.1x capability. For example, most printers, IP phones and fax machines do not have 802.1x capability. Note: MAB cannot work if Guest VLAN is enabled. |
|
Step 5 |
dot1x guest-vlan vid (Optional) Configure guest VLAN on the port. vid: Specify the ID of the VLAN to be configured as the guest VLAN. The valid values are from 0 to 4094. 0 means that Guest VLAN is disabled on the port. The configured VLAN must be an existing 802.1Q VLAN. Clients in the guest VLAN can only access resources from specific VLANs. Note: To use Guest VLAN, the control type of the port should be configured as port-based. |
|
Step 6 |
dot1x port-control { auto | authorized-force | unauthorized-force } Configure the control mode for the port. By default, it is auto. auto: If this option is selected, the port can access the network only when it is authenticated. authorized-force: If this option is selected, the port can access the network without authentication. unauthorized-force: If this option is selected, the port can never be authenticated. |
|
Step 7 |
dot1x port-method { mac-based | port-based } Configure the control type for the port. By default, it is mac-based. mac-based: All clients connected to the port need to be authenticated. port-based: If a client connected to the port is authenticated, other clients can access the LAN without authentication. |
|
Step 8 |
dot1x max-req times Specify the maximum number of attempts to send the authentication packet for the client. times: The maximum attempts for the client to send the authentication packet. It ranges from 1 to 9 and the default is 3. |
|
Step 9 |
dot1x quiet-period [time] (Optional) Enable the quiet feature for 802.1x authentication and configure the quiet period. time: Set a value between 1 and 999 seconds for the quiet period. It is 10 seconds by default. The quiet period starts after the authentication fails. During the quiet period, the switch does not process authentication requests from the same client. |
|
Step 10 |
dot1x timeout supp-timeout time Configure the supplicant timeout period. time: Specify the maximum time for which the switch waits for response from the client. It ranges from 1 to 9 seconds and the default time is 3 seconds. If the switch does not receive any reply from the client within the specified time, it will resend the request. |
|
Step 11 |
show dot1x interface [fastEthernet port |gigabitEthernet port | ten-gigabitEthernet port] (Optional) Verify the configurations of 802.1x authentication on the port. port: Enter the ID of the port to be configured. If no specific port is entered, the switch will show configurations of all ports. |
|
Step 12 |
end Return to privileged EXEC mode. |
|
Step 13 |
copy running-config startup-config Save the settings in the configuration file. |
The following example shows how to enable 802.1x authentication on port 1/0/2, configure the control type as port-based, and keep other parameters as default:
Switch#configure
Switch(config)#interface gigabitEthernet 1/0/2
Switch(config-if)#dot1x
Switch(config-if)#dot1x port-method port-based
Switch(config-if)#show dot1x interface gigabitEthernet 1/0/2
Port State MAB State GuestVLAN PortControl PortMethod
---- ----- --------- --------- ----------- ----------
Gi1/0/2 disabled disabled 0 auto port-based
MaxReq QuietPeriod SuppTimeout Authorized LAG
------ ----------- ----------- ---------- ---
3 10 3 unauthorized N/A
Switch(config-if)#end
Switch#copy running-config startup-config
2.2.4Viewing Authenticator State
You can view the authenticator state. If needed, you can also initialize or reauthenticate the specific client:
|
Step 1 |
show dot1x auth-state interface [fastEthernet port | gigabitEthernet port | tengigabitEthernet port] Displays the authenticator state. |
|
Step 2 |
configure Enter global configuration mode. |
|
Step 3 |
interface {fastEthernet port | range fastEthernet port-list | gigabitEthernet port | range gigabitEthernet port-list | ten-gigabitEthernet port | range ten-gigabitEthernet port-list} Enter interface configuration mode. port: Enter the ID of the port to be configured. |
|
Step 4 |
dot1x auth-init [ mac mac-address ] Initialize the specific client. To access the network, the client needs to provide the correct information to pass the authentication again. mac-address: Enter the MAC address of the client that will be unauthorized. |
|
Step 5 |
dot1x auth-reauth [ mac mac-address ] Reauthenticate the specific client. mac-address: Enter the MAC address of the client that will be reauthenticated. |
|
Step 6 |
end Return to privileged EXEC mode. |
|
Step 7 |
copy running-config startup-config Save the settings in the configuration file. |
3.1Network Requirements
The network administrator wants to control access from the end users (clients) in the company. It is required that all clients need to be authenticated separately and only the authenticated clients can access the internet.
3.2Configuration Scheme
To authenticate clients separately, enable 802.1x authentication, configure the control mode as auto, and set the control type as MAC based.
Enable 802.1x authentication on the ports connected to clients.
Keep 802.1x authentication disabled on ports connected to the authentication server and the internet, which ensures unrestricted connections between the switch and the authentication server or the internet.
3.3Network Topology
As shown in the following figure, Switch A acts as the authenticator. Port 1/0/1 is connected to the client, port 1/0/2 is connected to the RADIUS server, and port 1/0/3 is connected to the internet.
Figure 3-1 Network Topology
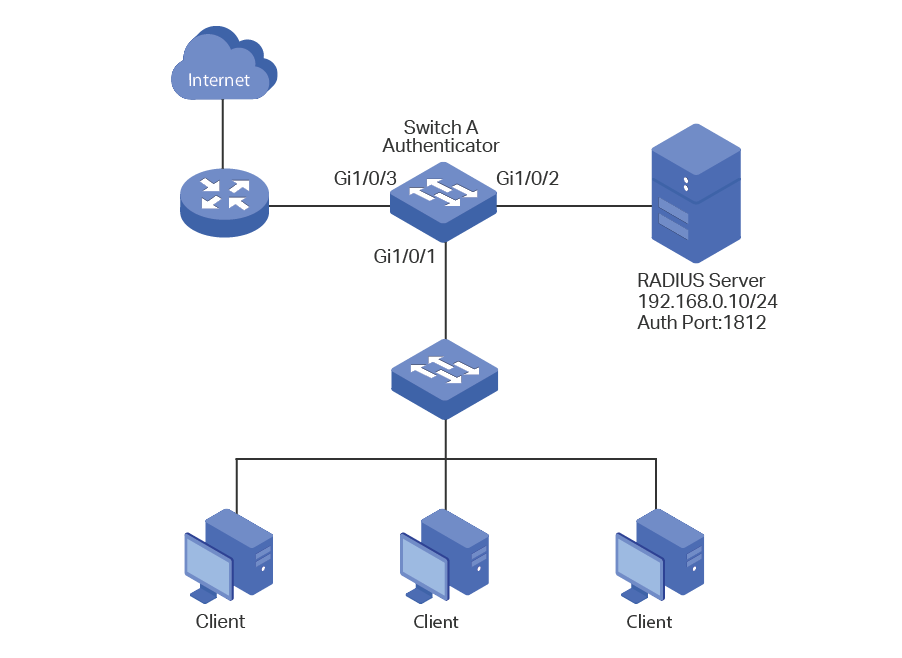
Demonstrated with T2600G-28TS acting as the authenticator, the following sections provide configuration procedure in two ways: using the GUI and using the CLI.
3.4Using the GUI
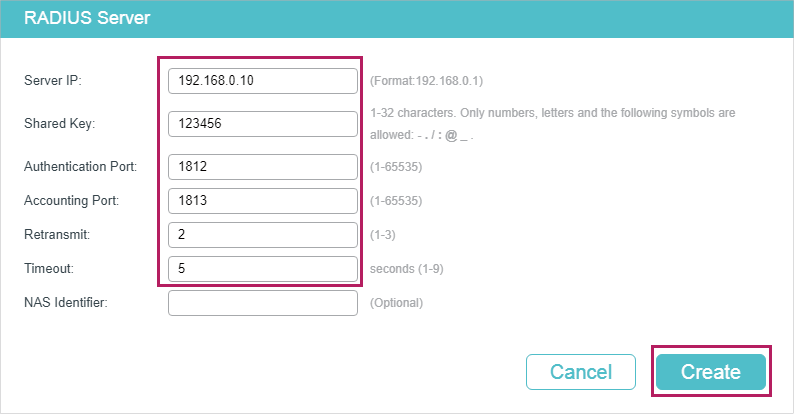
1)Choose the menu SECURITY > AAA > RADIUS Config and click  to load the following page. Configure the parameters of the RADIUS server and click Create.
Figure 3-2 Adding RADIUS Server
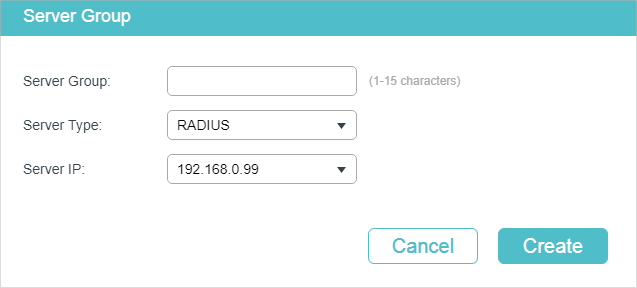
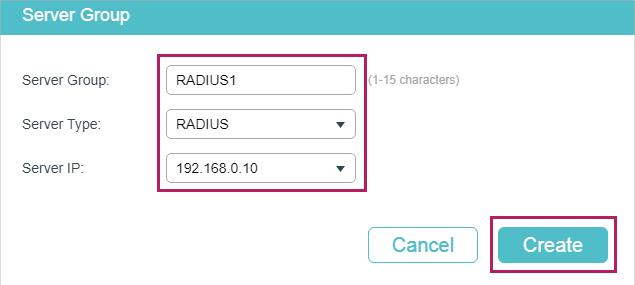
2)Choose the menu SECURITY > AAA > Server Group and click  to load the following page. Specify the group name as RADIUS1, select the server type as RADIUS and server IP as 192.168.0.10. Click Create.
Figure 3-3 Creating Server Group
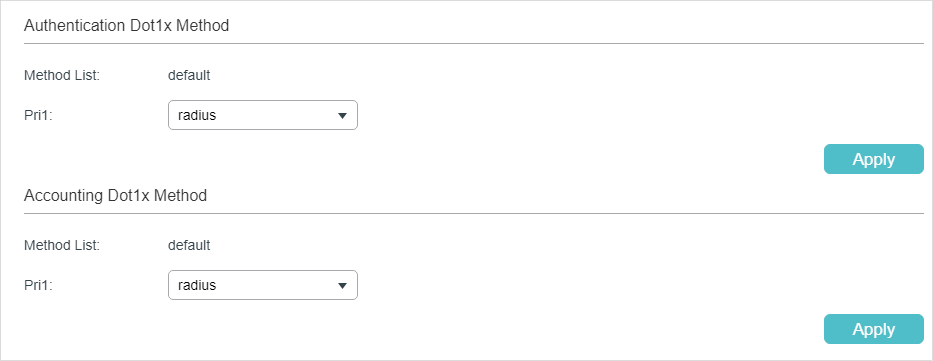
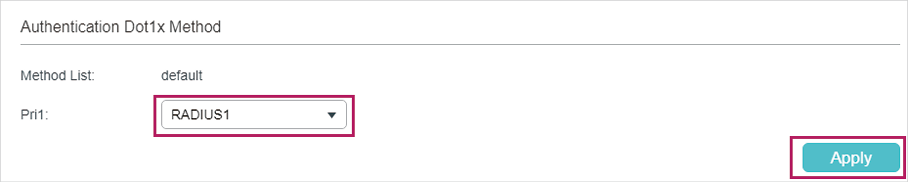
3)Choose the menu SECURITY > AAA > Dot1x List to load the following page. In the Authentication Dot1x Method section, select RADIUS1 as the RADIUS server group for authentication, and click Apply.
Figure 3-4 Configuring Authentication RADIUS Server
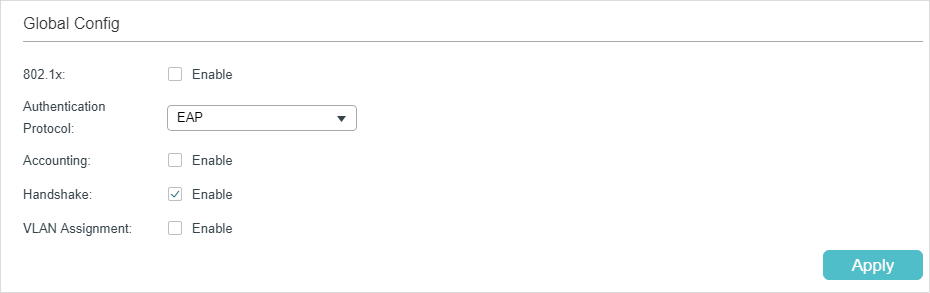
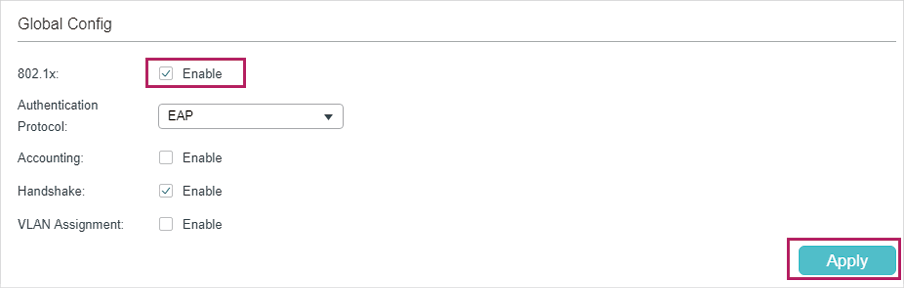
4)Choose the menu SECURITY > 802.1x > Global Config to load the following page. Enable 802.1x authentication and configure the Authentication Method as EAP. Keep the default authentication settings. Click Apply.
Figure 3-5 Configuring Global Settings
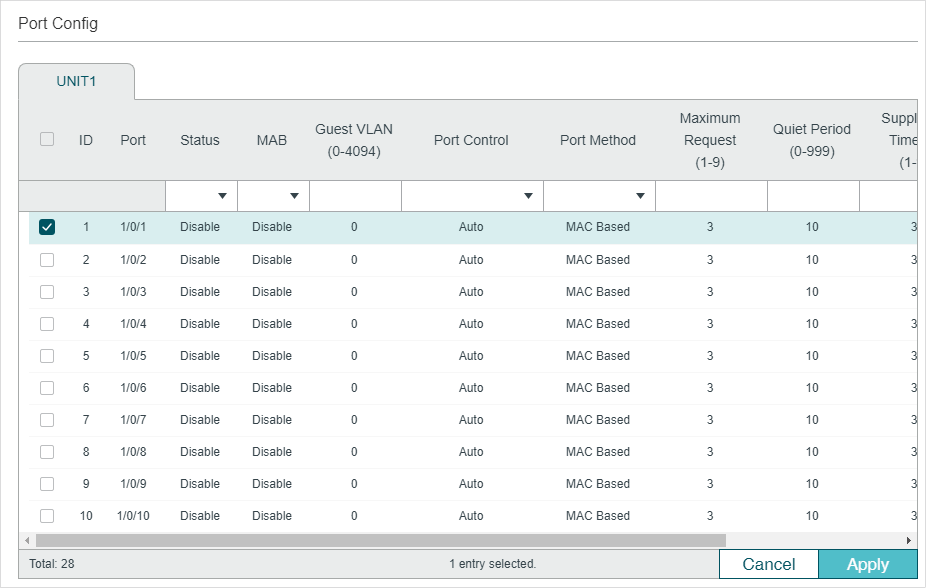
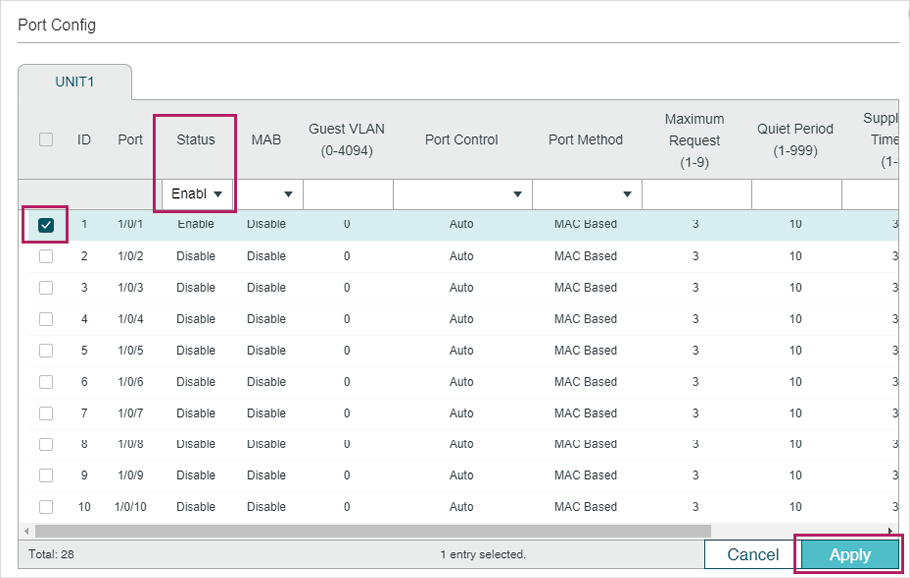
5)Choose the menu SECURITY > 802.1x > Port Config to load the following page. For port 1/0/1, enable 802.1x authentication, set the Control Mode as auto and set the Control Type as MAC Based; For port 1/0/2 and port 1/0/3, disable 802.1x authentication.
Figure 3-6 Configuring Port
6)Click  to save the settings.
3.5Using the CLI
1)Configure the RADIUS parameters.
Switch_A(config)#radius-server host 192.168.0.10 auth-port 1812 key 123456
Switch_A(config)#aaa group radius RADIUS1
Switch_A(aaa-group)#server 192.168.0.10
Switch_A(aaa-group)#exit
Switch_A(config)#aaa authentication dot1x default RADIUS1
2)Globally enable 802.1x authentication and set the authentication protocol.
Switch_A(config)#dot1x system-auth-control
Switch_A(config)#dot1x auth-protocol eap
3)Disable 802.1x authentication on port 1/0/2 and port 1/0/3. Enable 802.1x authentication on port 1/0/1, set the control mode as auto, and set the control type as MAC based.
Switch_A(config)#interface gigabitEthernet 1/0/2
Switch_A(config-if)#no dot1x
Switch_A(config-if)#exit
Switch_A(config)#interface gigabitEthernet 1/0/3
Switch_A(config-if)#no dot1x
Switch_A(config-if)#exit
Switch_A(config)#interface gigabitEthernet 1/0/1
Switch_A(config-if)#dot1x
Switch_A(config-if)#dot1x port-method mac-based
Switch_A(config-if)#dot1x port-control auto
Switch_A(config-if)#exit
Verify the Configurations
Verify the global configurations of 802.1x authentication:
Switch_A#show dot1x global
802.1X State: Enabled
Authentication Protocol: EAP
Handshake State: Enabled
802.1X Accounting State: Disabled
802.1X VLAN Assignment State: Disabled
Verify the configurations of 802.1x authentication on the port:
Switch_A#show dot1x interface
Port State MAB State GuestVLAN PortControl PortMethod
---- ----- --------- --------- ----------- ----------
Gi1/0/1 enabled disabled 0 auto mac-based
Gi1/0/2 disabled disabled 0 auto mac-based
Gi1/0/3 disabled disabled 0 auto mac-based
...
MaxReq QuietPeriod SuppTimeout Authorized LAG
------ ----------- ----------- ---------- ---
3 10 3 unauthorized N/A
3 10 3 unauthorized N/A
3 10 3 unauthorized N/A
...
Verify the configurations of RADIUS :
Switch_A#show aaa global
Module Login List Enable List
Console default default
Telnet default default
Ssh default default
Http default default
Switch_A#show aaa authentication dot1x
Methodlist pri1 pri2 pri3 pri4
default RADIUS1 -- -- --
Switch_A#show aaa group RADIUS1
192.168.0.10
Default settings of 802.1x are listed in the following table.
Table 4-1Default Settings of 802.1x
|
Parameter |
Default Setting |
|
Global Config |
|
|
802.1x Authentication |
Disable |
|
Authentication Method |
EAP |
|
Handshake |
Enable |
|
Accounting |
Disable |
|
VLAN Assignment |
Disable |
|
Port Config |
|
|
802.1x Status |
Disable |
|
MAB |
Disable |
|
Guest VLAN |
Disable |
|
Port Control |
Auto |
|
Guest VLAN |
0 |
|
Maximum Request |
3 |
|
Quiet Period |
10 seconds |
|
Supplicant Timeout |
3 seconds |
|
Port Method |
MAC Based |
|
Dot1X List |
|
|
Authentication Dot1x Method List |
List Name: default Pri1: radius |
|
Accounting Dot1x Method List |
List Name: default Pri1: radius |