Configuring SMS Portal Authentication
Chapter
3. Test the Configuration Result
|
|
This guide applies to: AC50, AC500 |

On the latest Wireless Controller AC500/AC50 (V1_170706 or above), we newly develop a powerful portal feature: SMS Portal. To help users easily understand and enjoy the new feature, this configuration guide detailedly introduces what SMS Portal is and how to configure SMS Portal.
1.1SMS Portal Introduction
In SMS Portal authentication, users can use their mobile phones to get a verification code via text message, and enter the received code to pass authentication.
The following introduces the main advantages of SMS Portal, which may help you determine when or whether you should choose SMS Portal on your network.
Convenient For Customers
Nowadays almost everyone takes a mobile phone when go outside. SMS Portal directly uses the phone number for authentication without additional registration account or information required. The authentication process is very simple for customers. Customers only need to get a verification code using their mobile phones and provide the received code on the authentication page.
Real-Name Authentication
Nowadays the United States, Germany, Britain, Australia, China and some other countries require users to provide a valid proof of identity and contact information to buy phone numbers. If your country requires users to provide proof of identity to access the network, SMS Portal is a good choice. Because SMS Portal authentication can verify the validity of users’ identity by verifying their mobile phone numbers.
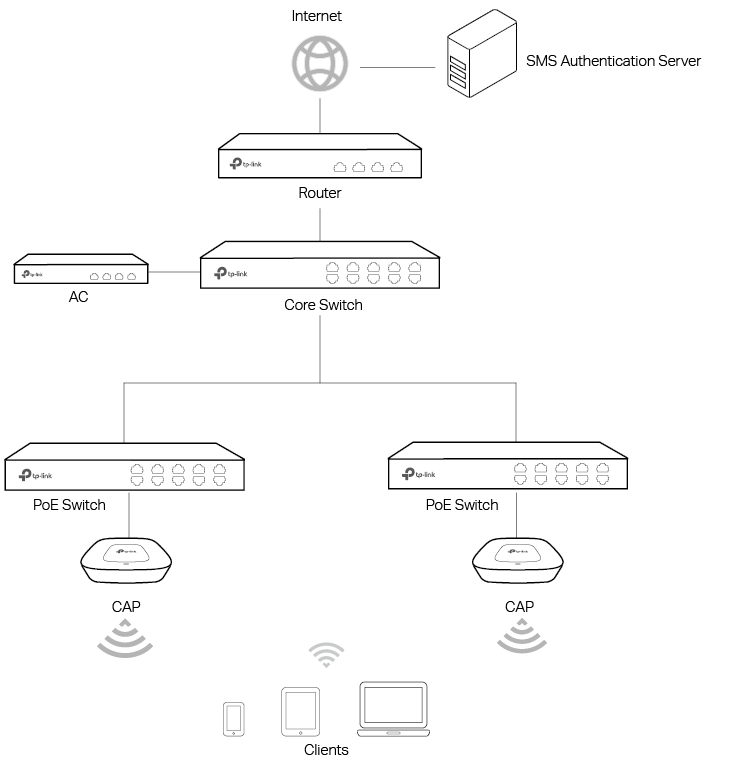
1.2Network Topology for SMS Portal
The following figure shows the network topology for SMS Portal.
1.3SMS Authentication Process
The process of accessing the internet via SMS Portal authentication is as follows:
1)Users connect to the SSID for SMS Portal and obtain the SMS authentication page.
2)On the authentication page, users enter their phone numbers and click the Get Code button.
3)The verification code will be sent to users’ mobile phones. Users enter the received verification code to log in.
4)After authenticated, users will be redirected to the authentication result page.
5)When the authentication times out, users need to complete the step 2) to step 4) again to pass the authentication.
The configuration overview is as follows:
1)Upgrade the firmwares.
2)Get a Twilio account.
3)Create SSID on AC.
4)Configure the default gateway and DNS on AC.
5)Configure Splash page on AC.
6)Configure SMS Portal on AC.
2.1Upgrade the Firmwares
To get the newly developed SMS Portal feature, make sure that both of your AC and CAP are upgraded to the latest firmwares:
AC: V1_1707076 or above
CAP: V1_170601 or above
Go to the download center http://www.tp-link.com/en/support/download-center and search your AC and CAP models. Then download the latest firmware files one by one and upgrade the AC and CAPs using the proper downloaded firmware files.
To use SMS Portal, you first need to get a Twilio account.
Twilio service is not free. When you test the SMS Portal feature the first time, you can get a free Twilio Trail account. However, the free Twilio Trail account can only provide SMS Portal service for the phone number which is used to register this Trail account. So if you are ready to use this feature, you need to update your Trail account.
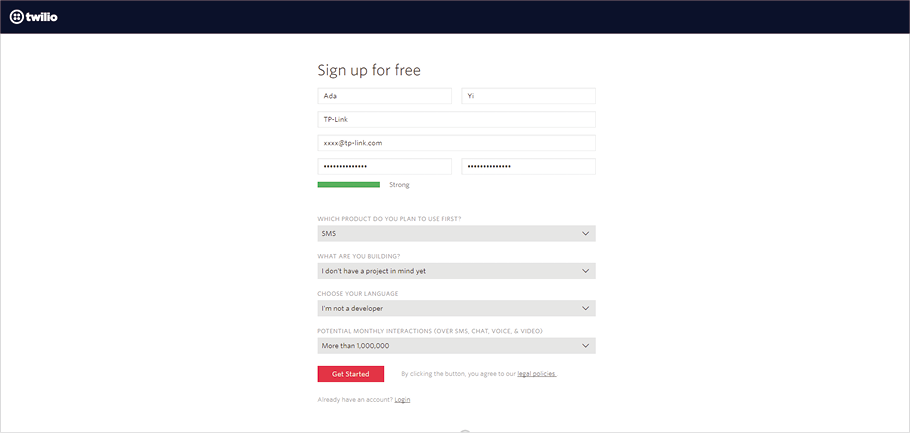
The following introduction takes a free Twilio Trial account as an example. Follow the steps below to get a Twilio Trail account:
1)Go to www.twilio.com/try-twilio and enter the required information to create a new account. Then click Get Started.
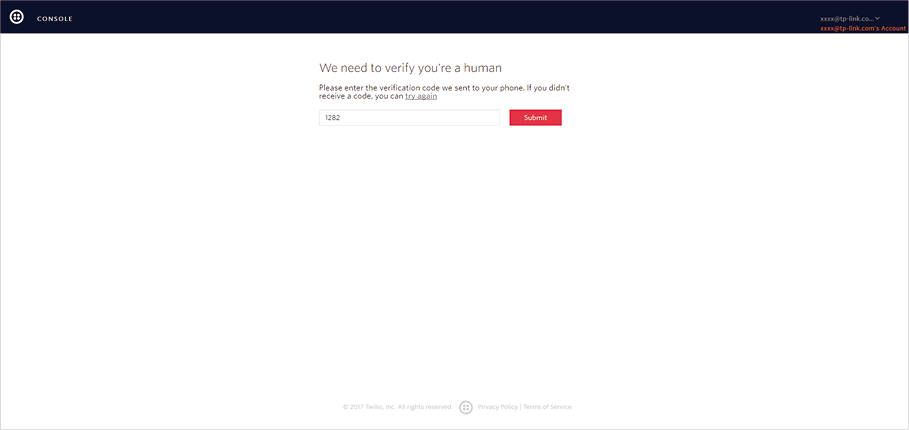
2)Enter your telephone number and click Verify via SMS. Twilio will send you a verification code.

3)Enter the received verification code and click Submit.
4)After sign up successfully, you will be redirected to the home page.
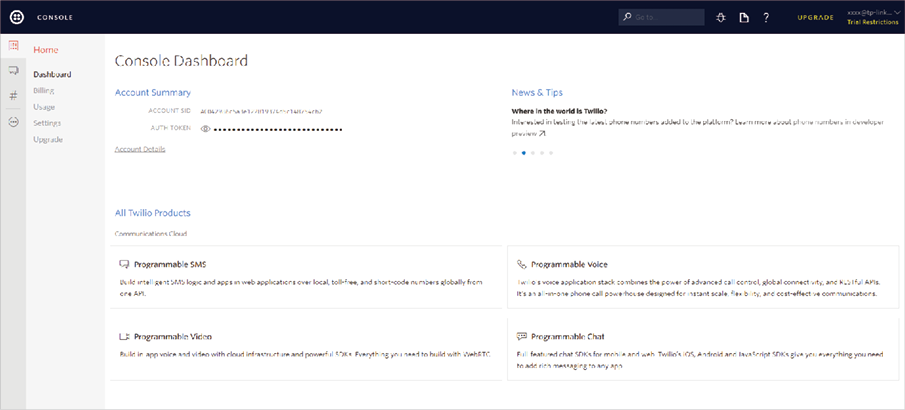
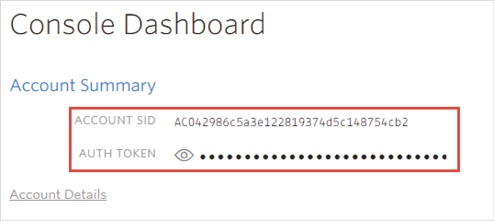
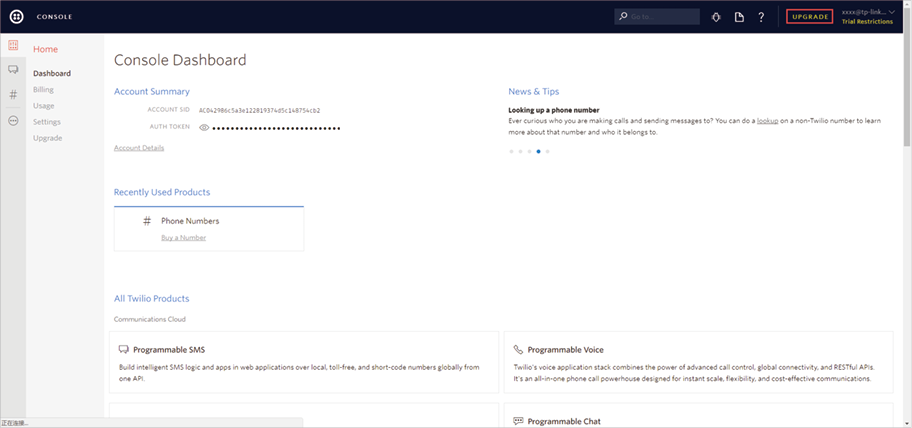
5)In the Console Dashboard > Account Summary section, you can find the ACCOUNT SID and AUTH TOKEN, which will be used in the AC configurations later.
|
|
Note: To copy AUTH TOKEN to the AC, you first need to click |

 to display the token.
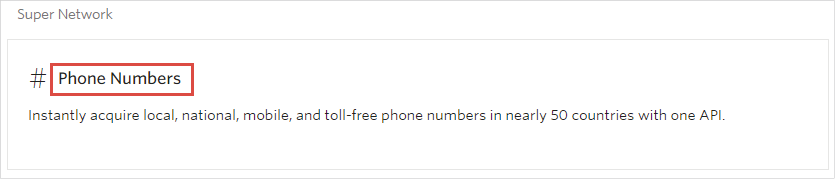
6)In the Console Dashboard > All Twilio Products > Super Network section, click Phone Numbers.
7)The following page will appear. Click Get Started.

8)The following page will appear. Click Get your first Twilio phone number.

9)The following window will pop up. Click Choose this Number.
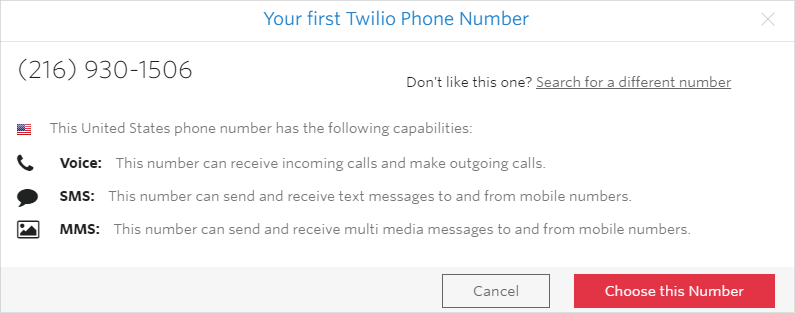
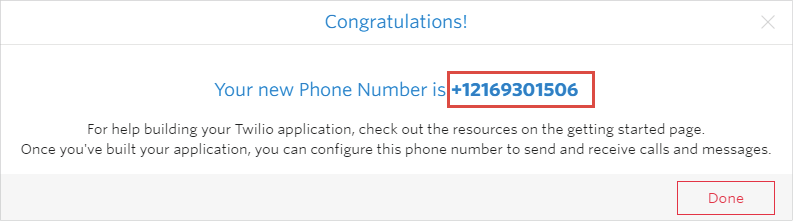
10)You will get a new phone number. This phone number will be used in the configurations later. Click Done.
2.3Create SSID on AC
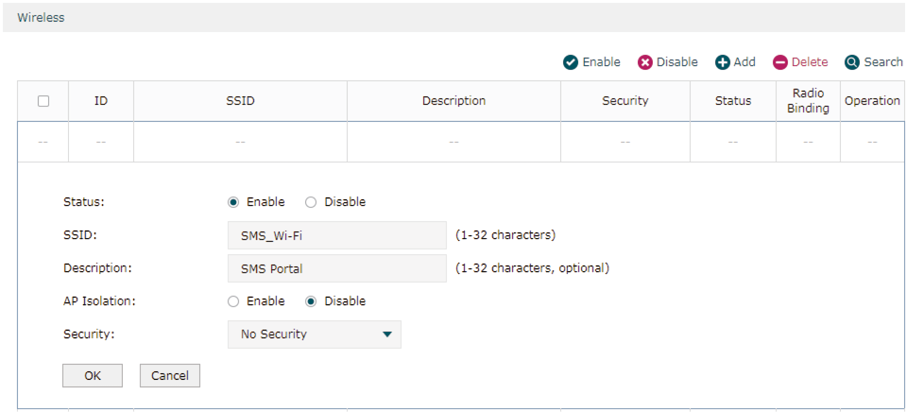
Follow the steps below to create an SSID for SMS Portal and bind the SSID to the CAP:
1)Go to Wireless > Wireless Service and click Add to load the following page. Specify the required parameters for the SMS Wi-Fi and click OK.
2)The SSID is created successfully. Click  .
.

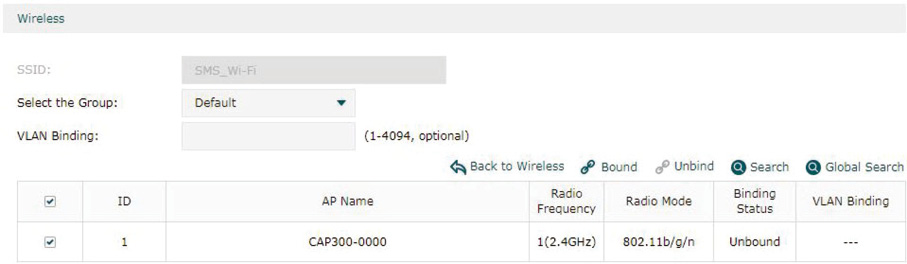
3)Select the CAP and click  to bind the SSID to the CAP.
2.4Configure Default Gateway and DNS on AC
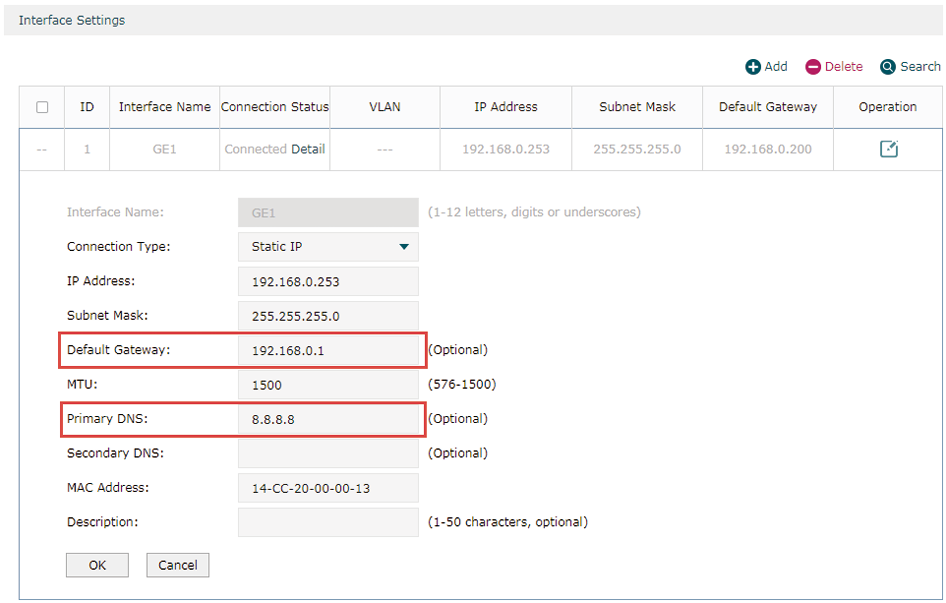
To ensure the AC can communicate with the SMS servers, you need to set correct default gateway and DNS on your AC.
Go to Network > Interface and click  to edit the interface which is connected to the gateway router. Specify the correct Default Gateway address and DNS address according to your actual network environment. Click OK.
2.5Configure Splash Page on AC
Before configuring SMS Portal, you need to create a splash page, on which users can get verification code and pass authentication.
Go to Authentication > Portal Authentication > Splash Page and click Add to load the following page.

Follow the steps below to create a splash page for SMS Wi-Fi:
1)Specify a name for the splash page.
2)Select Authentication Type as SMS.
3)Customize the splash page according to your needs. You can preview the page on the right side of the page.
4)Click OK.
2.6Configure SMS Portal on AC
Go to Authentication > Portal Authentication > SMS and click Add to load the following page.
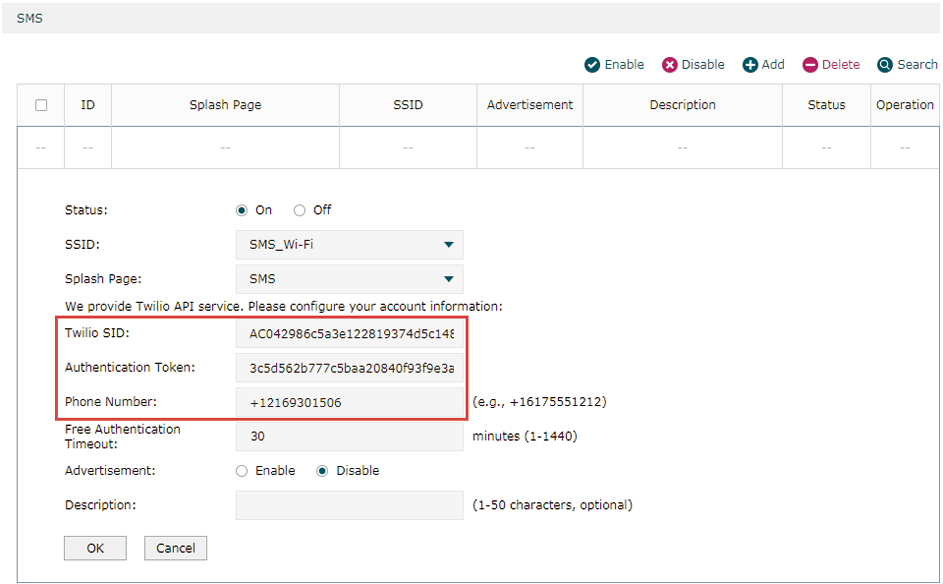
Follow the steps below to configure SMS Portal:
1)Enable SMS Portal.
2)Select an SSID and a splash page for SMS Wi-Fi.
3)Copy the Twilio SID, Authentication Token and Phone Number from the Twilio website to the AC one by one.
|
|
Note: Twilio SID and AUTH Token can be found in the Console Dashboard > Account Summary section, and Phone Number can be found in the Console Dashboard > Super Network > Phone Numbers section. For details, refer to Get a Twilio Account. |
4)Configure free authentication timeout and choose whether to display advertisements on the splash page according to your needs.
5)Click OK.
3Test the Configuration Result
After all configurations are completed, you can follow the steps below to test whether SMS Portal works normally.
|
|
Note: The free Trail account can only provide SMS service for the mobile phone which is used to register the Trail account. So make sure that the following testing is on the mobile phone used for Trail account register. |
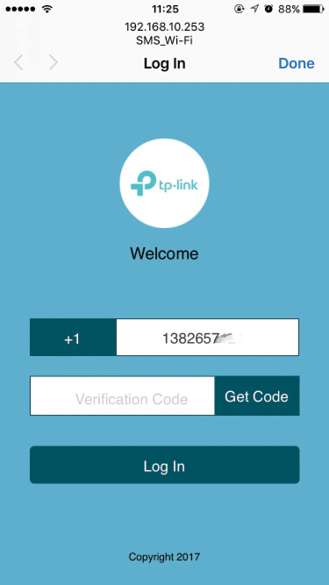
1)Enable the Wi-Fi feature of your mobile phone.
2)Search and connect to the SSID for SMS Portal.
3)The default web browser on the mobile phone will pop up and the authentication page will appear.
|
|
Note: Generally, the web browser pops up automatically. But if the web browser does not pop up, you can manually launch the web browser and visit any http website. Then the authentication page will appear. |
4)Select your country, enter your mobile phone number and click Get Code.
5)You will receive a verification code on your mobile phone. Enter the code on the authentication page and click Log In.
6)After authenticated, you will be redirected to the authentication result page.
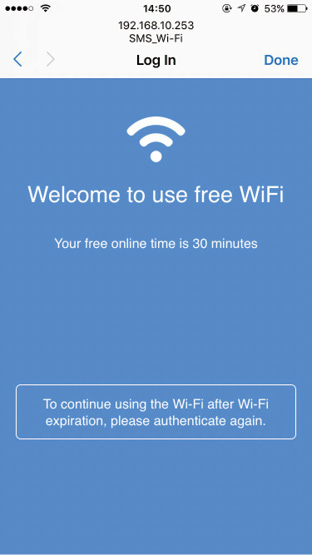
If all the steps above are completed, the SMS Portal feature works normally.
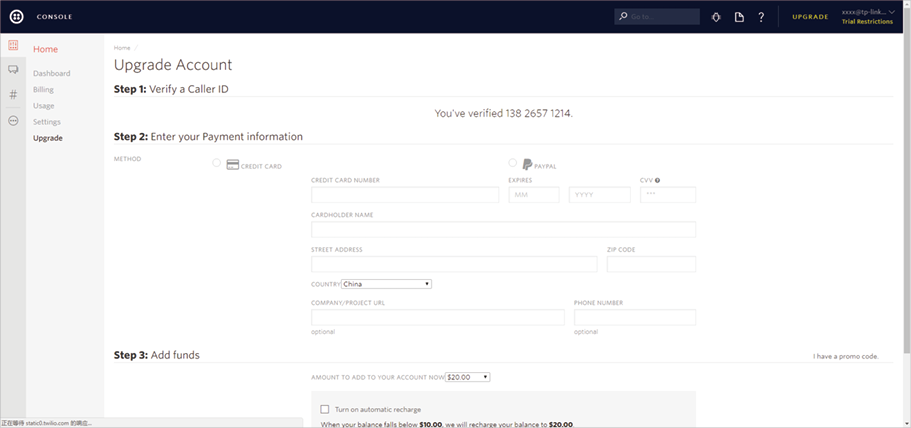
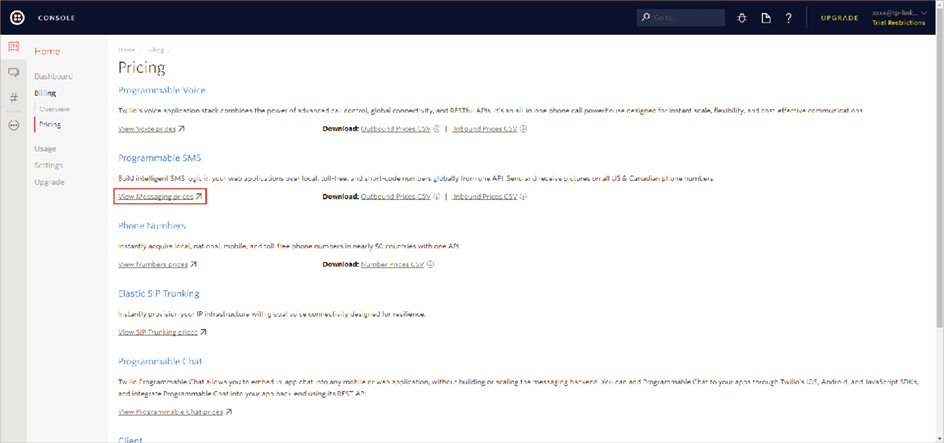
If you have determined to officially start to use SMS Portal, you need to upgrade your Trail account.
The SMS service is not free. To view the pricing for SMS service, you can go to Billing > Pricing and click View messaging prices.
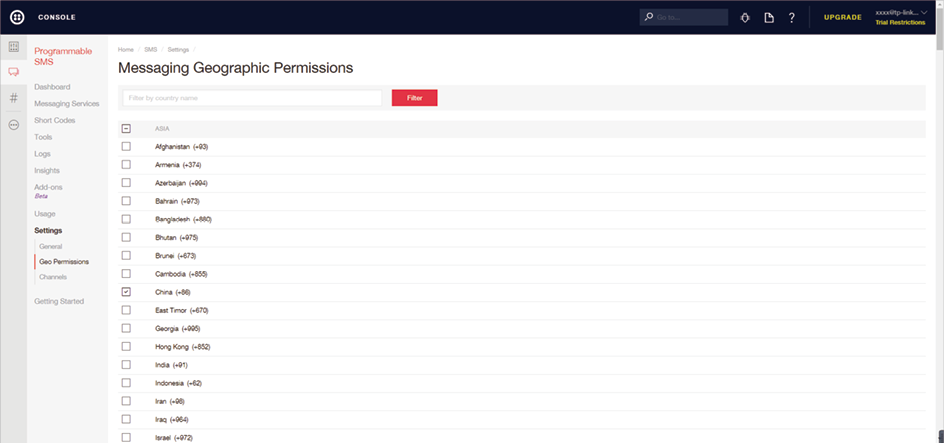
The SMS service is available in most regions. To view these resions, you can go to Programmable SMS > Settings > Geo Permissions. On this page, you can also configure which regions are allowed to use your SMS service.
To upgrade your Trail account, follow the steps below:
1)Click UPGRADE at the top right corner.
2)The following page will appear. Provide your payment information and add funds to your account. Then you can use the Twilio service normally.