Configuring 802.1X VLAN Assignment and MAB
CHAPTERS
2. Example for VLAN Assignment
|
|
This guide applies to: T2600G-28TS _v2_170323 or Above, T2600G-52TS_v2_1703023 or Above, T2600G-28MPS_v2_170928 or Above. |

802.1X authentication is a network access control method which safeguards network security. If the client passes the RADIUS server authentication then the client can access the LAN. Otherwise, the client cannot access the LAN.
VLAN Assignment and MAB are two important features of 802.1X authentication, and act as safety controls.
VLAN Assignment
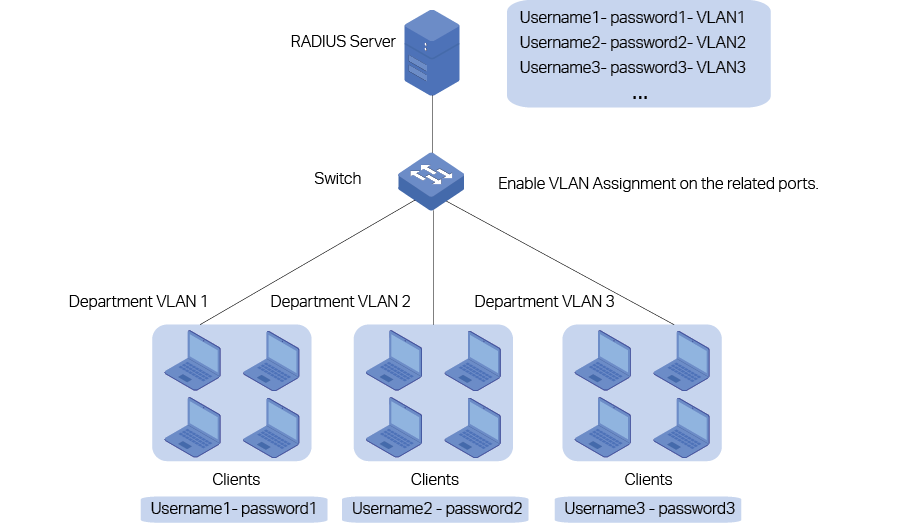
VLAN Assignment allows the RADIUS server to send the VLAN configuration to the port dynamically. VLAN Assignment is used together with 802.1X authentication. After the port is authenticated, the RADIUS server assigns the VLAN based on the username of the client connecting to the port. The username-to-VLAN mappings must already be stored in the RADIUS server database.
The figure below shows the typical topology of VLAN Assignment. VLAN Assignment is port-based. With VLAN Assignment enabled, the RADIUS server will send the VLAN configuration when the port is authenticated. VLAN IDs are assigned based on switch ports.
If the assigned VLAN is nonexistent on the switch, the switch will create the related VLAN automatically, add the authenticated port to the VLAN and change the PVID based on the assigned VLAN.
If the assigned VLAN exists on the switch, the switch will directly add the authenticated port to the related VLAN and change the PVID instead of creating a new VLAN.
If no VLAN is supplied by the RADIUS server or if 802.1X authentication is disabled, the port will be still in its original VLAN.
MAB
MAB (MAC Authentication Bypass) uses the MAC address of a device to determine whether the client can get access to the network. After checking the MAC addresses of the clients that you want to access the network, add these MAC addresses into the database of the RADIUS server. With MAB enabled on th port, the switch will learn the MAC address of the device automatically and send the authentication server a RADIUS access request frame with the client’s MAC address as the username and password. If the authorization succeeds, the RADIUS server grants the client access to the network. Thus devices can be authenticated without any client software installed. And MAB can be used to authenticate devices without 802.1X capability like IP phones.
MAB interacts with the other features:
802.1X authentication— MAB takes effect only if 802.1X authentication is enabled on the port.
VLAN Assignment— MAB can be used on a port with VLAN Assignment enabled. That is, if a client has an authorized MAC address identity, the switch assigns the client to a specific VLAN if VLAN Assignment is configured on the corresponding port.
2.1Network Requirements
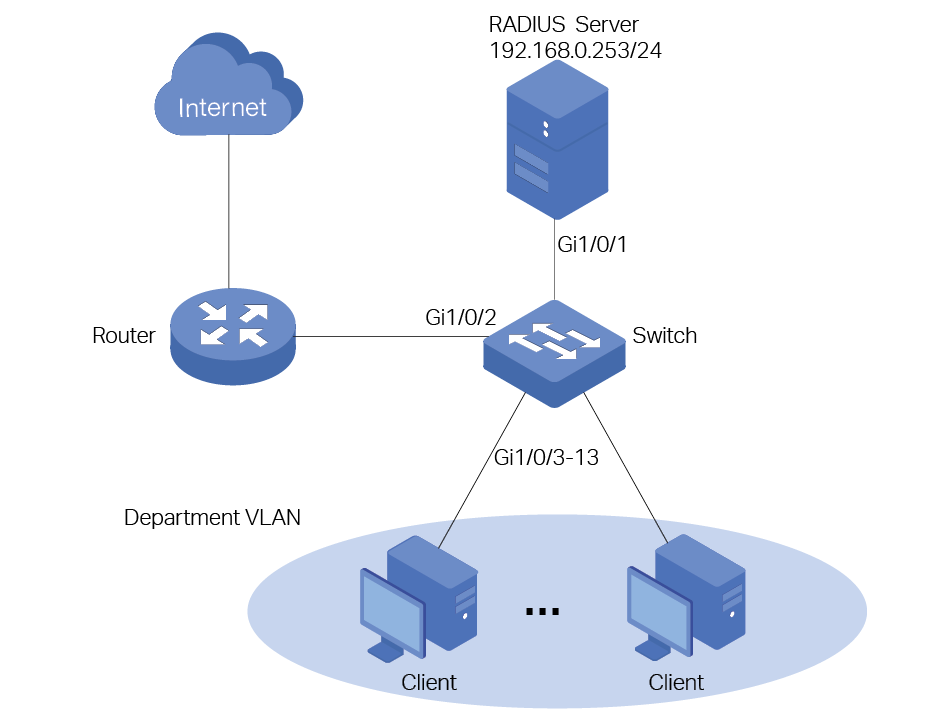
To enhance network security, a company requires that the employees can access the network normally only when their computers pass the authentication successfully. At the same time, to reduce the workload of the configuration, it is required that the ten authenticated computers can be automatically assigned to the VLANs of their departments. The network topology is shown as below.
2.2Configuration Scheme
802.1X Authentication is commonly used in solving authentication and security problems for LAN ports. VLAN Assignment can assign multiple clients to different VLANs depending on their authentication information. Thus configure 802.1X Authentication and VLAN Assignment to meet the requirement.
The configuration is briefly summarized in the following outlines:
1)Build a RADIUS Server.
2)Configure 802.1X and VLAN Assignment on the switch.
3)Start the authentication on 802.1X client software.
2.3RADIUS Server Introduction
A RADIUS server receives user authentication requests, authenticates the user, and then returns authentication results to the authenticator (the switch).
This guide takes FreeRADIUS.net as an example to build a RADIUS server. FreeRADIUS.net installation file can be downloaded from http://freeradius.net/index.html. Run the file and follow the wizard to install the FreeRADIUS.net on a local computer.
After installing FreeRADIUS.net on the computer, some configurations files should be modified to satisfy the 802.1X authentication requirements:
Modify the clients.conf to add RADIUS client (the switch) information.
Modify the users.conf to add user authentication information.
2.4Configuration
Configuration Guidelines:
VLAN Assignment takes effect only when the control type is Port Based. Set the control type as Port Based on the ports connected to clients.
802.1X authentication and Port Security cannot be enabled at the same time. Before enabling 802.1X authentication, make sure that Port Security is disabled.
Keep 802.1X authentication disabled on ports connected to the authentication server, the internet and the management computer, which ensures the traffic will not be blocked for the switch.
Demonstrated with T2600G-28TS acting as the authenticator, FreeRADIUS.net acting as the RADIUS server and TP-Link 802.1X Client Software, the following sections provide configuration procedures. The configuration procedures on the switch will be given in two ways: using the GUI and using the CLI.
2.4.1Build a RADIUS Server
For the network administrator, the first thing is to build a RADIUS server, and put the user information for employees into the RADIUS server. The network administrator can set different username and password for each employee or set a public username and password shared by all the employees in the same department. The setting of the username and password depends on the actual demands.
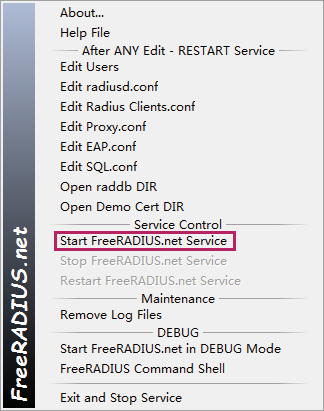
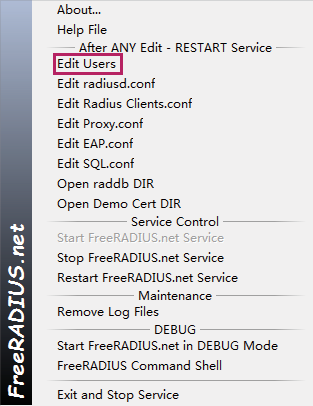
1)Right click the icon  to load the following window. Choose Start FreeRADIUS.net Service to start the RADIUS server.
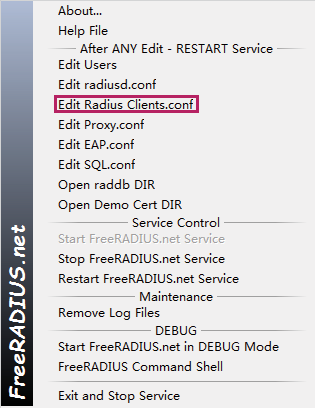
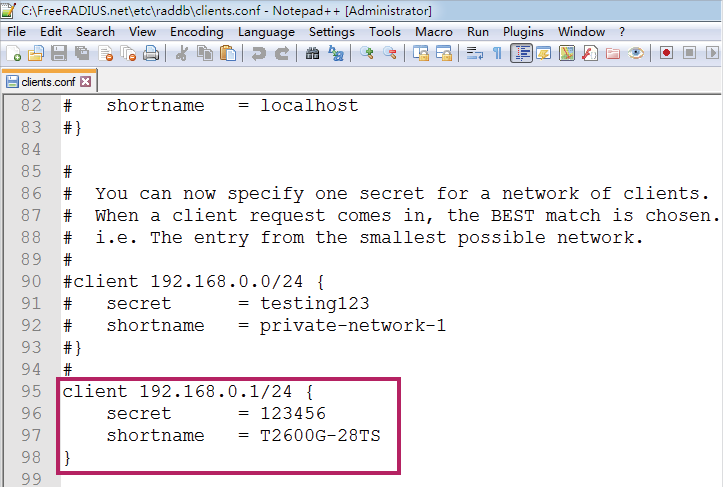
2)Right click the icon  and choose Edit Radius Clients.conf to add an entry for the RADIUS client (T2600G-28TS).
To avoid the format error of the adding code, use Notepad++ to edit configuration files.
One client section means a RADIUS client. You can choose one of the client sections and edit the following attributes. Or you can add a new client section to meet your requirements.
The clients.conf can be modified in three aspects:
The IP address of network segment of the authenticator (T2600G-28TS). After the installation is completed, the default configuration file contains the commonly used network segment. Thus you can keep it as default in most cases.
The secret which is the shared key between the RADIUS server and the switch. The RADIUS server and the switch use the key string to encrypt passwords and exchange responses.
The shortname which is used as an alias for the fully qualified domain name, or the IP address. A value can be filled in optionally for the shortname.
According to the network topology, add the following code and save the file.
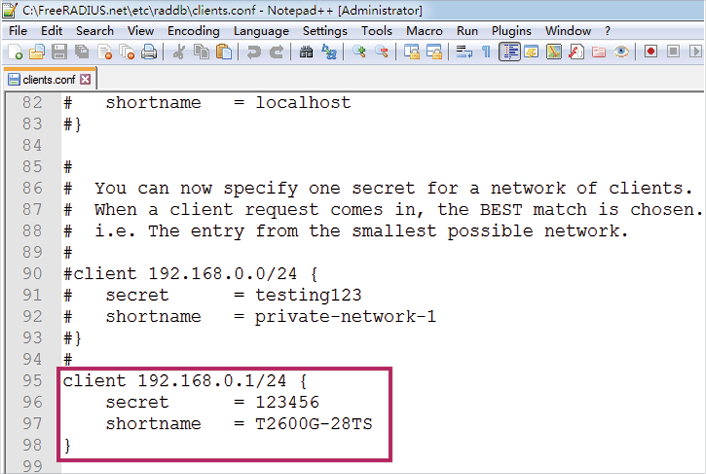
|
|
Note: The secret can be any string, up to 32 characters in length. |

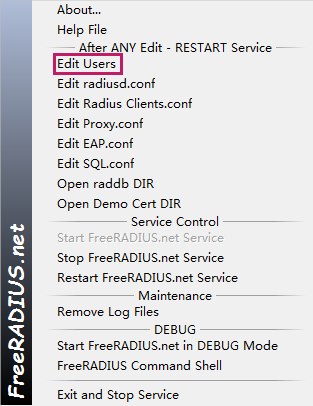
3)Right click the icon  and choose Edit Users to add a user which the VLAN will be assigned to.
The user information can be modified in four aspects:
User-name and User-Password, which is the authentication information of the clients. You can replace rfc3580 with the username which you want and replace demo with the new password. Or you can ignore the default user information and add new user information which has identical format in the next line.
Tunnel-Type, which indicates the tunneling protocol to be used. To configure VLAN Assignment, specify this value as VLAN.
Tunnel-Medium-Type, which indicates the transport medium to use when creating a tunnel for tunneling protocols. To configure VLAN Assignment, specify this value as IEEE-802.
Tunnel-Private-Group-Id, which indicates the group ID for a particular tunneled session, that is the assigned VLAN ID.
According to the network topology, add the following codes and save the file.
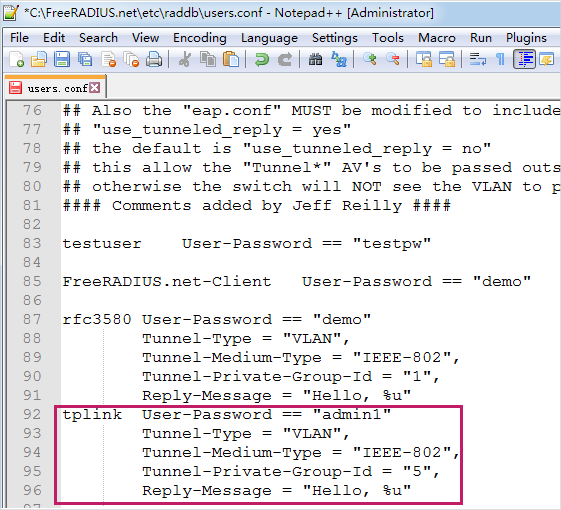
|
|
Note: More than one entry which indicates username-to-VLAN mapping can be added in this file or use a database to store the entries. The user-name can be up to 253 characters in length. |

4)Click Restart FreeRaDIUS.net Service to restart FreeRaDIUS.net.
2.4.2Configure VLAN Assignment on the Switch
Using the GUI
1)Choose the menu Network Security > AAA > Global Config to load the following page. In the Global Config section, enable AAA function and click Apply.

2)Choose the menu Network Security > AAA > Dot1x List to load the following page. In the Authentication Dot1x Method List section, select an existing RADIUS server group for authentication from the Pri1 drop-down list and click Apply.

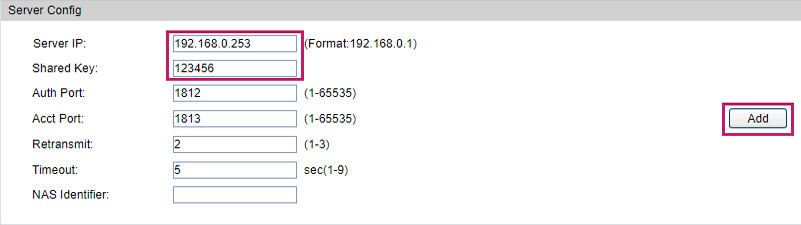
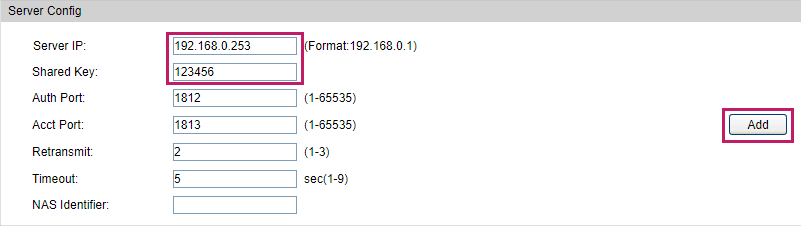
3)Choose the menu Network Security > AAA > RADIUS Config to load the following page. Enter the IP address of the RADIUS server and the shared key which is pre-defined in the Radius Clients.conf.
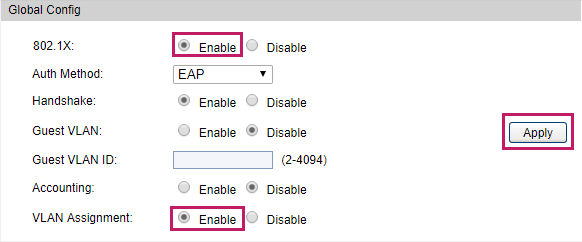
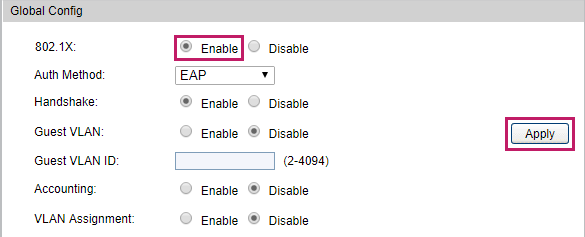
4)Choose the menu Network Security > 802.1X > Global Config to load the following page. In the Global Config section, enable 802.1X and VLAN Assignment globally and click Apply.
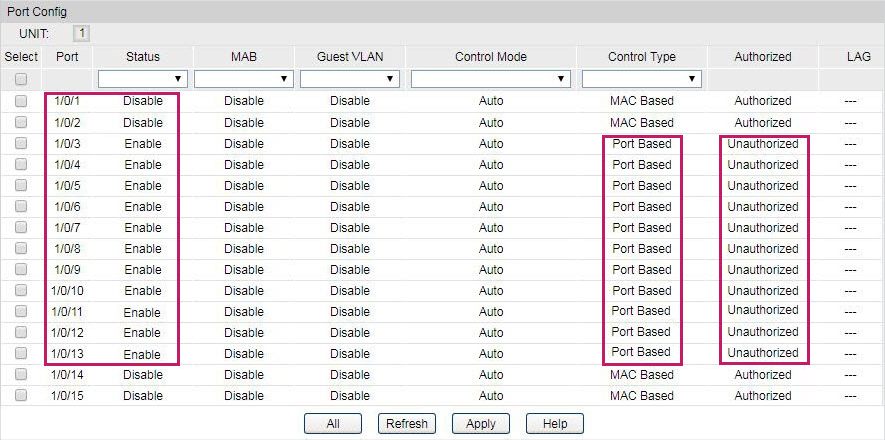
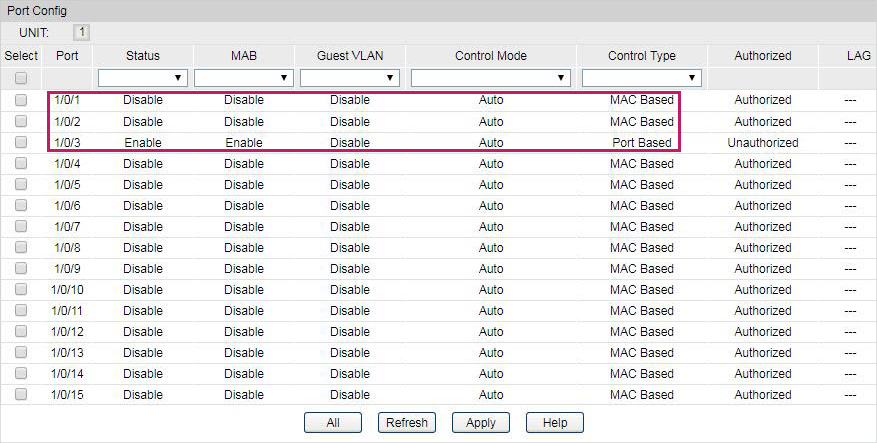
5)Choose the menu Network Security > 802.1X > Port Config to load the following page. Select the port 1/0/3-13 which you want to deploy 802.1X VLAN Assignment and set the status for port1/0/3-13 as Enable. Set the control type as Port Based for port1/0/3-13. Set the status for port 1/0/1 and port 1/0/2 as Disable so that the RADIUS server and the internet will not be blocked for the switch.
Using the CLI
1) Enable AAA globally and configure the RADIUS parameters.
T2600G-28TS#configure
T2600G-28TS(config)#aaa enable
T2600G-28TS(config)#aaa authentication dot1x default radius
T2600G-28TS(config)#radius -server host 192.168.0.253 auth-port 1812 key 123456
2)Globally enable 802.1X authentication and set the authentication protocol. Enable VLAN Assignment.
T2600G-28TS(config)#dot1x system-auth-control
T2600G-28TS(config)#dot1x auth-method eap
T2600G-28TS(config)#dot1x vlan-assignment
3)Disable 802.1X authentication on port 1/0/1and port 1/0/2. Enable 802.1X authentication on port 1/0/3, set the mode as Auto, and set the control type as Port-Based.
T2600G-28TS(config)#interface range gigabitEthernet 1/0/1-2
T2600G-28TS(config-if-range)#no dot1x
T2600G-28TS(config-if-range)#exit
T2600G-28TS(config)#interface range gigabitEthernet 1/0/3-13
T2600G-28TS(config-if-range)#dot1x
T2600G-28TS(config-if-range)#dot1x port-method port-based
T2600G-28TS(config-if-range)#dot1x port-control auto
T2600G-28TS(config-if-range)#exit
4)Verify the configurations.
Verify the global configurations of 802.1X authentication:
T2600G-28TS#show dot1x global
802.1X State: Enabled
Authentication Method: EAP
Handshake State: Enabled
Guest VLAN State: Disabled
Guest VLAN ID: N/A
802.1X Accounting State: Disabled
802.1X VLAN Assignment State: Enabled
Quiet-period State: Disabled
Quiet-period Timer: 10 sec.
Max Retry-times For RADIUS Packet: 3
Supplicant Timeout: 3 sec.
Verify the configurations of 802.1X authentication on the port:
T2600G-28TS#show dot1x interface
Port State MAB State GuestVLAN PortControl PortMethod Authorized LAG
---- ------ ------------ ------------ -------------- -------------- ------------- -----
Gi1/0/1 disabled disabled disabled auto mac-based authorized N/A
Gi1/0/2 disabled disabled disabled auto mac-based authorized N/A
Gi1/0/3 enabled disabled disabled auto port-based unauthorized N/A
Gi1/0/4 enabled disabled disabled auto port-based unauthorized N/A
...
Verify the configurations of RADIUS:
T2600G-28TS#show aaa global
AAA global status: Enable
Module Login List Enable List
Console default default
Telnet default default
Ssh default default
Http default default
T2600G-28TS#show aaa authentication dot1x
Methodlist pri1 pri2 pri3 pri4
default radius -- -- --
T2600G-28TS#show aaa group radius
192.168.0.253
2.4.3Set Up Authentication on 802.1X Client Software
Before the employee can access the internet, the employee should input the authentication information on the 802.1X Client Software. The authentication information is the username and password which is set by the network administrator in the RADIUS server.
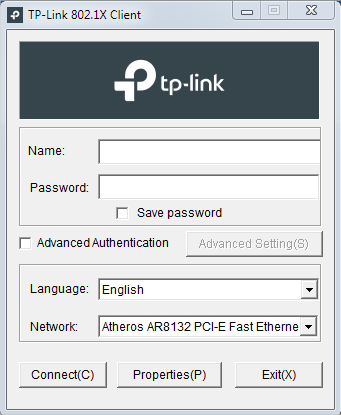
1)On the computer to be authorized, download the TP-Link 802.1X Client Software installation file from https://www.tp-link.com/en/download-center.html Run the file and follow the wizard to install the 802.1X client software. After completing installation, double click the icon  to run the TP-Link 802.1X Client Software. The following screen will appear.
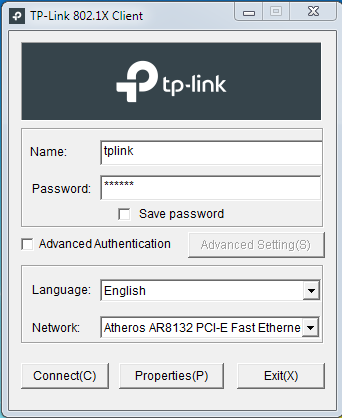
2)Enter the username and password. In this example, enter “tplink” as the username and “admin1” as the password , which is set in the RADIUS server, then click Connect.
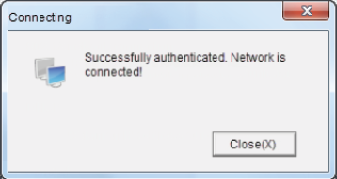
Then the 802.1X client software will automatically register to the RADIUS server and get the authority to the internet from the RADIUS server.
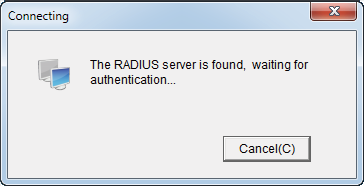
When passing the authentication, the following screen will appear.
2.5Verify the Configuration Result
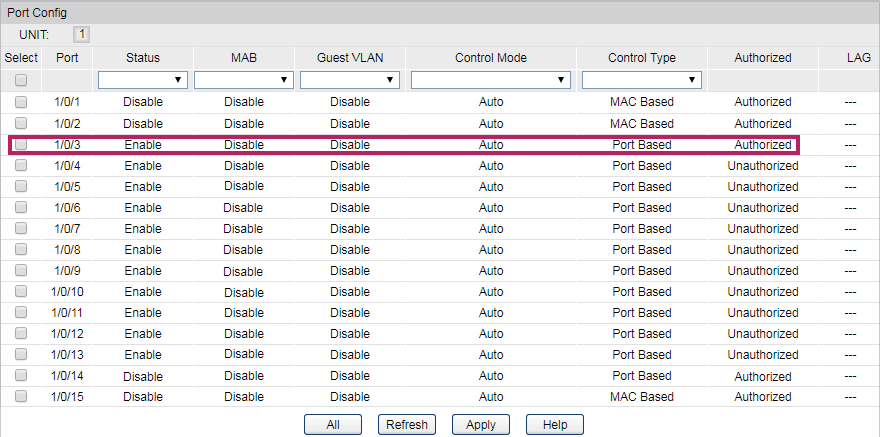
After all the configurations are completed, you can follow the steps below to verify whether 802.1X VLAN Assignment works. Taking port 3 for a example, you can check the switch by using GUI and CLI.
Using the GUI
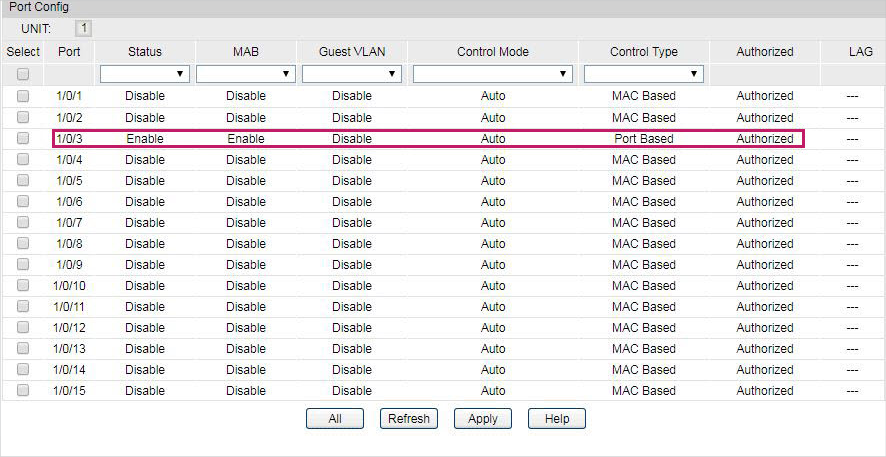
1)Choose the menu Network Security > 802.1X > Port Config to check whether the port 1/0/3 passes the 802.1X authentication successfully. After passing the 802.1X authentication successfully, the Authorized state will change from Unauthorized to Authorized.
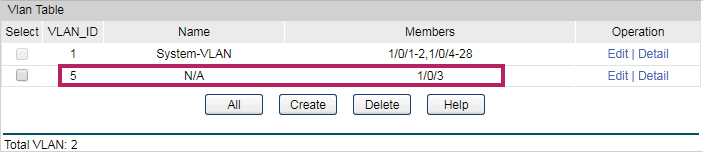
2)Choose the menu VLAN > 802.1Q VLAN > Global Config to check whether the port 1/0/3 is assigned to the corresponding VLAN.
Using the CLI
1)Verify the 802.1X authorization states on the port:
T2600G-28TS#show dot1x interface
Port State MAB State GuestVLAN PortControl PortMethod Authorized LAG
---- ----- ---------- --------- ------------- ------------- ------------- -----
Gi1/0/1 disabled disabled disabled auto mac-based authorized N/A
Gi1/0/2 disabled disabled disabled auto mac-based authorized N/A
Gi1/0/3 enabled disabled disabled auto port-based authorized N/A
...
2)Verify the VLAN information:
T2600G-28TS#show vlan
VLAN Name Status Ports
----- -------------------- --------- ----------------------------------------
1 System-VLAN active Gi1/0/1, Gi1/0/2, Gi1/0/4, Gi1/0/5,
Gi1/0/6, Gi1/0/7, Gi1/0/8, Gi1/0/9,
Gi1/0/10, Gi1/0/11, Gi1/0/12, Gi1/0/13,
Gi1/0/14, Gi1/0/15, Gi1/0/16, Gi1/0/17,
Gi1/0/18, Gi1/0/19, Gi1/0/20, Gi1/0/21,
Gi1/0/22, Gi1/0/23, Gi1/0/24, Gi1/0/25,
Gi1/0/26, Gi1/0/27, Gi1/0/28
5 N/A active Gi1/0/3
Primary Secondary Type Ports
------- --------- ------------------ ----------------------------------------
The port has been assigned to the related VLAN. That means 802.1X VLAN Assignment works.
3.1Network Requirements
The network administrator wants to restrict the authority of a device to access the network resources. The device should be authenticated before getting access to the internet. For convenience, it is better that the authentication process can be performed automatically. The network topology is shown as below.
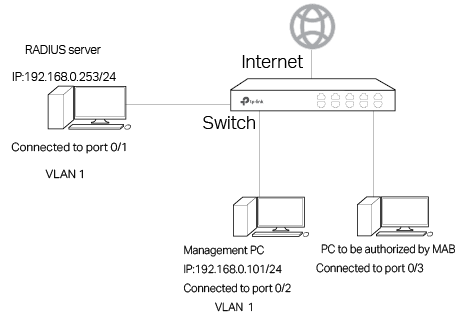
3.2Configuration Scheme
MAB uses the MAC address of a device to determine whether the device can get access to the network. Thus MAB can be used to authenticate devices without 802.1X Client Software.
The configuration is briefly summarized in two steps:
1)Build a RADIUS Server.
2)Configure MAB on TP-Link switch.
3.3Configuration
Configuration Guidelines:
MAB uses the MAC address of the client as the username and password. Please check the MAC addresses of the clients that you want to access the network in advance.
MAB takes effect only when 802.1X Authentication is enabled. Enable 802.1X Authentication on the ports connected to clients.
MAB takes effect only when Guest VLAN is disabled. Ensure that Guest VLAN is disabled when configuring MAB.
802.1X authentication and Port Security cannot be enabled at the same time. Before enabling 802.1X authentication, make sure that Port Security is disabled.
Keep 802.1X authentication disabled on ports connected to the authentication server, the internet and the management computer, which ensures they will not be blocked from accessing the switch.
Demonstrated with T2600G-28TS acting as the authenticator, FreeRADIUS.net acting as the RADIUS server, the following sections provide configuration procedures. The configuration procedures on the switch will be given in two ways: using the GUI and using the CLI.
3.3.1Build a RADIUS Server
1)Go to http://freeradius.net/index.html to download the FreeRADIUS.net and follow the wizard to install it.
2)Right click the icon to load the following page. Choose Start FreeRADIUS.net Service to start the RADIUS server.

3)Right click the icon  and choose Edit Radius Clients.conf to add an entry for our RADIUS client (T2600G-28TS).
To avoid the format errors when adding code, use Notepad++ to edit configuration files.
One client section means a RADIUS client. You can choose one of the section clients and edit the following attributes. Or you can add a new client section to meet your requirements. The Clients.conf should be modified in three aspects:
The IP address of network segment of the authenticator (T2600G-28TS). After the installation is completed, the default configuration file contains the commonly used network segment. Thus you can keep it as default in most cases.
The secret which is the shared key between the RADIUS server and the switch. The RADIUS server and the switch use the key string to encrypt passwords and exchange responses.
The shortname which is used as an alias for the fully qualified domain name, or the IP address of the RADIUS client. A value can be filled in optionally for the short name.
According to the network topology, add the following codes and save the file.
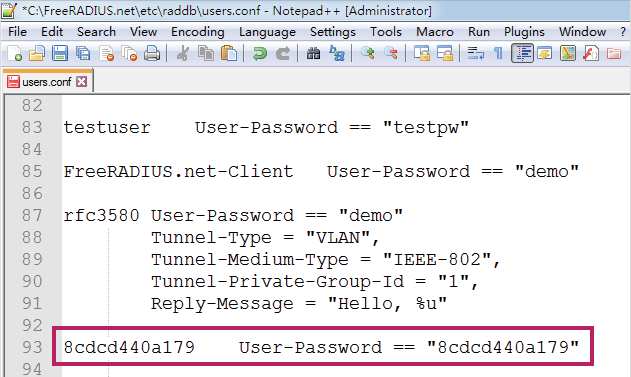
4)The MAC addresses of users should be stored in a database which can be accessed by the RADIUS server during the MAB attempt. This guide takes the internal database on the RADIUS server itself as an example. Right Click the icon and choose Edit Users to add an MAB user.
MAB uses the MAC address as the username and password. You can replace rfc3580 and demo with the allowed MAC address. Or you can ignore the default user information and add the MAC address in the next line.
Add the following codes and save the file:
|
|
Note: The format of the MAC address should be 12 hexadecimal digits, all lowercase and no punctuation. Because MAB uses the MAC address as the username and password, you should apply this format to make sure the RADIUS server can differentiate MAB requests from other type of request for network access. If you choose other RADIUS server in MAB, please ensure that the MAC address of the allowed client should be configured as username and password. |

5)Click Restart FreeRaDIUS.net Service to restart FreeRaDIUS.net.
3.3.2Configure MAB on the Switch
Using the GUI
1)Choose the menu Network Security > AAA > Global Config, enable AAA function on the switch and click Apply.

2)Choose the menu Network Security > AAA > Dot1x List, select an existing RADIUS server group for authentication from the Pri1 drop-down list and click Apply.

3)Choose the menu Network Security > AAA > RADIUS Config, and enter 192.168.0.253 which is the IP address of the RADIUS server. Enter the shared key between the RADIUS server and the switch. The RADIUS server and the switch use the key string to encrypt passwords and exchange responses.
4)Choose the menu Network Security > 802.1X > Global Config, enable 802.1X globally and click Apply.
5)Choose the menu Network Security > 802.1X > Port Config to load the following page. Select port 1/0/3 and set the status as Enable and set Control Type as Port Based. Enable MAB for port 1/0/3. Set the status for port 1/0/1 and port 1/0/2 as Disable so that the RADIUS server and the internet will not be blocked for the switch.
Using the CLI
1) Enable AAA globally.
T2600G-28TS#configure
T2600G-28TS(config)#aaa enable
T2600G-28TS(config)#aaa authentication dot1x default radius
T2600G-28TS(config)#radius -server host 192.168.0.253 auth-port 1812 key 123456
2)Globally enable 802.1X authentication and set the authentication protocol.
T2600G-28TS(config)#dot1x system-auth-control
T2600G-28TS(config)#dot1x auth-method eap
3)Disable 802.1X authentication on port 1/0/1and port 1/10/2. Enable 802.1X authentication and MAB on port 1/0/3, set the mode as Auto, and set the control type as Port Based.
T2600G-28TS(config)#interface range gigabitEthernet 1/0/1-2
T2600G-28TS(config-if-range)#no dot1x
T2600G-28TS(config-if-range)#exit
T2600G-28TS(config)#interface gigabitEthernet 1/0/3
T2600G-28TS(config-if)#dot1x
T2600G-28TS(config-if)#dot1x port-method port-based
T2600G-28TS(config-if)#dot1x port-control auto
T2600G-28TS(config-if)#dot1x mab
T2600G-28TS(config-if)#exit
4)Verify the configurations.
Verify the global configurations of 802.1X authentication:
T2600G-28TS#show dot1x global
802.1X State: Enabled
Authentication Method: EAP
Handshake State: Enabled
Guest VLAN State: Disabled
Guest VLAN ID: N/A
802.1X Accounting State: Disabled
802.1X VLAN Assignment State: Disabled
Quiet-period State: Disabled
Quiet-period Timer: 10 sec.
Max Retry-times For RADIUS Packet: 3
Supplicant Timeout: 3 sec.
Verify the configurations of 802.1X authentication on the port:
T2600G-28TS#show dot1x interface
Port State MAB State GuestVLAN PortControl PortMethod Authorized LAG
---- ----- --------- ----------- -------------- ----------- ------------- -----
Gi1/0/1 disabled disabled disabled auto mac-based authorized N/A
Gi1/0/2 disabled disabled disabled auto mac-based authorized N/A
Gi1/0/3 enabled enabled disabled auto port-based unauthorized N/A
...
Verify the configurations of RADIUS:
T2600G-28TS#show aaa global
AAA global status: Enable
Module Login List Enable List
Console default default
Telnet default default
Ssh default default
Http default default
T2600G-28TS#show aaa authentication dot1x
Methodlist pri1 pri2 pri3 pri4
default radius -- -- --
T2600G-28TS#show aaa group radius
192.168.0.253
3.4Verify the Configuration Result
After all configurations are completed, you can follow the steps below to test whether MAB works.
Using the GUI
1)Choose the menu Network Security > 802.1X > Port Config to check whether the port 1/0/3 has passed the authentication successfully.
The port authentication state changes from Unauthorized to Authorized, that is, the port has passed the authentication.
2)Open a web browser and browse a website to check whether the PC can get access to the internet.
Using the CLI
1)Verify the 802.1X authorization states on the port:
T2600G-28TS#show dot1x interface
Port State MAB State GuestVLAN PortControl PortMethod Authorized LAG
---- ------- ------------ ------------ ------------ --------------- ------------ -----
Gi1/0/1 disabled disabled disabled auto mac-based authorized N/A
Gi1/0/2 disabled disabled disabled auto mac-based authorized N/A
Gi1/0/3 enabled enabled disabled auto port-based authorized N/A
...
2)Open a web browser and browse a website and to check whether the PC can get access to the internet.