Application Example (Standalone EAP)
CHAPTERS
1. Determine the Network Requirements
|
|
This guide applies to: EAP225-Outdoor 1.0, EAP110-Outdoor 3.0, EAP110 4.0, EAP115 4.0, EAP115-Wall 1.0, EAP225-Wall 2.0, EAP225 3.0, EAP245 3.0, EAP320 2.0, EAP330 2.0. |

This guide provides an application example about how to establish and manage a EAP wireless network:
A restaurant wants to provide the wireless internet access for the employees and guests. The restaurant now has a router, a switch, a dual-band EAP and a computer. Follow the steps below to establish the wireless network:
1. Determine the Network Requirements
2. Build the Network Topology
3. Log in to the EAP
4. Configure the EAP
5. Test the Network
1Determine the Network Requirements
Before starting to build the network, we need to first analyze and determine the network requirements. In this restaurant example, the network requirements are as follows:
On both 2.4GHz and 5GHz bands, there are two SSIDs needed: one for the restaurant employees and one for the guests.
In order to advertise the restaurant, the Portal feature needs to be configured on the SSIDs for the guests. In this way, the guests who have passed the portal authentication will be redirected to the restaurant’s official website http://www.restaurant1.com.
The employees of the restaurant can use the correct password to access the internet and do not need to pass the portal authentication. For security, the SSIDs for the employees should be encrypted with WPA2-PSK.
To reduce power consumption, the Scheduler feature needs to be configured. The radio should operate only during the working time (9:00 am to 22:00 pm).
Build the network topology as the following figure shows.
Figure 2-1 Network Topology
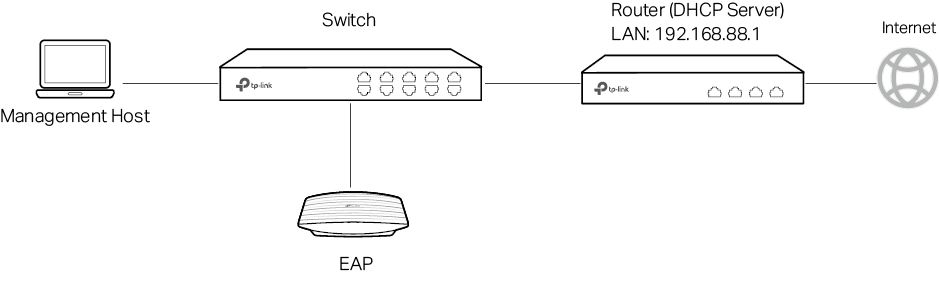
The router is the gateway of the network and acts as a DHCP server to assign dynamic IP addresses to the management host, EAP and clients. The LAN IP of the router is 192.168.88.1/24.
Connect the switch to the LAN port of the router.
Connect the management host and the EAP to the switch. The IP address mode of the management host and EAP is dynamic, which means that they will get dynamic IP addresses from the router.
|
|
Tips If the router has more than one LAN port, we can also respectively connect the management host and the EAP to the LAN ports of the router. |

After building the network topology, follow the steps below to log in to the web page of the EAP:
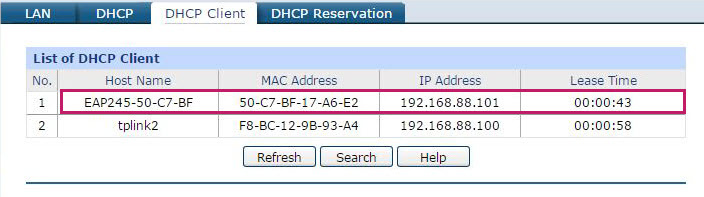
1)On the management host, launch the web browser and enter “192.168.88.1” in the address bar. Then log in to the router and find the IP address of the EAP. As the following figure shows, the IP address of the EAP is 192.168.88.101.
Figure 3-1 Viewing the IP Address of EAP
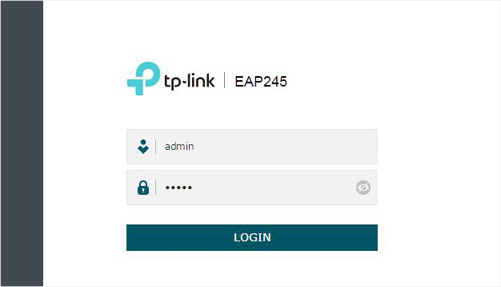
2)Enter “192.168.88.101” in the address bar to load the login page of the EAP. Type the default username and password (both admin) in the two fields and click LOGIN.
Figure 3-2 Logging In to EAP
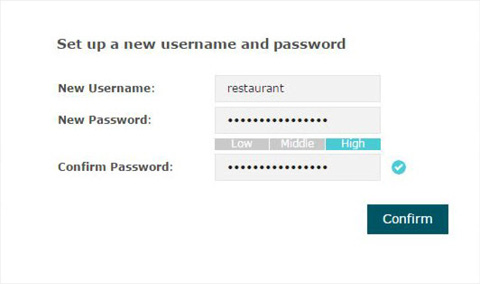
3)In the pop-up window, specify a new username and a new password for the user account. Click Confirm.
Figure 3-3 Configuring New Username and Password
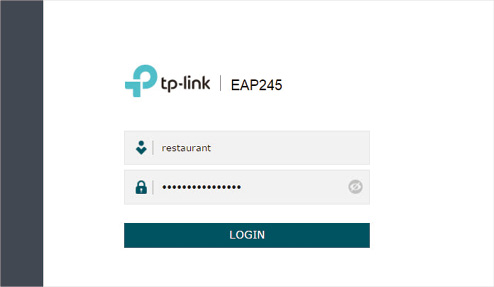
4)Enter the new username and new password and click LOGIN. Then we can enter the web page of the EAP.
Figure 3-4 Logging In to EAP Using the New Username and Password
To achieve the network requirements in this application example, we need to configure SSIDs, Portal Authentication and Scheduler.
Follow the steps below to respectively configure SSIDs for the employees and guests on the 2.4GHz band and 5GHz band:
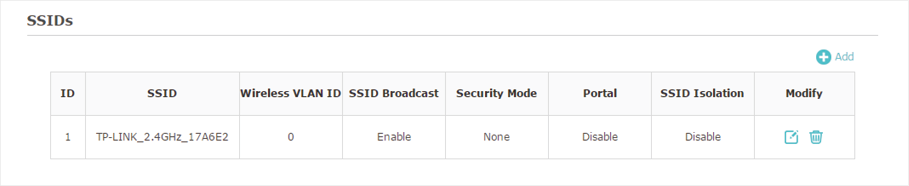
1)Go to the Wireless > Wireless Settings page.
2)In the SSIDs section, there is already a default SSID on the 2.4GHz band. Click  .
.
Figure 4-1 Editing SSID
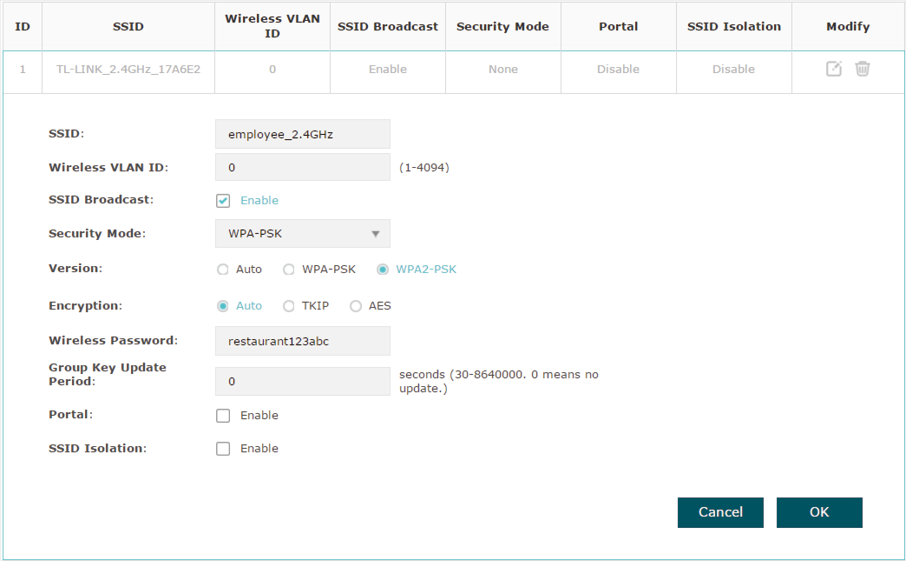
3)The following page will appear. Configure this SSID for the employees. Change SSID to “employee_2.4GHz”, select the Security Mode as “WPA2-PSK”, and specify the Wireless Password as “restaurant123abc“. Click OK.
Figure 4-2 Editing SSID
4)On the same page, click  to add a new SSID.
Figure 4-3 Adding SSID

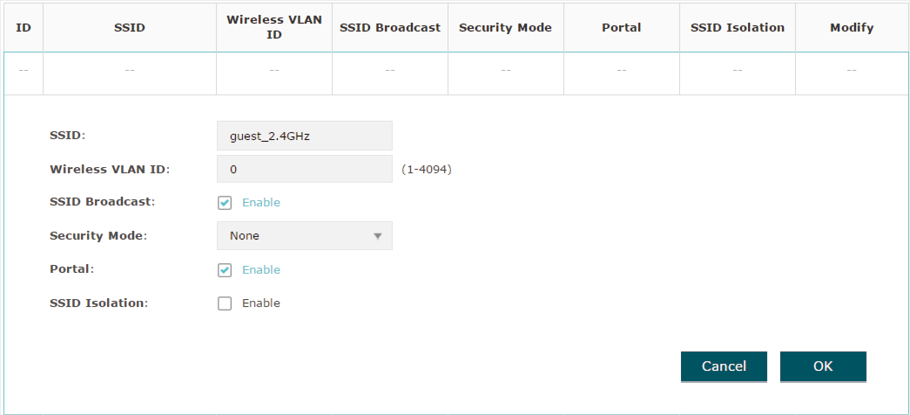
5)The following page will appear. Configure this SSID for the guests. Change SSID to “guest_2.4GHz“, keep the Security Mode as “None” and check the box to enable the Portal feature for this SSID. Click OK.
Figure 4-4 Adding SSID
6)Click  to enter the configuration page for the 5GHz band. Similarly to the configurations for the 2.4GHz band, configure two SSIDs for the employees and guests on the 5GHz band.
4.2Configure Portal Authentication
Follow the steps below to configure portal authentication:
1)Go to the Wireless > Portal page.
2)Configure the portal feature as the following figure shows.
Figure 4-5 Configuring Portal
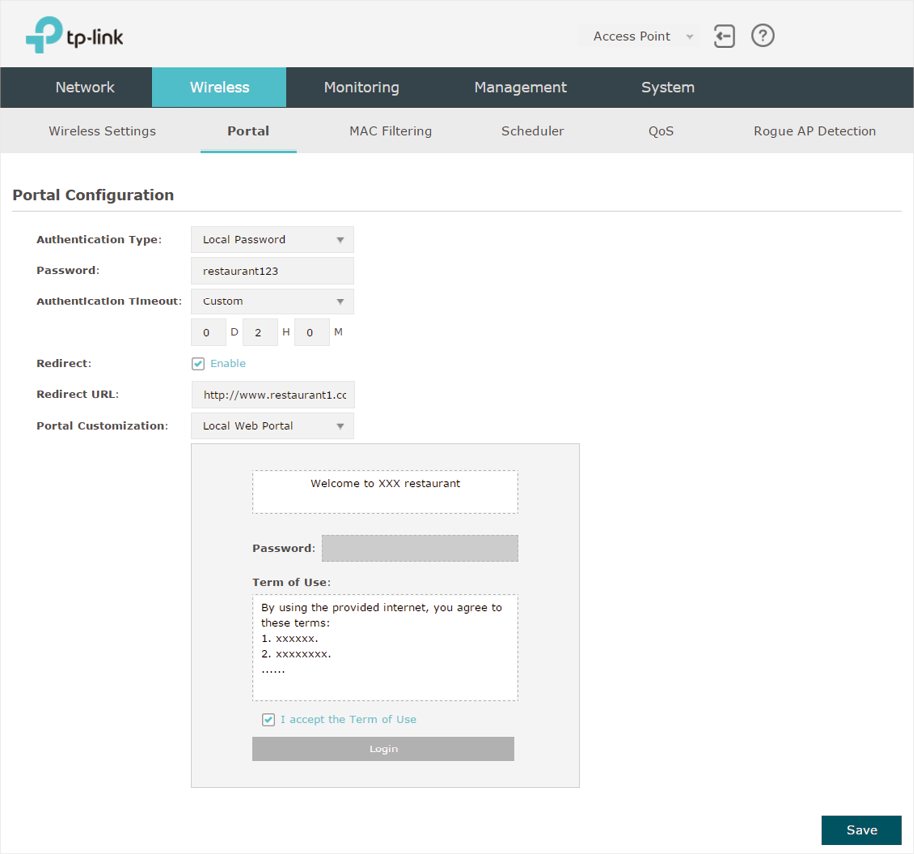
Select the Authentication Type as “Local Password” and specify the Password as “restaurant123”.
Configure Authentication Timeout. Here we customize the timeout as 2 hours. It means that guests will be logged out after they have been authenticated for 2 hours. To continue to use the internet service, these guests need to enter the password to pass the portal authentication once again.
Check the box to enable Redirect, and enter the website of the restaurant: http://www.restaurant1.com.
Configure the authentication page. Specify the title and the term of use. To access the internet, guests need to enter the correct password in the Password field, accept the Term of Use, and click the Login button.
3)Click Save.
Follow the steps below to schedule the radio to operate only during the working time (9:00 am to 22:00 pm).
1)Go to the Wireless > Scheduler page.
2)In the Settings section, check the box to enable Scheduler, and select the Association Mode as “Associated with AP“. Click Save.
Figure 4-6 Configuring Scheduler

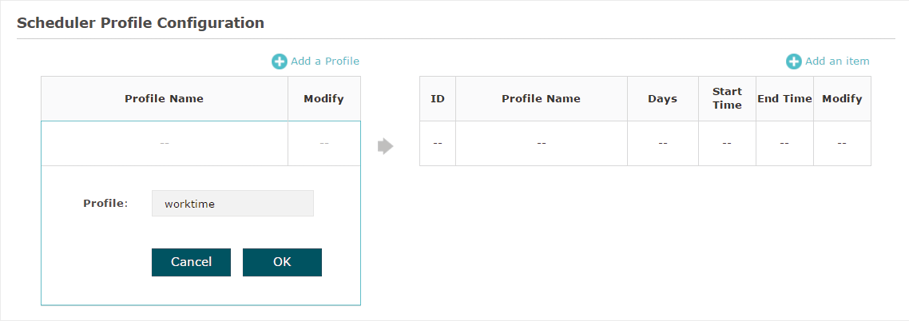
3)In the Scheduler Profile Configuration section, click  .
.
Figure 4-7 Creating Profile

4)The following page will appear. Click  and specify the profile name as “worktime”. Click OK.
Figure 4-8 Adding Profile
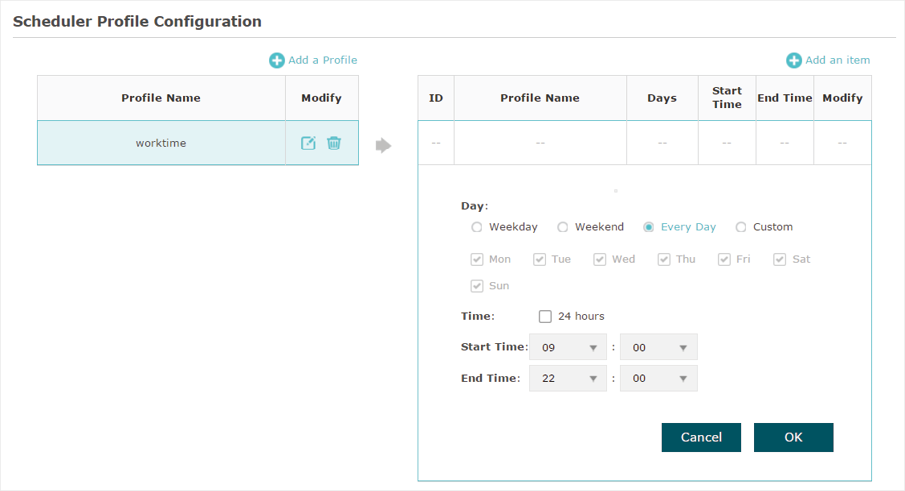
5)Choose the newly added profile “worktime”, and click  . Then the item configuration page will appear. Specify the time range as everyday 9:00 to 22:00. Click OK.
Figure 4-9 Adding Item
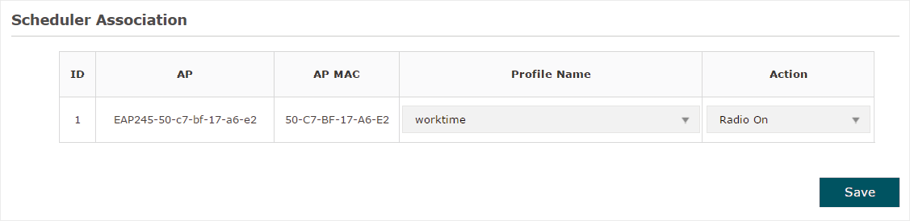
6)In the Scheduler Association section, select “worktime“ in the Profile Name column and select “Radio On” in the Action column. Click Save.
Figure 4-10 Configuring Action
To ensure that the employees and guests can surf the internet via the wireless network, we can use a client device, such as a telephone, to test whether the SSIDs are working normally.
To test the SSIDs for the employees, follow the steps below:
1)Enable the Wi-Fi feature of the client device.
2)Choose the SSID “employee_2.4GHz“ or “employee_5GHz“ among the detected SSIDs.
3)Enter the password “restaurant123abc“ to join the wireless network.
4)Check whether internet websites can be visited successfully.
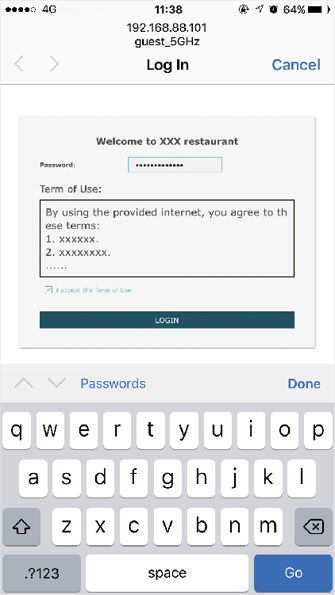
To test the SSIDs for the guests, follow the steps below:
1)Enable the Wi-Fi feature of the client device.
2)Choose the SSID “guest_2.4GHz“ or “guest_5GHz“ among the detected SSIDs.
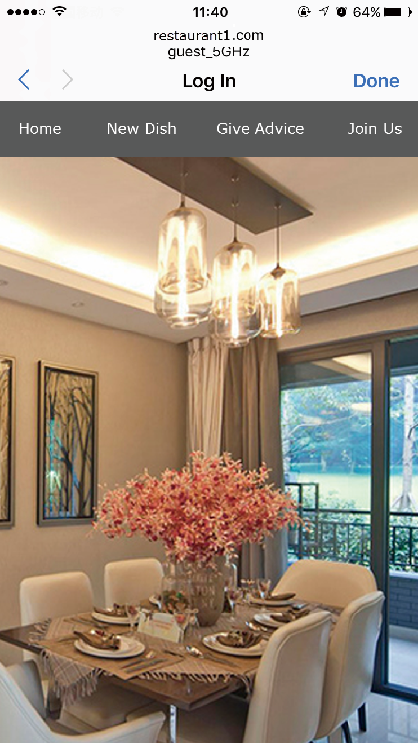
3)The default web browser on the device will pop up and the authentication page will appear. Enter the password “restaurant123”, check the box to accept the term of use, and click the LOGIN button.
Figure 5-1 Logging In
|
|
Tips Generally, the web browser pops up automatically. But if the web browser does not pop up, we can manually launch the web browser and visit any http website. Then the authentication page will appear. |
4)If the network is working normally, we will be redirected to the website of the restaurant: http://www.restaurant1.com.
Figure 5-2 Redirect Page