How to Factory Reset Your TP-Link Range Extender or Access Point
This page covers how to factory reset a TP-Link range extender or access point to its default settings using the RESET button. A reset is useful when your device is unresponsive, misconfigured, or you've forgotten the password. Be aware that a factory reset will erase all custom settings; you'll need to reconfigure the device from scratch afterward, unless you have a saved configuration file backup to restore.
Key Takeaways
- A factory reset restores the device to its original settings. All custom configurations will be lost, and the device will need to be set up again from scratch.
- For most access points: press and hold the RESET button with a pin for eight to ten seconds while the device is powered on. Release when all lights flash, go off, and some come back on slowly.
- For models range exctender: press and hold the RESET button for one to two seconds while the device is powered on and wait for power light blinking.
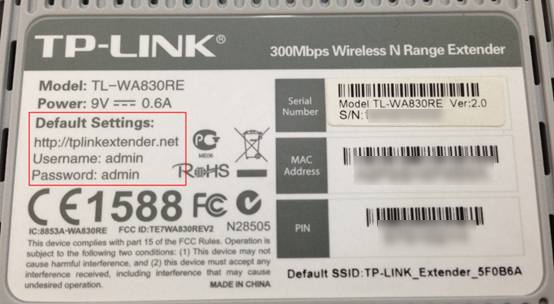
- After the reset, check the label on the back of your device for the default Wi-Fi name, password, and login credentials.
To perform a hard reset, please follow the instructions below.
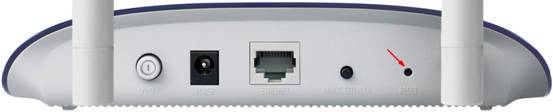
Access Point: Hold the RESET Button for 8–10 Seconds
With the access point powered on, press and hold the RESET button with a pin for 8 to 10 seconds. The reset is successful when all lights flash, go off, and some come back on slowly.
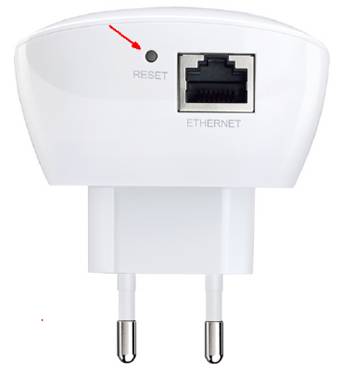
Range Extender: Hold the RESET Button for 1–2 Seconds
With the extender powered on, press and hold the RESET button with a pin for 1 to 2 seconds. The reset is successful when all the lights go off, and the power LED light blinks.
Note: After the reset, check the label on the back of your device for the default Wi-Fi name, password, and login credentials.
Get to know more details of each function and configuration please go to the Download Center to download the manual of your product.
Is this faq useful?