


How to set up Port Forwarding feature on TP-Link SMB Router (new UI)
Introduction
Due to the existence of NAT feature, traffic from external networks actively accessing the router LAN will be discarded by the NAT. How to allow remote IP to connect to a specific computer or service on the internal LAN? We need to open ports for the server on TP-Link SMB router.
Application Scenario
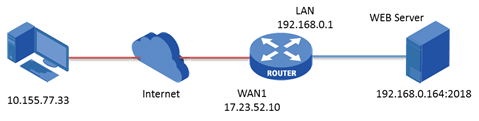
Take ER7206 V2 as an example. The Web server is behind ER7206 V2 LAN port as 192.168.0.164:2018. WAN1 of ER7206 V2 is Link UP and its IP address is 17.23.52.10. Client could be any IP that is accessible to WAN1. Here we take 10.155.77.33 which is out of WAN1 through the Internet. Our topology is connected as follows.
Configuration Steps
On the main WebUI management page, go to Transmission---->NAT---->Virtual Servers. Click Add. In the popup menu, fill in every option as below screenshot.

Note: The “WAN IP” is an optional parameter. If left empty, the rule will apply to the current WAN IP.
Specify the entry name as WEB_Server, choose the interface as WAN1, and specify the internal/ external port as 2018, enter the IP address of Web server (192.168.0.164) as the internal server IP. Select the protocol as ALL, then keep Status of this entry as Enable. Click OK.
Verification
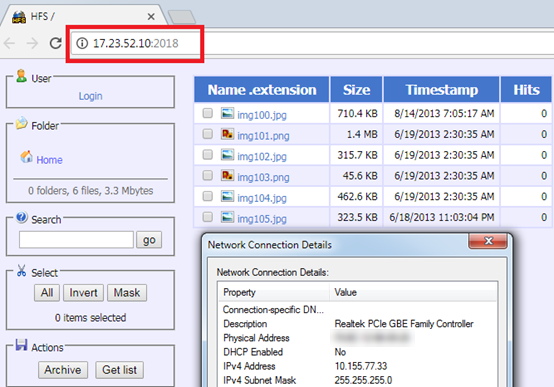
On 10.155.77.33 in the topology, when we type in 17.23.52.10:2018 (17.23.52.10 is WAN1 of ER7206 v2), we will find it turns out that we could access the Web Server on 192.168.0.164:2018.
A fost util acest FAQ?
Părerea ta ne ajută să îmbunătățim acest site.

