How to add VIGI devices to VIGI VMS

VIGI VMS
Recent updates may have expanded access to feature(s) discussed in this FAQ. Visit your product's support page, select the correct hardware version for your device, and check either the Datasheet or the firmware section for the latest improvements added to your product. Please note that product availability varies by region, and certain models may not be available in your region.
VIGI VMS can discover and add VIGI devices in three ways: Auto Add, Manually Add, and Remotely Add. From this article, you can learn how to add VIGI devices to VIGI VMS via different methods.
Auto Add
Auto Add is used in topologies where the VIGI device and the VIGI VMS are located on the same network. VIGI VMS broadcast and scan VIGI devices on the same network using the TP-Link private protocol and perform association to add them.
1. Connect the VIGI device to the network and ensure it can communicate with the VIGI VMS.
2. Log in to the VIGI VMS web management interface and navigate to the Device menu. Click the “Add” button to add the device.
3. Click on the "+" button next to the device you want to add.
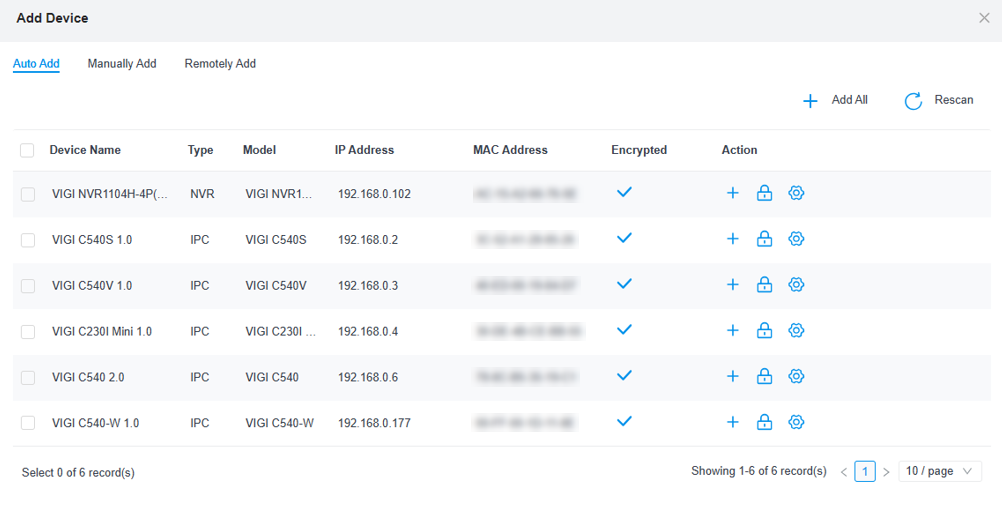
4. Select the corresponding Site. Enter the device's username and password.
5. If the device has been added successfully, it will be displayed in the Device List. To view the Device List, return to it.
Manually Add
Manually Add is frequently used to add VIGI cameras with a specific IP address or located within a specific IP range.
Customer specifies the relevant IP address, and the VIGI VMS initiates association with the VIGI device at the specific address, including single IP address addition and multiple IP address addition.
1. The steps for preparation are identical to the Auto Add steps.
2. If Single mode is selected, enter the specific IP address. If Multiple mode is selected, enter the corresponding IP address range.
3. Click on “Obtain Device” to retrieve device information.
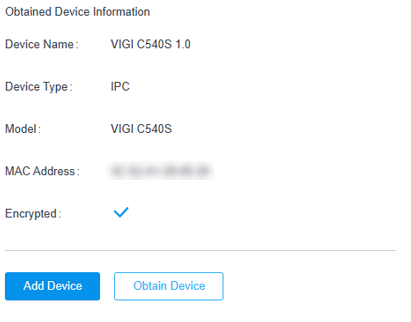
4. Check the device information and click on the “Add Device” button. Then, select the site and enter the username and password for verification.
Remotely Add
Remotely Add is typically used when the VIGI VMS and VIGI devices are not on the same network and need to connect via the Internet. In this case, adding the device is highly dependent on the network. If NAT exists at the front-end of the VIGI VMS, port forwarding on the routes at the front-end of the server is usually necessary.
1. log in to the web management interface of the VIGI device o, go to the “Platform Access” section in the Network Configuration item.
2. Enable 'Access to VIGI VMS' and fill in the IP address and connection port of VIGI VMS (default is 10123).
3. log in to the VMS web management interface, navigate to the Device menu, and select “Remotely Add”.
4. Select the corresponding VIGI device, choose the site, and enter the username and password for verification.
Czy ten poradnik FAQ był pomocny?
Twoja opinia pozwoli nam udoskonalić tę stronę.
Jakie są Twoje uwagi dotyczące tego artykułu?
- Niezadowolenie z produktu
- Zbyt skomplikowany
- Mylący tytuł
- Nie dotyczy mnie
- Zbyt ogólnikowy
- Inne
Dziękujemy
Dziękujemy za przesłanie opinii.
Kliknij tutaj, aby skontaktować się ze Wsparciem technicznym TP-Link.
Sugerowane produkty
z United States?
Uzyskaj produkty, wydarzenia i usługi przeznaczone dla Twojego regionu.
Ta witryna wykorzystuje tzw. pliki cookies, aby usprawnić jej przeglądanie, w celu analizy ruchu oraz do jak najlepszej optymalizacji wyświetlanych treści. W każdej chwili można wyłączyć obsługę plików cookies. Więcej informacji na ten temat dostępnych jest w Polityce prywatności
Podstawowe Cookies
Te pliki cookies niezbędne są do poprawnego działania witryny i nie moga zostać wyłączone.
TP-Link
SESSION, JSESSIONID, accepted_local_switcher, tp_privacy_base, tp_privacy_marketing, tp_smb-select-product_scence, tp_smb-select-product_scenceSimple, tp_smb-select-product_userChoice, tp_smb-select-product_userChoiceSimple, tp_smb-select-product_userInfo, tp_smb-select-product_userInfoSimple, tp_top-banner, tp_popup-bottom, tp_popup-center, tp_popup-right-middle, tp_popup-right-bottom, tp_productCategoryType
Youtube
id, VISITOR_INFO1_LIVE, LOGIN_INFO, SIDCC, SAPISID, APISID, SSID, SID, YSC, __Secure-1PSID, __Secure-1PAPISID, __Secure-1PSIDCC, __Secure-3PSID, __Secure-3PAPISID, __Secure-3PSIDCC, 1P_JAR, AEC, NID, OTZ
Zendesk
OptanonConsent, __cf_bm, __cfruid, _cfuvid, _help_center_session, _pendo___sg__.<container-id>, _pendo_meta.<container-id>, _pendo_visitorId.<container-id>, _zendesk_authenticated, _zendesk_cookie, _zendesk_session, _zendesk_shared_session, ajs_anonymous_id, cf_clearance
Cookies dotyczące analizy i marketingu
Analiza - Te pliki Cookies są wykorzystywane w celu analizy ruchu na naszej stronie, co umożliwia poprawę i dostosowanie wyświetlanych treści.
Marketing - Te pliki Cookies mogą być wykorzystywane przez naszych partnerów reklamowych podczas tworzenia profilu Twoich zainteresowań, co pozwala na wyświetlanie odpowiednich reklam na innych stronach.
Google Analytics & Google Tag Manager
_gid, _ga_<container-id>, _ga, _gat_gtag_<container-id>
Google Ads & DoubleClick
test_cookie, _gcl_au