Comment ajouter et configurer à distance des caméras IP à votre système NVR
Contenu
Objectif
Cet article explique comment ajouter des IPC à distance à un NVR. Il aborde les structures topologiques typiques, les scénarios d'application et les étapes de configuration.
Exigences
- Caméras IP VIGI (IPC)
- Enregistreurs vidéo VIGI (NVR)
Introduction
La fonctionnalité d'enregistrement à distance de VIGI permet d'ajouter des IPC à distance à un NVR, pour un déploiement et une gestion efficaces sur de longues distances. Cette fonctionnalité est adaptée à divers scénarios, notamment :
- Surveillance multi-sites : tels que les chaînes de magasins, les écoles, les usines et autres environnements distribués, permettant une gestion centralisée des caméras sur plusieurs sites.
- Déploiement rapide : adapté aux scénarios de surveillance d'urgence ou temporaires, permettant une installation et une configuration rapides des appareils.
- Environnements extérieurs : tels que les champs, les fermes, les forêts et autres espaces extérieurs.
Configuration
- Avant de commencer la configuration, assurez-vous que vos appareils prennent en charge la fonction d’enregistrement à distance .
- Le guide de configuration suivant inclut les configurations NVR et IPC.
- Le NVR Web et l'interface utilisateur graphique prennent tous deux en charge l'enregistrement à distance. Les étapes de configuration suivantes sont utilisées à titre d'exemple avec le NVR Web.
Étape 1. Configuration du NVR
Accédez à Paramètres > Appareil photo > Enregistrement à distance, activez la fonction Enregistrement à distance et configurez le code de vérification .
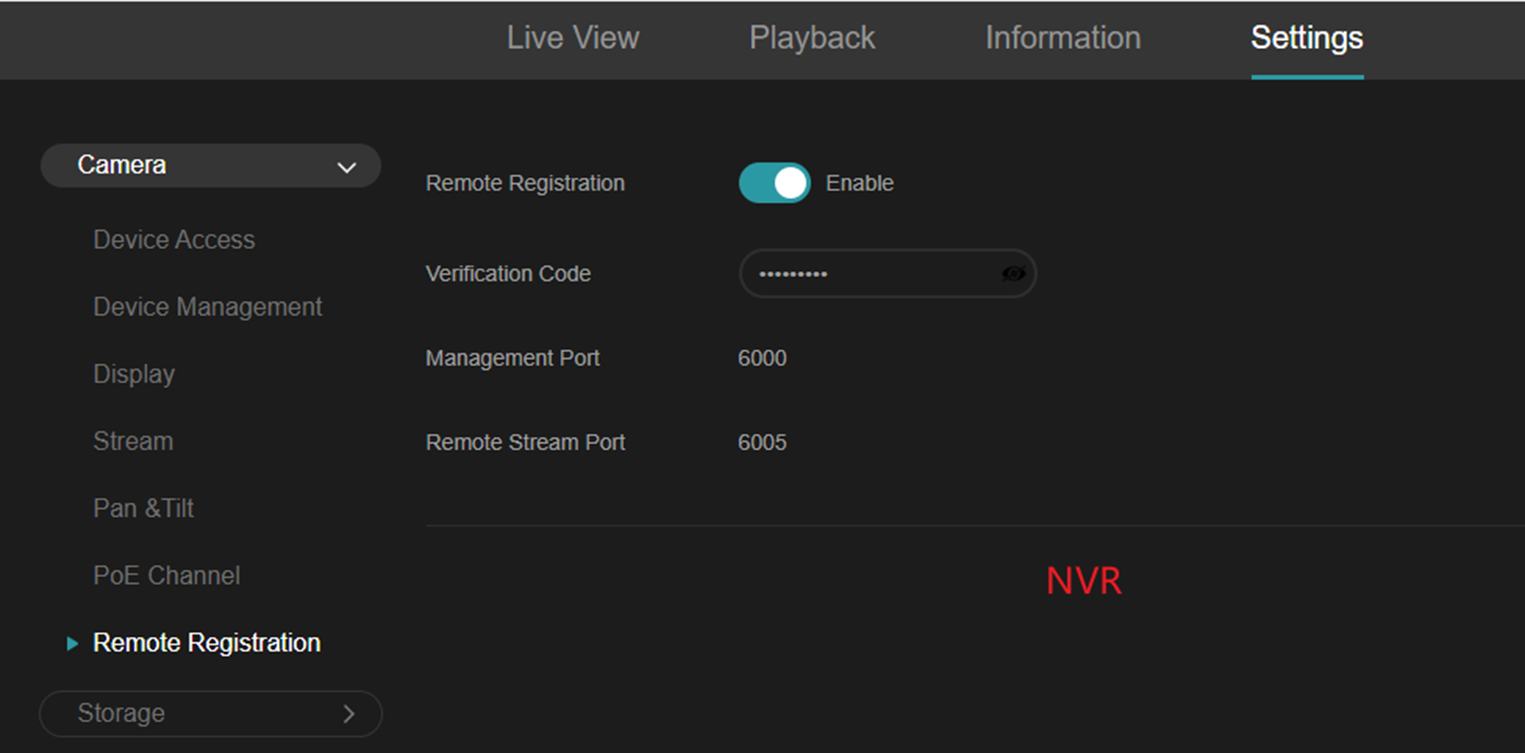
Remarques :
- Le code de vérification doit comporter entre 9 et 32 caractères et être une combinaison de lettres majuscules, de lettres minuscules, de chiffres et de symboles. Il ne peut pas contenir trois chiffres ou lettres consécutifs.
- Le port de gestion par défaut et le port de flux distant sont 6000 et 6005. Cependant, si ces ports sont en conflit avec les ports de l'environnement, ils peuvent également être modifiés dans les paramètres Réseau > Port .
Étape 2. Configuration IPC
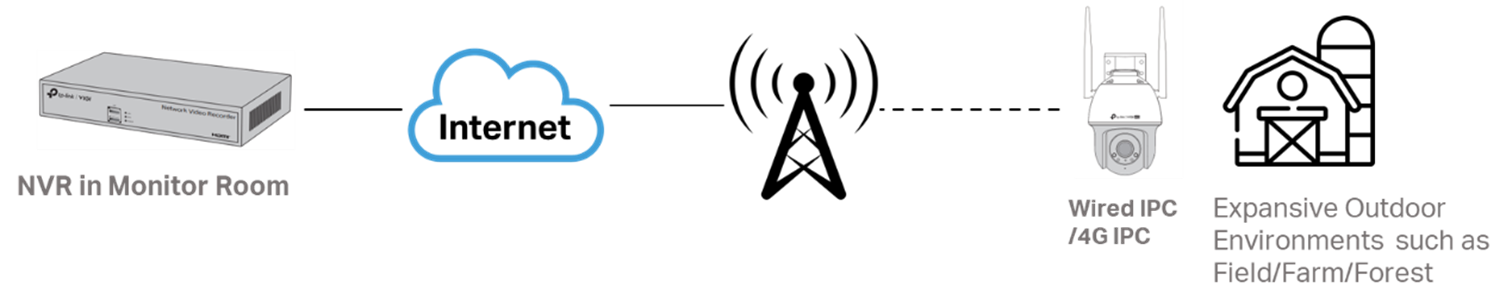
Il existe deux scénarios de configuration : l'un dans lequel le NVR a une adresse IP publique et l'autre dans lequel il se trouve derrière une adresse IP privée.
Configuration pour le scénario 1
L'adresse IP du NVR est privée. Le routeur connecté au NVR doit disposer d'une adresse IP publique. Parallèlement, le routeur doit mapper le port de gestion et le port de diffusion distante au réseau public via UPnP ou d'autres méthodes (par exemple, la fonction de redirection de port du routeur). Un schéma de topologie typique est le suivant :

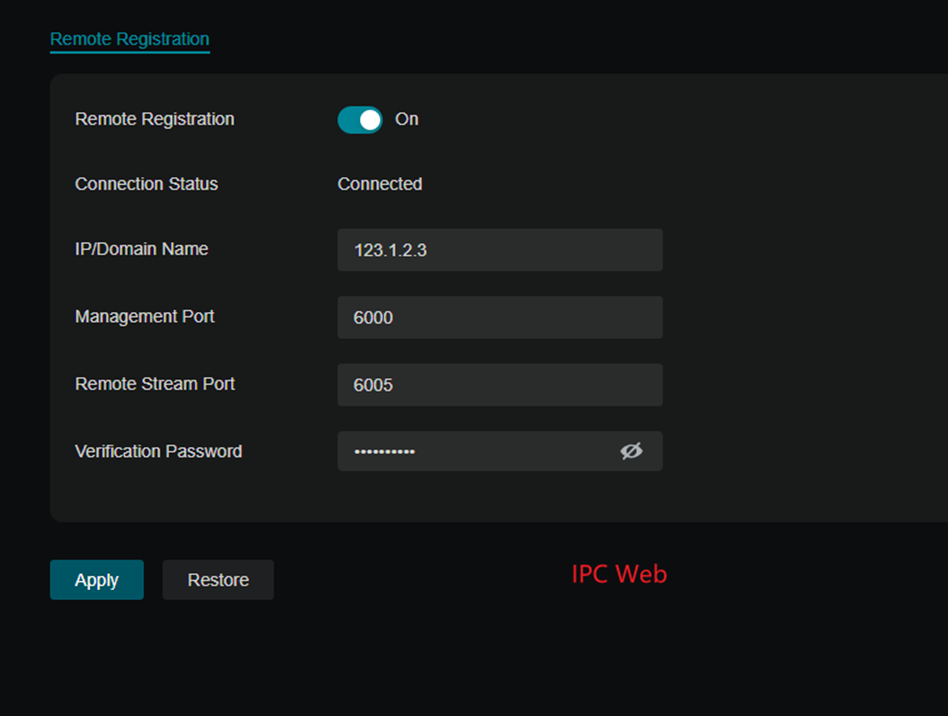
Le nom IP/domaine doit être l' adresse IP publique du routeur et les ports doivent également être les ports externes du réseau public mappés à partir de ces deux ports sur le NVR.
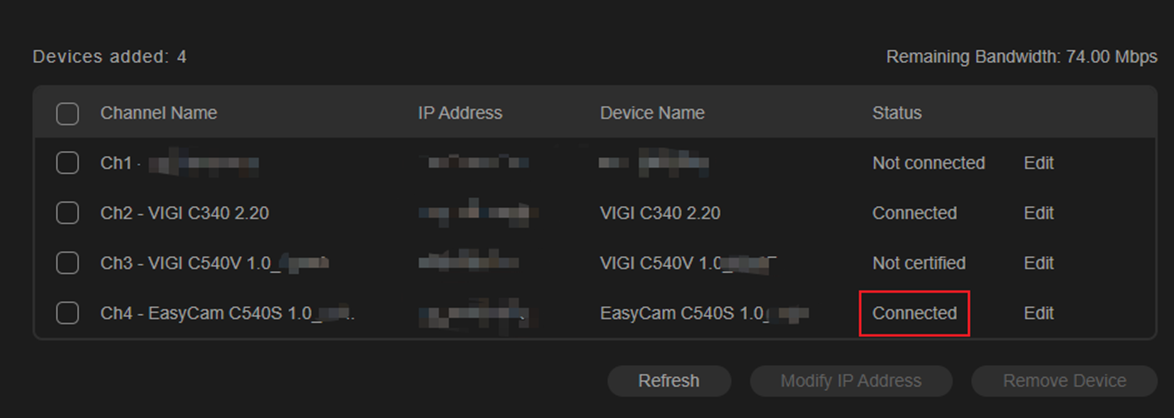
Une fois connecté, le statut s'affichera comme « Connecté ».
Configuration pour le scénario 2
L'adresse IP du NVR est une adresse IP publique. Un schéma de topologie typique est le suivant :

Configurez l'IPC avec les informations du NVR. Saisissez l' adresse IP publique du NVR (ou son nom de domaine avec prise en charge DDNS), le port et le code de vérification.
Étape 3. Ajouter l'IPC
Accédez à Paramètres > Caméra > Accès à l'appareil et ajoutez l'IPC à l' interface Web du NVR.
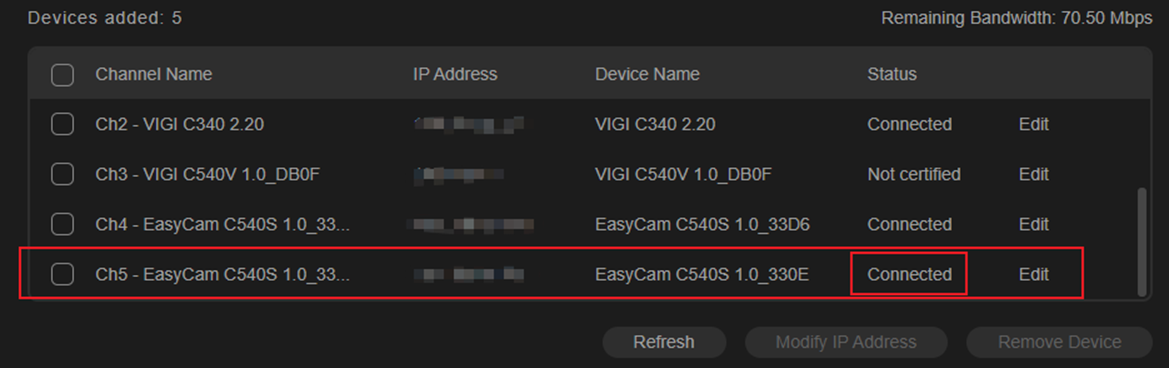
1) Lors de la première connexion, le NVR ajoutera automatiquement l'IPC avec le même mot de passe. L'IPC apparaîtra dans la liste des appareils ajoutés et son statut passera à « Connecté ».
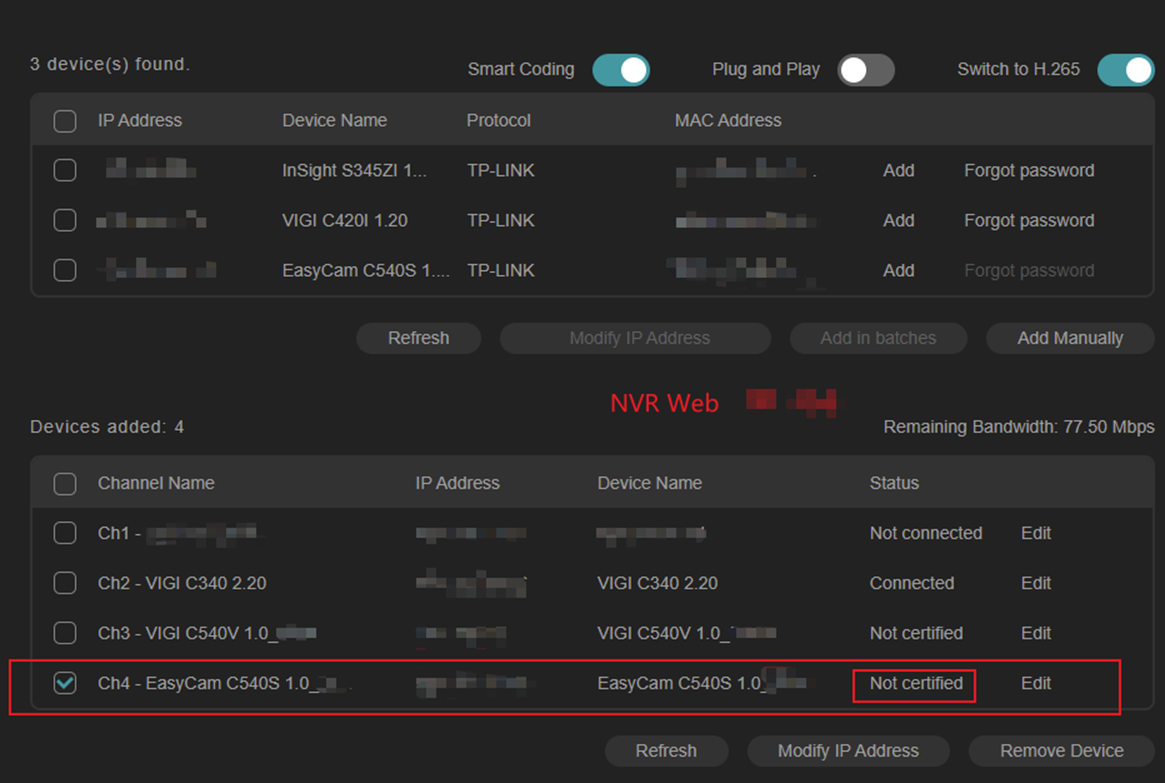
2) Si le mot de passe est incorrect, le statut de l'IPC est « Non certifié ».
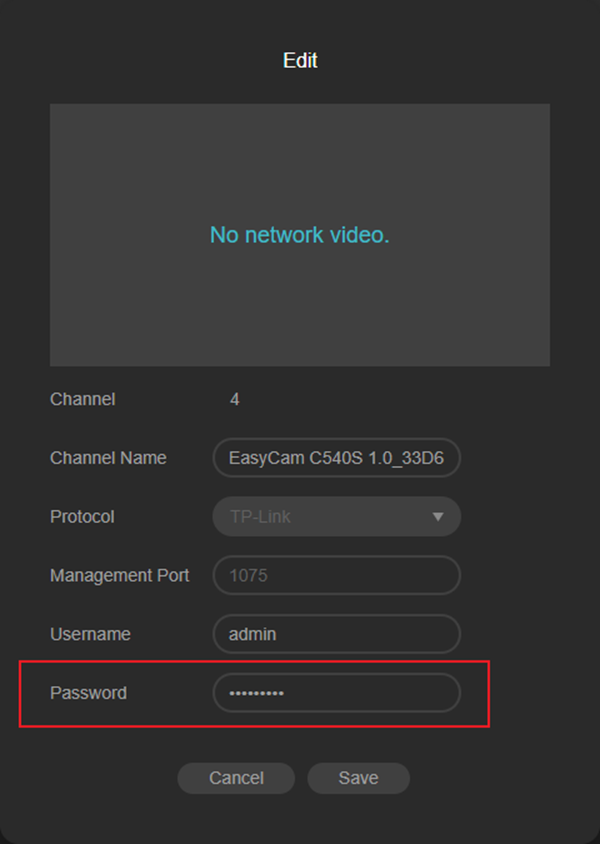
Cliquez sur « Modifier » pour saisir le mot de passe IPC correct. Cliquez ensuite sur « Enregistrer » ; le statut de l'IPC passe à « Connecté ».
3) Après avoir supprimé l'IPC, si ce n'est pas la première fois que vous l'ajoutez, recherchez l'IPC distant dans l'interface du NVR. Cliquez ensuite sur « Ajouter » et saisissez le nom d'utilisateur et le mot de passe de l'IPC.
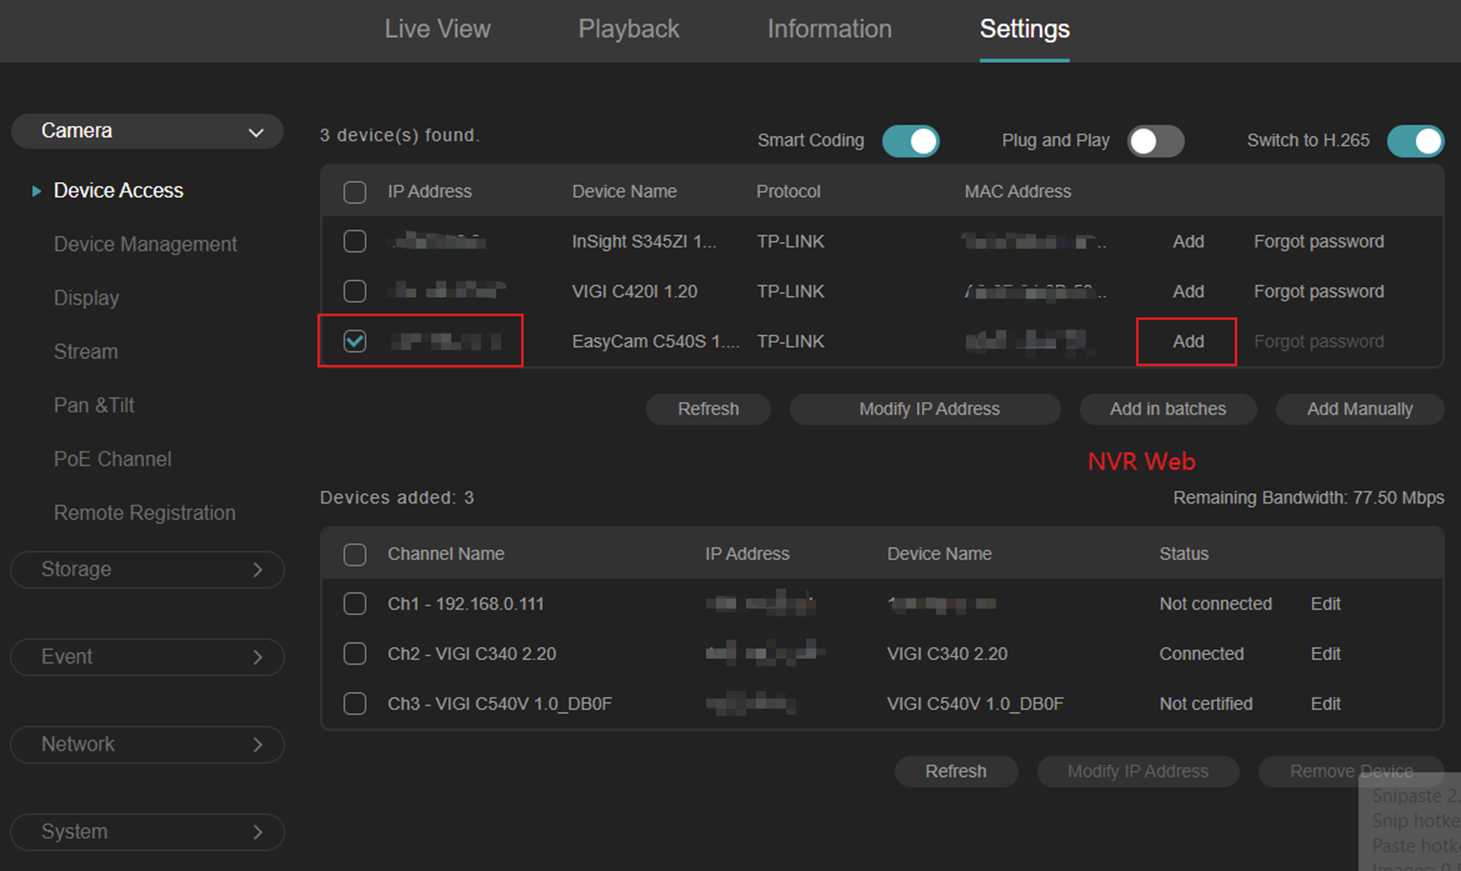
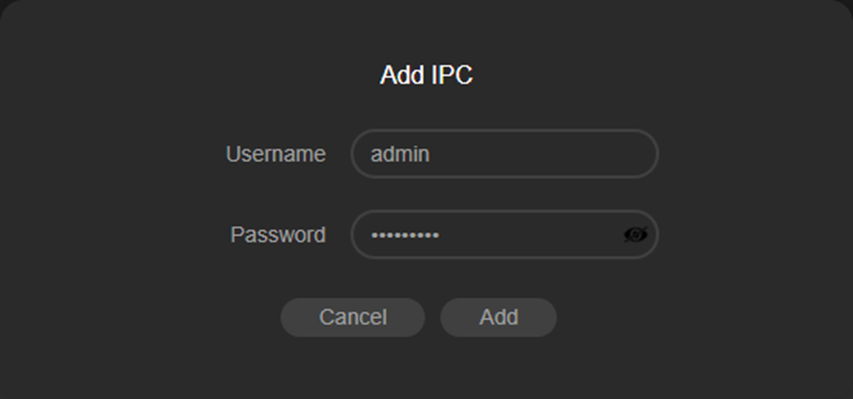
Si le nom d'utilisateur et le mot de passe sont incorrects, une fenêtre contextuelle affichera le message « Le nom d'utilisateur ou le mot de passe est incorrect. », ce qui entraîne l'échec de l'ajout de l'IPC.

Lorsque l'IPC ne parvient pas à se connecter, l'état de connexion sur l'interface Web de l'IPC affiche « Échec de la connexion au NVR ».
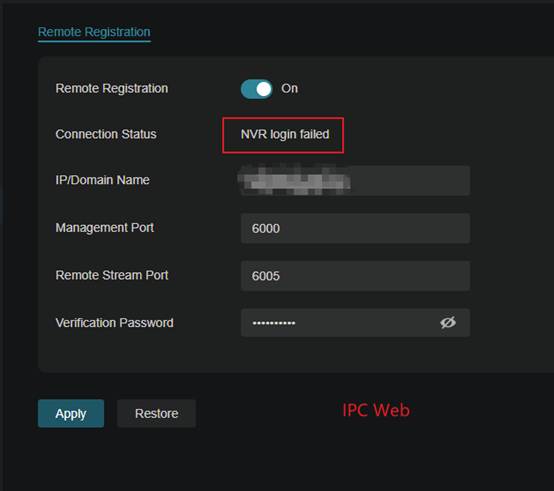
Veuillez ressaisir le nom d'utilisateur et le mot de passe corrects pour finaliser l'ajout de l'IPC distant. Le statut de l'IPC passe alors à « Connecté » dans la liste des appareils ajoutés.
Conclusion
Avec les étapes ci-dessus, vous avez ajouté avec succès l’IPC à un NVR à distance.
Pour en savoir plus sur chaque fonction et configuration, veuillez vous rendre dans le Centre de téléchargement pour télécharger le manuel de votre produit.
Est-ce que ce FAQ a été utile ?
Vos commentaires nous aideront à améliorer ce site.