


Cómo configurar la función de reenvío de puertos en el router SMB de TP-Link (nueva interfaz de usuario)
Introducción
Debido a la existencia de la función NAT, el tráfico de las redes externas que acceden activamente a la LAN del router será descartado por la NAT. ¿Cómo permitir que la IP remota se conecte a una PC o servicio específico en la LAN interna? Necesitamos abrir puertos para el servidor en el router SMB TP-Link.
Escenario de aplicación
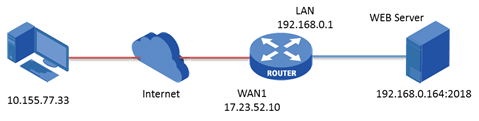
Tomemos ER7206 V2 como ejemplo. El servidor web está detrás del puerto LAN ER7206 V2 como 192.168.0.164:2018. WAN1 de ER7206 V2 es Link UP y su dirección IP es 17.23.52.10. El cliente puede ser cualquier IP a la que pueda acceder WAN1. Aquí tomamos 10.155.77.33 que está fuera de WAN1 a través de Internet. Nuestra topología está conectada de la siguiente manera.
Pasos de configuración
En la página principal de administración de la interfaz de usuario web, vaya a Transmisión---->NAT---->Servidores virtuales. Haga clic en Agregar. En el menú emergente, complete todas las opciones como se muestra a continuación en la captura de pantalla.

Nota: La "IP WAN" es un parámetro opcional. Si se deja vacía, la regla se aplicará a la IP de WAN actual.
Especifique el nombre de la entrada como WEB_Server, elija la interfaz como WAN1 y especifique el puerto interno/externo como 2018, introduzca la dirección IP del servidor web (192.168.0.164) como IP del servidor interno. Seleccione el protocolo como ALL, luego mantenga el Estado de esta entrada como Habilitar. Haga clic en Aceptar.
Verificación
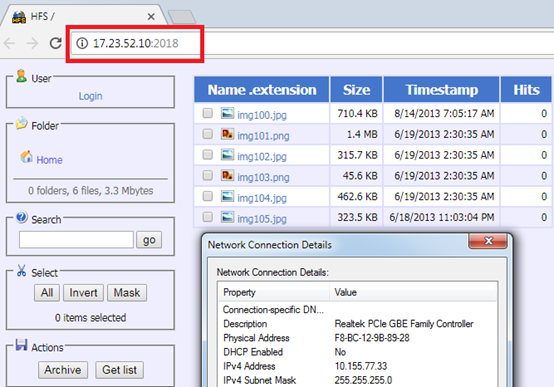
En 10.155.77.33 en la topología, cuando escribimos 17.23.52.10:2018 (17.23.52.10 es WAN1 de ER7206 v2), encontraremos que resulta que podríamos acceder al servidor web en 192.168.0.164:2018.
¿Es útil este artículo?
Tus comentarios nos ayudan a mejorar esta web.