How to manage EAPs at different sites across Internet using Omada Controller (via VPN Tunnel with EAP Discover Utility) (Old UI)

EAP225 V3 , EAP110-Outdoor V3 , EAP225-Wall , EAP115 V4 , OC200( V1 ) , EAP225-Outdoor , EAP225 V2 , EAP245 , EAP320 , EAP110 , EAP220 , EAP330 , EAP120 , EAP235-Wall , EAP110 V4 , EAP115 , EAP225 , EAP110-Outdoor , Omada Software Controller , EAP115-Wall
Recent updates may have expanded access to feature(s) discussed in this FAQ. Visit your product's support page, select the correct hardware version for your device, and check either the Datasheet or the firmware section for the latest improvements added to your product. Please note that product availability varies by region, and certain models may not be available in your region.
As shown below, HQ and Branch Office are connected with each other through IPsec VPN tunnel. In HQ, there are TP-Link EAP controller, EAP1 and TL-ER6120 (VPN Router) in subnet 192.168.1.0/24. In branch office, there are TP-Link EAP discover utility, EAP2 and TL-ER6120 (VPN router) in subnet 192.168.0.0/24.
This document will introduce how to manage EAPs at different sites across Internet using TP-Link EAP/Omada controller (via VPN Tunnel with EAP discover utility). About how to choose VPN Router and set up site to site IPSec VPN tunnel, please refer to: Setting up Site-to-Site IPsec VPN on TP-Link Router
Step1. VPN Settings on TL-ER6120 in Branch Office
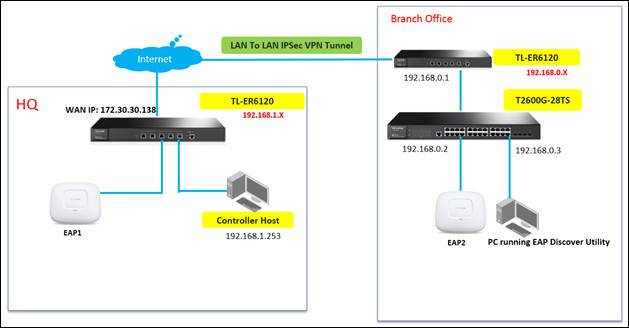
1. Go to VPN -> IKE -> IKE Proposal, and complete IKE Proposal settings shown as below.
2. Go to VPN -> IKE -> IKE Policy, and complete IKE Policy settings shown as below.
3. Go to VPN -> IPsec -> IPsec Proposal, and complete IPsec Proposal settings shown as below.
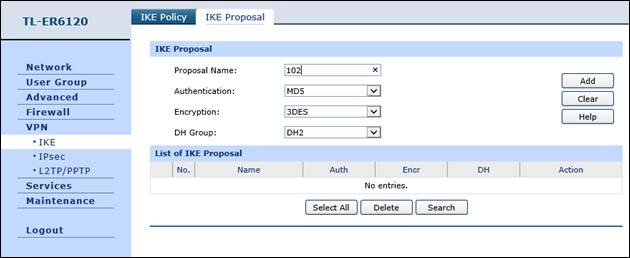
4. Go to VPN -> IPsec -> IPsec Policy, and complete IPsec Policy settings shown as below. Note: “Remote Gateway” should be the WAN IP address of TL-ER6120 in HQ.
Step2. VPN settings on TL-ER6120 in HQ are similar with “Step 1”. Here we don’t describe them in detail any more. After all settings, the VPN tunnel will be established between HQ and Branch Office shown as below.
Step3. Configurations on PC that is running EAP Discover Utility in Branch Office
Run EAP discover utility, and fill in EAP/Omada controller’s IP address (192.168.1.253) and the Username/Password of the EAP (admin/admin by default). At last, click “Apply”.
Note: After EAP successfully adopted by EAP/Omada Controller, you don’t need EAP Discover Utility any more, thus you can remove the PC which is running the EAP discover utility from the network.
Step4. Run EAP Controller. The EAP will appear in EAP/Omada controller’s “pending” list, which means you can use EAP/Omada controller to adopt and manage this EAP now shown as below.
Buscar Más
¿Es útil este artículo?
Tus comentarios nos ayudan a mejorar esta web.
Selecciona qué describe mejor la información:
- Insatisfech@ con el producto
- El articulo es demasiado complicado
- Título es confusa o errónea
- No es la información que estaba buscando
- El artículo es poco claro
- Otro
Gracias
Agradecemos los comentarios.
Pulsa aquí para contactar con el soporte técnico de TP-Link.
Este sitio web utiliza cookies para mejorar la navegación por el sitio web, analizar las actividades en línea y ofrecer la mejor experiencia de usuario posible en nuestro sitio web. Puedes oponerte al uso de cookies en cualquier momento. Encontrarás más información en nuestra política de privacidad .
Cookies Básicas
Estas cookies son necesarias para el funcionamiento del sitio web y no pueden desactivarse en tu sistema.
TP-Link
SESSION, JSESSIONID, accepted_local_switcher, tp_privacy_base, tp_privacy_marketing, tp_smb-select-product_scence, tp_smb-select-product_scenceSimple, tp_smb-select-product_userChoice, tp_smb-select-product_userChoiceSimple, tp_smb-select-product_userInfo, tp_smb-select-product_userInfoSimple, tp_top-banner, tp_popup-bottom, tp_popup-center, tp_popup-right-middle, tp_popup-right-bottom, tp_productCategoryType
Youtube
id, VISITOR_INFO1_LIVE, LOGIN_INFO, SIDCC, SAPISID, APISID, SSID, SID, YSC, __Secure-1PSID, __Secure-1PAPISID, __Secure-1PSIDCC, __Secure-3PSID, __Secure-3PAPISID, __Secure-3PSIDCC, 1P_JAR, AEC, NID, OTZ
Zendesk
OptanonConsent, __cf_bm, __cfruid, _cfuvid, _help_center_session, _pendo___sg__.<container-id>, _pendo_meta.<container-id>, _pendo_visitorId.<container-id>, _zendesk_authenticated, _zendesk_cookie, _zendesk_session, _zendesk_shared_session, ajs_anonymous_id, cf_clearance
Cookies de Análisis y de Marketing
Las cookies de análisis nos permiten analizar tus actividades en nuestro sitio web con el fin de mejorar y adaptar la funcionalidad del mismo.
Las cookies de marketing pueden ser instaladas a través de nuestro sitio web por nuestros socios publicitarios con el fin de crear un perfil de tus intereses y mostrarte anuncios relevantes en otros sitios web.
Google Analytics & Google Tag Manager
_gid, _ga_<container-id>, _ga, _gat_gtag_<container-id>
Google Ads & DoubleClick
test_cookie, _gcl_au