Methods for Managing Omada EAPs Network
CHAPTERS
1. How to Select the Best Management Method for Your Needs
2. How to Manage EAPs with Different Management Methods
3. Appendix: A Quick Overview of EAP Management Method
|
|
This guide applies to: EAP110 / EAP115 / EAP225 / EAP245 / EAP320 / EAP330 / EAP115-Wall / EAP225-Wall / EAP110-Outdoor / EAP225-Outdoor |

As a stepping stone helping you get started in Omada EAPs, this article introduces how to choose an optimal management method in your situation, and the setup steps of each method.
1How to Select the Best Management Method for Your Needs
There are several essential considerations when looking for the optimal methods, from your network size to the management tools. This part helps you select the best management methods for your needs. For the detailed steps of each management method, refer to How to Manage EAPs with Different Management Methods.
1.1Choose the Management Mode According to Your Wireless Network Size
Omada EAPs support two configuration modes: Controller Mode and Standalone Mode.
The following comparison chart clarifies the notable features of the two modes.
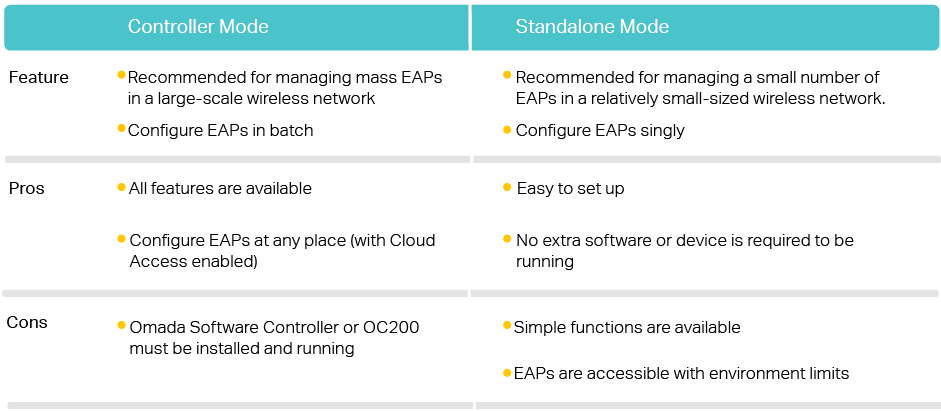
Controller Mode
Controller Mode is the preferred method for centrally managing mass EAPs in a large-scale wireless network. Controller Mode provides an all-in-one and super convenient solution for EAPs configurations and maintenance. You can use Controller Mode at any place. And you can view the AP devices, clients, statistics, insights, logs. And some advanced functions frequently used in large-scale network like customizing the facebook portal and monitoring the system topology on a map are only supported in Controller Mode.
In Controller Mode, all EAPs can be centrally configured and monitored via a software controller (Omada Software Controller) or a hardware controller (Omada Cloud Controller OC200). For how to determine the controller type, see here to get help.
Standalone Mode
Standalone Mode is designed for singly managing a small number of EAPs in a relatively small-sized wireless network. This mode is recommended for users who want to control their APs right away without taking the time to configure a controller, which can simplify the process.
In Standalone Mode, each EAP can be configured by the Omada app or the management web page. For detailed information about the configuration steps, see here to get help.
1.2Choose Software Controller or OC200 According to Your Budget and Needs
Tailored to your needs and budget, choose an Omada Software Controller or an Omada Cloud Controller (OC200) to configure your EAPs in Controller Mode.
The following comparison chart clarifies the notable features of Software Controller and OC200.

Software Controller
Omada Software Controller is a free management software for TP-Link EAP devices. With this software hosted on the computer of your network, you can configure EAPs in batches and conduct real-time monitoring of EAPs locally or remotely through Omada Cloud service.
Omada Software Controller is required to be running for the devices to use advanced functions like Voucher portal. So the downside is additional considerations and expense for the computer’s continuous work.
Cloud Controller (OC200)
The Omada Cloud Controller (OC200) and Omada Software Controller is essentially the same. OC200 is pre-installed with the Omada Software Controller 3.0.2 or above. You just need to pay for the OC200, then the built-in Omada Controller software is free to use, no license fee or extra cost required. With the small size as a mobile phone which does not take much space, OC200 is easy to deploy and install.
1.3Choose Omada App or a Web Browser According to Your Management Device
The suited management interface depends on what kind of management device you use.
Using a Web Browser
On a PC, you can use a web browser. Both Controller Mode and Standalone Mode support login with a web browser. In Controller Mode, the Mozilla Firefox, Google Chrome, Opera and Microsoft Internet are supported. We recommend that you use the latest version of browser to manage Omada Controller.
Using Omada App
On a mobile phone, you can use the Omada app. There are versions for iOS and Android, available for free on the App Store and Google Play. With Omada app, You can monitor your network or make quick configuration adjustments when you are on the go.
2How to Manage EAPs with Different Management Methods
2.1Manage Your EAP via Omada App in Standalone Mode
Follow the steps to set up your EAP via Omada app in Standalone Mode.
1)Launch the Apple App Store (iOS) or Google Play store (Android) and search “TP-Link Omada” or simply scan the QR code to download and install the app.

2)Connect your mobile device to the EAP by using the SSID of the EAP (the default SSID is printed on the label at the bottom of the EAP in the format of TP-Link 2.4GHz/5GHz_XXXXXX).
3)Launch the Omada app, tap Standalone APs and wait for the EAP device to be discovered. Tap on the EAP device appearing on the page. Set a new username and password for your login account of the EAP.
2.2Manage Your EAP via a Web Browser in Standalone Mode
Follow the steps to set up your EAPs via a web browser.
1)Connect wirelessly by using the SSID of the EAP (the default SSID is printed on the label at the bottom of the EAP in the format of TP-Link 2.4GHz/5GHz_XXXXXX).
2)Launch a web browser and enter http://tplinkeap.net in the address bar. Use admin for both Username and Password to log in.
3)Set up a new Username and Password for secure management purpose. Modify the wireless parameters and reconnect your wireless devices to the new wireless network.
2.3Manage Your EAP Using Software Controller in Controller Mode
Follow the steps to set up your EAPs using Software Controller.
1)On the PC with Windows OS or Linux OS, download the Omada Controller installation file from TP-Link official website.
2)Run the file and follow the wizard to install the Omada Controller.
3)Launch the Omada Controller and follow the step-by-step instructions to complete the Quick Setup. After the wizard is finished, a login screen will appear.
4)Enter the username and password you created and click Log in. Then you can further configure the Omada Controller.
2.4Manage Your EAP Using OC200 in Controller Mode
Follow the steps to set up your EAPs using OC200.
1)Deploy OC200 on your network and power on it. Make sure that your management device and OC200 are on the same subnet.
2)Check the DHCP server (typically a router) for OC200’s IP address.
3)Launch a web browser and type OC200’s IP address in the address bar, then press Enter (Windows) or Return (Mac).
4)Launch the OC200 and follow the step-by-step instructions to complete the configuration wizard.
2.5Manage Your EAP with Omada Cloud Service in Controller Mode
1)Enable Cloud Access on the controller software or OC200.
2)Make sure that your management device and the controller (the OC200 device or the host installed with Omada Controller software) can access the internet.
3)Launch a web browser and type https://omada.tplinkcloud.com in the address bar, then press Enter (Windows) or Return (Mac). Enter your TP-Link ID and password to log in.
4)The configurations between the Software Controller and OC200 is are slightly different.
For Software Controller, a list of Omada Software Controller that has been bound with your TP-Link ID will appear. Click Launch to visit the web management interface of your controller software.
For OC200, enter your TP-Link ID and password to log in. Then click Add Cloud Controller and follow the instructions to add your OC200. Click Launch to visit the web management interface of OC200.
2.6Manage Your EAP with Omada App in Controller Mode
First, you need to download Omada app on your mobile device from the the Apple App Store (iOS) or Google Play store (Android). Search “TP-Link Omada” or simply scan the QR code to download and install the app.

Local Access
For Software Controller, connect your mobile to the EAP by using the default SSID printed on the label of the EAP. Launch the app and go to Local Access, tap + button on the upper-right corner to add Omada controller.
For OC200, make sure that your management device and OC200 are on the same subnet. Launch the app and go to Local Access, tap + button on the upper-right corner to add OC200.
Remote Access
For Software Controller, make sure that Cloud Access is enabled on your controller and your controller has been bound with a TP-Link ID. Launch the app and log in with your TP-Link ID. Then go to Cloud Access. A list of Omada Controller that has been bound with your TP-Link ID will appear. Then you can further configure the controller.
For OC200, make sure that your management device and OC200 can access the internet. Launch the app and log in with your TP-Link ID. Tap the + button on the upper-right corner to add OC200. Select OC200 and follow the step-by-step instructions to complete the configuration wizard.
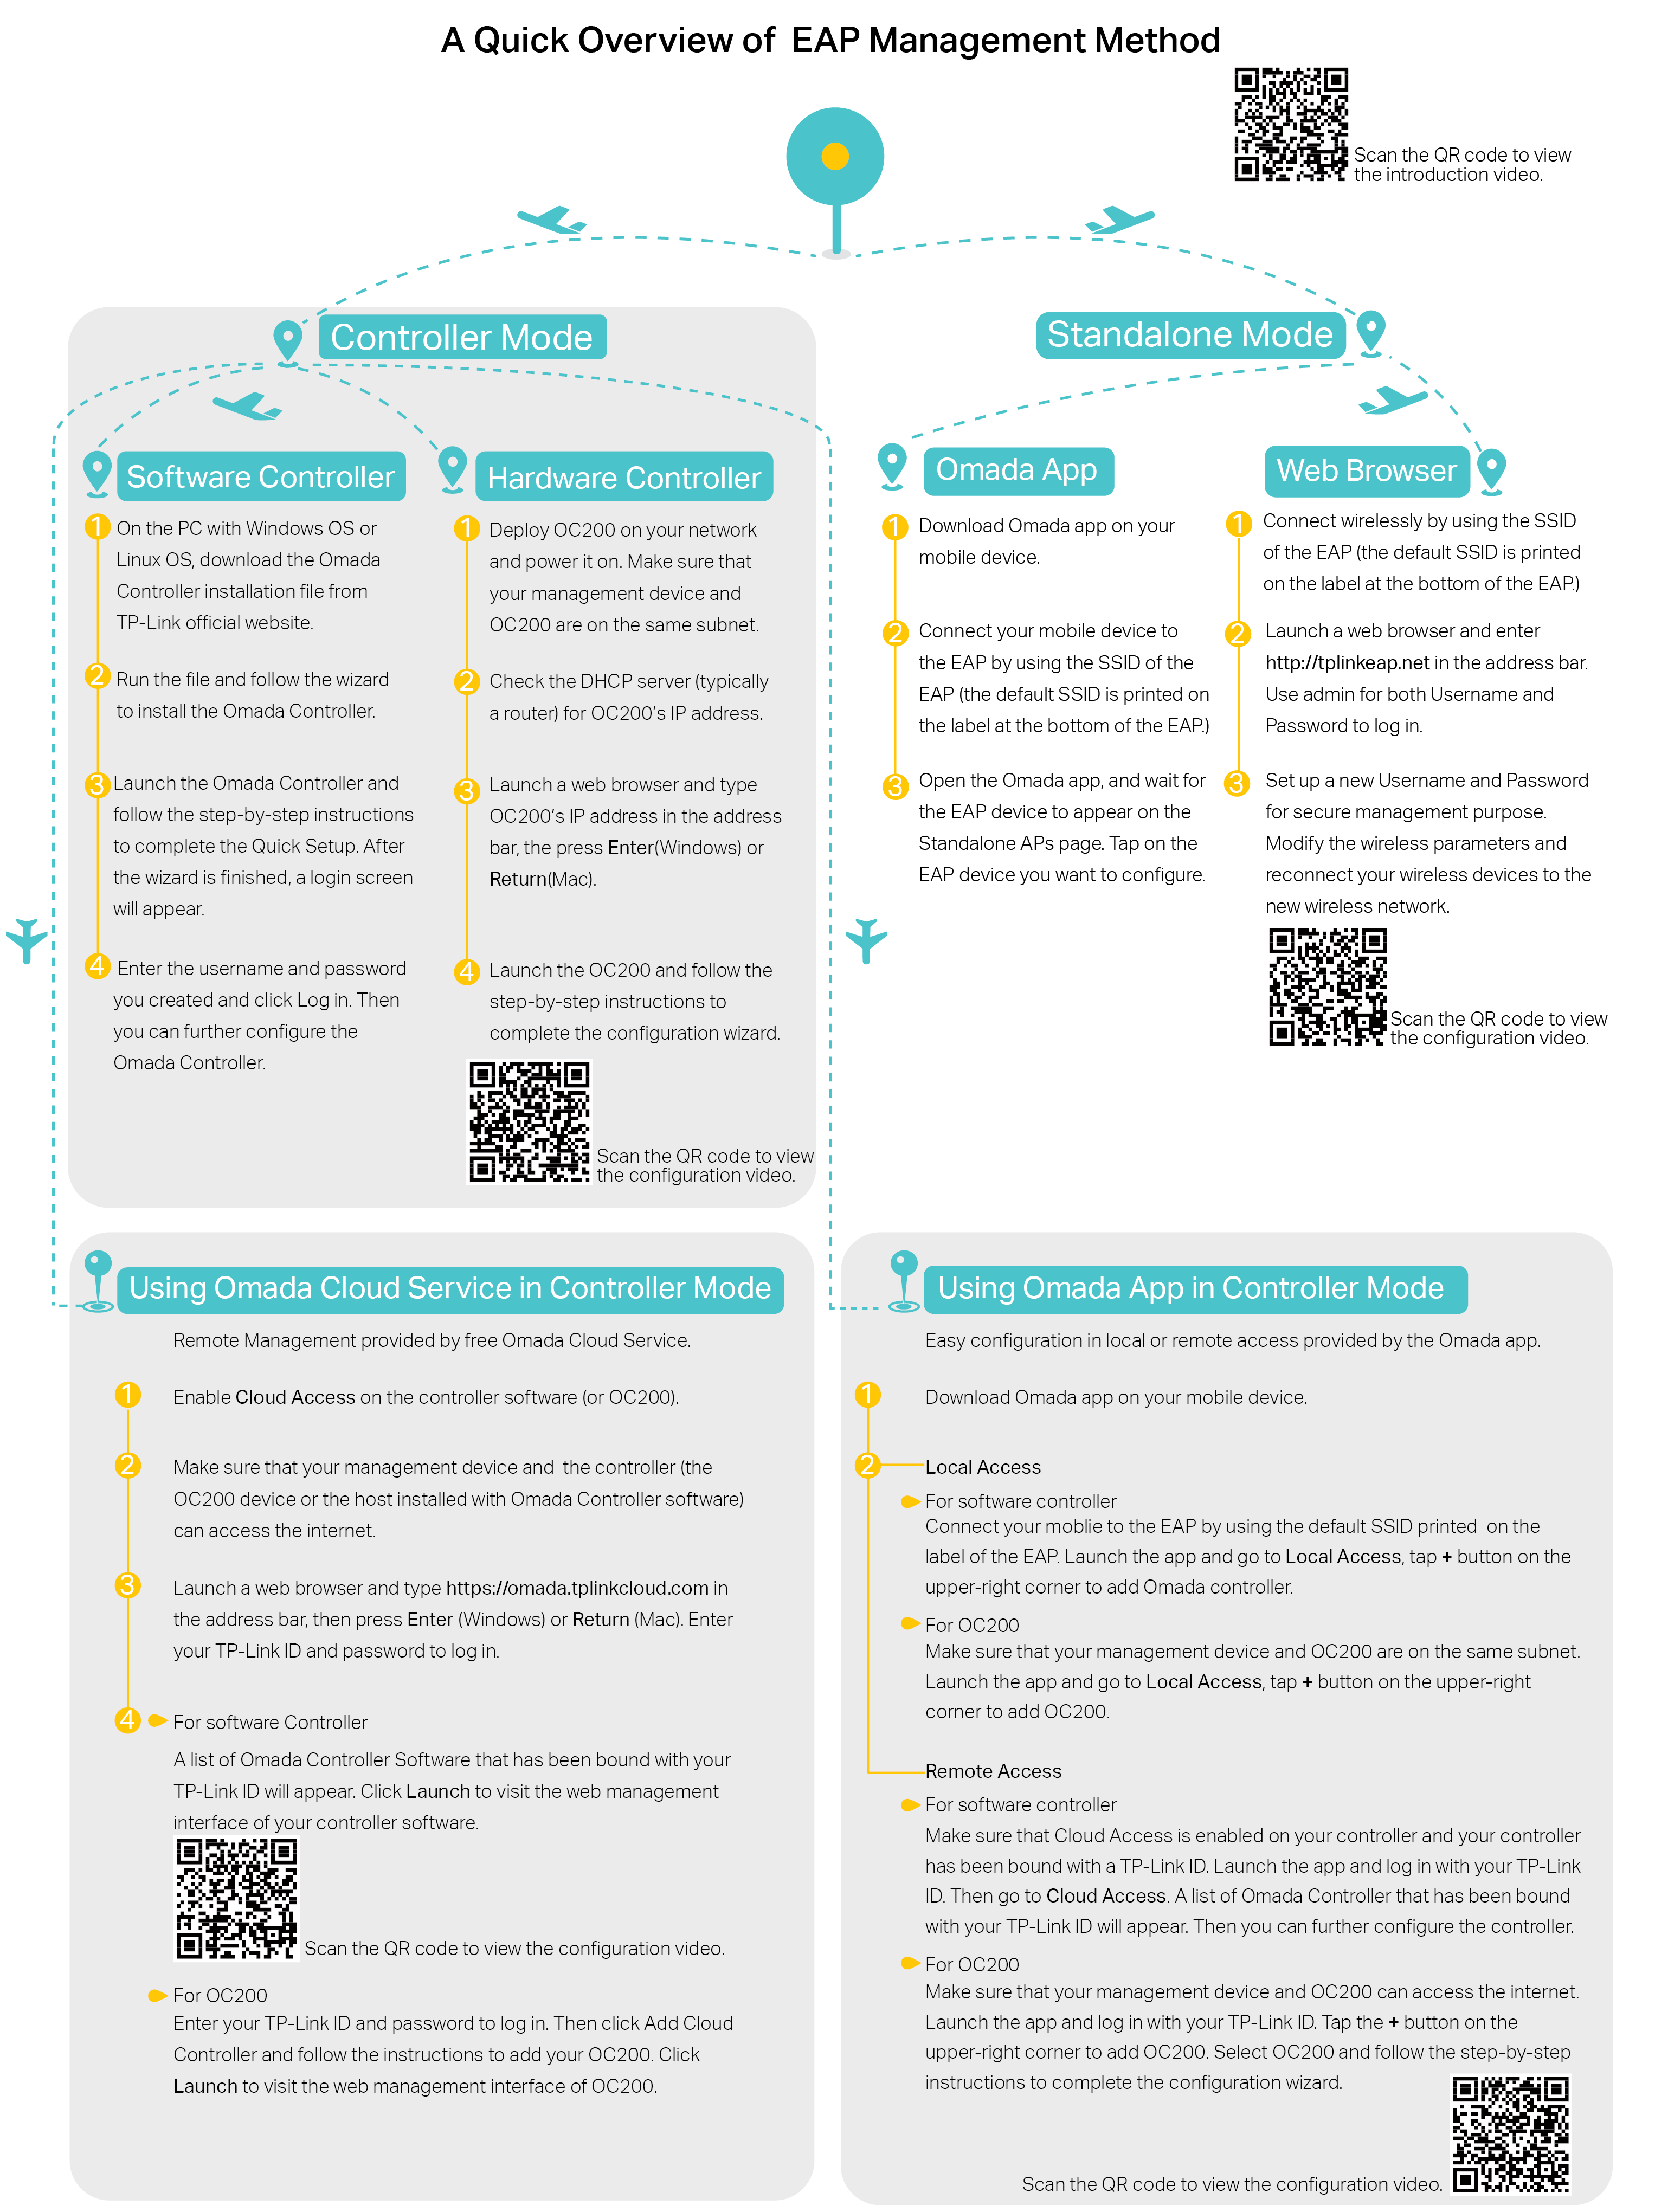
3Appendix: A Quick Overview of EAP Management Method
The following picture gives a quick overall information of the methods for managing Omada EAPs. You can scan the related QR code to open the corresponding configuration videos.
For more detailed introductions of the EAP and controller, you can visit https://www.tp-link.com/support to download the configuration guide in the download center. To ask questions, find answers, and communicate with TP-Link users or engineers, please visit https://community.tp-link.com to join TP-Link Community.