Managing the Omada Controller
CHAPTERS
1. Information About the Software
2. User Account
|
|
This guide applies to: Omada Controller 2.6.0. |

This guide mainly introduces how to manage the user account and configure system settings on Omada Controller. This guide includes the following contents:
Information About the Software
User Account
Controller Settings
1Information About the Software
You can view the Omada Controller’s version and copyright information on the About page.
Figure 1-1 The System Page

You can use different user account to log in to the Omada Controller. User has three roles: administrator, operator and observer. The administration authority varies among different roles.
|
Administrator |
The first administrator account is created in the Basic Configuration process and this account can not be deleted. An administrator can change the settings of the EAP network and create and delete user accounts. |
|
Operator |
An operator account can be created or deleted by the administrator. The operator can change the settings of the EAP network. |
|
Observer |
An observer account can be created or deleted by the administrator. The observer can only view the status and settings of the EAP network but not change the settings. |
Follow the steps below to add a user account.
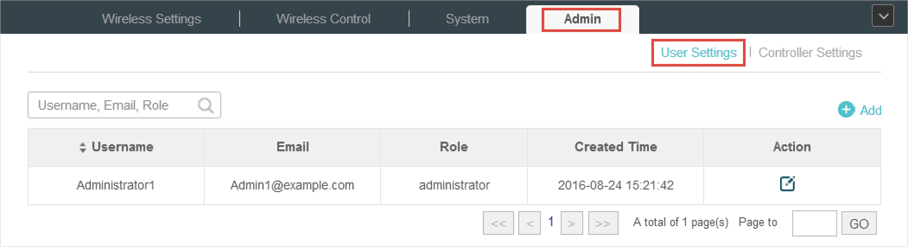
1)Go to Admin > User Settings.
Figure 2-1 User Settings
2)Click  and the following window will pop up.
Figure 2-2 Adding a User Account
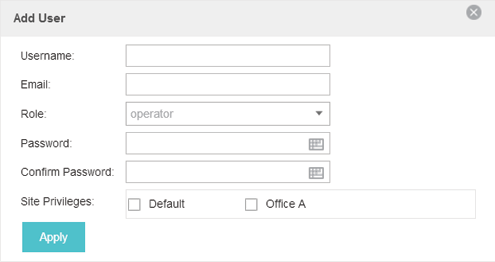
3)Specify the username, Email and password of the account.
4)Select the role from the drop-down list.
If you select operator or observer, you also need to select the Site Privileges.
If you select administrator, the Site Privileges option will not appear and all sites are available for the administrator user.
5)Click Apply to add the user account.
|
|
Note: You can refer to the Role page to view the user role’s type, description information, permission scope and created time. |

You can configure the Omada Controller’s hostname and IP address. In addition, we recommend you configure the Mail server to reset your login password when you forget it.
3.1Configure Controller Hostname/IP
Follow the steps below to configure the hostname or IP address of the Omada Controller.
1)Go to Admin > Controller Settings and click Omada Controller.
Figure 3-1 Controller Settings
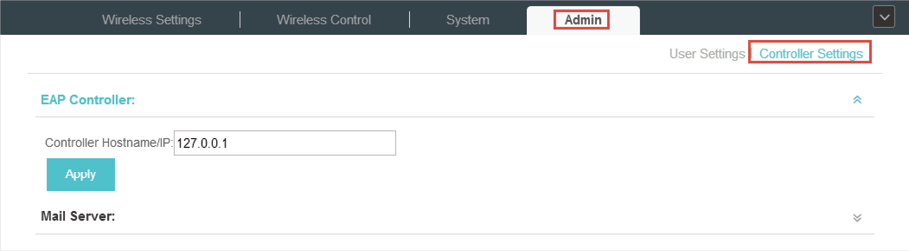
2)Enter the hostname or IP address of the Omada Controller.
3)Click Apply to save the configuration.
With the Mail Server, you can reset the password of the user account and receive notifications from the Omada Controller. It is different from the SMTP Server, which is just for the system log emails sending.
Follow the steps below to configure mail server.
1)Go to Admin > Controller Settings.
2)Click Mail Server, check the box to enable SMTP Server, and then the following screen will appear.
Figure 3-2 Mail Server
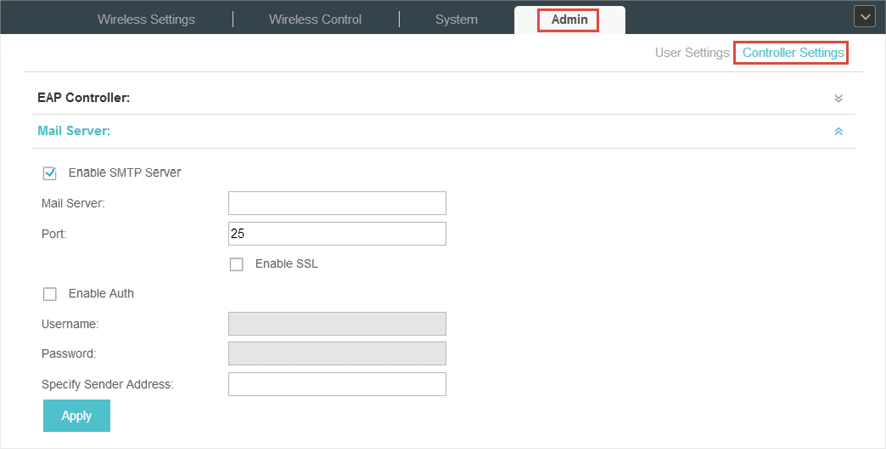
3)Configure the following parameters.
|
Mail Server |
Enter the IP address or domain of SMTP Server. |
|
Port |
The default is 25. You can enable SSL (Security Socket Layer) to enhance secure communications over the Internet. If SSL is enabled, the port number will automatically change to 465. |
|
Enable Auth |
Select this option to enable authentication. |
|
Username/Password |
If you enable authentication, enter the username and password required by the mail server. |
|
Specify Sender Address |
Specify the sender's mail address. Enter the email address that will appear as the sender of the warning email. |
4)Click Apply to save the configuration.
|
|
Note: Specify the account email address based on the Mail server to receive the notifications. |