Managing System (Standalone EAP)
CHAPTERS
4. Backup and Restore the Configuration
|
|
This guide applies to: EAP225-Outdoor 1.0, EAP110-Outdoor 3.0, EAP110 4.0, EAP115 4.0, EAP115-Wall 1.0, EAP225-Wall 2.0, EAP225 3.0, EAP245 3.0, EAP320 2.0, EAP330 2.0. |

This guide introduces how to manage the system of your EAP, including:
Configure the User Account
Configure the System Time
Reboot and Reset the EAP
Backup and Restore the Configuration
Update the Firmware
Every EAP device has a user account, which is used to log in to the management page of the EAP. When you start the EAP at the first time, the username and password of the user account are both admin. After the first login, the system will require you to set a new username and a new password for the user account. And then you can use the new user account to log in to the EAP. Also, you can change your user account as needed.
|
|
Tips Please remember your user account well. If you forget it, reset the EAP to the factory defaults and log in with the default user account (username and password are both admin). |

To configure the user account, go to System > User Account page.
Figure 1-1 User Account Page
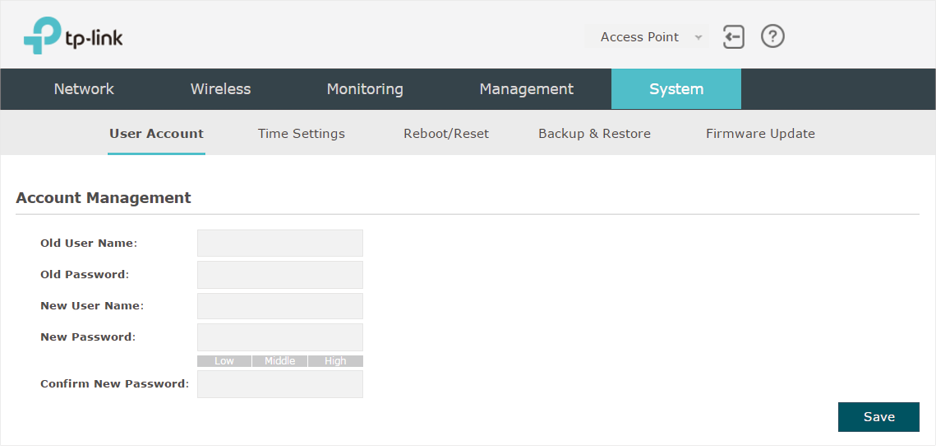
Follow the steps below to change your user account on this page:
1)Enter the old username and old password of your user account.
2)Specify a new username and a new password for your user account. The system will automatically detect the strength of your entered password. For security, we recommend that you set a password with high strength.
3)Retype the new password.
4)Click Save.
System time is the standard time for Scheduler and other time-based functions. The EAP supports the basic system time settings and the Daylight Saving Time (DST) feature.
To configure the system time, go to the System > Time Settings page.
Figure 2-1 Time Settings Page
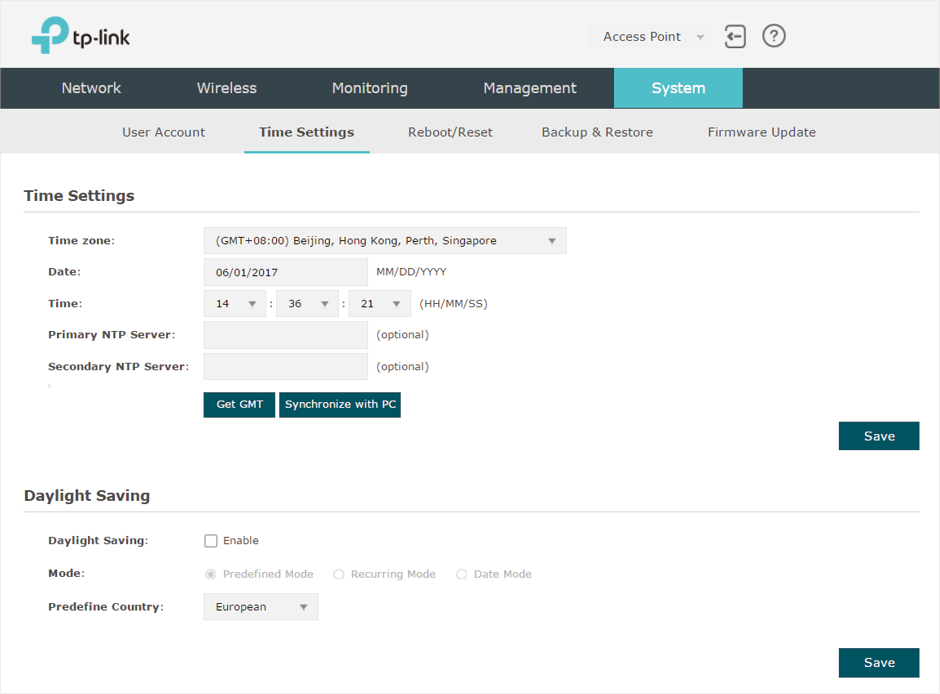
The following two sections introduce how to configure the basic system time settings and the Daylight Saving Time feature.
2.1Configure the System Time
In the Time Settings section, you can configure the system time. There are three methods to set the system time: Set the System Time Manually, Acquire the System Time From an NTP Server, and Synchronize the System Time with PC’s Clock.
Figure 2-2 Configuring Time Settings
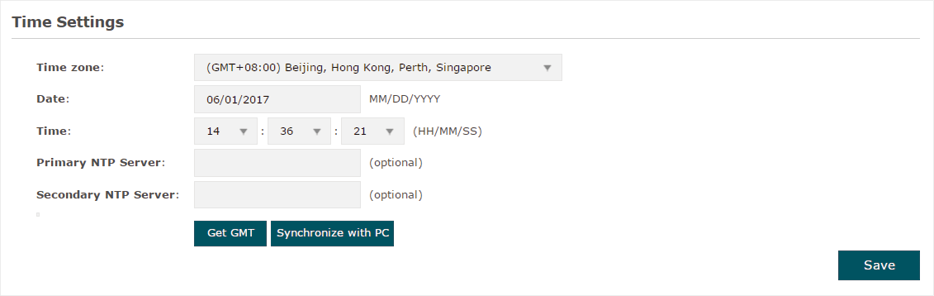
Determine the way of setting the system time and follow the steps below to complete the configurations:
To set the system time manually, follow the steps below:
1)Configure the following three options on the page: Time Zone, Date and Time.
|
Time Zone |
Select your time zone from the drop-down list. Here GMT means Greenwich Mean Time. |
|
Date |
Specify the current date in the format MM/DD/YYYY. MM means month, DD means day and YYYY means year. For example: 06/01/2017. |
|
Time |
Specify the current time in the format HH/MM/SS. HH means hour, MM means minute and SS means second. It uses 24-hour system time. For example: 14:36:21. |
2)Click Save.
|
|
Tips The system time set manually will be lost after the EAP is rebooted. |
Acquire the System Time From an NTP Server
To get the system time from an NTP server, follow the steps below:
1)Build an NTP server on your network and make sure that it is reachable by the EAP. Or you can simply find an NTP server on the internet and get its IP address.
|
|
Tips If you use an NTP server on the internet, make sure that the gateway address is set correctly on the EAP. Otherwise, the EAP cannot get the system time from the NTP server successfully. |
2)Specify the NTP server for the EAP. If you have two NTP servers, you can set one of them as the primary NTP server, and the other as the secondary NTP server. Once the primary NTP server is down, the EAP can get the system time from the secondary NTP server.
|
Primary NTP Server |
Enter the IP address of the primary NTP server. Note: If you have only one NTP server on your network, enter the IP address of the NTP server in this field. |
|
Secondary NTP Server |
Enter the IP address of the secondary NTP server. |
3)Click the button  and the acquired system time will be displayed in the Date and Time fields.
4)Click Save.
Synchronize the System Time with PC’s Clock
To synchronize the system time with the clock of your currently logged-in host, follow the steps below:
1)Click the button  and the synchronized system time will be displayed in the Date and Time fields.
2)Click Save.
|
|
Tips The system time synchronized with PC’s clock will be lost after the EAP is rebooted. |
2.2Configure Daylight Saving Time
Daylight saving time is the practice of advancing clocks during summer months so that evening daylight lasts longer, while sacrificing normal sunrise times. The EAP provides daylight saving time configuration.
Figure 2-3 Configuring Daylight Saving

Follow the steps below to configure daylight saving time:
1)Check the box to enable Daylight Saving.
2)Select the mode of daylight saving time. Three modes are available: Predefined Mode, Recurring Mode and Date Mode.
3)Configure the related parameters of the selected mode.
Predefined Mode
If you select Predefined Mode, choose your region from the drop-down list and the EAP will use the predefined daylight saving time of the selected region.
Figure 2-4 Predefined Mode

There are four regions provided: USA, European, Austrilia and New Zealand. The following table introduces the predefined daylight saving time of each region.
|
USA |
From 2: 00 a.m. on the Second Sunday in March to 2:00 a.m. on the First Sunday in November. |
|
European |
From 1: 00 a.m. on the Last Sunday in March to 1:00 a.m. on the Last Sunday in October. |
|
Australia |
From 2:00 a.m. on the First Sunday in October to 3:00 a.m. on the First Sunday in April. |
|
New Zealand |
From 2: 00 a.m. on the Last Sunday in September to 3:00 a.m. on the First Sunday in April. |
Recurring Mode
If you select Recurring Mode, manually specify a cycle time range for the daylight saving time of the EAP. This configuration will be used every year.
Figure 2-5 Recurring Mode
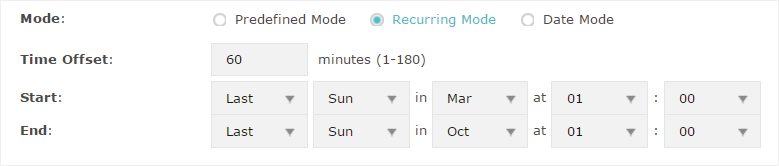
The following table introduces how to configure the cycle time range.
|
Time Offset |
Specify the time to set the clock forward by. |
|
Start |
Specify the start time of daylight saving time. The interval between the start time and end time should be more than 1 day and less than 1 year (365 days). |
|
End |
Specify the end time of daylight saving time. The interval between the start time and end time should be more than 1 day and less than 1 year (365 days). |
Date Mode
If you select Date Mode, manually specify an absolute time range for the daylight saving time of the EAP. This configuration will be used only once.
Figure 2-6 Date Mode
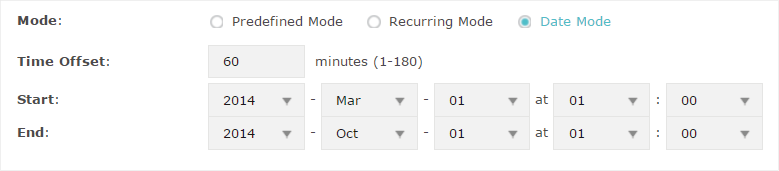
The following table introduces how to configure the absolute time range.
|
Time Offset |
Specify the time to set the clock forward by. |
|
Start |
Specify the start time of daylight saving time. The interval between the start time and end time should be more than 1 day and less than 1 year (365 days). |
|
End |
Specify the end time of daylight saving time. The interval between the start time and end time should be more than 1 day and less than 1 year (365 days). |
4)Click Save.
You can reboot and reset the EAP according to your need.
To reboot and reset the EAP, go to the System > Reboot&Reset page.
Figure 3-1 Reboot&Reset Page
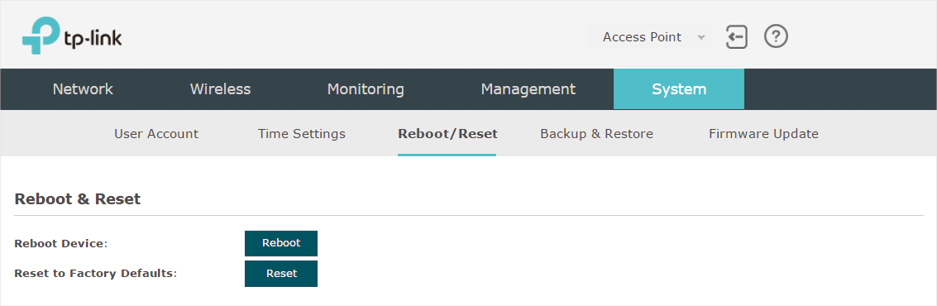
To reboot the EAP, click the  button , and the EAP will be rebooted automatically. Please wait without any operation.
To reset the EAP, click the  button , and the EAP will be reset to the factory defaults automatically. Please wait without any operation.
|
|
Tips After reset, all the current configuration of the EAP will be lost. We recommend that you check whether you have any configuration that needs to be backed up before resetting the EAP. |
4Backup and Restore the Configuration
You can save the current configuration of the EAP as a backup file and save the file to your host. And if needed, you can use the backup file to restore the configuration. We recommend that you backup the configuration before resetting or upgrading the EAP.
To backup and restore the configuration, go to the System > Backup&Restore page.
Figure 4-1 Backup&Restore Page
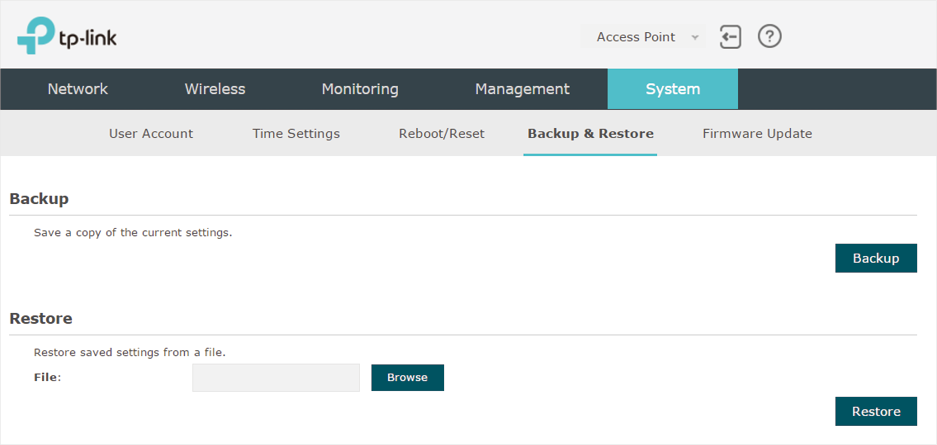
To backup the configuration, click the button  in the Backup section, and the backup file will be saved to the host automatically.
To restore the configuration, click the button  in the Restore section and choose the backup file from the host. Then click the button
  to restore the configuration.
We occasionally provide the firmware update files for the EAP products on our official website. To get new functions of the EAP, you can check our official website and download the update files to update the firmware of your EAP.
To update the firmware, go to the System > Firmware Update page.
Figure 5-1 Firmware Update Page
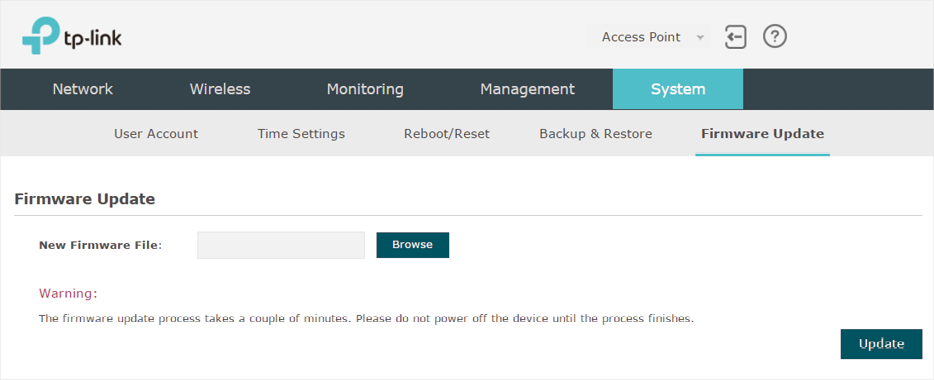
Follow the steps below to update the firmware of your EAP:
1)Go to the official website and search your EAP model. Download the proper firmware file on the support page of the EAP.
2)Click the button  , locate and choose the correct firmware file from your host.
3)Click the button  to update the firmware of the EAP. After updated, the EAP will be rebooted automatically.
|
|
Tips The update process takes several minutes. To avoid damage to the EAP, please wait without any operation until the update is finished. |