Managing EAPs Via EAP Controller
CHAPTERS
|
|
This guide applies to: EAP Controller. |

The EAP provides specialized functions for maintenance and management. Users can centrally monitor and manage the EAPs via EAP Controller’s management interface. The EAP Controller is a management software for TP-Link EAP devices. The free EAP Controller software allows users to manage hundreds of EAPs not only when they are in the same network segment but also in different network segments.
Configuration procedures differ depending on the network topology. This guide introduces how to manage EAPs via EAP Controller in various scenarios.
The application overview is as follows:
Managing EAPs in the Same Subnet
Managing EAPs in Different Subnets
»Managing EAPs at the Same Site
»Using Discovery Utility to Discover EAPs
»Using DHCP Option 138 to Discover EAPs
»Managing EAPs at Different Sites
»Using Discovery Utility to Discover EAPs via VPN Tunnel
»Using DHCP Option 138 to Discover EAPs via VPN Tunnel
»Using Discovery Utility to Discover EAPs via NAT Port Forwarding
»Using DHCP Option 138 to Discover EAPs via NAT Port Forwarding
Configuration Guideline:
Please ensure that EAP Controller is in the white list of Windows built-in firewall or a third-party antivirus/firewall. Generally, the EAP Controller will be automatically added into the white list of Windows built-in firewall, while for other operating systems or third-party antivirus/firewall, it may need a manual step.
Please ensure that ports 8043, 8088, 29810, 29811, 29812 and 29813 are accessible on the host where EAP Controller is installed. That is, these ports should not be occupied by other applications.
2.1Managing EAPs in the Same Subnet
Before configuring EAP Controller to centrally manage the EAPs, confirm whether EAPs and EAP Controller are in same network segment or not.
In the following network topology, the EAP Controller and EAPs are in the same subnet. A router functions as a DHCP server to assign IP addresses to EAPs and clients. The EAP Controller should be installed on one host, known as Controller Host.
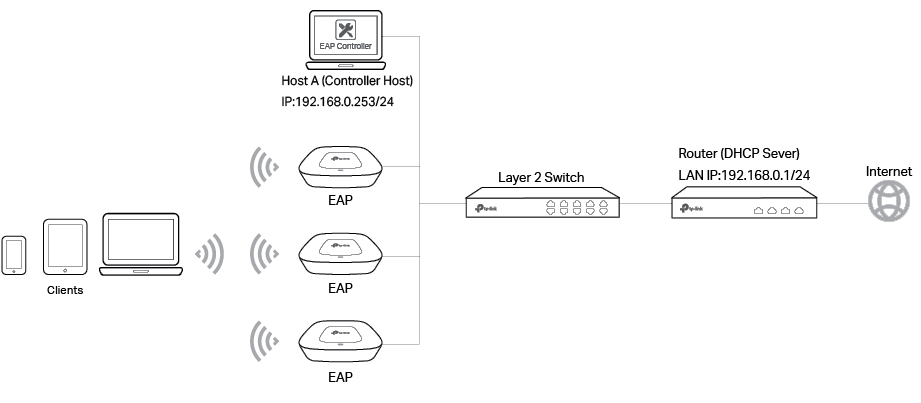
To ensure that all EAPs are adopted, follow the steps below:
1)Launch EAP Controller to load the login page, enter the username and password which are set in the installation of EAP Controller and click Sign In.

2)The EAP Controller and EAPs are in the same subnet, thus once the EAP is powered on, it can be discovered by EAP Controller automatically. The EAP Controller will automatically adopt the EAP using the default username and password (both are admin).
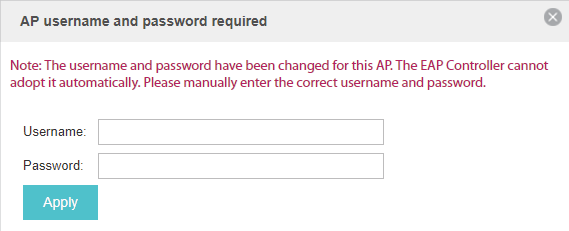
3)If the Retry button shows in the Action column, it means that the username and password of the EAP have been changed.

You should enter the current username and password of the EAP.
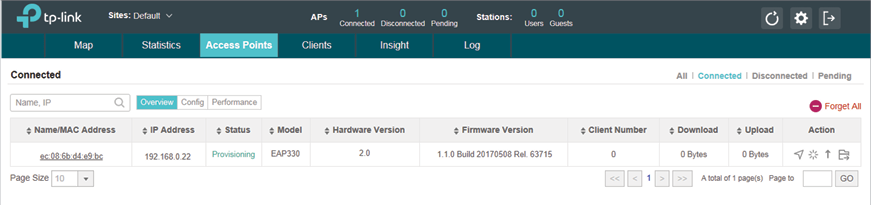
After successful adoption, the EAP will be displayed in the Connected list.
2.2Managing EAPs in Different Subnets
When EAP Controller and EAPs are in different subnets, the problem is how the EAPs find EAP Controller. There are two solutions:
Running EAP Discovery Utility on a host which is in the same network segment with the EAPs to help the EAPs find the Controller Host.
Configure DHCP option 138 on a DHCP server which supports DHCP option 138 feature, thus the DHCP server will tell the EAPs where EAP Controller is.
The EAP Controller can manage multiple EAP networks, which are called sites. Generally multiple sites are logically separated and located in different physical places. The following section will introduce how to manage EAPs when they are at the same site and different subnets.
2.2.1Managing EAPs at the Same Site
Using Discovery Utility to Discover EAPs
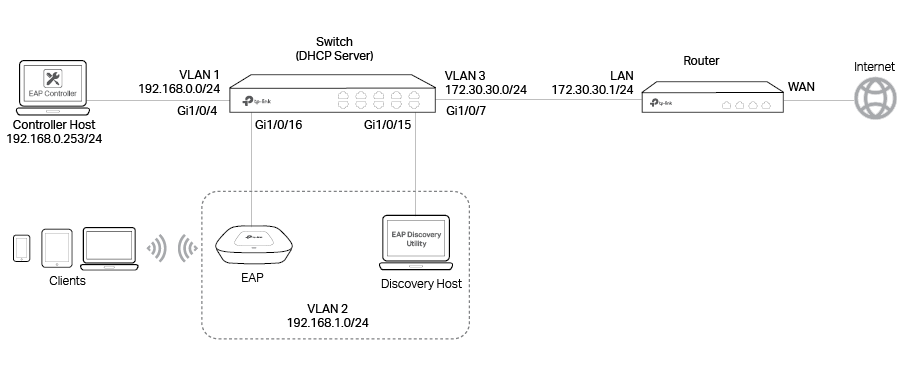
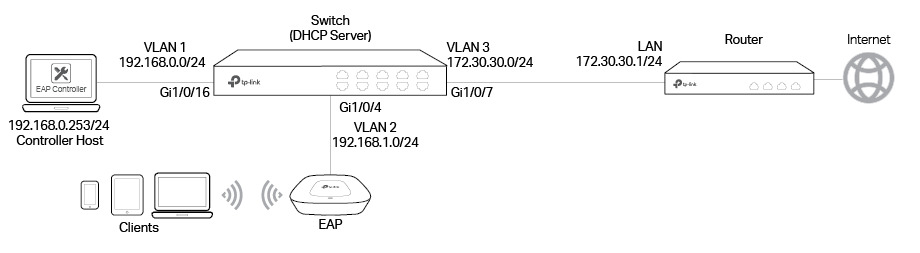
Demonstrated with the network topology below, this section provides configuration procedures for managing EAPs in different subnets at the same site with EAP Discovery Utility.
There are three VLANs (three subnets), which are VLAN1 (192.168.0.0/24), VLAN2 (192.168.1.0/24) and VLAN3 (172.30.30.0/24). The three VLANs are divided by switch T2600G-28TS. Now we want the EAP Controller in VLAN1 to manage the EAP in VLAN2. The computer that is running EAP Discovery Utility and the EAP to be managed should be in the same VLAN. The gateway router is TP-Link router TL-ER6120.
Step 1: Configurations on Switch
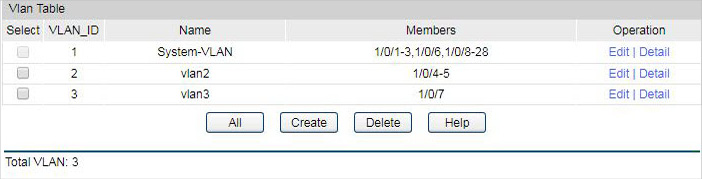
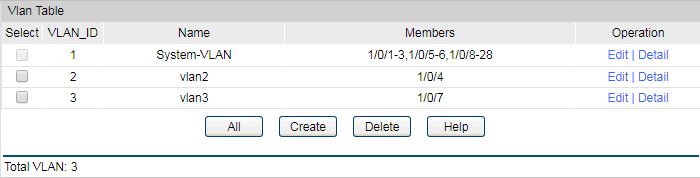
1)Go to VLAN > 802.1Q VLAN > VLAN Config to create VLAN2 and VLAN3. VLAN2 includes port4 and port5. VLAN3 includes port7. The detailed VLAN settings are shown as below.
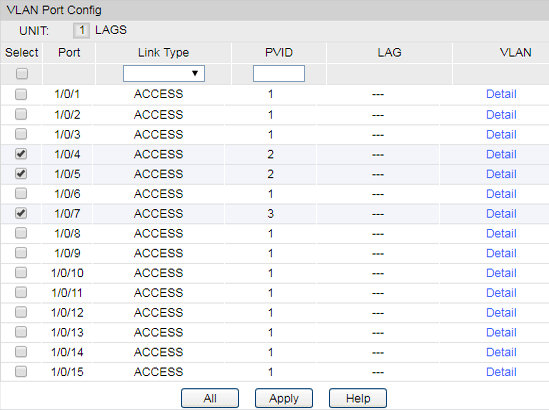
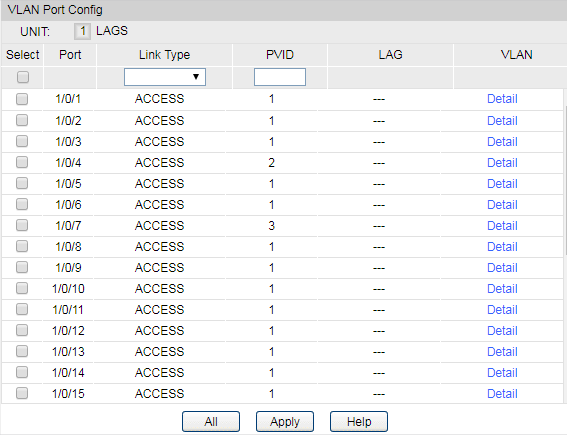
2)Go to VLAN > 802.1Q VLAN > Port Config to make sure that port 4, 5, 7 and 16 have been configured as “Access“ type ports. Make sure that the PVID of port4 and 5 have been configured as 2, and the PVID of port7 has been configured as 3.
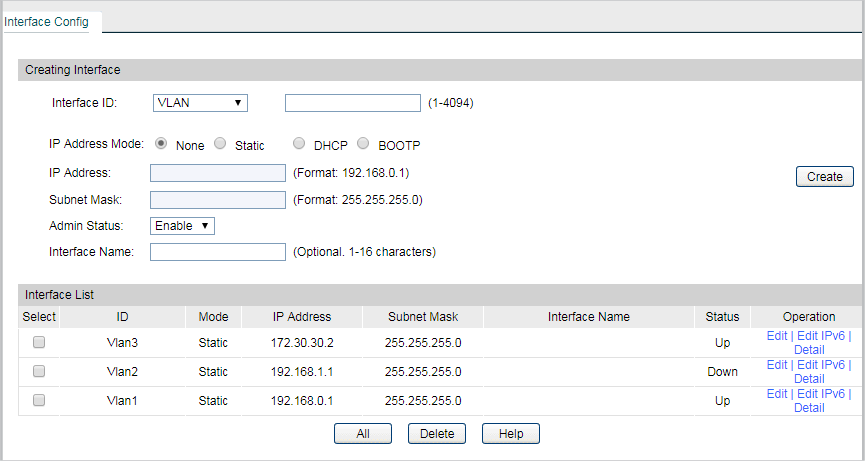
3)Go to Routing > Interface to enter the IP interface for VLAN1,VLAN2 and VLAN3, and configure relevant IP addresses for these three interfaces as shown below.
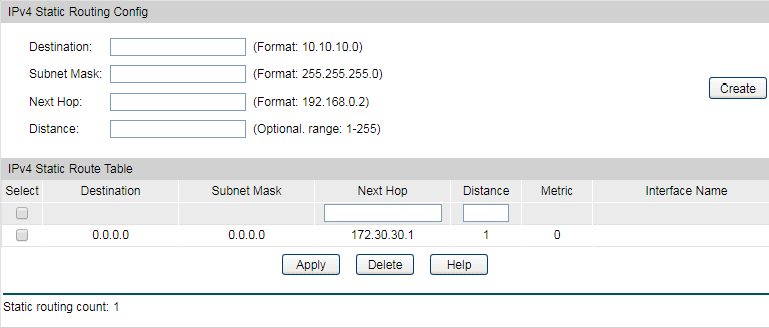
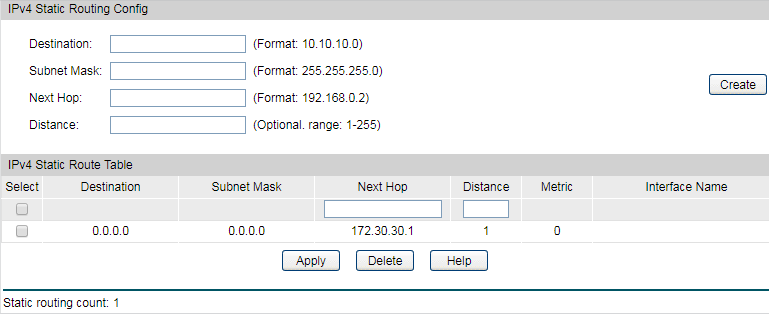
4)Go to Routing > Static Routing > IPv4 Static Routing Config to configure the static default routing entry which leads to the gateway router.
5)Go to Routing > DHCP Server > Global Config to enable DHCP Server function.
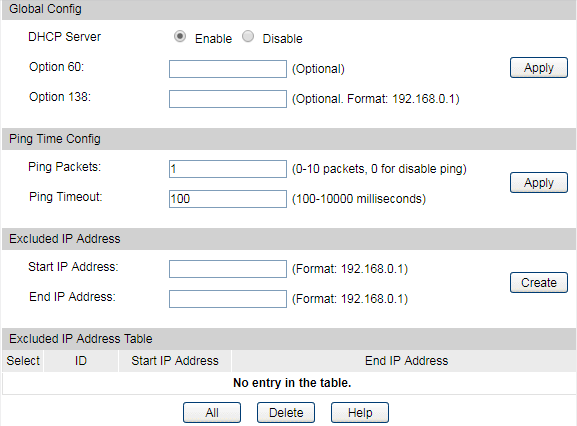
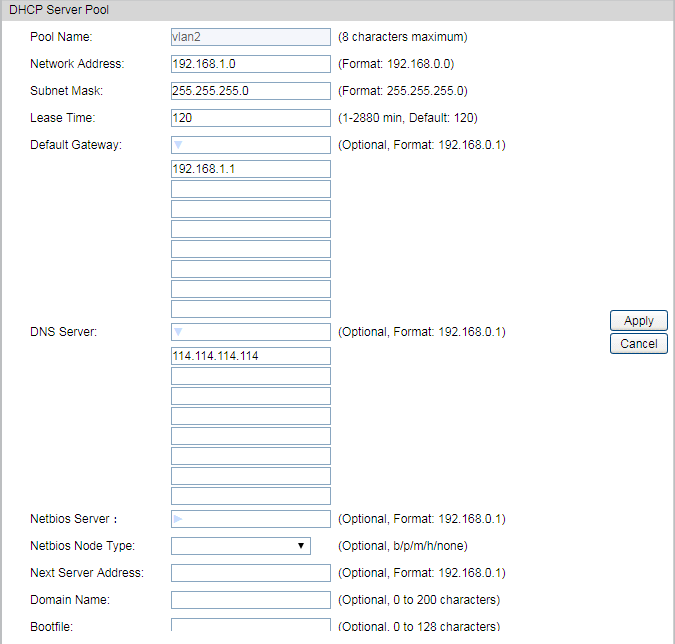
6)Go to Routing > DHCP Server > Pool Setting to configure 192.168.1.0/24 IP address pool for EAPs.
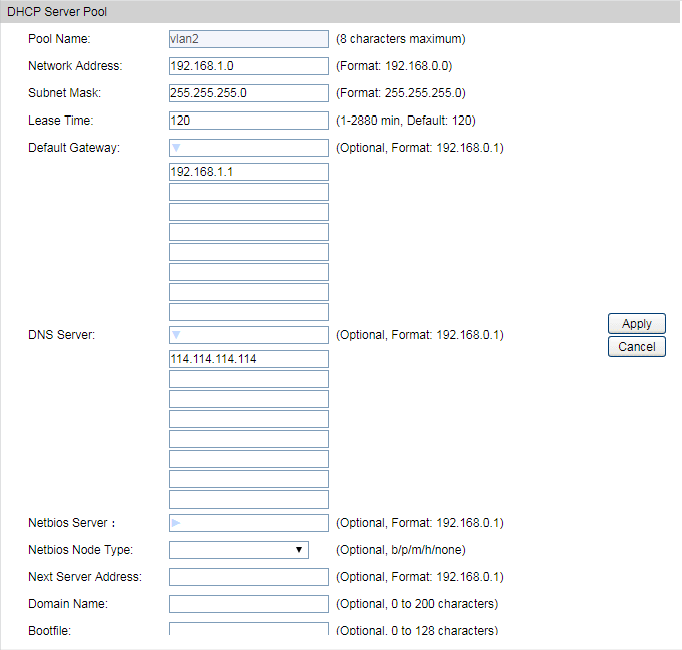
|
|
Note: Do not forget to fill in the default gateway address and DNS server address. |

Step 2: Configurations on the Router
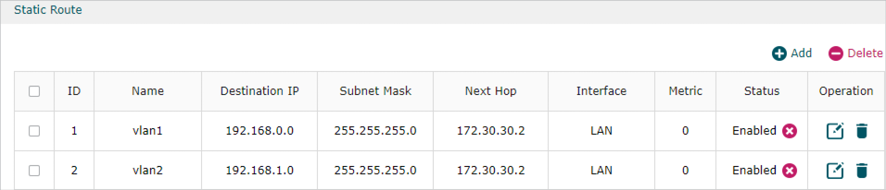
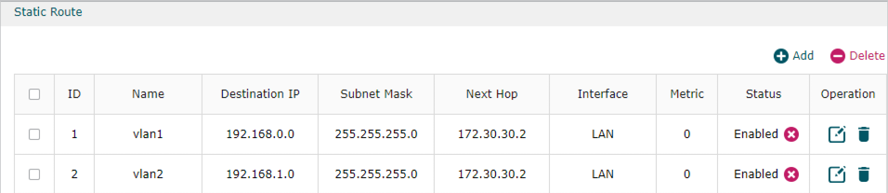
1)Go to Transmission > Static Route to add Static Routing for VLAN1 and VLAN 2 subnets.
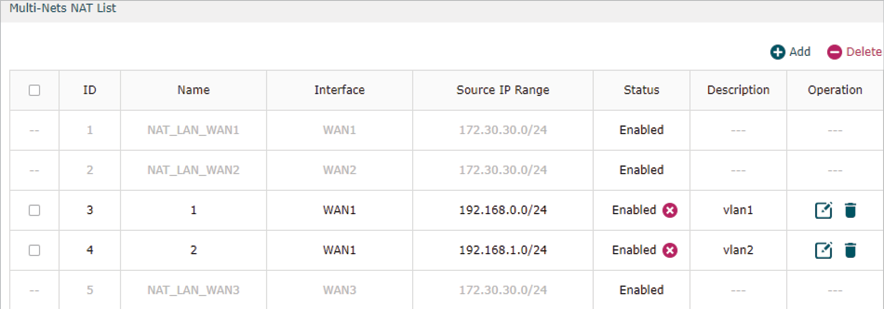
2)Go to Transmission >NAT > Multi-NAT to configure multi-nets NAT for subnets 192.168.0.0/24 and 192.168.1.0/24.
Step 3: Configurations on EAP Discovery Host
1)Connect the computer that is running EAP Discovery Utility to port5 of the switch, and connect the EAP to port4. In this way, both EAP Discovery Utility and EAP are in the same subnet (192.168.1.0/24). Then open EAP Discovery Utility to let it discover the EAP as shown below.
.png)
2)After EAP Discovery Utility has found the EAP, click Manage, then fill in the IP address of Controller host and the Username/Password of the EAP (admin/admin by default) so EAP Controller can manage this EAP.
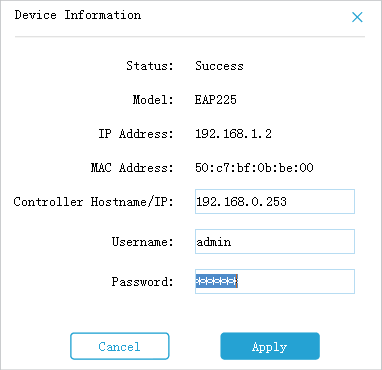
|
|
Note: After the EAP has been successfully adopted by EAP Controller, you no longer need EAP Discovery Utility. Thus, you can remove the computer that’s running EAP Discovery Utility from the network. |

Step 4: Adopt and Manage EAP
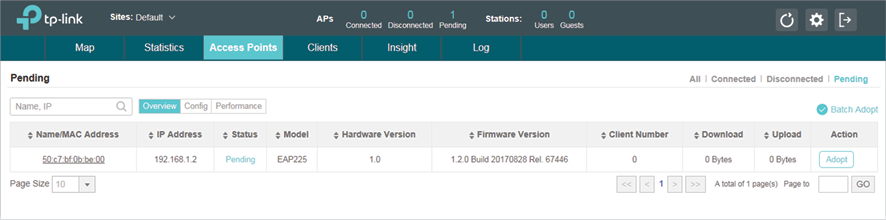
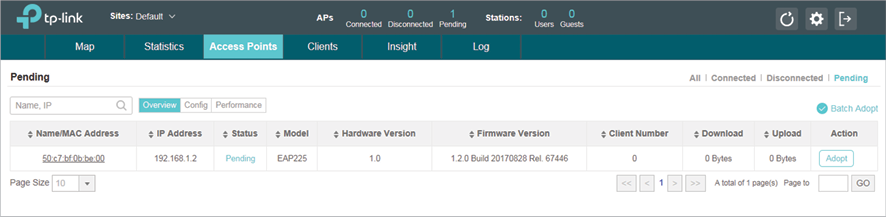
1)Run EAP Controller. The EAP which has been configured by EAP Discovery Utility in the last step will appear in the Pending list as shown below, which means the EAP can be adopted and managed by EAP Controller.
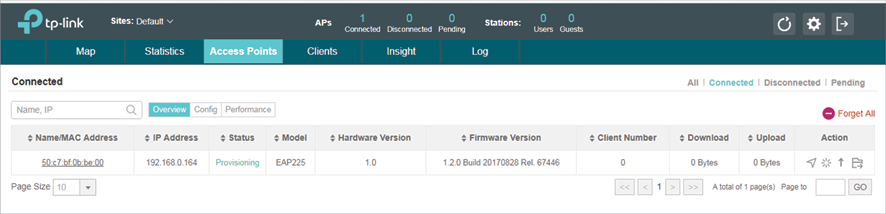
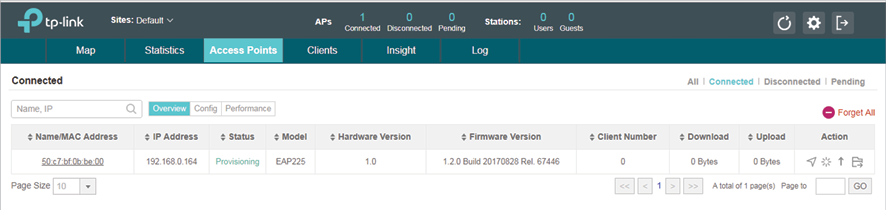
2)The EAP Controller will automatically adopt the EAP using the default username and password (both are admin). If the Retry button appears in the Action column, it means that the username and password of the EAP have been changed. You should enter the current username and password of the EAP. If the EAP appears in the Connected list as shown below, it means the EAP has been adopted and can be managed by EAP Controller.
Using DHCP Option 138 to Discover EAPs
Demonstrated with the network topology below, this section provides configuration procedures for managing EAPs in different subnets at the same site with DHCP option 138. There are three VLANs (three subnets), which are VLAN1 (192.168.0.0/24), VLAN2 (192.168.1.0/24) and VLAN3 (172.30.30.0/24). The three VLANs (three subnets) are divided by switch T2600G-28TS. Now we want the EAP Controller in VLAN1 to manage the EAP in VLAN2. The gateway router is TP-Link SMB router TL-ER6120.
Step 1: Configurations on Switch
1)Go to VLAN > 802.1Q VLAN > VLAN Config to create VLAN2 and VLAN3. VLAN2 includes port4. VLAN3 includes port7. The detailed VLAN settings are shown as below.
2)Go to VLAN > 802.1Q VLAN > Port Config to make sure that port 4, 7 and 16 have been configured as “Access“ type ports. Make sure that the PVID of port4 and 5 has been configured as 2, the PVID of port7 has been configured as 3.
3)Go to Routing > Interface to enter the IP interface for VLAN1,VLAN2 and VLAN3, and configure relevant IP addresses for these three interfaces as shown below.

4)Go to Routing > Static Routing > IPv4 Static Routing Config to configure the static default routing entry which leads to the gateway router.
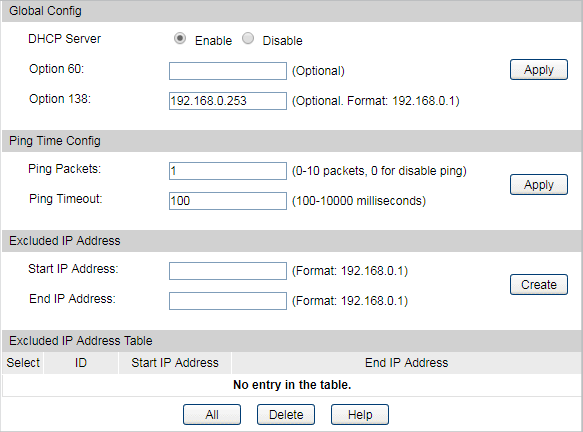
5)Go to Routing > DHCP Server to enable DHCP Server function. For Option138, you should fill in the IP address of the Controller Host which is “192.168.0.253”. The DHCP Server will then tell the EAPs where EAP Controller is, so that EAP Controller and EAPs can communicate with each other among different subnets.
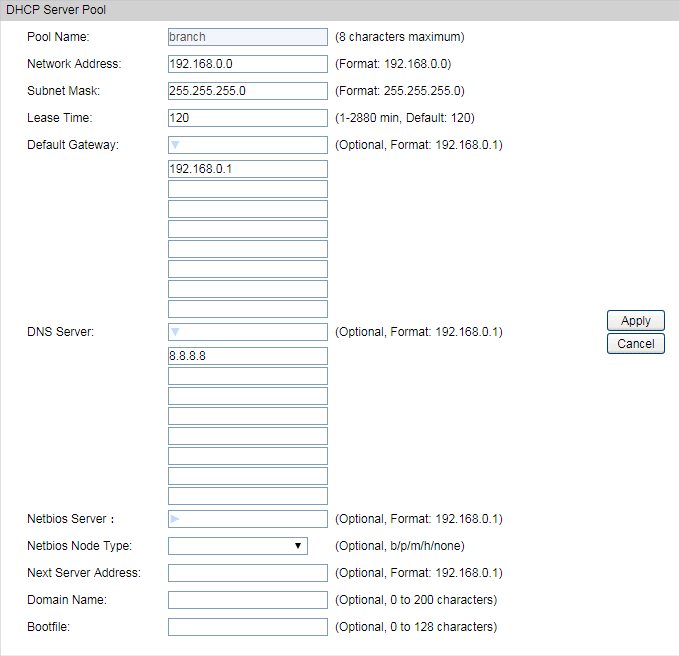
6)Go to Routing > DHCP Server > Pool Setting to configure 192.168.1.0/24 IP address pool for EAPs.
|
|
Note: Do not forget to fill in the default gateway address and DNS server address. |

Step 2: Configurations on the Router
1)Go to Transmission > Static Route to add Static Routing for VLAN1 and VLAN2 subnets.
2)Go to Transmission >NAT > Multi-NAT to configure multi-nets NAT for 192.168.0.0/24 and 192.168.1.0/24 subnets.

Step 3: Adopt and Manage EAP
1)Run EAP Controller. The EAP which has DHCP option 138 configured from the last step will appear in the Pending list as shown below, which means the EAP can be adopted and managed by EAP Controller.
2)The EAP Controller will automatically adopt the EAP using the default username and password (both are admin). If the Retry button appears in the Action column, it means that the username and password of the EAP have been changed. You should enter the current username and password of the EAP. If the EAP appears in the Connected list as shown below, it means the EAP has been adopted and can be managed by EAP Controller.
2.2.2Managing EAPs at Different Sites
When the devices are at different sites, we will manage EAPs using EAP Controller across the internet. In this case, there are two ways to achieve remote management:
Create a VPN connection between the local and remote networks by site to site IPsec VPN.
Transmit traffic between the inside and outside networks by NAT Port Forwarding.
The two remote communication methods can achieve the purpose of managing EAP via EAP Discovery Utility or DHCP option138 respectively with EAP Controller. The section will give the detailed configuration steps in different cases.
Using Discovery Utility to Discover EAPs via VPN Tunnel
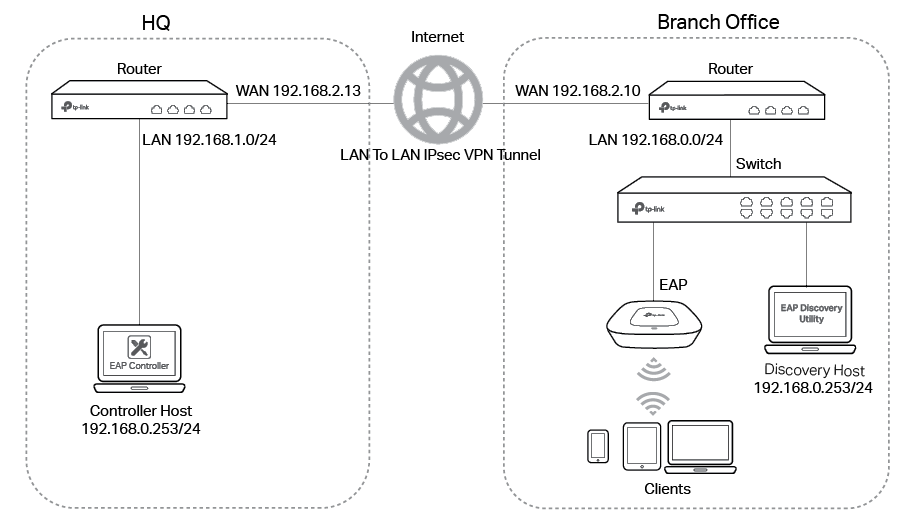
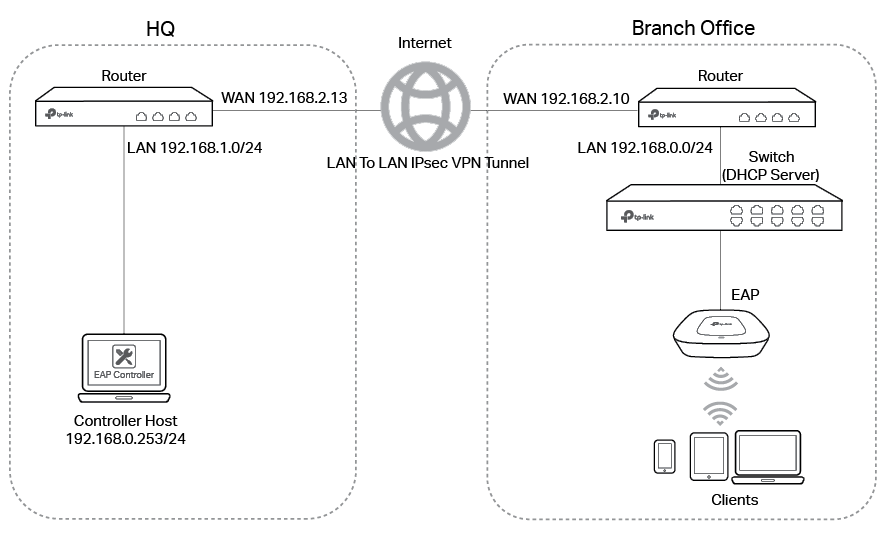
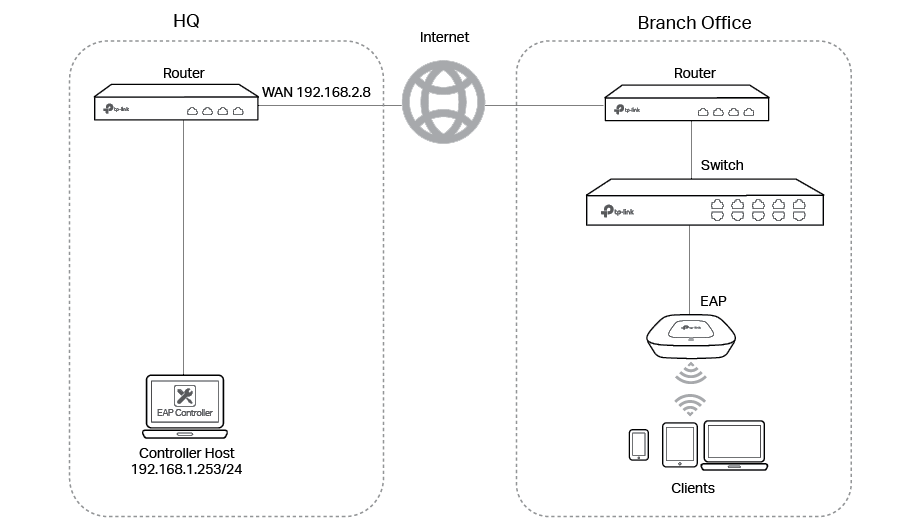
Demonstrated with the network topology below, this section provides configuration procedures for managing EAPs at different sites via VPN Tunnel with EAP Discovery Utility. As shown below, the HQ and branch office are located in different places which is connected with each other through IPsec VPN tunnel. The EAP Controller and a VPN router (TL-ER6120) are in the subnet 192.168.1.0/24 of HQ. TP-Link EAP Discovery Utility, EAP and a VPN router (TL-ER6120 ) are in the subnet 192.168.0.0/24 of branch office.
Step 1: VPN Settings for the Router in Branch Office
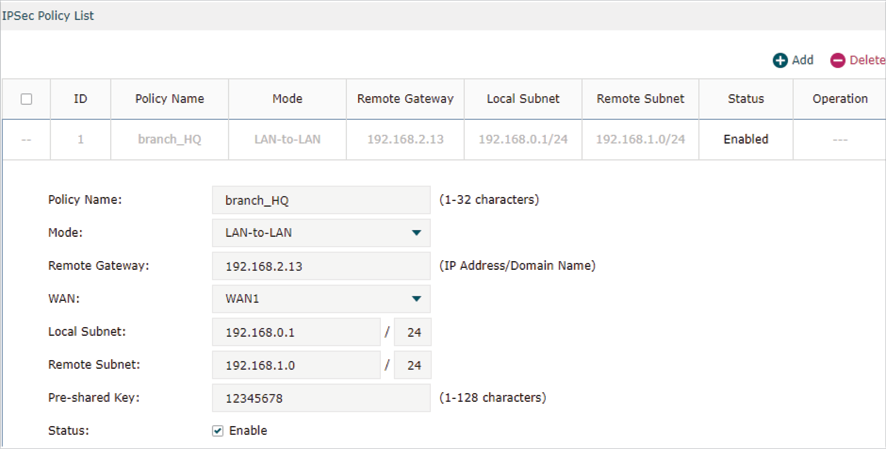
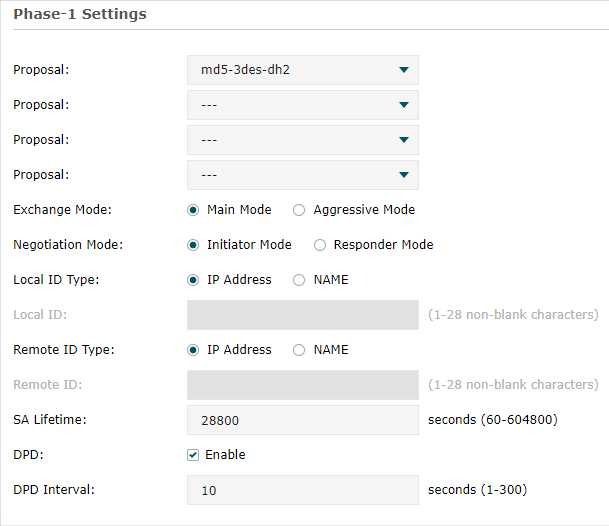
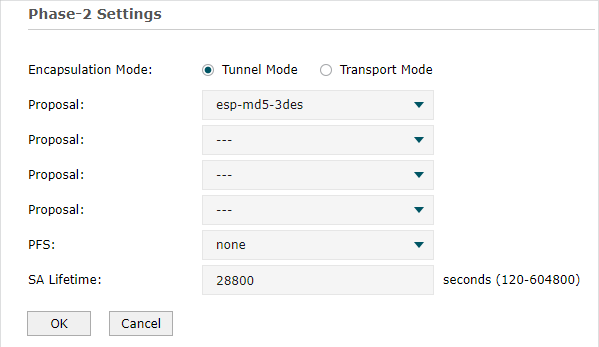
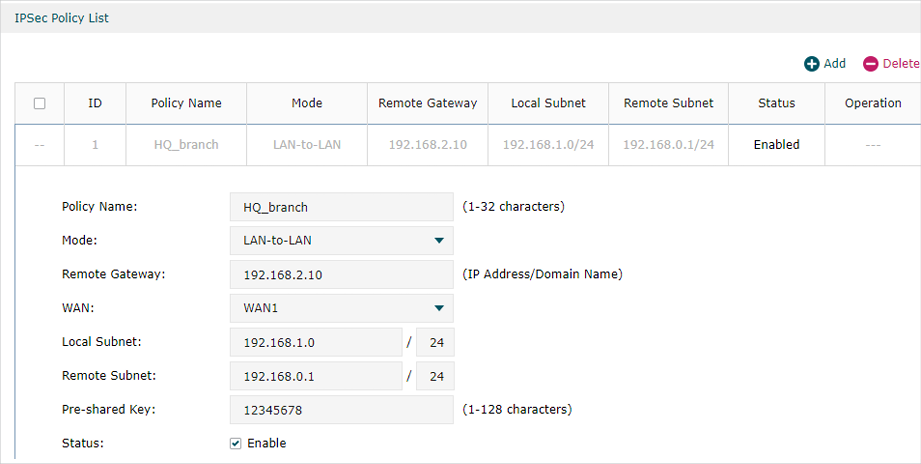
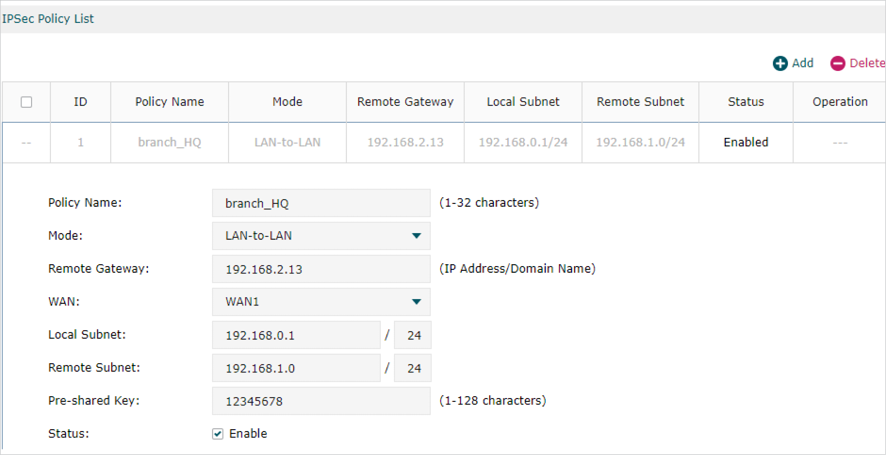
1)Go to VPN > IPsec > IPsec Policy to add an IPsec VPN Policy as the following picture shows.
|
|
Note: •Remote Gateway should be configured with the WAN IP address of the VPN router in HQ. •Local Subnet should be configured with the IP subnet of the branch office. •Remote Subnet should be configured with the IP subnet of HQ. |
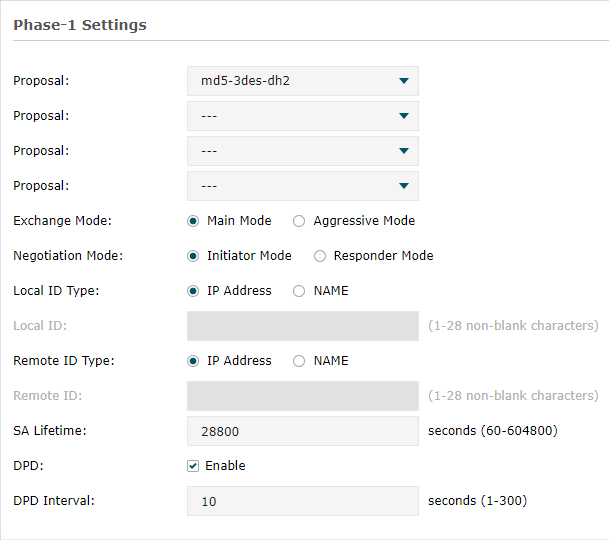
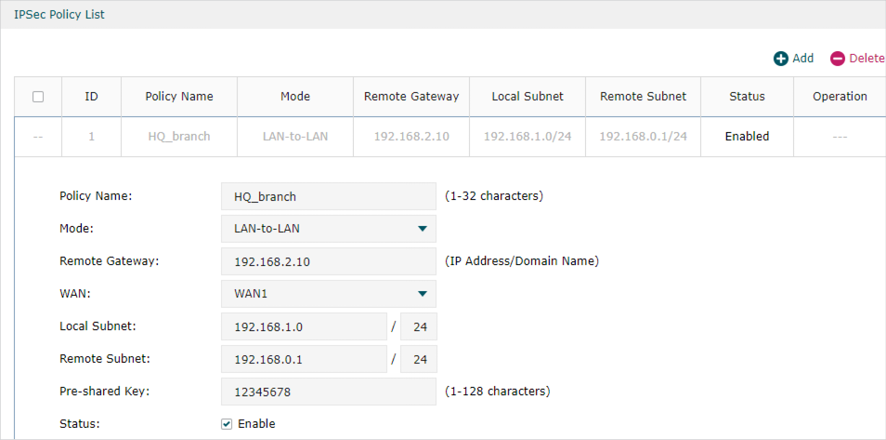
Step 2: VPN Settings for the Router in HQ
Configuring VPN settings on TL-ER6120 in HQ is similar to “Step 1”. We won’t describe this in detail here.

|
|
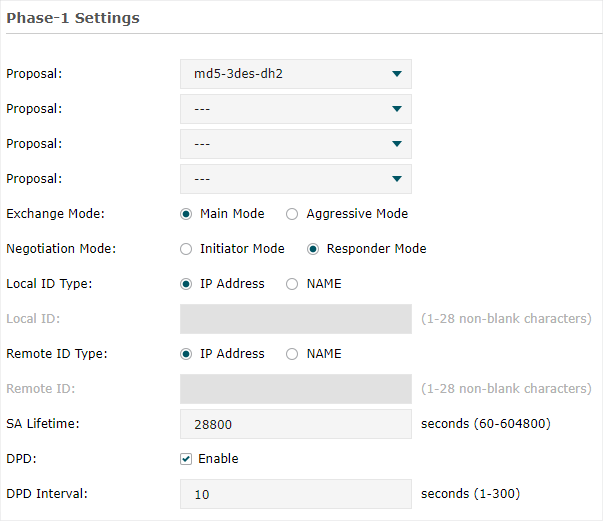
Note: •Remote Gateway should be configured with the WAN IP address of the VPN router in branch office. •Local Subnet should be configured with the IP subnet of HQ. •Remote Subnet should be configured with the IP subnet of the branch office. •Negotiation Mode should be chosen the Responder Mode in HQ (Negotiation Mode has been chosen as Initiator Mode in the branch office. •Pre-shared key should be filled with the same number string. |
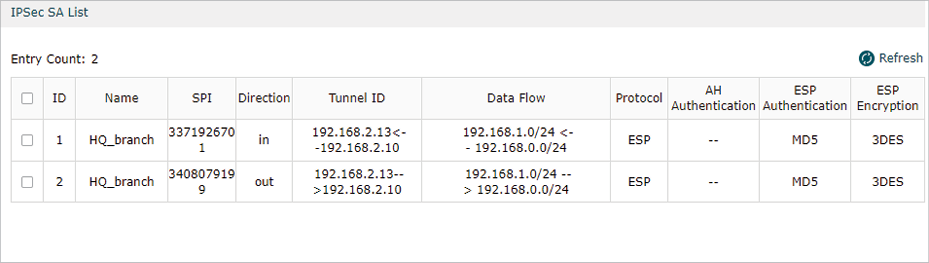
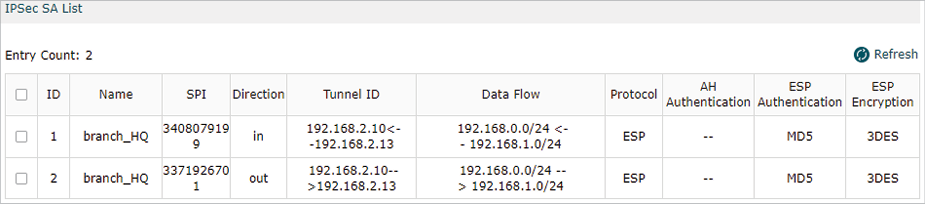
After all settings are done, the VPN tunnel will be established between HQ and the branch office as shown below.
Step 3: Configurations on EAP Discovery Host
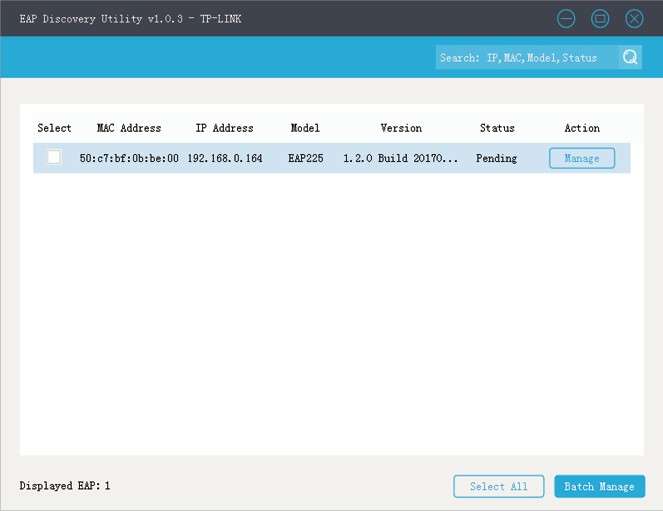
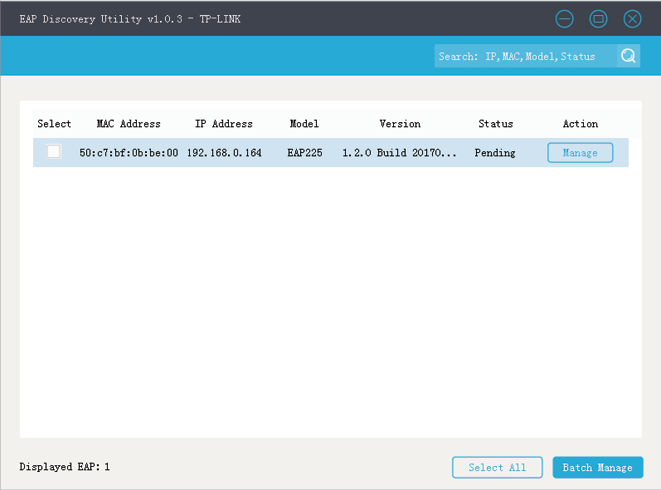
1)Connect the computer that is running EAP Discovery Utility and the EAP to the switch in the branch office. Then open EAP Discovery Utility to let it discover the EAP as shown below.
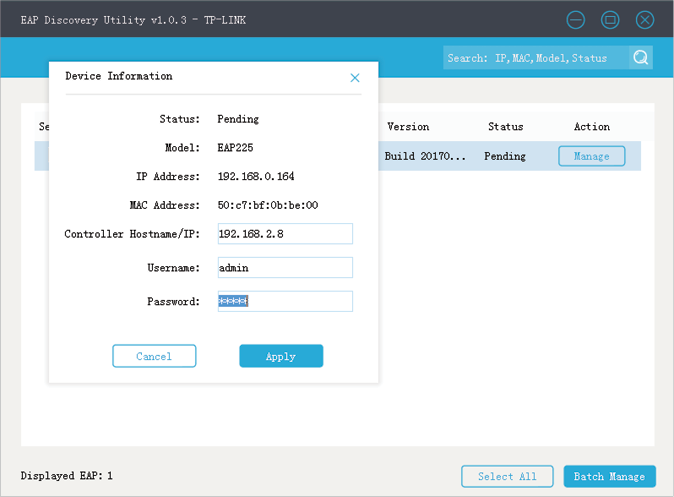
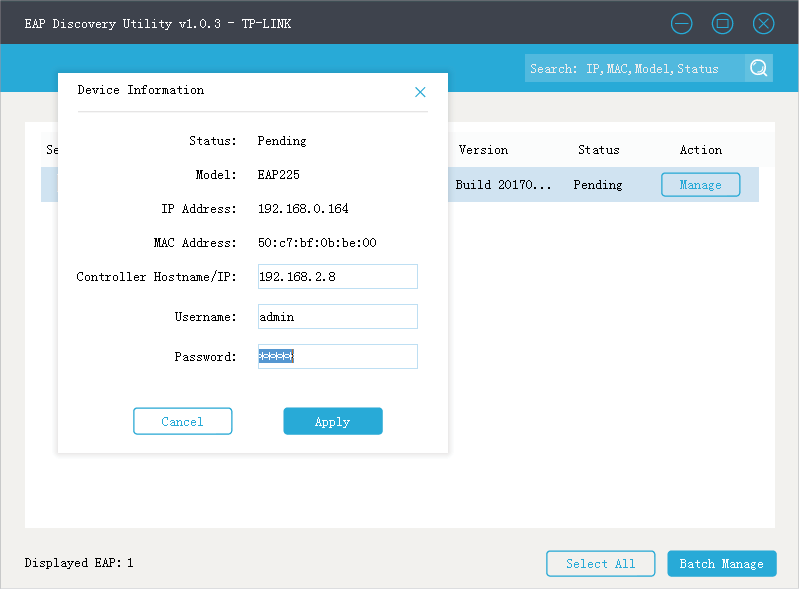
2)After EAP Discovery Utility finds the EAP, click Manage, and then fill in the IP address of the Controller Host and the Username/Password of the EAP (admin/admin by default) to let EAP Controller find and manage this EAP.
|
|
Note: After the EAP is successfully adopted by EAP Controller, you don’t need EAP Discovery Utility any more, thus you can remove the computer that is running EAP Discovery Utility from the network. |
Step 4: Adopt and Manage EAP
1)Run EAP Controller. The EAP which has been configured by EAP Discovery Utility in the last step will appear in the Pending list as shown below, which means the EAP can be adopted and managed by EAP Controller.
.png)
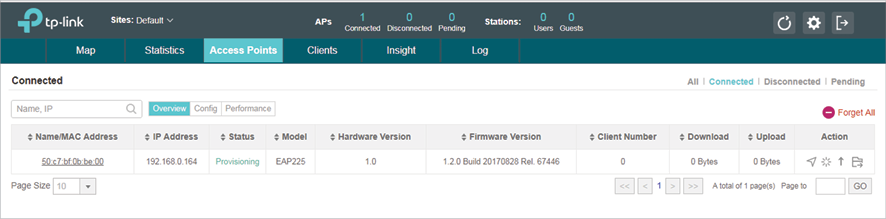
2)The EAP Controller will automatically adopt the EAP using the default username and password (both are admin). If the Retry button appears in the Action column, it means that the username and password of the EAP have been changed. You should enter the current username and password of the EAP. If the EAP appears in the Connected list as shown below, it means the EAP has been adopted and can be managed by EAP Controller.
.png)
Using DHCP Option 138 to Discover EAPs via VPN Tunnel
Demonstrated with the network topology below, this section provides configuration procedures for managing EAPs at different sites via VPN Tunnel with DHCP Option 138. As shown below, the HQ and branch office are connected with each other through IPsec VPN tunnel. The EAP Controller and VPN router TL-ER6120 are in the subnet 192.168.1.0/24 of HQ. EAP, switch T2600G-28TS as DHCP Server (supporting DHCP option 138) and another VPN router TL-ER6120 are in the subnet 192.168.0.0/24 of branch office.
Step 1: Configurations on the Switch in Branch Office
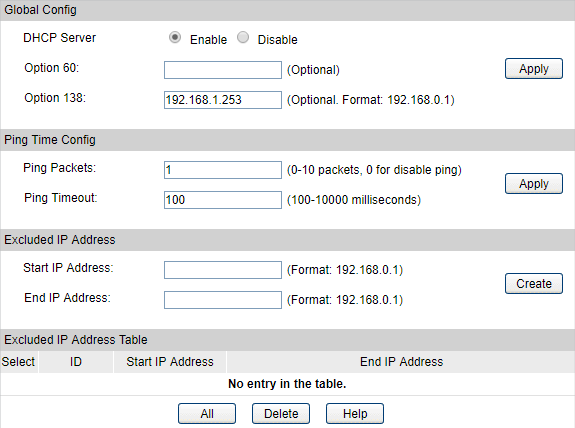
1)Go to Routing > DHCP Server > DHCP Server to enable DHCP Server function. For Option138, you should fill in the IP address of Controller Host which is “192.168.1.253”. The DHCP Server will then tell the EAPs where EAP Controller is, so that EAP Controller and EAPs can communicate with each other among different subnets.
|
|
Note: Change switch’s default IP address from 192.168.0.1 to 192.168.0.2 to avoid IP conflict with gateway router. |
2)Go to Routing > DHCP Server > Pool Setting to configure 192.168.0.0/24 IP address pool for EAPs.
|
|
Note: Change switch’s default IP address from 192.168.0.1 to 192.168.0.2 to avoid IP conflict with gateway router. |
Step 2: VPN Settings for the Router in Branch Office
Before you configure VPN, you should disable the DHCP server on the router in branch office.
1)Go to VPN > IPSec > IPSec Policy to add a IPSec VPN Policy as the following page.

|
|
Note: •Remote Gateway should be configured with the WAN IP address of the VPN router in HQ. •Local Subnet should be configured with the IP subnet of the Branch Office. •Remote Subnet should be configured with the IP subnet of HQ. |
Step 3: VPN Settings for the Router in HQ
Configuring VPN settings on TL-ER6120 in HQ is similar to “Step 1”. We won’t describe this in detail here.


|
|
Note: •Remote Gateway should be filled in with the WAN IP address of the VPN router in the branch office. •Local Subnet should be filled in the IP subnet of HQ. •Remote Subnet should be filled in the IP subnet of the Branch Office. •Negotiation Mode should be chosen the Responder Mode in HQ (Negotiation Mode has been chosen as the Initiator Mode in Branch Office. •Pre-shared key should be filled with the same number string. |
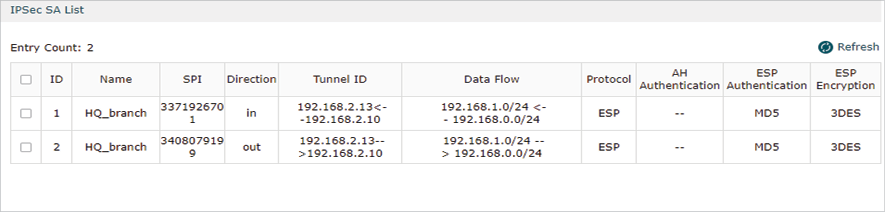
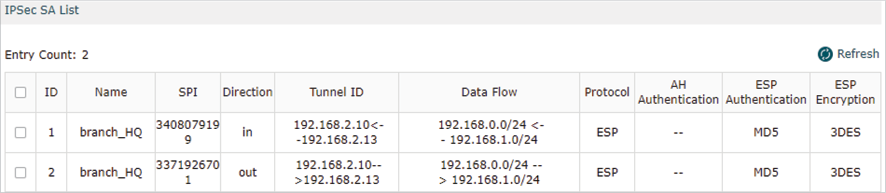
After all settings are done, the VPN tunnel will be established between the HQ and branch office as shown below.
Step 4: Adopt and Manage EAP
1)Run EAP Controller. The EAP which has DHCP option 138 configured from the last step will appear in the Pending list as shown below, which means the EAP can be adopted and managed by EAP Controller.
.png)
2)The EAP Controller will automatically adopt the EAP using the default username and password (both are admin). If the Retry button appears in the Action column, it means that the username and password of the EAP have been changed. You should enter the current username and password of the EAP. If the EAP appears in the Connected list as shown below, it means the EAP has been adopted and can be managed by EAP Controller.
.png)
Using Discovery Utility to Discover EAPs via NAT Port Forwarding
Demonstrated with the network topology below, this section provides configuration procedures for managing EAPs at different sites via NAT Port Forwarding with EAP Discovery Utility. the HQ and branch office are connected with each other. The EAP Controller and TL-ER6120 (VPN router) are in subnet 192.168.1.0/24 of HQ. The EAP Discovery Utility, EAP and TL-ER6120 (VPN router) are in subnet 192.168.0.0/24 of the branch office.
Step 1: Configure Port Forwarding Rules on the Router in HQ
1)Go to Advanced > NAT > Virtual Server and configure virtual server for All ports, ranging from 29810 to 29814. Configure Internal Server IP with 192.168.01.253, which is the IP of the Controller Host.
Click OK and the configured NAT Port Forwarding rules will be displayed on the following page.

Step 2:Configurations on the Discovery Host
1)Connect the computer that is running EAP Discovery Utility and EAP to the switch in branch office. Then open EAP Discovery Utility to let it discover the EAP as shown below.
2)After EAP Discovery Utility finds the EAP, click Manage, and then fill in the WAN IP address of the router in HQ and the Username/Password of the EAP (admin/admin by default) to let EAP Controller find and manage this EAP.
Step 3: Adopt and Manage EAP
1)Run EAP Controller. The EAP which has been configured by EAP Discovery Utility in the last step will appear in the Pending list as shown below, which means the EAP can be adopted and managed by EAP Controller.
.png)
2)The EAP Controller will automatically adopt the EAP using the default username and password (both are admin). If the Retry button appears in the Action column, it means that the username and password of the EAP have been changed. You should enter the current username and password of the EAP. If the EAP appears in the Connected list as shown below, it means the EAP has been adopted and can be managed by EAP Controller.
Using DHCP Option 138 to Discover EAPs via NAT Port Forwarding
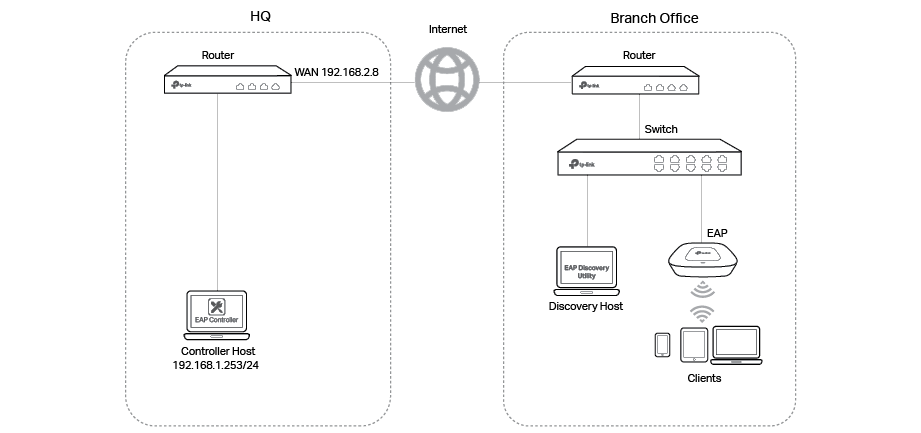
Demonstrated with the network topology below, this section provides configuration procedures for managing EAPs at different sites via NAT Port Forwarding with DHCP option 138. As shown below, the EAP Controller and a VPN router (TL-ER6120) are in the subnet 192.168.1.0/24 of HQ. EAP, switch T2600G-28TS as DHCP Server (supporting DHCP option138) and another VPN router (TL-ER6120) are in the subnet 192.168.0.0/24 of Branch Office.
Step 1:Configure Port Forwarding Rules on the Router in HQ
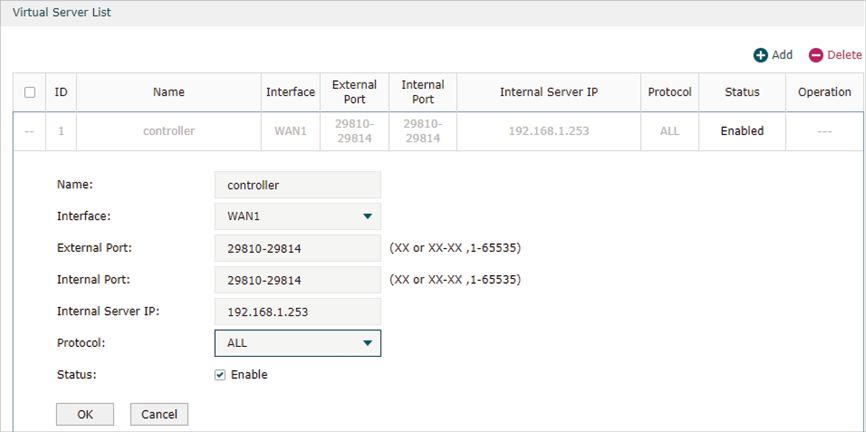
1)Go to Advanced > NAT > Virtual Server and configure virtual server for All, ranging from 29810 to 29814. Configure Internal Server IP with 192.168.01.253, which is the IP of the Controller Host.
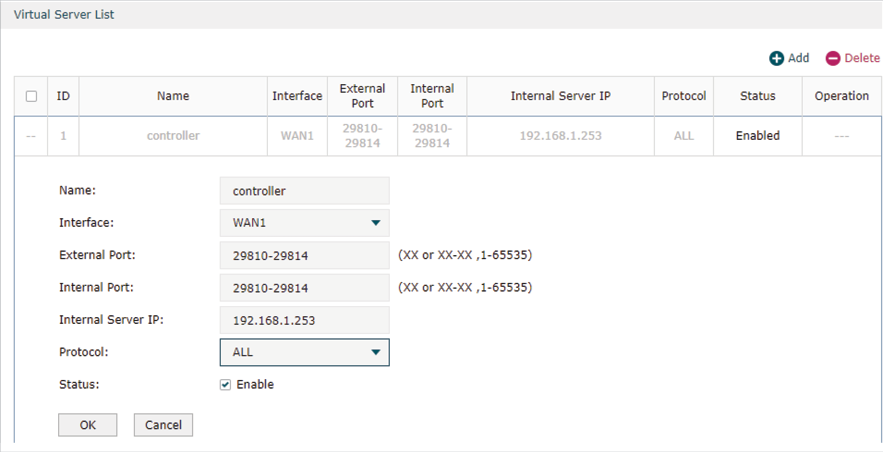
Click OK, the configured NAT Port Forwarding rules will be displayed on the following page.

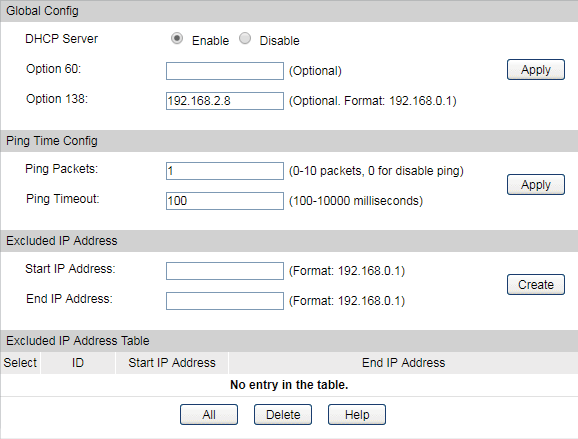
Step 2: Configurations on Switch in Branch Office
1)Go to Routing > DHCP Server > DHCP Server to enable DHCP Server function. Set DHCP option 138 as the WAN IP (192.168.2.8) address of the router which is behind the EAP Controller in HQ.
|
|
Note: Change switch’s default IP address from 192.168.0.1 to 192.168.0.2 to avoid IP conflict with gateway router. |
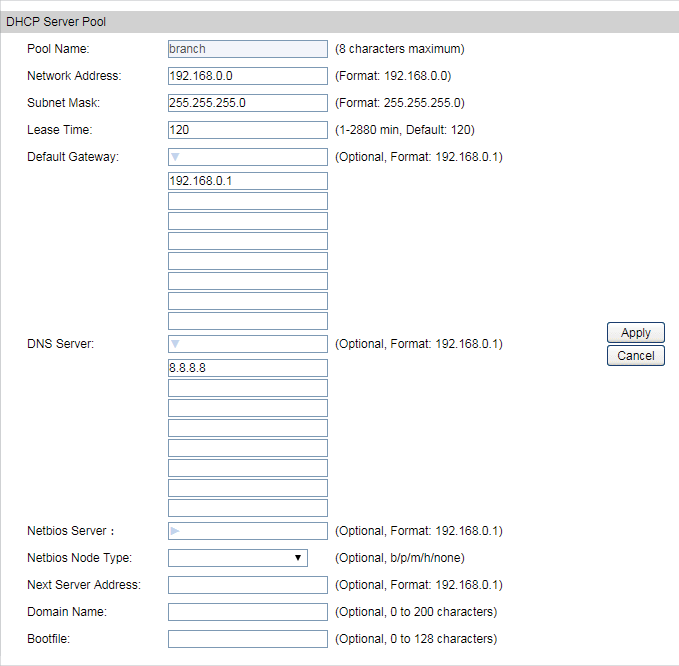
2)Go to Routing > DHCP Server > Pool Setting to configure 192.168.0.0/24 IP address pool for EAPs, and Click Apply.
Step 3: Adopt and Manage EAP
1)Run EAP Controller. The EAP which has been configured by DHCP option 138 in the last step will appear in the Pending list as shown below, which means the EAP can be adopted and managed by the EAP Controller.
.png)
2)The EAP Controller will automatically adopt the EAP using the default username and password (both are admin). If the Retry button appears in the Action column, it means that the username and password of the EAP have been changed. You should enter the current username and password of the EAP. If the EAP appears in the Connected list as shown below, it means the EAP has been adopted and can be managed by the EAP Controller.
.png)