


How to Configure Web Authentication (Remote Authentication Server & Local Web Server) on TP-Link CAP/AC Serial Products
TP-LINK AC controller supports multiple kinds of portal authentication functions. This article will introduce how to configure the Web Authentication (Remote Authentication Server & Local Web Server) on TP-Link CAP/AC serial products. Here is one kind of application Scenario in which we use Radius Server as remote authentication server to provide authentication service for wireless clients.
Step1. Go to “Redirect Page”, add one entry, and the “Authentication Type” should be “Web Authentication”.

Step2. Go to “Authentication Server” page, choose “Radius Server” page. Here create Radius Server entry, and fill in the IP address of the Radius Server.

Step3. Go to “Authentication Server” page, choose “Authentication Server” page. Here create Authentication Server entry, the name is “ServerGroup” in this instance, and select “123” we just created as the Radius Server.

Step4. Go to “Web Authentication” page, create one entry, and the “Authentication Server Type ”should be “Remote Authentication Server”. Select “ServerGroup” we just created as “Authentication Server Group”. “Success Redirect URL” means the webpage the guest will be redirected to after passing portal authentication.

Step5. Here we used “WinRadius” as the remote radius server and create one account (username/password are both “admin”).

Step6. Create a SSID and bind the SSID with corresponding CAPs.


Step7. After all configurations, you can use your wireless client to connect to CAP’s wireless network and there will be a pop-up portal authentication webpage when you try to open any HTTP website as shown below. Input the user account, and you can go to Internet. (Note: HTTPS website is not supported to redirect to pop-up authentication webpage, so you can only use HTTP website to get the pop-up portal authentication page)

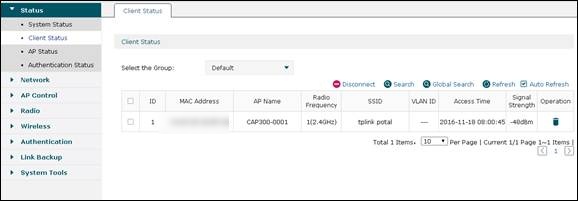
Step8. You can check your wireless client device’s status in “Client Status” Page.
Finden Sie diese FAQ hilfreich?
Mit Ihrer Rückmeldung tragen Sie dazu bei, dass wir unsere Webpräsenz verbessern.
Von United States?
Erhalten Sie Produkte, Events und Leistungen speziell für Ihre Region