How to configure RSTP on TP-Link switches using the old GUI

TL-SG2452 , T1500G-10PS , TL-SL2210 , TL-SL2452 , TL-SG3424 , TL-SG2216 , TL-SG2424P , TL-SG5428 , TL-SG2210P , T2700G-28TQ , TL-SG5412F , T1500G-10MPS , TL-SG3424P , SG2210P , S4500-8G , TL-SL3428 , TL-SL2218 , TL-SL3452 , TL-SG2424 , TL-SG3216 , TL-SL5428E , TL-SG2008 , TL-SG3210 , SG3210 , Festa FS310GP , TL-SL2428 , T3700G-28TQ , T1500G-8T
Recent updates may have expanded access to feature(s) discussed in this FAQ. Visit your product's support page, select the correct hardware version for your device, and check either the Datasheet or the firmware section for the latest improvements added to your product. Please note that product availability varies by region, and certain models may not be available in your region.
STP (Spanning Tree Protocol), subject to IEEE 802.1D standard, is aimed at disbranching a ring network in the Data Link layer of local area network. Devices running STP can discover loops in the network and block ports by exchanging information. Then a ring network can be disbranched to form a tree-topological no ring network to prevent broadcast storm. RSTP refers to deliver a very fast way to convergence.
Now let’s learn how to configure RSTP on TP-Link Switches by the following example:
Network Topology:
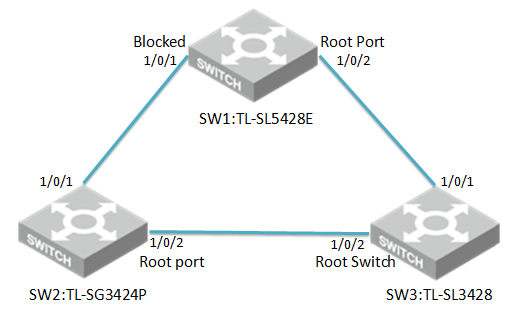
Three switches are under the same VLAN
Attention:
- Please configure the RSTP of switches first and then connect them together to avoid the broadcast storm.
- In this test we will let three switches elect root switch automatically. If you want to set a specific switch as root switch, please set CIST priority number of the switch smallest among three.
Here we take TL-SG3424P、TL-SL5428E and TL-SL3428 as an example.
The connection of three switches shows as the topology.
Configuration steps:
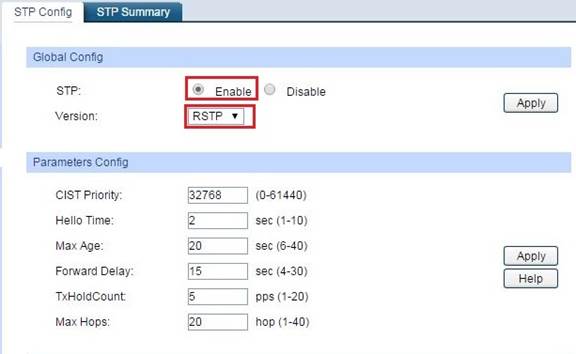
- Choose the menu Spanning Tree→STP Config→STP Config to load the following page, Enable STP and select version RSTP on Three switches.
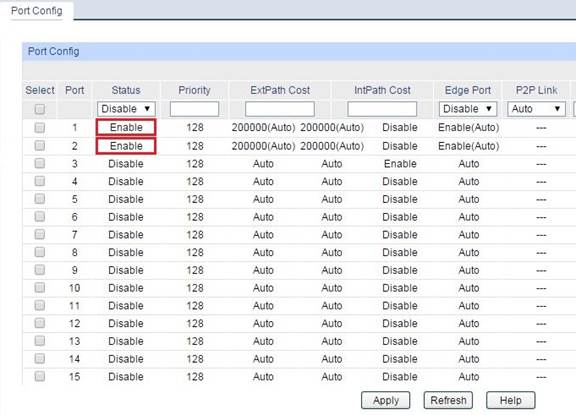
2. Choose the menu Spanning Tree →Port Config and Enable the
Up-link port status on TL-SG3424P、TL-SL3428 and TL-SL5428E.
The Up-link port is the port which connected to other switches.
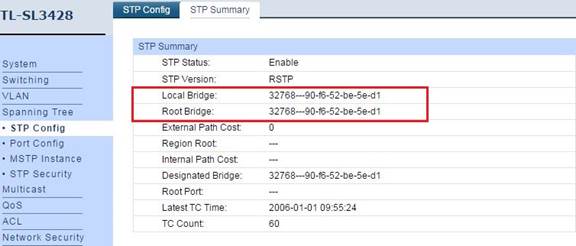
3. Then we can see three switches elected the root switch TL-SL3428 via RSTP through menu Spanning Tree→STP Config→STP Summary.
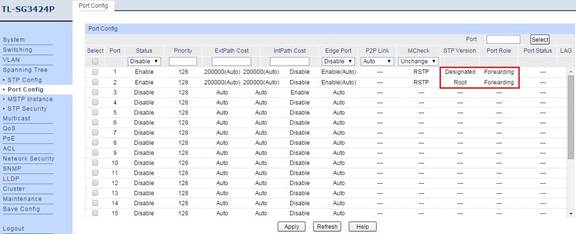
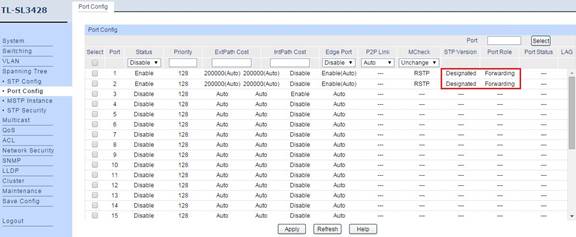
4. We can see the STP version and port role on three switches.
TL-SG3424P
TL-SL3428
TL-SL5428E
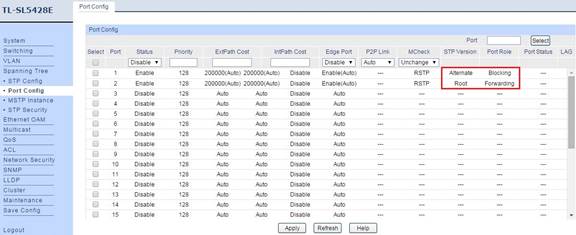
5. Now we can make clear which port was blocked via RSTP. From the port role we can see port 1 of TL-5428E was blocked.
So the finally topology is the following:
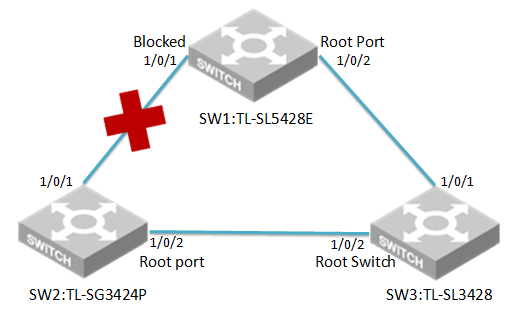
Finally, the network will work normally.
¿Es útil este artículo?
Tus comentarios nos ayudan a mejorar esta web.
Selecciona qué describe mejor la información:
- Insatisfech@ con el producto
- El articulo es demasiado complicado
- Título es confusa o errónea
- No es la información que estaba buscando
- El artículo es poco claro
- Otro
Gracias
Agradecemos los comentarios.
Pulsa aquí para contactar con el soporte técnico de TP-Link.
Este sitio web utiliza cookies para mejorar la navegación por el sitio web, analizar las actividades en línea y ofrecer la mejor experiencia de usuario posible en nuestro sitio web. Puedes oponerte al uso de cookies en cualquier momento. Encontrarás más información en nuestra política de privacidad .
Cookies Básicas
Estas cookies son necesarias para el funcionamiento del sitio web y no pueden desactivarse en tu sistema.
TP-Link
SESSION, JSESSIONID, accepted_local_switcher, tp_privacy_base, tp_privacy_marketing, tp_smb-select-product_scence, tp_smb-select-product_scenceSimple, tp_smb-select-product_userChoice, tp_smb-select-product_userChoiceSimple, tp_smb-select-product_userInfo, tp_smb-select-product_userInfoSimple, tp_top-banner, tp_popup-bottom, tp_popup-center, tp_popup-right-middle, tp_popup-right-bottom, tp_productCategoryType
Youtube
id, VISITOR_INFO1_LIVE, LOGIN_INFO, SIDCC, SAPISID, APISID, SSID, SID, YSC, __Secure-1PSID, __Secure-1PAPISID, __Secure-1PSIDCC, __Secure-3PSID, __Secure-3PAPISID, __Secure-3PSIDCC, 1P_JAR, AEC, NID, OTZ
Zendesk
OptanonConsent, __cf_bm, __cfruid, _cfuvid, _help_center_session, _pendo___sg__.<container-id>, _pendo_meta.<container-id>, _pendo_visitorId.<container-id>, _zendesk_authenticated, _zendesk_cookie, _zendesk_session, _zendesk_shared_session, ajs_anonymous_id, cf_clearance
Cookies de Análisis y de Marketing
Las cookies de análisis nos permiten analizar tus actividades en nuestro sitio web con el fin de mejorar y adaptar la funcionalidad del mismo.
Las cookies de marketing pueden ser instaladas a través de nuestro sitio web por nuestros socios publicitarios con el fin de crear un perfil de tus intereses y mostrarte anuncios relevantes en otros sitios web.
Google Analytics & Google Tag Manager
_gid, _ga_<container-id>, _ga, _gat_gtag_<container-id>
Google Ads & DoubleClick
test_cookie, _gcl_au