


How to set up a wireless network using TP-Link AC/CAP serial products
Here we use a typical network topology to explain how set up a simple wireless network using TP-LINK AC/CAP serial products.

As shown in the picture above, the CAP300 is connected and powered by the PoE switch, the AC Controller is connected to the PoE switch as well. All the devices are in the same subnet, so that the CAP can be controlled and managed by the AC Controller locally. The DHCP server on the Router will assign the IP addresses for all the clients connected to the CAP’s wireless network and the switch’s wired network while the DHCP Server on the AC Controller will assign the IP address for the CAP only.
Configuration Procedure
Step 1 Set up wired network
Please set up your wired network as illustrated in the network topology, you may need to change the default management IP address of the PoE switch to make sure there is no IP conflict. And please ensure that you can get online when you connect your PC to the PoE switch directly.
Step 2 find and control the CAP
2.1 Change the CAP300 to the FIT mode (Default Mode) and then connect it to the PoE switch. Please wait until the LED is static Green which means the CAP boots and initializes successfully.

2.2 Login to the AC Controller’s Web Page
Please connect a PC to the AC Controller directly, if you have connected the network as shown in the network topology, the DHCP Server in the Router will assign an IP address for you PC automatically, but if not, please design a static IP address in the range 192.168.0.x for PC manually as shown below

Then open the web browser like Chrome or Firefox, and type http://192.168.0.253 in the address bar and press the Enter key. The system will ask you to set up the Username and Password the first time when you login to the management page as shown below.

After that, you need to login to the web page with the Username and Password you set just now.

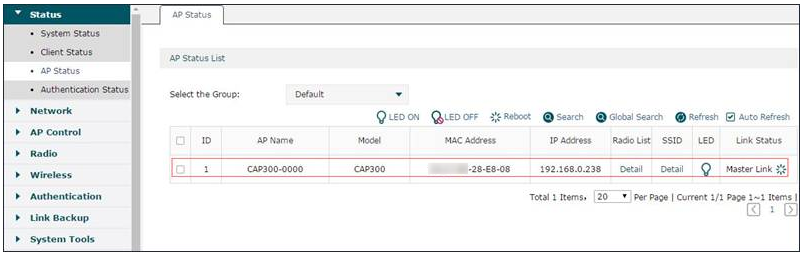
2.3 By default settings, the AC Controller will find the CAP automatically as shown in the picture below:
Step 3 Set up wireless network
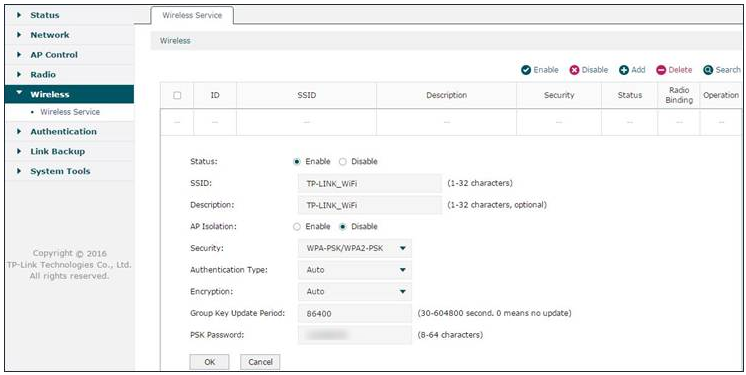
3.1 Create a Wireless SSID
Please go to Wireless – Wireless Service and click the Add button to create a SSID as shown below:
The SSID is the wireless network’s name that you will find in your client devices. If you enable the AP Isolation, the clients connected to the same SSID of the same AP will not be able to communication with each other. There are three kinds of Security methods, we recommend you to use WPA-PSK/WPA2-PSK, which is safe and easy to use. Please set the PSK Password as what you like and remember it, here we use 12345678 just for example.
3.2 bind the SSID with the CAP
After you add the SSID, please click the Radio Binding button to bind the SSID with the CAP to take it into effect.

After you click the Radio Binding button, it will jump to the CAP list page, here please select the CAPs that you want to bind and then click the Bound button.

Note: in this page, you can also bind the SSID with a certain VLAN, but in this example, we didn’t create any VLAN in switch, we can just leave this option blank.
Now, all the configurations are done, you can use your phone or laptop to search the SSID and connect to it with the PSK password you set and then enjoy the network.
FAQ:
Question 1 Why my AC Controller cannot find the CAPs.
Answer:
- Please make sure the CAPs are working at the FIT mode.
- Please make sure if the CAPs have got the IP address from the AC Controller. You can check on the Network – DHCP Server – DHCP Client List page. If the AC did not assign IP address for the CAP, please make sure the network connection is OK and then try to reboot the CAP again.

Question 2 Can I use the DHCP Server on the AC Controller to assign IP for clients connected to the CAPs?
Answer: by default, the AC controller’s DHCP Server is working at For AP Only mode which means it can only assign IP addresses for the CAPs. If you want to the DHCP Server to assign IP addresses for the clients connected to the CAPs, please select the For AP and Client Mode on the Network – DHCP Server – Global Settings page.

Question 3 Can I use the DHCP Server on the Router to assign IP address for the CAPs?
Answer: By default, the TP-LINK CAP cannot get IP address from any other DHCP server except the one on the AC Controller. If you want to use extra DHCP Server to assign IP address for the TP-LINK CAP, please make sure the DHCP server supports Option 60 and Option 138 and set the Option 60 value as TP-LINK and the Option 138 value as 192.168.0.253 (the IP address of the AC Controller).
Is this faq useful?
Your feedback helps improve this site.
1.0_1505290145255s.jpg)
1.0_1505290425728l.jpg)
TP-Link Community
Still need help? Search for answers, ask questions, and get help from TP-Link experts and other users around the world.