How to Change DNS Server Settings on a TP-Link Wireless Router or DSL Modem Router
You may need to change the DNS server settings on your TP-Link wireless router or DSL modem router to use a preferred DNS provider or resolve network issues. If your Internet connection seems slow or unstable, updating your DNS settings is a good first step. This guide covers how to change DNS settings on both device types via the web management page.
Key Takeaways
- To change DNS settings on a TP-Link wireless router, log in at https://tplinkwifi.net/ or http://192.168.0.1/, go to Advanced > Network > Internet, and select Use the following DNS addresses to enter your Primary and Secondary DNS.
- For some wireless router models, the DNS fields appear directly on the Advanced > Network > Internet page without needing to expand Advanced Settings. Enter your addresses and click SAVE.
- TP-Link recommends using 8.8.8.8 for the Primary DNS and 1.1.1.1 for the Secondary DNS for reliable performance.
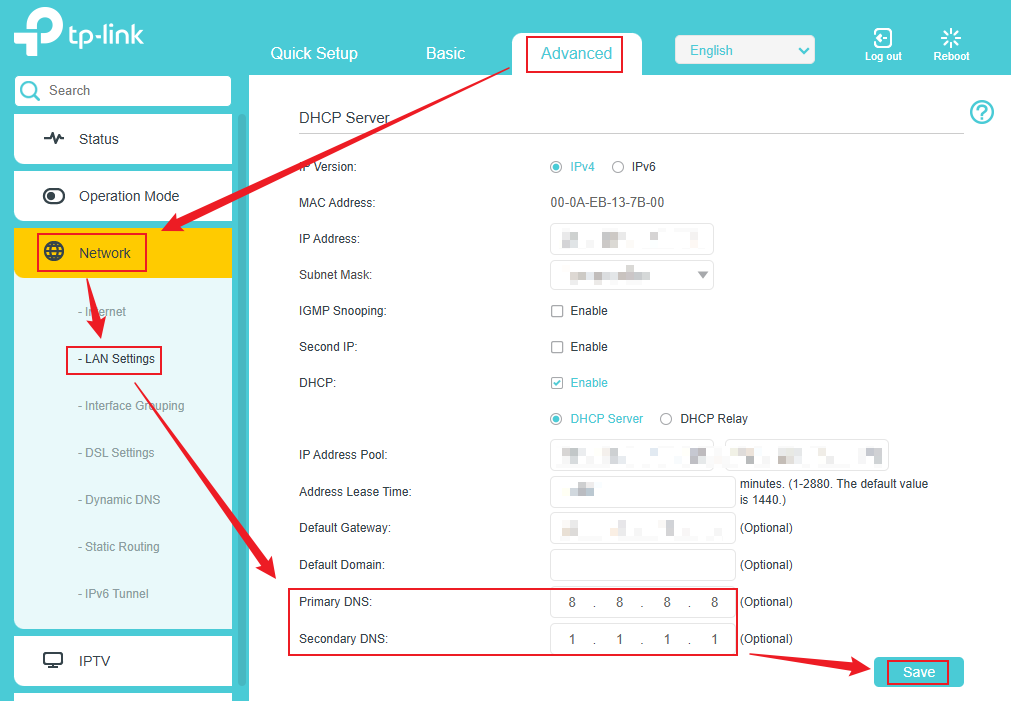
- To change DNS settings on a TP-Link DSL Modem Router, log in at http://tplinkmodem.net/ or http://192.168.1.1/ , go to Advanced > Network > LAN Settings, click Modify, enter your preferred DNS servers, and tap Save.
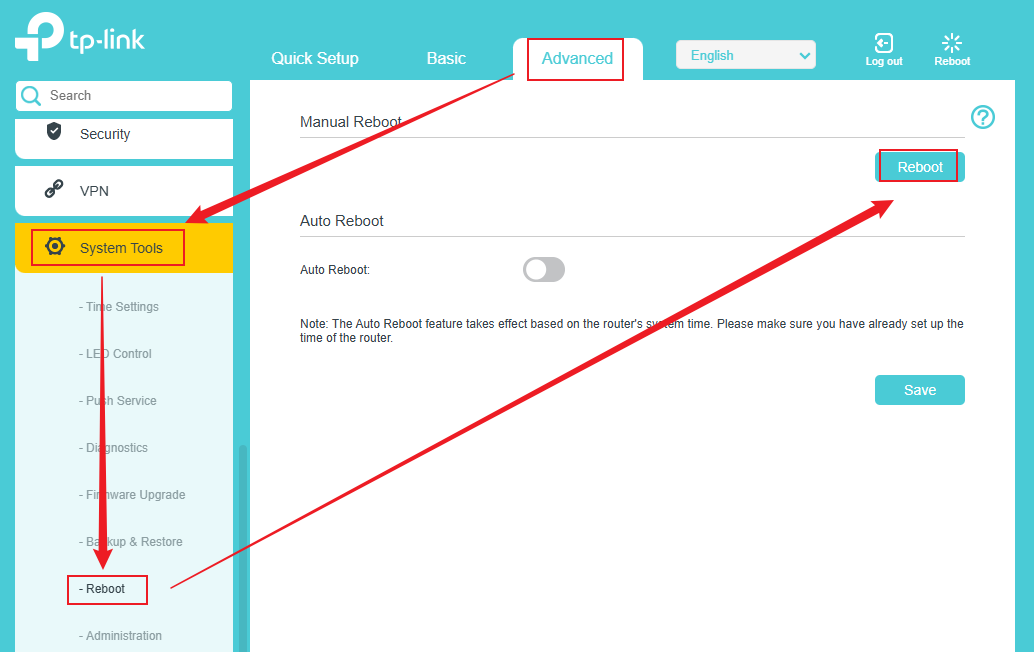
- After saving the DNS settings, a reboot is required for the changes to take effect. Go to Advanced > System > Reboot (wireless routers) or Advanced > System Tools > Reboot (DSL modem routers) and click Reboot.
- To change DNS settings on a TP-Link Deco system, see How to change DNS server settings on my Deco. You can also use a custom DNS server like Pi-Hole; see How to use Pi-Hole DNS Server on TP-Link routers for details.
Configuration
Follow Scenario 1 if you have a TP-Link wireless router, or Scenario 2 if you have a DSL modem router.
Scenario 1: For Wireless Routers
Use the following steps to change the DNS server settings on your TP-Link wireless router.
Step 1. Connect your computer to the TP-Link Wireless Router, then open a browser and visit https://tplinkwifi.net/ or http://192.168.0.1/ to log in to the router's web management page.
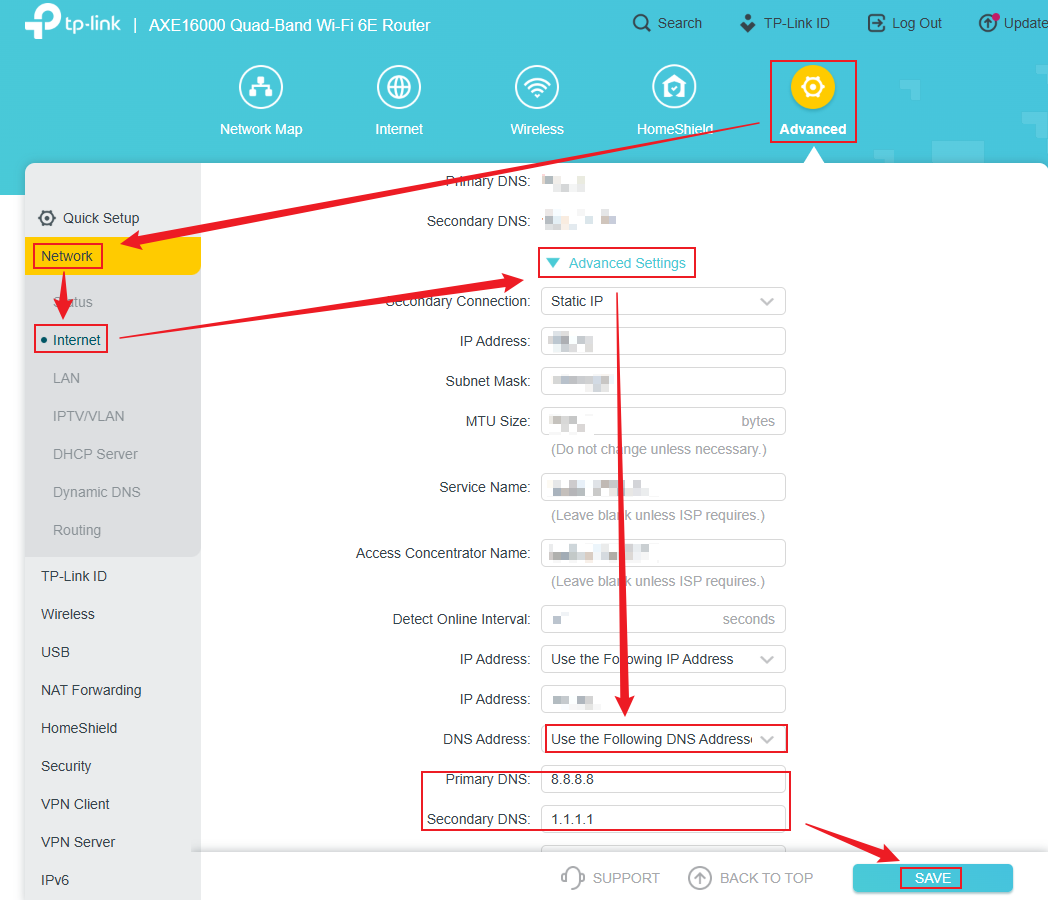
Step 2. Navigate to Advanced > Network > Internet. Locate the Advanced Settings section, then select the option labeled Use the following DNS addresses. Once selected, the Primary DNS and Secondary DNS fields will be displayed. Enter the DNS addresses (e.g., 8.8.8.8 and 1.1.1.1). Click SAVE to apply the settings.
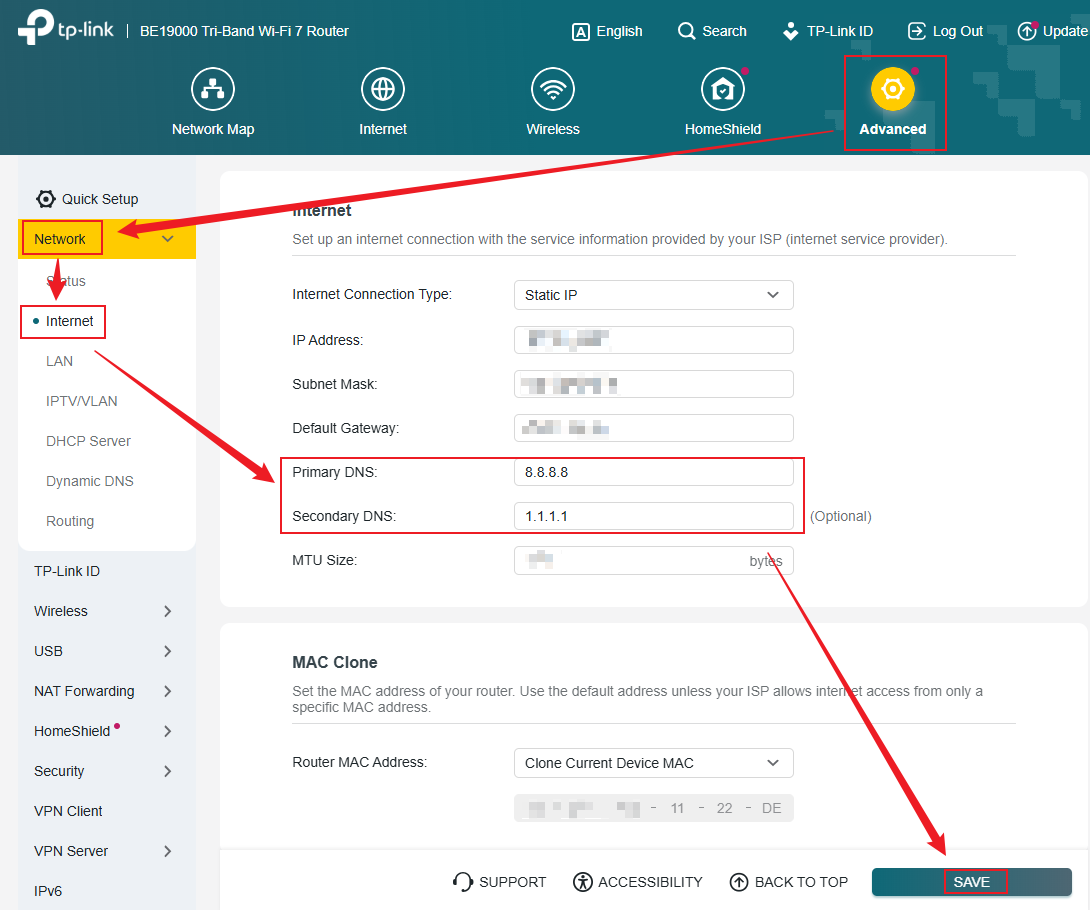
For some models, you will see the DNS field directly. Please navigate to Advanced > Network > Internet and enter the DNS addresses you want to change. For reliable performance, we recommend using 8.8.8.8 for the Primary DNS and 1.1.1.1 for the Secondary DNS. Once configured, click SAVE to apply the changes.
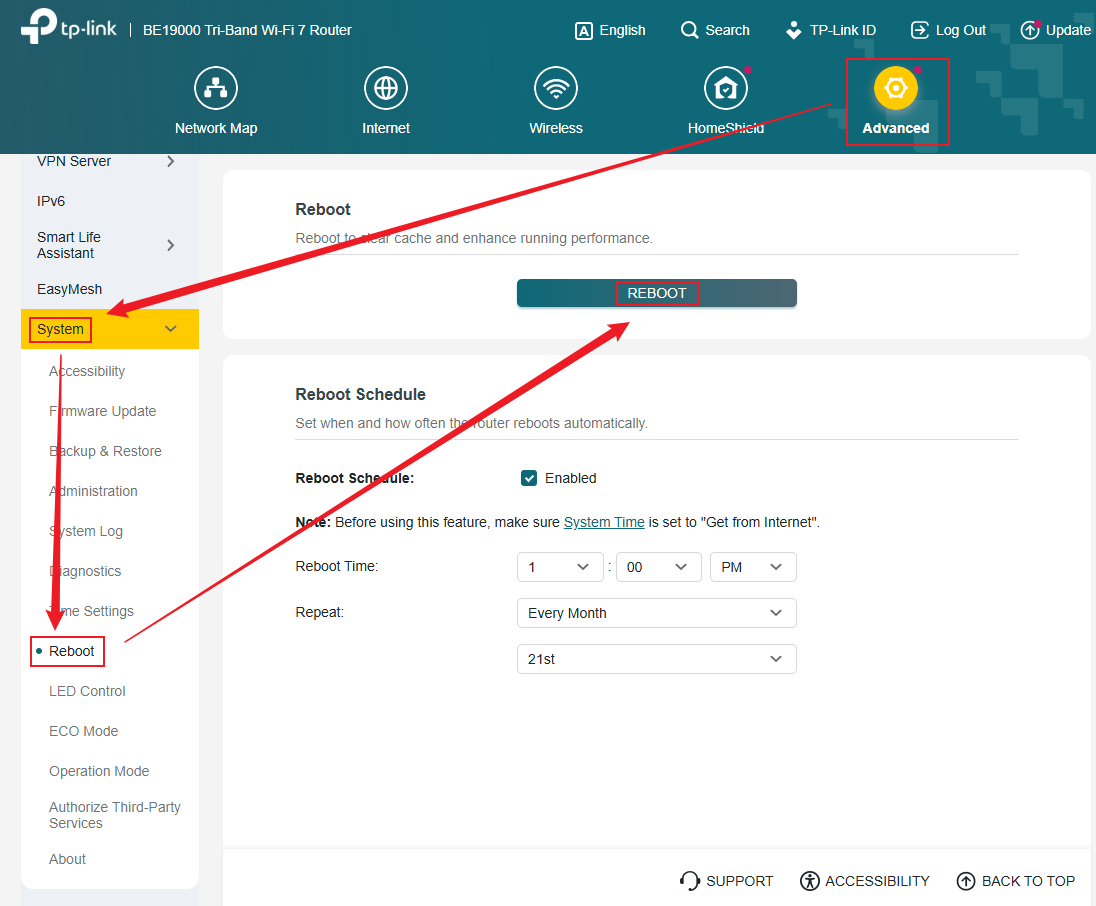
Your router must be rebooted for the new DNS settings to take effect.
Step 3. Go to Advanced > System > Reboot, click REBOOT.
Scenario 2: For DSL Modem Routers
Use the following steps to change the DNS server settings on your TP-Link DSL Modem Router.
Step 1. Connect your computer to the TP-Link DSL Modem Router and open a browser to visit http://tplinkmodem.net/ or http://192.168.1.1/ to log in to the DSL Modem Router's management page.
Step 2. Go to Advanced > Network > LAN Settings. Click Modify, locate the DNS settings, enter your preferred servers, and tap Save.
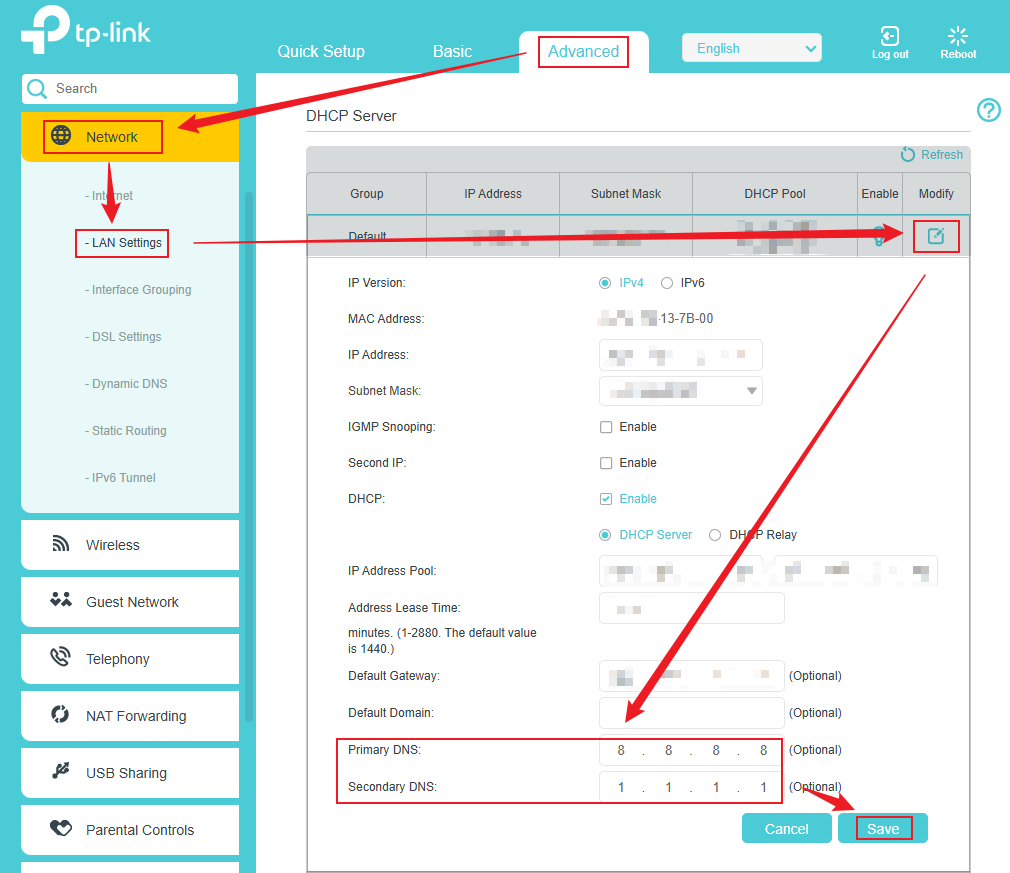
For some DSL modem router models, the DNS settings are located under Advanced > Network > LAN Settings. On this page, you will see the fields for Primary DNS and Secondary DNS. We recommend configuring them with the addresses 8.8.8.8 and 1.1.1.1, respectively, for optimal performance. Once entered, simply click Save to apply the new settings.
Step 3. Go to Advanced > System Tools > Reboot, click Reboot.
¿Es útil esta pregunta frecuente?
Sus comentarios nos ayudan a mejorar este sitio.


