


How to configure the QoS based on IP and MAC by ACL (Smart Switch)
Introduction:
The QoS function is used to define the priority of different applications. TP-Link Switches can support QoS based on port, which means you can define a priority of each port to make the traffic stream be forwarded according the priority. Some customers may have different requirements. For example, if you want to configure the QoS based on IP or MAC address for some special needs, you may find the QoS cannot match your need. But actually, it can be achieved by the function of ACL.
Here is the guide to help you to achieve the QoS based on IP or MAC Address.
Note: The configuration described in this document are based on the default setting. You may pay attention that the ACL could have some influence on the other functions.
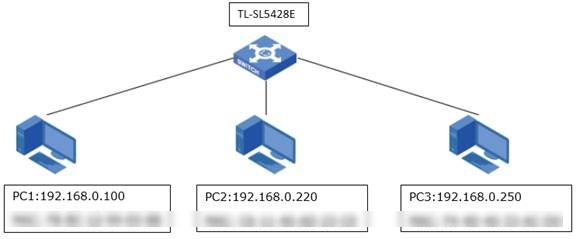
Topology:
Requirement:
1. The topology shows like above.
2. We configure the MAC ACL for PC1, and assign the DSCP Priority 48, cooperated with the QoS function. The PC3’s IP should be marked by the lower DSCP Priority 16.
3. The PC2 is used to test the configuration.
Step1
Create MAC ACL for PC1
1. Click ‘ACL’---’ACL Config’ in the left bar.
2. Then click ’ACL Create’ to create a ACL ID (0-99 for MAC ACL), here we take ID 10 as example; click “Create” to save the configuration.
3. Click ’MAC ACL’ to create MAC rule. Choose the ACL ID 10 created in the last step, and fill a Rule ID for MAC rule (the ID can be same as ACL ID); choose ’Permit’ for the ’Operation’; click S-MAC and fill the blank with MAC address of PC1. Click ’Create’ to save your configuration.
4. Click ’ACL’---’Policy Config’ in the left bar.
5. Click ‘Policy Create’ to create a policy for ACL 10, fill the ‘Policy Name’(For example 10), then click ’Create’ to save.
6. Click ‘Action Create’ to bind the ACL rule with the policy. Select the policy 10 we have just created, and match the ACL 10. Then select the option ‘QoS Remark’. Here we choose the value 48 for DSCP.

Step2
Create Standard IP ACL for PC3
1. Click ‘ACL’---’ACL Config’ in the left bar.
2. Then click ’ACL Create’ to create a ACL ID (100-199 for Standard IP ACL), here we take ID 100 as example; click “Create” to save.
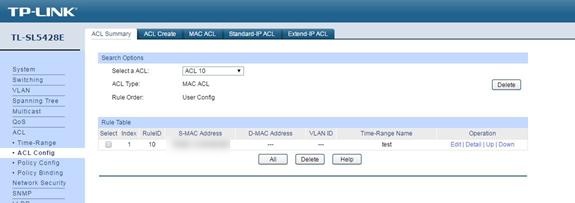
3. Click ‘Standard-IP ACL’ to create IP rule. Choose ACL ID 100 we just created, then fill a Rule ID for IP rule(for example 100); choose ‘Permit’ for the ‘Operation’; Click ‘S-IP’ and fill the blank with IP address 192.168.0.250. Click ‘Create’ to save.

The screenshots above shows the ACL Summary.
4. Click ’ACL’---’Policy Config’ in the left bar.
5. Click ‘Policy Create’ to create a policy for ACL 100, fill the ‘Policy Name’(For example 100) ;click ’Create’ to save.
6. Click ‘Action Create’ to bind the ACL rule with the policy. Select the policy 100 we have created just now, and match the ACL 100. Then select the option ‘QoS Remark’. Here we choose the value 16 for DSCP.

Step3
Binding the Policy with port or VLAN.
1. Click ’ACL’---’Policy Binding’ in the left bar. In normal condition, all the ports belong to the default VLAN1, so we choose VLAN binding here.
2. Click ‘VLAN Binding’, then select a Policy Name and fill the VLAN ID. (Here we fill the blank with VLAN 1, which means all the ports in VLAN 1 will follow the policy.)
3. After binding all the policies with the VLAN, you can click ‘Binding Table’ to check the bindings.

Note: You can also bind the policy with specific ports or VLAN according to your needs.
The role of the ACL we just created is matching the devices according to the MAC or IP. Till now, we have completed the configuration on ACL. Then we should enable the QoS to define the way that different priorities will take.
Setp4
Setting in QoS
1. We have configured the Remark DSCP, so the DSCP Priority should be enabled. We keep the default mapping.

2. Then the Schedule Mode will be the last step of the configuration of QoS. It defines the way of the queue be forwarded. Four choices include SP Mode, WRR Mode, SP+WRR Mode and EQU Mode. Here we choose SP Mode, which means the low priority packets will be forwarded till the high ones are done.

Step5
Packets analysis
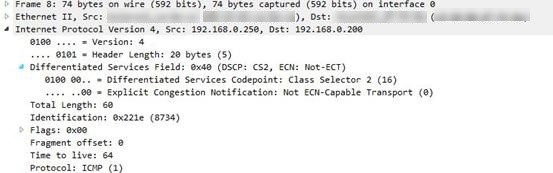
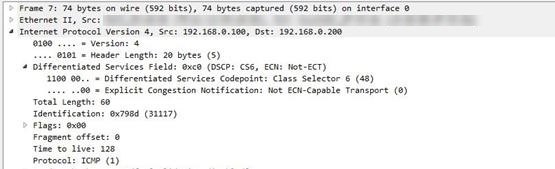
Ping PC2 192.168.0.250 from PC1 (MAC ACL) 192.168.0.100 and PC3 (IP ACL) PC3:192.168.0.220.
We can capture packets to check the QoS configuration.
¿Es útil esta pregunta frecuente?
Sus comentarios nos ayudan a mejorar este sitio.