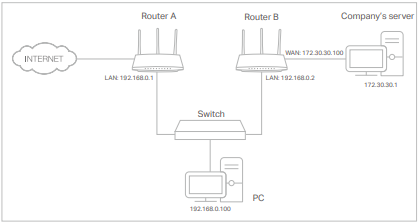
How to Set Up Static Routing on Your TP-Link Router
Static routing lets you manually tell your TP-Link router how to forward data to a specific destination network. A common use case: your PC connects to the Internet through Router A, but you also need to access your company's network through Router B. Setting up TP-Link static routing creates a dedicated path for that traffic. The process is straightforward and requires you to enter four values, which are explained in the steps below.
Key Takeaways
- Static routing is a manually configured path that tells your TP-Link router how to forward data packets to a specific destination network.
- To set up static routing, log in to your router's web management page at tplinkwifi.net, then go to Advanced > Network > Static Routing and click Add.
- You will need to enter four values: Network Destination, Subnet Mask, Default Gateway, and Interface. The page includes an explanation of each field.
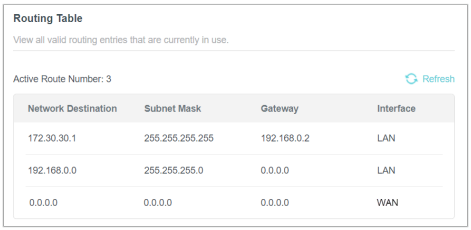
- After saving, verify that the entry appears in the Routing Table below the configuration form. If it does, the static route has been added successfully.
- To confirm the route is working, open a browser and enter the destination server's IP address directly.
How to Set Up Static Routing on Your TP-Link Router
Step 1. Ensure router's LAN IP addresses are different from each other but within the same subnet. Disable Router B's DHCP function.
Step 2. Connect your device to Router A via Wi-Fi or an Ethernet cable, open a browser, enter https://tplinkwifi.net/, and log in with your credentials.
Step 3. Go to Advanced > Network > Routing.
Step 4. Click Add and finish the settings according to the following explanations:
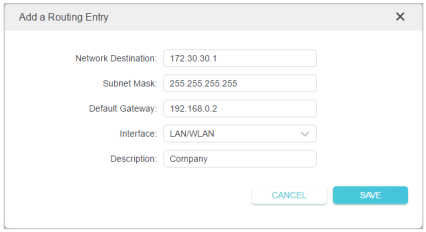
- Network Destination: The destination IP address that you want to assign to a static route. This IP address cannot be on the same subnet as the WAN IP or LAN IP of Router A. In the example, the company network's IP address is the destination IP address; enter 172.30.30.1.
- Subnet Mask: Determines the destination network with the destination IP address. If the destination is a single IP address, enter 255.255.255.255; otherwise, enter the subnet mask of the corresponding network IP. In the example, the destination network is a single IP, so here enter 255.255.255.255.
- Default Gateway: The IP address of the gateway device to which the data packets will be sent. This IP address must be on the same subnet as the router’s IP address, which sends out data. In the example, the data packets will be sent to the LAN port of Router B and then to the server, so the default gateway should be 192.168.0.2.
- Interface: Determined by the port (WAN/LAN) that sends out data packets. In the example, the data is sent to the gateway through the LAN port of Router A, selecting LAN/WLAN. Description: Enter a description for this static routing entry.
Step 6. Check the Routing Table below. If the entry appears in the Routing Table, the static route has been added successfully.
Open a web browser and enter the company server's IP address to see if you can access it.
Looking for More
Is this faq useful?
Your feedback helps improve this site.


TP-Link Community
Still need help? Search for answers, ask questions, and get help from TP-Link experts and other users around the world.